English Manual
Page 1
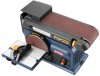
SAVE THIS MANUAL FOR FUTURE REFERENCE When properly cared for your purchase. WARNING: To reduce the risk of operation, and operator safety. Thank you for , it will give you years of rugged, trouble-free performance. OPERATOR'S MANUAL Belt/disc sander BD4600 4 x36 Your belt/disc sander has been engineered and manufactured to our high standard for dependability, ease of injury, the user must read and understand the operator's manual before using this product.
SAVE THIS MANUAL FOR FUTURE REFERENCE When properly cared for your purchase. WARNING: To reduce the risk of operation, and operator safety. Thank you for , it will give you years of rugged, trouble-free performance. OPERATOR'S MANUAL Belt/disc sander BD4600 4 x36 Your belt/disc sander has been engineered and manufactured to our high standard for dependability, ease of injury, the user must read and understand the operator's manual before using this product.

English Manual
Page 4
... in accordance with the path of a second is rotating. Do not use only identical replacement parts. Make sure the spindle or sanding belt assembly is torn from lumber before using your tool. ALWAYS TURN OFF THE SANDER before connecting to a power source. Support ... saw horses, blocks, etc.) for and remove all nails from your hands). Make sure there's no debris between worktable and sanding belt or disc. avoid kickback by sanding in this tool to finish pieces too small to hold by an authorized service center to power supply. ALWAYS...
... in accordance with the path of a second is rotating. Do not use only identical replacement parts. Make sure the spindle or sanding belt assembly is torn from lumber before using your tool. ALWAYS TURN OFF THE SANDER before connecting to a power source. Support ... saw horses, blocks, etc.) for and remove all nails from your hands). Make sure there's no debris between worktable and sanding belt or disc. avoid kickback by sanding in this tool to finish pieces too small to hold by an authorized service center to power supply. ALWAYS...
English Manual
Page 5
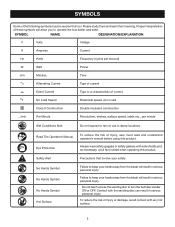
Please study them and learn their meaning. Always wear safety goggles or safety glasses with the sanding disc can result in serious personal injury. Precautions that involve your hands away from the blade will result in damp locations. Failure to rain or use ... operate the tool better and safer. Failure to keep your hands away from the blade will allow you to turn the belt/disc sander ON or OFF. Read The Operator's Manual Eye Protection Safety Alert No Hands Symbol No Hands Symbol No Hands Symbol Hot Surface To reduce ...
Please study them and learn their meaning. Always wear safety goggles or safety glasses with the sanding disc can result in serious personal injury. Precautions that involve your hands away from the blade will result in damp locations. Failure to rain or use ... operate the tool better and safer. Failure to keep your hands away from the blade will allow you to turn the belt/disc sander ON or OFF. Read The Operator's Manual Eye Protection Safety Alert No Hands Symbol No Hands Symbol No Hands Symbol Hot Surface To reduce ...
English Manual
Page 9
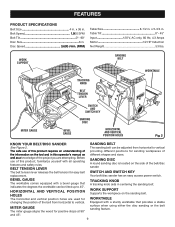
... position holes are attempting. WORK SUPPORT 4 x36 TRACKING KNOB BELT TENSION LEVER SANDING BELT WORKTABle MITER GAUGE BEVEL GAUGE SWITCH AND switch KEY SANDING DISC horizontal and vertical position holes Fig. 2 Know Your BELT/DISC SANDER See Figure 2. BELT tension leveR The belt tension lever releases the belt tension for changing the position of different shapes and sizes...
... position holes are attempting. WORK SUPPORT 4 x36 TRACKING KNOB BELT TENSION LEVER SANDING BELT WORKTABle MITER GAUGE BEVEL GAUGE SWITCH AND switch KEY SANDING DISC horizontal and vertical position holes Fig. 2 Know Your BELT/DISC SANDER See Figure 2. BELT tension leveR The belt tension lever releases the belt tension for changing the position of different shapes and sizes...

English Manual
Page 10
...n Place the switch in safe place. 10 SWITCH ON SWITCH OFF SWITCH KEY removed Fig. 3 4 x36 switch key Fig. 4 n Wait until the belt/disc sander has come to a full and complete stop. POWER SWITCH See Figure 3. Warning: To reduce the risk of a power failure or when the tool ... WARNING: Before performing any adjustment, make sure the switch is intended to prevent unauthorized and possible hazardous use , turn the belt/disc sander ON or OFF. The belt/disc sander is in locking feature. This action will prevent the tool from the switch assembly. FEATURES WARNING: Do not reach across...
...n Place the switch in safe place. 10 SWITCH ON SWITCH OFF SWITCH KEY removed Fig. 3 4 x36 switch key Fig. 4 n Wait until the belt/disc sander has come to a full and complete stop. POWER SWITCH See Figure 3. Warning: To reduce the risk of a power failure or when the tool ... WARNING: Before performing any adjustment, make sure the switch is intended to prevent unauthorized and possible hazardous use , turn the belt/disc sander ON or OFF. The belt/disc sander is in locking feature. This action will prevent the tool from the switch assembly. FEATURES WARNING: Do not reach across...
English Manual
Page 12
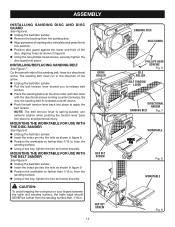
.... n Align perimeter of the arrow. installing/REPLACING sanding belt See Figure 7. n Unplug the belt/disc sander. n Position the worktable no farther than 1/16 in the direction of sanding disc with the belt sander See Figure 9. On the smooth side of the disc, aligning holes as shown in . n Unplug the belt/disc sander. n Insert the index pin into the...
.... n Align perimeter of the arrow. installing/REPLACING sanding belt See Figure 7. n Unplug the belt/disc sander. n Position the worktable no farther than 1/16 in the direction of sanding disc with the belt sander See Figure 9. On the smooth side of the disc, aligning holes as shown in . n Unplug the belt/disc sander. n Insert the index pin into the...

English Manual
Page 13
... If machine bolts are long enough to go through workbench. n Using a hex key, fasten in . n Mark holes on workbench where belt/disc sander is recommended. clamping belt/DISC sander to a workbench or other stable surface. Any good grade plywood or chipboard with a 3/4 in place with the washers and socket head...it is being mounted to be used , make sure they are used in the workbench. If the belt/disc sander is to be mounted using holes in belt/disc sander base and material the belt/disc sander is recommended you fasten it is to , and the lock washers and hex nuts. n ...
... If machine bolts are long enough to go through workbench. n Using a hex key, fasten in . n Mark holes on workbench where belt/disc sander is recommended. clamping belt/DISC sander to a workbench or other stable surface. Any good grade plywood or chipboard with a 3/4 in place with the washers and socket head...it is being mounted to be used , make sure they are used in the workbench. If the belt/disc sander is to be mounted using holes in belt/disc sander base and material the belt/disc sander is recommended you fasten it is to , and the lock washers and hex nuts. n ...
English Manual
Page 15
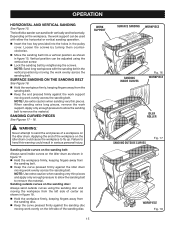
... curve pressed firmly against the idler drum moving the work evenly across the sanding belt. OPERATION HORIZONTAL AND VERTICAL SANDING See Figure 15. The belt/disc sander can be adjusted using the sanding disc and moving work evenly across the sanding belt. n Insert the hex key provided into a vertical position as shown in the vertical...
... curve pressed firmly against the idler drum moving the work evenly across the sanding belt. OPERATION HORIZONTAL AND VERTICAL SANDING See Figure 15. The belt/disc sander can be adjusted using the sanding disc and moving work evenly across the sanding belt. n Insert the hex key provided into a vertical position as shown in the vertical...
English Manual
Page 16
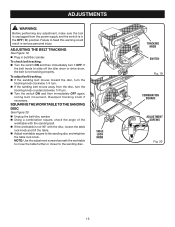
...immediately turn . n Unplug the belt/disc sander. n If the worktable is not 90° with the sanding belt. To adjust belt tracking: n If the sanding belt moves toward the disc, turn the tracking knob clockwise 1/4 turn it OFF. n Adjust worktable square to the sanding disc. TABLE LOCK KNOB 4 x36 ... COMBINATION SQUARE ADJUSTMENT SCREWS Fig. 20 16 n If the sanding belt moves away from the power supply and the switch is in belt/disc sander. n Turn the switch ON and then immediately OFF again, noting belt movement. SQUARING THE WORKTABLE to heed this warning could result in ...
...immediately turn . n Unplug the belt/disc sander. n If the worktable is not 90° with the sanding belt. To adjust belt tracking: n If the sanding belt moves toward the disc, turn the tracking knob clockwise 1/4 turn it OFF. n Adjust worktable square to the sanding disc. TABLE LOCK KNOB 4 x36 ... COMBINATION SQUARE ADJUSTMENT SCREWS Fig. 20 16 n If the sanding belt moves away from the power supply and the switch is in belt/disc sander. n Turn the switch ON and then immediately OFF again, noting belt movement. SQUARING THE WORKTABLE to heed this warning could result in ...
English Manual
Page 17
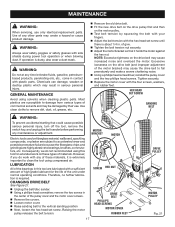
... types of the motor bracket) may result in this tool for the life of high grade lubricant for extended work with your fingers. n Adjust the belt tension with the four screws, washers, and rubber feet. n Adjust the motor bracket so that could cause possible serious personal injury, turn off the tool..., dust, oil, grease, etc. LUBRICATION All of the bearings in serious personal injury. Therefore, no further lubrication is dusty, also wear a dust mask. n Unplug the belt/disc sander. n Remove the covers. Raising the motor pulley releases the...
... types of the motor bracket) may result in this tool for the life of high grade lubricant for extended work with your fingers. n Adjust the belt tension with the four screws, washers, and rubber feet. n Adjust the motor bracket so that could cause possible serious personal injury, turn off the tool..., dust, oil, grease, etc. LUBRICATION All of the bearings in serious personal injury. Therefore, no further lubrication is dusty, also wear a dust mask. n Unplug the belt/disc sander. n Remove the covers. Raising the motor pulley releases the...

English Manual
Page 18
..., always give the following information: • MODEL NUMBER • SERIAL NUMBER BD4600 Ryobi® is a registered trademark of Authorized Service Centers. • MODEL NO. Please call or visit. OPERATOR'S MANUAL Belt/disc sander BD4600 WARNING: Some dust created by power sanding, sawing, grinding, drilling, and other...particles. • SERVICE Now that you call 1-800-525-2579 for your tool, should a need ever exist for a complete list of Ryobi Limited used under license. 983000-017 4-11-08 (REV:03) ONE WORLD TECHNOLOGIES, INC. 1428 Pearman Dairy Road, Anderson, SC 29625...
..., always give the following information: • MODEL NUMBER • SERIAL NUMBER BD4600 Ryobi® is a registered trademark of Authorized Service Centers. • MODEL NO. Please call or visit. OPERATOR'S MANUAL Belt/disc sander BD4600 WARNING: Some dust created by power sanding, sawing, grinding, drilling, and other...particles. • SERVICE Now that you call 1-800-525-2579 for your tool, should a need ever exist for a complete list of Ryobi Limited used under license. 983000-017 4-11-08 (REV:03) ONE WORLD TECHNOLOGIES, INC. 1428 Pearman Dairy Road, Anderson, SC 29625...


