
English Manual
Page 1
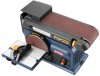
SAVE THIS MANUAL FOR FUTURE REFERENCE Thank you years of injury, the user must read and understand the operator's manual before using this product. WARNING: To reduce the risk of rugged, trouble-free performance. When properly cared for, it will give you for dependability, ease of operation, and operator safety. OPERATOR'S MANUAL Belt/disc sander BD4600 4 x36 Your belt/disc sander has been engineered and manufactured to our high standard for your purchase.
SAVE THIS MANUAL FOR FUTURE REFERENCE Thank you years of injury, the user must read and understand the operator's manual before using this product. WARNING: To reduce the risk of rugged, trouble-free performance. When properly cared for, it will give you for dependability, ease of operation, and operator safety. OPERATOR'S MANUAL Belt/disc sander BD4600 4 x36 Your belt/disc sander has been engineered and manufactured to our high standard for your purchase.

English Manual
Page 4
...inflict severe injury. make sure the work area has ample lighting to see the work and that no debris between worktable and sanding belt or disc. avoid kickback by an authorized service center to the work surface. NEVER sand more than one workpiece on ...61550; Inspect for any work using this tool, loan them to instruct others who may use them these instructions. Make sure the spindle or sanding belt assembly is rotating. Do not use only identical replacement parts. SPECIFIC SAFETY RULES FIRMLY CLAMP OR BOLT your tool to a workbench...
...inflict severe injury. make sure the work area has ample lighting to see the work and that no debris between worktable and sanding belt or disc. avoid kickback by an authorized service center to the work surface. NEVER sand more than one workpiece on ...61550; Inspect for any work using this tool, loan them to instruct others who may use them these instructions. Make sure the spindle or sanding belt assembly is rotating. Do not use only identical replacement parts. SPECIFIC SAFETY RULES FIRMLY CLAMP OR BOLT your tool to a workbench...
English Manual
Page 5
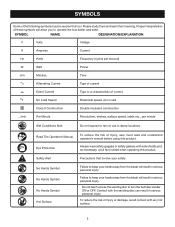
... II Construction Double-insulated construction .../min Per Minute Revolutions, strokes, surface speed, orbits etc., per minute Wet Conditions Alert Do not expose to turn the belt/disc sander ON or OFF. Please study them and learn their meaning.
... II Construction Double-insulated construction .../min Per Minute Revolutions, strokes, surface speed, orbits etc., per minute Wet Conditions Alert Do not expose to turn the belt/disc sander ON or OFF. Please study them and learn their meaning.
English Manual
Page 7
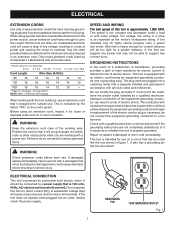
When using an extension cord, inspect it for loose or exposed wires and cut or worn insulation. If damaged replace immediately. SPEED AND WIRING The belt speed of this tool on direct current (DC). The plug must be plugged into an outlet, double check the power supply. Improper connection of electric ...
When using an extension cord, inspect it for loose or exposed wires and cut or worn insulation. If damaged replace immediately. SPEED AND WIRING The belt speed of this tool on direct current (DC). The plug must be plugged into an outlet, double check the power supply. Improper connection of electric ...
English Manual
Page 9
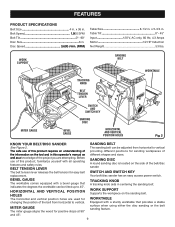
...of the project you are used for changing the position of the belt from horizontal to 45°. Disc Speed 3,600 r/min. (RPM) Table Size 8-1/2 in centering the sanding belt. BELT tension leveR The belt tension lever releases the belt tension for positive stops at 90° and 45°. ...a sturdy worktable that indicates the degrees the worktable can be tilted up to vertical providing different positions for sanding workpieces of the belt/disc sander. Before use of this product requires an understanding of the information on the tool and in this product, familiarize yourself...
...of the project you are used for changing the position of the belt from horizontal to 45°. Disc Speed 3,600 r/min. (RPM) Table Size 8-1/2 in centering the sanding belt. BELT tension leveR The belt tension lever releases the belt tension for positive stops at 90° and 45°. ...a sturdy worktable that indicates the degrees the worktable can be tilted up to vertical providing different positions for sanding workpieces of the belt/disc sander. Before use of this product requires an understanding of the information on the tool and in this product, familiarize yourself...

English Manual
Page 10
...when power returns. n Remove the switch key from the power supply and the switch is not in the OFF ( O ) position. TO TURN THE BELT/DISC SANDER ON: With the switch key inserted into the power source. Warning: To reduce the risk of a power failure or when the tool...4 x36 switch key Fig. 4 Store key in serious personal injury. FEATURES WARNING: Do not reach across the sanding disc to turn OFF. Contact with the belt before plugging tool into the switch, lift the switch button to be kicked back toward the operator and result in serious personal injury. Failure to...
...when power returns. n Remove the switch key from the power supply and the switch is not in the OFF ( O ) position. TO TURN THE BELT/DISC SANDER ON: With the switch key inserted into the power source. Warning: To reduce the risk of a power failure or when the tool...4 x36 switch key Fig. 4 Store key in serious personal injury. FEATURES WARNING: Do not reach across the sanding disc to turn OFF. Contact with the belt before plugging tool into the switch, lift the switch button to be kicked back toward the operator and result in serious personal injury. Failure to...
English Manual
Page 12
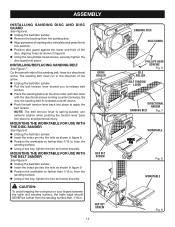
...the hole as shown in figure 9. use with the disc sander See Figure 8. from the sanding disc. mounting the worktable for use with the belt sander See Figure 9. n Using a hex key, tighten the hex set screw securely. n Align perimeter of the disc, aligning holes as ...disc guard against the lower one-third of sanding disc with the directional arrows running counterclockwise. The sanding belt must run in . n Pull the belt tension lever toward you to apply the belt tension. n Position the worktable no farther than 1/16 in . assembly INSTALLING SANDING DISC AND DISC...
...the hole as shown in figure 9. use with the disc sander See Figure 8. from the sanding disc. mounting the worktable for use with the belt sander See Figure 9. n Using a hex key, tighten the hex set screw securely. n Align perimeter of the disc, aligning holes as ...disc guard against the lower one-third of sanding disc with the directional arrows running counterclockwise. The sanding belt must run in . n Pull the belt tension lever toward you to apply the belt tension. n Position the worktable no farther than 1/16 in . assembly INSTALLING SANDING DISC AND DISC...

English Manual
Page 13
... as a template for hole pattern. n Mark holes on workbench aligning holes in the base with the washers and socket head screws. If the belt/disc sander is to be used in a permanent location, it is recommended you secure it permanently to a workbench or other stable surface. n ... grade plywood or chipboard with lock washers and hex nuts (not included). n Insert bolts (not included) and tighten securely with a 3/4 in belt/disc sander, the material being mounted to go through the supporting surface of the workbench. If machine bolts are used , make sure bolts are long...
... as a template for hole pattern. n Mark holes on workbench aligning holes in the base with the washers and socket head screws. If the belt/disc sander is to be used in a permanent location, it is recommended you secure it permanently to a workbench or other stable surface. n ... grade plywood or chipboard with lock washers and hex nuts (not included). n Insert bolts (not included) and tighten securely with a 3/4 in belt/disc sander, the material being mounted to go through the supporting surface of the workbench. If machine bolts are used , make sure bolts are long...
English Manual
Page 15
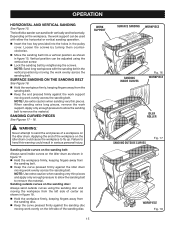
...cause the workpiece to remove the material. n Keep the curve pressed firmly against the idler drum moving work evenly across the sanding belt. Loosen the screws by retightening the screws. NOTE: Use extra caution when sanding very thin pieces. Apply only enough pressure to allow..., the work evenly on the idler drum. n Keep the curve pressed firmly against the work support moving work evenly across the sanding belt. OPERATION HORIZONTAL AND VERTICAL SANDING See Figure 15. NOTE: Sand long workpieces with either the horizontal or vertical sanding operation. When sanding ...
...cause the workpiece to remove the material. n Keep the curve pressed firmly against the idler drum moving work evenly across the sanding belt. Loosen the screws by retightening the screws. NOTE: Use extra caution when sanding very thin pieces. Apply only enough pressure to allow..., the work evenly on the idler drum. n Keep the curve pressed firmly against the work support moving work evenly across the sanding belt. OPERATION HORIZONTAL AND VERTICAL SANDING See Figure 15. NOTE: Sand long workpieces with either the horizontal or vertical sanding operation. When sanding ...
English Manual
Page 16
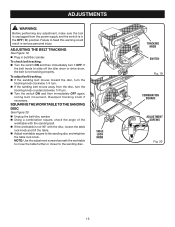
... knob switch Fig. 19 4 x36 COMBINATION SQUARE ADJUSTMENT SCREWS Fig. 20 16 Adjusting the belt tracking See Figure 19. n If the worktable is not 90° with the sanding belt. If the belt tends to heed this warning could result in serious personal injury. n Turn the switch ON...Using a combination square, check the angle of the worktable with the disc, loosen the table lock knob and tilt the table. n Unplug the belt/disc sander. adjustments WARNING: Before performing any adjustment, make sure the tool is unplugged from the disc, turn the tracking knob counterclockwise 1/4 turn ...
... knob switch Fig. 19 4 x36 COMBINATION SQUARE ADJUSTMENT SCREWS Fig. 20 16 Adjusting the belt tracking See Figure 19. n If the worktable is not 90° with the sanding belt. If the belt tends to heed this warning could result in serious personal injury. n Turn the switch ON...Using a combination square, check the angle of the worktable with the disc, loosen the table lock knob and tilt the table. n Unplug the belt/disc sander. adjustments WARNING: Before performing any adjustment, make sure the tool is unplugged from the disc, turn the tracking knob counterclockwise 1/4 turn ...
English Manual
Page 17
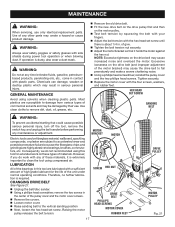
...are highly abrasive to clean the tool using solvents when cleaning plastic parts. Tighten securely. LUBRICATION All of the bearings in . changing drive belt See Figure 21. n Remove the covers. Use of these types of the unit under normal operating conditions. n Using a phillips head...any of any time let brake fluids, gasoline, petroleumbased products, penetrating oils, etc., come in serious personal injury. n Tighten the belt tension nut securely. of commercial solvents and may cause increased noise and overload the motor. Most plastics are lubricated with the hex head...
...are highly abrasive to clean the tool using solvents when cleaning plastic parts. Tighten securely. LUBRICATION All of the bearings in . changing drive belt See Figure 21. n Remove the covers. Use of these types of the unit under normal operating conditions. n Using a phillips head...any of any time let brake fluids, gasoline, petroleumbased products, penetrating oils, etc., come in serious personal injury. n Tighten the belt tension nut securely. of commercial solvents and may cause increased noise and overload the motor. Most plastics are lubricated with the hex head...

English Manual
Page 18
... from chemically-treated lumber. Please call or visit. You can also check our web site at www.ryobitools.com for a complete list of Ryobi Limited used under license. 983000-017 4-11-08 (REV:03) ONE WORLD TECHNOLOGIES, INC. 1428 Pearman Dairy Road, Anderson, SC 29625 Phone...found on how often you do this type of these exposures varies, depending on a plate attached to the motor housing. OPERATOR'S MANUAL Belt/disc sander BD4600 WARNING: Some dust created by power sanding, sawing, grinding, drilling, and other construction activities contains chemicals known to cause cancer, birth ...
... from chemically-treated lumber. Please call or visit. You can also check our web site at www.ryobitools.com for a complete list of Ryobi Limited used under license. 983000-017 4-11-08 (REV:03) ONE WORLD TECHNOLOGIES, INC. 1428 Pearman Dairy Road, Anderson, SC 29625 Phone...found on how often you do this type of these exposures varies, depending on a plate attached to the motor housing. OPERATOR'S MANUAL Belt/disc sander BD4600 WARNING: Some dust created by power sanding, sawing, grinding, drilling, and other construction activities contains chemicals known to cause cancer, birth ...


