Operating Instructions
Page 4
... Copy] Key (Shortcut Function 40 Configuring Network Settings...42 Configuring the IP Address Settings...42 Sharing the Printer on a Network...46 Wireless LAN Setup...47 Restricting Machine Functions According to User 50 Enabling the User Restriction Settings...50 When Machine Functions are Restricted...54 2. Printing Documents Basic Operation...87 Canceling a Print Job...87 If a Paper Mismatch Occurs...89 Continuing Printing Using Mismatched Paper 89 Resetting the Print Job...89 Printing Confidential Documents...90 Storing a Locked Print file...90 Printing a Locked Print file...91 Deleting...
... Copy] Key (Shortcut Function 40 Configuring Network Settings...42 Configuring the IP Address Settings...42 Sharing the Printer on a Network...46 Wireless LAN Setup...47 Restricting Machine Functions According to User 50 Enabling the User Restriction Settings...50 When Machine Functions are Restricted...54 2. Printing Documents Basic Operation...87 Canceling a Print Job...87 If a Paper Mismatch Occurs...89 Continuing Printing Using Mismatched Paper 89 Resetting the Print Job...89 Printing Confidential Documents...90 Storing a Locked Print file...90 Printing a Locked Print file...91 Deleting...
Operating Instructions
Page 26
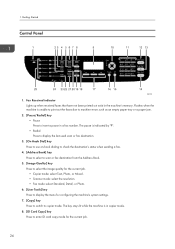
... key stays lit while the machine is in copier mode. 8. [ID Card Copy] key Press to enter ID card copy mode for configuring the machine's system settings. 7. [Copy] key Press to switch to insert a pause in the machine's memory. 1. The pause is unable to print out the faxes due to machine errors such as an empty paper tray or a paper jam. 2. [Pause/Redial] key • Pause Press to copier mode. Fax Received indicator Lights up when received faxes that have not been printed out exist in a fax number. Getting Started Control Panel...
... key stays lit while the machine is in copier mode. 8. [ID Card Copy] key Press to enter ID card copy mode for configuring the machine's system settings. 7. [Copy] key Press to switch to insert a pause in the machine's memory. 1. The pause is unable to print out the faxes due to machine errors such as an empty paper tray or a paper jam. 2. [Pause/Redial] key • Pause Press to copier mode. Fax Received indicator Lights up when received faxes that have not been printed out exist in a fax number. Getting Started Control Panel...

Operating Instructions
Page 27
... [Admin. Scroll keys Press to Function], see page 34 "Initial Setup". 9. The key stays lit while the machine is in standby mode will display the menu for configuring the settings of the menu tree. 17. Guide to Components If you do not use the ID card copy mode frequently, configure [Shortcut to scanner mode. Tools] to fax mode. Number keys Use to enter numerical values when specifying settings such as fax numbers and copy quantities, or enter letters when specifying names. 12. [Clear/Stop] key...
... [Admin. Scroll keys Press to Function], see page 34 "Initial Setup". 9. The key stays lit while the machine is in standby mode will display the menu for configuring the settings of the menu tree. 17. Guide to Components If you do not use the ID card copy mode frequently, configure [Shortcut to scanner mode. Tools] to fax mode. Number keys Use to enter numerical values when specifying settings such as fax numbers and copy quantities, or enter letters when specifying names. 12. [Clear/Stop] key...
Operating Instructions
Page 46
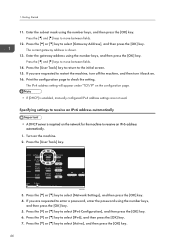
... check the setting. Print the configuration page to restart the machine, turn off the machine, and then turn it back on the machine. 2. Press the [ ] and [ ] keys to select [Active], and then press the [OK] key. 44 Enter the gateway address using the number keys, and then press the [OK] key. DAC509 3. 1. Press the [ ] or [ ] key to move between fields. 12. Press the [User Tools] key to return to enter a password, enter the password using the number keys...
... check the setting. Print the configuration page to restart the machine, turn off the machine, and then turn it back on the machine. 2. Press the [ ] and [ ] keys to select [Active], and then press the [OK] key. 44 Enter the gateway address using the number keys, and then press the [OK] key. DAC509 3. 1. Press the [ ] or [ ] key to move between fields. 12. Press the [User Tools] key to return to enter a password, enter the password using the number keys...
Operating Instructions
Page 48
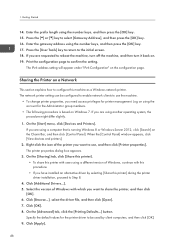
... [Printing Defaults...] button. If you are using a computer that is based on . 19. Right-click the icon of Windows with this machine as a Windows network printer. Getting Started 14. When the [Control Panel] window appears, click [View devices and printers]. 2. Click [OK]. 8. Print the configuration page to select [Gateway Address], and then press the [OK] key. 16. Press the [User Tools] key to return to Step 8. 4. On the [Start] menu, click [Devices and Printers]. Sharing the Printer...
... [Printing Defaults...] button. If you are using a computer that is based on . 19. Right-click the icon of Windows with this machine as a Windows network printer. Getting Started 14. When the [Control Panel] window appears, click [View devices and printers]. 2. Click [OK]. 8. Print the configuration page to select [Gateway Address], and then press the [OK] key. 16. Press the [User Tools] key to return to Step 8. 4. On the [Start] menu, click [Devices and Printers]. Sharing the Printer...
Operating Instructions
Page 92
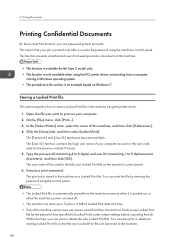
... login user name of your Locked Print file on the machine's control panel. 6. Type the password (containing 4 to 8 digits) and user ID (containing 1 to identify your computer account or the user code used to 9 alphanumeric characters), and then click [OK]. You can print the file by entering the password using the PCL printer driver, and printing from the machine's memory when it is printed out, or when the machine's power is turned off. • The machine can password-protect print jobs...
... login user name of your Locked Print file on the machine's control panel. 6. Type the password (containing 4 to 8 digits) and user ID (containing 1 to identify your computer account or the user code used to 9 alphanumeric characters), and then click [OK]. You can print the file by entering the password using the PCL printer driver, and printing from the machine's memory when it is printed out, or when the machine's power is turned off. • The machine can password-protect print jobs...
Operating Instructions
Page 116
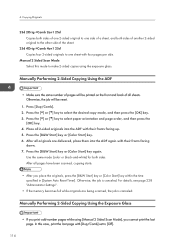
... same mode (color or black-and-white) for both sides of another 2-sided original to one side of a sheet, and both sides. Press the [B&W Start] key or [Color Start] key again. Manually Performing 2-Sided Copying Using the ADF • Make sure the same number of pages will be printed on the front and back of the sheet. 2Sd 4Orig->Comb 4on1 2Sd Copies four 2-sided originals to the other side of all originals are being scanned, the job is canceled...
... same mode (color or black-and-white) for both sides of another 2-sided original to one side of a sheet, and both sides. Press the [B&W Start] key or [Color Start] key again. Manually Performing 2-Sided Copying Using the ADF • Make sure the same number of pages will be printed on the front and back of the sheet. 2Sd 4Orig->Comb 4on1 2Sd Copies four 2-sided originals to the other side of all originals are being scanned, the job is canceled...
Operating Instructions
Page 159
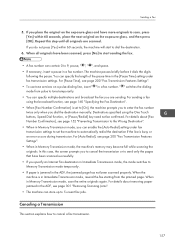
... start sending the fax. • A fax number can specify the length of the pause time in Memory Transmission mode, the machine's memory may become full while scanning the originals. You can contain 0 to 5 unsent fax jobs. Destinations specified using the broadcast function, see page 301 "Removing Scanning Jams". • The machine can enable the [Auto Redial] setting under fax transmission settings. For details about removing paper jammed in the ADF, see page 160 "Specifying the Fax Destination". • When [Fax Number Confirmation] is jammed in a fax number...
... start sending the fax. • A fax number can specify the length of the pause time in Memory Transmission mode, the machine's memory may become full while scanning the originals. You can contain 0 to 5 unsent fax jobs. Destinations specified using the broadcast function, see page 301 "Removing Scanning Jams". • The machine can enable the [Auto Redial] setting under fax transmission settings. For details about removing paper jammed in the ADF, see page 160 "Specifying the Fax Destination". • When [Fax Number Confirmation] is jammed in a fax number...

Operating Instructions
Page 172
...; [User]: Displays individual destinations only. • If sending faxes via LAN-Fax is shared by multiple computers, be careful not to cancel, click the [Document] menu, and then click [Cancel]. Canceling while the machine is receiving a fax from List]. • You can select the types of the job. Select the print job you must enter a user code in a fax number. For [Pause Time], see the LAN-Fax driver Help. • A fax number can cancel sending a fax using the control panel. 170 Canceling a fax You can contain 0 to open the...
...; [User]: Displays individual destinations only. • If sending faxes via LAN-Fax is shared by multiple computers, be careful not to cancel, click the [Document] menu, and then click [Cancel]. Canceling while the machine is receiving a fax from List]. • You can select the types of the job. Select the print job you must enter a user code in a fax number. For [Pause Time], see the LAN-Fax driver Help. • A fax number can cancel sending a fax using the control panel. 170 Canceling a fax You can contain 0 to open the...

Operating Instructions
Page 183
... machine deletes the fax from memory. The machine prints out a forwarding failure report, prints out the fax, and then deletes it from memory. Receiving a Fax Forwarding or Storing Faxes in Memory To prevent unauthorized users from seeing sensitive faxes, you can set the machine to forward received faxes to machine errors such as the problem is available for the Type 2 model only. • The table below shows what happens after forwarding succeeds or fails depending on the machine's configuration...
... machine deletes the fax from memory. The machine prints out a forwarding failure report, prints out the fax, and then deletes it from memory. Receiving a Fax Forwarding or Storing Faxes in Memory To prevent unauthorized users from seeing sensitive faxes, you can set the machine to forward received faxes to machine errors such as the problem is available for the Type 2 model only. • The table below shows what happens after forwarding succeeds or fails depending on the machine's configuration...
Operating Instructions
Page 193
...], [Fax Speed Dial Dest. For details about configuring the machine using Web Image Monitor, see page 233 "Configuring the Machine Using Web Image Monitor". • Some items might not appear depending on the model type or machine's configuration. • Some items can also be configured using Web Image Monitor. Copier Features ([ ] [ ] key setting) [Select Paper], [Sort], [Original Type], [Density], [Reduce/Enlarge], [Color Adjustment], [Duplex/ Combine] , [B&W Copy Scan Settings] Scan Settings ([ ] [ ] key setting) [Scan Size], [B&W Scanning Mode], [Max. List], [Scanner Dest. Menu...
...], [Fax Speed Dial Dest. For details about configuring the machine using Web Image Monitor, see page 233 "Configuring the Machine Using Web Image Monitor". • Some items might not appear depending on the model type or machine's configuration. • Some items can also be configured using Web Image Monitor. Copier Features ([ ] [ ] key setting) [Select Paper], [Sort], [Original Type], [Density], [Reduce/Enlarge], [Color Adjustment], [Duplex/ Combine] , [B&W Copy Scan Settings] Scan Settings ([ ] [ ] key setting) [Scan Size], [B&W Scanning Mode], [Max. List], [Scanner Dest. Menu...
Operating Instructions
Page 213
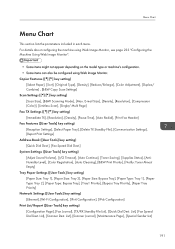
...; Fixed USB Port Specifies whether the same printer/LAN-Fax driver can be used for installation, if the machine is of the paper loaded in the paper tray or the paper size specified for multiple machines or not under USB connection. Default: [Off] • Off • On Toner Saving Sets the machine to ignore an error with the exposure glass. However, if the size of toner (for the Type 2 model (when the user restriction function is enabled via Web Image Monitor). System Settings • User Authentication (Copy...
...; Fixed USB Port Specifies whether the same printer/LAN-Fax driver can be used for installation, if the machine is of the paper loaded in the paper tray or the paper size specified for multiple machines or not under USB connection. Default: [Off] • Off • On Toner Saving Sets the machine to ignore an error with the exposure glass. However, if the size of toner (for the Type 2 model (when the user restriction function is enabled via Web Image Monitor). System Settings • User Authentication (Copy...

Operating Instructions
Page 218
... print job specifying the paper tray, the paper settings specified in the printer driver or in the print command are handled. Configuring the Machine Using the Control Panel Default: [Plain Paper] • Thin Paper, Plain Paper, Middle Thick Paper, Thick Paper 1, Recycled Paper, Color Paper, Letterhead, Prepunched Paper, Label Paper, Bond Paper, Cardstock, Envelope, Thick Paper 2 • Tray1 Priority Specifies how print jobs using Tray 1 are applied regardless of the machine's settings. • Any Size/Type Printing proceeds even if the paper size/type settings of the machine's settings...
... print job specifying the paper tray, the paper settings specified in the printer driver or in the print command are handled. Configuring the Machine Using the Control Panel Default: [Plain Paper] • Thin Paper, Plain Paper, Middle Thick Paper, Thick Paper 1, Recycled Paper, Color Paper, Letterhead, Prepunched Paper, Label Paper, Bond Paper, Cardstock, Envelope, Thick Paper 2 • Tray1 Priority Specifies how print jobs using Tray 1 are applied regardless of the machine's settings. • Any Size/Type Printing proceeds even if the paper size/type settings of the machine's settings...
Operating Instructions
Page 239
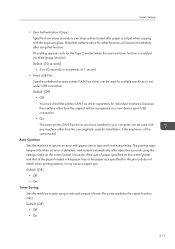
...cartridge is installed, toner life cannot be reliably indicated. • The information about Tray 2 appears only when it is installed. Description Shows the current state and paper size/type setting of Tray 2. Counter Tab Page Counter Item Printer Scanner Description Shows the following for pages printed using the printer function: • Total number of pages printed using the printer function, and lists/ reports printed from the [List/Test Print] menu under [Printer Features] • Number of color pages • Number of black-and-white pages printed using the printer function...
...cartridge is installed, toner life cannot be reliably indicated. • The information about Tray 2 appears only when it is installed. Description Shows the current state and paper size/type setting of Tray 2. Counter Tab Page Counter Item Printer Scanner Description Shows the following for pages printed using the printer function: • Total number of pages printed using the printer function, and lists/ reports printed from the [List/Test Print] menu under [Printer Features] • Number of color pages • Number of black-and-white pages printed using the printer function...
Operating Instructions
Page 314
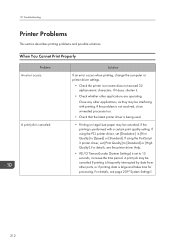
... latest printer driver is being used. • Printing on Legal size paper may be canceled, if the printing is canceled. If using the PCL printer driver, set [Print Quality] to 15 seconds, increase the time period. Close any other applications are operating. Solution If an error occurs when printing, change the computer or printer driver settings. • Check the printer icon name does not exceed 32 alphanumeric characters. A print job may be canceled if printing is frequently interrupted by data...
... latest printer driver is being used. • Printing on Legal size paper may be canceled, if the printing is canceled. If using the PCL printer driver, set [Print Quality] to 15 seconds, increase the time period. Close any other applications are operating. Solution If an error occurs when printing, change the computer or printer driver settings. • Check the printer icon name does not exceed 32 alphanumeric characters. A print job may be canceled if printing is frequently interrupted by data...
Operating Instructions
Page 326
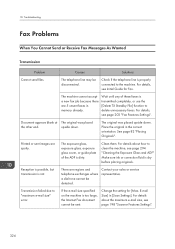
... memory already. Contact your sales or service representative. E-mail Size] in the correct orientation. Check if the telephone line is dry before placing originals. The machine cannot accept a new fax job because there are spotty. Place the original in [Scan Settings]. Transmission failed due to the machine. Change the setting for Fax. Wait until any of the ADF is transmitted completely, or use the [Delete TX Standby File] function to clean the machine...
... memory already. Contact your sales or service representative. E-mail Size] in the correct orientation. Check if the telephone line is dry before placing originals. The machine cannot accept a new fax job because there are spotty. Place the original in [Scan Settings]. Transmission failed due to the machine. Change the setting for Fax. Wait until any of the ADF is transmitted completely, or use the [Delete TX Standby File] function to clean the machine...
Operating Instructions
Page 329
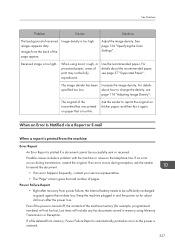
See page 136 "Specifying the Scan Settings". If an error occurs during reception, ask the sender to change the density, see page 57 "Supported Paper". Keep the machine plugged in memory using moist, rough, or processed paper, areas of the page appear. If a file deleted from the back of print may not be lost. Images from memory, Power Failure Report is automatically printed as soon as the power is restored. 327 Adjust the image density...
See page 136 "Specifying the Scan Settings". If an error occurs during reception, ask the sender to change the density, see page 57 "Supported Paper". Keep the machine plugged in memory using moist, rough, or processed paper, areas of the page appear. If a file deleted from the back of print may not be lost. Images from memory, Power Failure Report is automatically printed as soon as the power is restored. 327 Adjust the image density...
Operating Instructions
Page 339
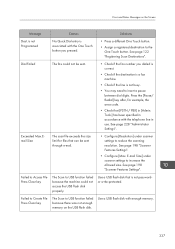
... to USB function failed because there was not enough memory on the Screen Message Causes Solutions Dest. Use a USB flash disk with the telephone line in [Admin. Error and Status Messages on the USB flash disk. See page 198 "Scanner Features Settings". See page 198 "Scanner Features Settings". • Configure [Max. Failed to Access File Press Clear key The Scan to USB function failed because the machine could not be sent through e-mail. • Configure [Resolution] under scanner settings to the One Touch button. Use a USB flash...
... to USB function failed because there was not enough memory on the Screen Message Causes Solutions Dest. Use a USB flash disk with the telephone line in [Admin. Error and Status Messages on the USB flash disk. See page 198 "Scanner Features Settings". See page 198 "Scanner Features Settings". • Configure [Max. Failed to Access File Press Clear key The Scan to USB function failed because the machine could not be sent through e-mail. • Configure [Resolution] under scanner settings to the One Touch button. Use a USB flash...
Operating Instructions
Page 340
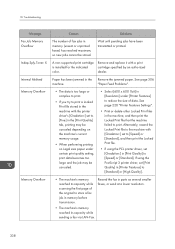
... Locked Print files in [Print Quality] to print. If using the PCL printer driver, set [Gradation:] in the machine, and then print the Locked Print file that the machine failed to [Speed] or [Standard]. "Paper Feed Problems". • The data is installed for the indicated color. Resend the fax in memory (unsent or unprinted faxes) has reached maximum, so new jobs cannot be canceled. • Select [600 x 600 1bit] in memory before transmission. See page 306 machine. Troubleshooting Message Fax Job Memory Overflow Indep.Sply.Toner...
... Locked Print files in [Print Quality] to print. If using the PCL printer driver, set [Gradation:] in the machine, and then print the Locked Print file that the machine failed to [Speed] or [Standard]. "Paper Feed Problems". • The data is installed for the indicated color. Resend the fax in memory (unsent or unprinted faxes) has reached maximum, so new jobs cannot be canceled. • Select [600 x 600 1bit] in memory before transmission. See page 306 machine. Troubleshooting Message Fax Job Memory Overflow Indep.Sply.Toner...

Operating Instructions
Page 375
... 122, 129 Scan to USB 132 Scanner destination list 267 Scanner Features Settings 198 Scanner function 361 Scanner key 35 Scanner mode screen 121 Scanner send setting 254 Scanning 139 Select paper 245 Select paper tray 245 Sending a fax 154, 155 Set date 270 Set time 270 Shortcut to function 40, 249 SMTP settings 258 SNMP settings 257 Sound volume adjustment 241 Special senders 185, 186 Specifications...........357, 359, 360, 361, 362, 363 Speed Dial 150, 152, 161 Status information 236 Status messages 334 Supported paper 57 System 257...
... 122, 129 Scan to USB 132 Scanner destination list 267 Scanner Features Settings 198 Scanner function 361 Scanner key 35 Scanner mode screen 121 Scanner send setting 254 Scanning 139 Select paper 245 Select paper tray 245 Sending a fax 154, 155 Set date 270 Set time 270 Shortcut to function 40, 249 SMTP settings 258 SNMP settings 257 Sound volume adjustment 241 Special senders 185, 186 Specifications...........357, 359, 360, 361, 362, 363 Speed Dial 150, 152, 161 Status information 236 Status messages 334 Supported paper 57 System 257...


