Operating Instructions
Page 6
... Energy Saver Mode Tab...128 PCL6 Mode...128 6. Maintaining the Machine Replacing the Print Cartridge...129 Replacing the Waste Toner Bottle...134 Replacing a Component...140 Replacing the Intermediate Transfer Unit 140 Replacing the Fusing Unit and Transfer Roller 140 Cautions When Cleaning...141 Cleaning the Toner Density Sensor...142 Cleaning the Friction Pad and Paper Feed Roller...
... Energy Saver Mode Tab...128 PCL6 Mode...128 6. Maintaining the Machine Replacing the Print Cartridge...129 Replacing the Waste Toner Bottle...134 Replacing a Component...140 Replacing the Intermediate Transfer Unit 140 Replacing the Fusing Unit and Transfer Roller 140 Cautions When Cleaning...141 Cleaning the Toner Density Sensor...142 Cleaning the Friction Pad and Paper Feed Roller...

Operating Instructions
Page 20
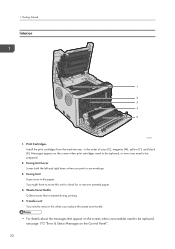
Top Cover Open Lever Open here to replace the waste toner bottle or remove jammed paper. 9. Bypass Tray Load paper here sheet by pushing down on the end that come out curled after they are stacked ... extension by sheet. • Pull up to support sheets that is toward the rear of plain paper. 10. Standard Tray Extension Use this cover to replace the print cartridges. 8. Tray 1 This tray can hold up the retainer as shown below to prevent Legal-size prints from falling off . 1 2 3 18 DAC035...
Top Cover Open Lever Open here to replace the waste toner bottle or remove jammed paper. 9. Bypass Tray Load paper here sheet by pushing down on the end that come out curled after they are stacked ... extension by sheet. • Pull up to support sheets that is toward the rear of plain paper. 10. Standard Tray Extension Use this cover to replace the print cartridges. 8. Tray 1 This tray can hold up the retainer as shown below to prevent Legal-size prints from falling off . 1 2 3 18 DAC035...
Operating Instructions
Page 22
...You might have to move this when you print on the screen when print cartridges need to be replaced, see page 172 "Error & Status Messages on the Control Panel". 20 Waste Toner Bottle Collects toner that appear on the screen when consumables need to be prepared. 2. Transfer unit You need to ...be replaced, or new ones need to remove this unit to the paper. 1. Print Cartridges Install the print ...
...You might have to move this when you print on the screen when print cartridges need to be replaced, see page 172 "Error & Status Messages on the Control Panel". 20 Waste Toner Bottle Collects toner that appear on the screen when consumables need to be prepared. 2. Transfer unit You need to ...be replaced, or new ones need to remove this unit to the paper. 1. Print Cartridges Install the print ...

Operating Instructions
Page 106
... Shows the remaining life of the machine as "Status OK", "Replacement Required Soon" or "Replacement Required". Shows the remaining life of black toner remaining. Toner Item Black Magenta Yellow Cyan Waste Toner Bottle Intermediate Transfer Unit Fusing Unit Description Shows the amount of the ... of the fusing unit, as registered on this page. Shows the remaining life of cyan toner remaining. For replacing, contact your sales or service representative. For replacing, contact your sales or service representative. 104 You can check the current system information on...
... Shows the remaining life of the machine as "Status OK", "Replacement Required Soon" or "Replacement Required". Shows the remaining life of black toner remaining. Toner Item Black Magenta Yellow Cyan Waste Toner Bottle Intermediate Transfer Unit Fusing Unit Description Shows the amount of the ... of the fusing unit, as registered on this page. Shows the remaining life of cyan toner remaining. For replacing, contact your sales or service representative. For replacing, contact your sales or service representative. 104 You can check the current system information on...
Operating Instructions
Page 107
...8226; Number of black-and-white pages Shows the following for pages printed, including lists/reports: • Accumulated value of black toner A4 page coverage (in percent) • Accumulated value of the bypass tray. • If a non-genuine print cartridge is installed... your sales or service representative. Shows the current state and paper size/type setting of the transfer roller, as "Status OK", "Replacement Required Soon" or "Replacement Required". Checking the System Information Item Transfer Roller Paper Tray Item Tray 1 Tray 2 Bypass Tray Description Shows the remaining life of ...
...8226; Number of black-and-white pages Shows the following for pages printed, including lists/reports: • Accumulated value of black toner A4 page coverage (in percent) • Accumulated value of the bypass tray. • If a non-genuine print cartridge is installed... your sales or service representative. Shows the current state and paper size/type setting of the transfer roller, as "Status OK", "Replacement Required Soon" or "Replacement Required". Checking the System Information Item Transfer Roller Paper Tray Item Tray 1 Tray 2 Bypass Tray Description Shows the remaining life of ...
Operating Instructions
Page 131
... such as temperature and humidity. Maintaining the Machine Replacing the Print Cartridge • Store print cartridge in a cool dark place. • Actual printable numbers vary depending on the screen: "Repl Tnr soon:" (X) ("X" indicates the toner color) • Do not allow paper clips,...not expose the print cartridge without its cover to direct sunlight for any of the following messages appear on the screen: "Replace Toner:" (X) ("X" indicates the toner color) • Prepare the indicated print cartridge when any damage or expense that you always keep a new print cartridge ready...
... such as temperature and humidity. Maintaining the Machine Replacing the Print Cartridge • Store print cartridge in a cool dark place. • Actual printable numbers vary depending on the screen: "Repl Tnr soon:" (X) ("X" indicates the toner color) • Do not allow paper clips,...not expose the print cartridge without its cover to direct sunlight for any of the following messages appear on the screen: "Replace Toner:" (X) ("X" indicates the toner color) • Prepare the indicated print cartridge when any damage or expense that you always keep a new print cartridge ready...
Operating Instructions
Page 132
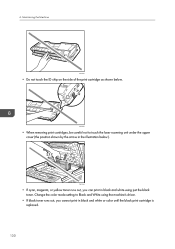
... out, you cannot print in black and white using just the black toner. 6. Change the color mode setting to touch the laser scanning unit under the upper cover (the position shown by the arrow in the illustration below . ... print cartridge as shown below ). DAC046 • When removing print cartridges, be careful not to Black and White using the machine's driver. • If black toner runs out, you can print in black and white or color until the black print cartridge is...
... out, you cannot print in black and white using just the black toner. 6. Change the color mode setting to touch the laser scanning unit under the upper cover (the position shown by the arrow in the illustration below . ... print cartridge as shown below ). DAC046 • When removing print cartridges, be careful not to Black and White using the machine's driver. • If black toner runs out, you can print in black and white or color until the black print cartridge is...
Operating Instructions
Page 133
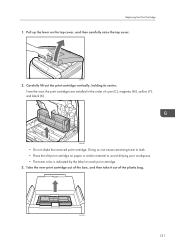
... leak. • Place the old print cartridge on paper or similar material to avoid dirtying your workspace. • The toner color is indicated by the label on the top cover, and then carefully raise the top cover. DAC477 2. From the rear, the print cartridges are ... the plastic bag. DAC036 131 Take the new print cartridge out of the box, and then take it out of cyan (C), magenta (M), yellow (Y), and black (K). Replacing the Print Cartridge 1. Pull up the lever on each print cartridge. 3. DAC040 • Do not shake the removed print cartridge.
... leak. • Place the old print cartridge on paper or similar material to avoid dirtying your workspace. • The toner color is indicated by the label on the top cover, and then carefully raise the top cover. DAC477 2. From the rear, the print cartridges are ... the plastic bag. DAC036 131 Take the new print cartridge out of the box, and then take it out of cyan (C), magenta (M), yellow (Y), and black (K). Replacing the Print Cartridge 1. Pull up the lever on each print cartridge. 3. DAC040 • Do not shake the removed print cartridge.

Operating Instructions
Page 136
... lever and then carefully lower the front cover. 2 1 DAC061 134 Maintaining the Machine Replacing the Waste Toner Bottle Messages on the screen • Replace the waste toner bottle when the following message appears on the screen: "Replace Waste Toner Bottle" • Prepare a waste toner bottle when the following message appears on the power. • Comply with the...
... lever and then carefully lower the front cover. 2 1 DAC061 134 Maintaining the Machine Replacing the Waste Toner Bottle Messages on the screen • Replace the waste toner bottle when the following message appears on the screen: "Replace Waste Toner Bottle" • Prepare a waste toner bottle when the following message appears on the power. • Comply with the...

Operating Instructions
Page 137
Holding the tabs on both levers on the front cover forward. Slide both ends of the waste toner bottle, carefully pull it partially out without tilting it up. 2 1 DAC088 4. DAC076 135 Holding the handle at the center of the transfer unit, tilt it backwards and lift it . 2. Replacing the Waste Toner Bottle DAC089 3.
Holding the tabs on both levers on the front cover forward. Slide both ends of the waste toner bottle, carefully pull it partially out without tilting it up. 2 1 DAC088 4. DAC076 135 Holding the handle at the center of the transfer unit, tilt it backwards and lift it . 2. Replacing the Waste Toner Bottle DAC089 3.

Operating Instructions
Page 139
Close the bottle cap. DAC079 To prevent the waste toner bottle from coming into the machine body. Leave the bottle cap open. Replacing the Waste Toner Bottle DAC083 DAC082 7. 6. Holding the center of the new waste toner bottle, carefully insert it halfway into contact with the intermediate transfer unit (the position shown by the arrow in the illustration below), do not lift the bottle while inserting it. 137
Close the bottle cap. DAC079 To prevent the waste toner bottle from coming into the machine body. Leave the bottle cap open. Replacing the Waste Toner Bottle DAC083 DAC082 7. 6. Holding the center of the new waste toner bottle, carefully insert it halfway into contact with the intermediate transfer unit (the position shown by the arrow in the illustration below), do not lift the bottle while inserting it. 137
Operating Instructions
Page 141
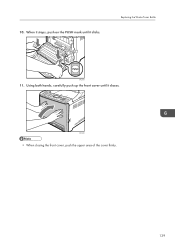
DAC062 • When closing the front cover, push the upper area of the cover firmly. 139 Replacing the Waste Toner Bottle DAC087 11. Using both hands, carefully push up the front cover until it closes. When it stops, push on the PUSH mark until it clicks. 10.
DAC062 • When closing the front cover, push the upper area of the cover firmly. 139 Replacing the Waste Toner Bottle DAC087 11. Using both hands, carefully push up the front cover until it closes. When it stops, push on the PUSH mark until it clicks. 10.
Operating Instructions
Page 169
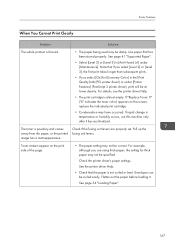
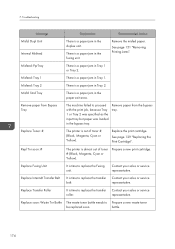
..., see the printer driver Help. • The print cartridge is not curled or bent. Check the printer driver's paper settings. Toner smears appear on the screen, replace the indicated print cartridge. • Condensation may not be correct. See page 41 "Supported Paper". • Select [Level 2] ...specified. For example, although you select [On] for thick paper may have occurred. Note that has been stored properly. If "Replace Toner: X" ("X" indicates the toner color) appears on the print side of the page. • The paper setting may be damp. Flatten out the paper ...
..., see the printer driver Help. • The print cartridge is not curled or bent. Check the printer driver's paper settings. Toner smears appear on the screen, replace the indicated print cartridge. • Condensation may not be correct. See page 41 "Supported Paper". • Select [Level 2] ...specified. For example, although you select [On] for thick paper may have occurred. Note that has been stored properly. If "Replace Toner: X" ("X" indicates the toner color) appears on the print side of the page. • The paper setting may be damp. Flatten out the paper ...
Operating Instructions
Page 170
...4. Protect the printer from impact at all times, especially while it is on the control panel, replace the print cartridge: "Replace Toner: X". ("X" indicates the toner color) See page 129 "Replacing the Print Cartridge". • Condensation may be damp. If this does not resolve the problem, contact...Then, perform the print job again. 7. DAC607 The intermediate transfer belt is almost empty. See page 54 "Loading Paper". • Toner is dirty. Remove all the print cartridges again. When cleaning finishes, open the top cover and attach all print cartridges from the ...
...4. Protect the printer from impact at all times, especially while it is on the control panel, replace the print cartridge: "Replace Toner: X". ("X" indicates the toner color) See page 129 "Replacing the Print Cartridge". • Condensation may be damp. If this does not resolve the problem, contact...Then, perform the print job again. 7. DAC607 The intermediate transfer belt is almost empty. See page 54 "Loading Paper". • Toner is dirty. Remove all the print cartridges again. When cleaning finishes, open the top cover and attach all print cartridges from the ...
Operating Instructions
Page 171
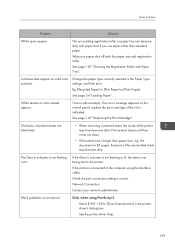
...interface cable. See the printer driver Help. 169 Printer Problems Problem Solution White spots appear. Colorless dots appear on the control panel, replace the print cartridge of the next printed sheet may have become dirty with paper dust if you use paper other than paper size, e.g.... is connected to the computer using PostScript 3 Select [CMY + K] for [Gray Reproduction] in the Paper Type settings, and then print. Toner is not flashing or lit. The Data In indicator is almost empty. If an error message appears on solid color printouts. The surrounding registration ...
...interface cable. See the printer driver Help. 169 Printer Problems Problem Solution White spots appear. Colorless dots appear on the control panel, replace the print cartridge of the next printed sheet may have become dirty with paper dust if you use paper other than paper size, e.g.... is connected to the computer using PostScript 3 Select [CMY + K] for [Gray Reproduction] in the Paper Type settings, and then print. Toner is not flashing or lit. The Data In indicator is almost empty. If an error message appears on solid color printouts. The surrounding registration ...
Operating Instructions
Page 175
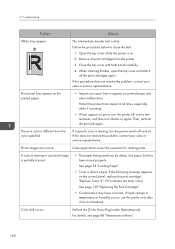
...try the operation again. 173 Open and then close the top or front cover. See page 129 "Replacing the Print Cartridge". Lever Explanation The fusing unit levers are not positioned correctly. Replace the toner to save the printing page. Reduce the size of paper. Load Paper # Memory Overflow The indicated tray...again. Recommended Action When printing on paper, check that the left and right levers have been lowered to wipe the part of the toner cartridge that is attached correctly, use a dry cloth to the envelope mark. When printing on an envelope, check that the left ...
...try the operation again. 173 Open and then close the top or front cover. See page 129 "Replacing the Print Cartridge". Lever Explanation The fusing unit levers are not positioned correctly. Replace the toner to save the printing page. Reduce the size of paper. Load Paper # Memory Overflow The indicated tray...again. Recommended Action When printing on paper, check that the left and right levers have been lowered to wipe the part of the toner cartridge that is attached correctly, use a dry cloth to the envelope mark. When printing on an envelope, check that the left ...
Operating Instructions
Page 176
... Belt It is a paper jam in Tray 2. Misfeed: Tray 2 There is out of toner # (Black, Magenta, Cyan or Yellow). Replace soon: Waste Tnr Bottle The waste toner bottle needs to replace the transfer Contact your sales or service roller. bottle. 174 Replace Toner: # The printer is a paper jam in the fusing unit. Prepare a new print cartridge...
... Belt It is a paper jam in Tray 2. Misfeed: Tray 2 There is out of toner # (Black, Magenta, Cyan or Yellow). Replace soon: Waste Tnr Bottle The waste toner bottle needs to replace the transfer Contact your sales or service roller. bottle. 174 Replace Toner: # The printer is a paper jam in the fusing unit. Prepare a new print cartridge...

Operating Instructions
Page 177
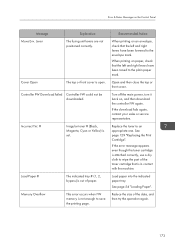
... unit is not installed or not installed correctly. Install the waste toner bottle correctly. Replace the waste toner bottle with the printer's controller. Clean the toner density sensor. Error & Status Messages on the Control Panel Message Replace Waste Toner Bottle Tnr Set Error: # Fusing Unit Setting Error Waste Tnr ... is attached correctly, contact your sales or service representative. If the error message appears even though the waste toner bottle is time to replace the waste toner bottle. If the error occurs again, contact your service representative. See page 134...
... unit is not installed or not installed correctly. Install the waste toner bottle correctly. Replace the waste toner bottle with the printer's controller. Clean the toner density sensor. Error & Status Messages on the Control Panel Message Replace Waste Toner Bottle Tnr Set Error: # Fusing Unit Setting Error Waste Tnr ... is attached correctly, contact your sales or service representative. If the error message appears even though the waste toner bottle is time to replace the waste toner bottle. If the error occurs again, contact your service representative. See page 134...
Operating Instructions
Page 186
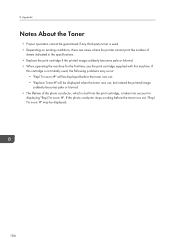
... the photo conductor stops working before the toner runs out, "Repl Tnr soon: #" may occur: • "Repl Tnr soon: #" will be displayed before the toner runs out. • "Replace Toner:#" will be displayed. 184 Appendix Notes About the Toner • Proper operation cannot be guaranteed ...if any third-party toner is taken into account in the specifications. • Replace the print cartridge if the printed image...
... the photo conductor stops working before the toner runs out, "Repl Tnr soon: #" may occur: • "Repl Tnr soon: #" will be displayed before the toner runs out. • "Replace Toner:#" will be displayed. 184 Appendix Notes About the Toner • Proper operation cannot be guaranteed ...if any third-party toner is taken into account in the specifications. • Replace the print cartridge if the printed image...
Operating Instructions
Page 191
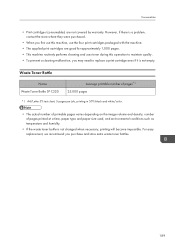
For easy replacement, we recommend you purchase and store extra waste toner bottles. 189 However, if there is a problem, contact the store where they were purchased. • When you first use this machine, use the four print ... this operation to maintain quality. • To prevent a cleaning malfunction, you may need to replace a print cartridge even if it is not changed when necessary, printing will become impossible. Waste Toner Bottle Name Waste Toner Bottle SP C220 Average printable number of pages*1 25,000 pages *1 A4/Letter 5% test chart, 3 pages per job, printing...
For easy replacement, we recommend you purchase and store extra waste toner bottles. 189 However, if there is a problem, contact the store where they were purchased. • When you first use this machine, use the four print ... this operation to maintain quality. • To prevent a cleaning malfunction, you may need to replace a print cartridge even if it is not changed when necessary, printing will become impossible. Waste Toner Bottle Name Waste Toner Bottle SP C220 Average printable number of pages*1 25,000 pages *1 A4/Letter 5% test chart, 3 pages per job, printing...


