Operating Instructions
Page 22
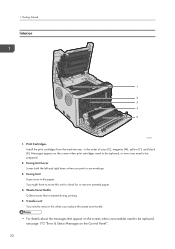
..., in the order of cyan (C), magenta (M), yellow (Y), and black (K). Fusing Unit Fuses toner to move this when you print on an envelope. 3. Transfer unit You need to check for or remove jammed paper. 4. Waste Toner Bottle Collects toner that appear on the screen when consumables.... 2. Getting Started Interior 1 2 3 4 5 DAC027 1. You might have to the paper. Messages appear on the Control Panel". 20 Fusing Unit Lever Lower both the left and right levers when you replace the waste toner bottle. • For details about the messages that is wasted during printing. 5. 1.
..., in the order of cyan (C), magenta (M), yellow (Y), and black (K). Fusing Unit Fuses toner to move this when you print on an envelope. 3. Transfer unit You need to check for or remove jammed paper. 4. Waste Toner Bottle Collects toner that appear on the screen when consumables.... 2. Getting Started Interior 1 2 3 4 5 DAC027 1. You might have to the paper. Messages appear on the Control Panel". 20 Fusing Unit Lever Lower both the left and right levers when you replace the waste toner bottle. • For details about the messages that is wasted during printing. 5. 1.
Operating Instructions
Page 56
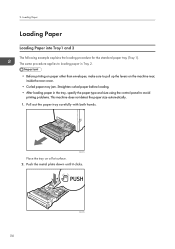
Straighten curled paper before loading. • After loading paper in Tray 2. • Before printing on paper other than envelopes, make sure to avoid printing problems. This machine does not detect the paper size automatically. 1. 2. Pull out the paper tray carefully with both hands. Loading ... DAC050 The same procedure applies to loading paper in the tray, specify the paper type and size using the control panel to pull up the levers on a flat surface. 2.
Straighten curled paper before loading. • After loading paper in Tray 2. • Before printing on paper other than envelopes, make sure to avoid printing problems. This machine does not detect the paper size automatically. 1. 2. Pull out the paper tray carefully with both hands. Loading ... DAC050 The same procedure applies to loading paper in the tray, specify the paper type and size using the control panel to pull up the levers on a flat surface. 2.
Operating Instructions
Page 60
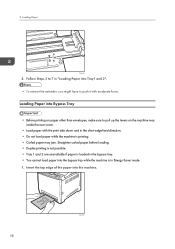
... machine is loaded in the bypass tray. • You cannot load paper into Bypass Tray • Before printing on paper other than envelopes, make sure to pull up the levers on the machine rear, inside the rear cover. • Load paper with moderate force. Follow Steps 3 to push it with the print...
... machine is loaded in the bypass tray. • You cannot load paper into Bypass Tray • Before printing on paper other than envelopes, make sure to pull up the levers on the machine rear, inside the rear cover. • Load paper with moderate force. Follow Steps 3 to push it with the print...

Operating Instructions
Page 61
...with low printing quality. 59 DAC065 Loading Envelopes • Before printing on envelopes, make sure to lower the levers on envelopes may cause machine malfunctions. • Check there is no air in the envelopes before loading. • Load only one or two envelopes in advance to the paper size. Print ... edge going into the machine) by running a pencil or ruler across them. • Some kinds of an envelope have different thicknesses. Also, pull up the levers back to avoid envelopes coming out creased. Adjust the paper guides to check the print quality. • In a hot and humid ...
...with low printing quality. 59 DAC065 Loading Envelopes • Before printing on envelopes, make sure to lower the levers on envelopes may cause machine malfunctions. • Check there is no air in the envelopes before loading. • Load only one or two envelopes in advance to the paper size. Print ... edge going into the machine) by running a pencil or ruler across them. • Some kinds of an envelope have different thicknesses. Also, pull up the levers back to avoid envelopes coming out creased. Adjust the paper guides to check the print quality. • In a hot and humid ...
Operating Instructions
Page 62
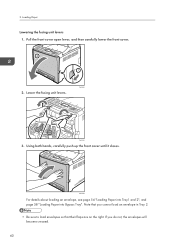
DAC340 3. DAC062 For details about loading an envelope, see page 54 "Loading Paper into Tray1 and 2", and page 58 "Loading Paper into Bypass Tray". Using both hands, carefully push up the front cover until it closes. Loading Paper Lowering the fusing unit levers 1. Pull the front cover open lever, and then carefully lower the front cover. 2 1 DAC061 2. Note that their flaps are on the right. If you cannot load an envelope in Tray 2. • Be sure to load envelopes so that you do not, the envelopes will become creased. 60 2. Lower the fusing unit levers.
DAC340 3. DAC062 For details about loading an envelope, see page 54 "Loading Paper into Tray1 and 2", and page 58 "Loading Paper into Bypass Tray". Using both hands, carefully push up the front cover until it closes. Loading Paper Lowering the fusing unit levers 1. Pull the front cover open lever, and then carefully lower the front cover. 2 1 DAC061 2. Note that their flaps are on the right. If you cannot load an envelope in Tray 2. • Be sure to load envelopes so that you do not, the envelopes will become creased. 60 2. Lower the fusing unit levers.
Operating Instructions
Page 67
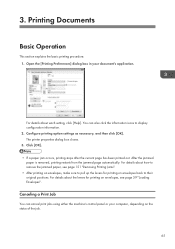
...jam occurs, printing stops after the current page has been printed out. For details about the levers for printing on envelopes, see page 151 "Removing Printing Jams". • After printing on envelopes, make sure to display configuration information. 2. Printing Documents Basic Operation This section explains the ...option settings as necessary, and then click [OK]. For details about how to remove the jammed paper, see page 59 "Loading Envelopes". You can cancel print jobs using either the machine's control panel or your document's application. Canceling a Print Job You can...
...jam occurs, printing stops after the current page has been printed out. For details about the levers for printing on envelopes, see page 151 "Removing Printing Jams". • After printing on envelopes, make sure to display configuration information. 2. Printing Documents Basic Operation This section explains the ...option settings as necessary, and then click [OK]. For details about how to remove the jammed paper, see page 59 "Loading Envelopes". You can cancel print jobs using either the machine's control panel or your document's application. Canceling a Print Job You can...
Operating Instructions
Page 169
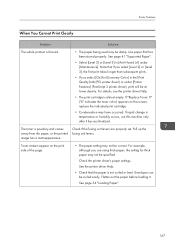
Check if the fusing unit levers are using thick paper, the setting for [Economy Color] in the [Print Quality] tab (PCL printer driver) or under [Maintenance]. Envelopes can be specified. Printer Problems When You Cannot Print Clearly Problem Solution The whole printout is not curled or ...• The print cartridge is powdery and comes away from the paper, or the printed image has a matt appearance. Pull up the fusing unit levers. Check the printer driver's paper settings. See page 41 "Supported Paper". • Select [Level 2] or [Level 3] in temperature or humidity ...
Check if the fusing unit levers are using thick paper, the setting for [Economy Color] in the [Print Quality] tab (PCL printer driver) or under [Maintenance]. Envelopes can be specified. Printer Problems When You Cannot Print Clearly Problem Solution The whole printout is not curled or ...• The print cartridge is powdery and comes away from the paper, or the printed image has a matt appearance. Pull up the fusing unit levers. Check the printer driver's paper settings. See page 41 "Supported Paper". • Select [Level 2] or [Level 3] in temperature or humidity ...
Operating Instructions
Page 173
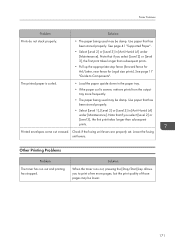
... takes longer than subsequent prints. Use paper that if you to Components". Lower the fusing unit levers. See page 17 "Guide to print a few more frequently. • The paper being used may be damp. Printed envelopes come out creased. Note that has been stored properly. • Select [Level 1], [Level 2] or [Level 3] in...
... takes longer than subsequent prints. Use paper that if you to Components". Lower the fusing unit levers. See page 17 "Guide to print a few more frequently. • The paper being used may be damp. Printed envelopes come out creased. Note that has been stored properly. • Select [Level 1], [Level 2] or [Level 3] in...
Operating Instructions
Page 175
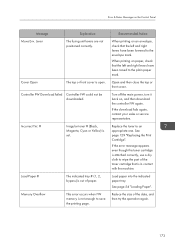
...service representative. Replace the toner to the plain paper mark. Controller FW Download failed Controller FW could not be downloaded. When printing on an envelope, check that is set. See page 129 "Replacing the Print Cartridge". If the error message appears even though the toner cartridge is attached ...correctly, use a dry cloth to wipe the part of the toner cartridge that the left and right levers have been lowered to save the printing page. Open and then close the top or front cover. Load paper into the indicated paper tray...
...service representative. Replace the toner to the plain paper mark. Controller FW Download failed Controller FW could not be downloaded. When printing on an envelope, check that is set. See page 129 "Replacing the Print Cartridge". If the error message appears even though the toner cartridge is attached ...correctly, use a dry cloth to wipe the part of the toner cartridge that the left and right levers have been lowered to save the printing page. Open and then close the top or front cover. Load paper into the indicated paper tray...


