
User Guide
Page 1
Adjustment Item Menu Guide: TCRU Model Name: Pro C900S/Pro C900 Read this manual carefully before using this machine and keep it handy for future reference. 1
Adjustment Item Menu Guide: TCRU Model Name: Pro C900S/Pro C900 Read this manual carefully before using this machine and keep it handy for future reference. 1
User Guide
Page 3
...of other foreign jurisdictions. GENERAL SAFETY INSTRUCTIONS Switches and Symbols Where symbols are registered trademarks of each symbol conforms with this manual might be slightly different from use of data, and to prevent damage to ensure safe operation and avoid minor injuries. ON...in some countries. Certain options might result from the machine. For details, please contact your local dealer. CONVENTIONS USED IN THIS MANUAL CAUTIONS, NOTES, ETC. The following headings provide important information that might not be responsible for Imaging, Inc. Patent and Trademark ...
...of other foreign jurisdictions. GENERAL SAFETY INSTRUCTIONS Switches and Symbols Where symbols are registered trademarks of each symbol conforms with this manual might be slightly different from use of data, and to prevent damage to ensure safe operation and avoid minor injuries. ON...in some countries. Certain options might result from the machine. For details, please contact your local dealer. CONVENTIONS USED IN THIS MANUAL CAUTIONS, NOTES, ETC. The following headings provide important information that might not be responsible for Imaging, Inc. Patent and Trademark ...
User Guide
Page 6
... CLEANING UNIT 22 4.1 REMOVING THE DRUM CLEANING UNIT 22 4.2 REINSTALLING THE DRUM CLEANING UNIT 25 5. BEFORE YOU BEGIN 6 2. Table of Contents CONVENTIONS USED IN THIS MANUAL 2 GENERAL SAFETY INSTRUCTIONS 2 1.
... CLEANING UNIT 22 4.1 REMOVING THE DRUM CLEANING UNIT 22 4.2 REINSTALLING THE DRUM CLEANING UNIT 25 5. BEFORE YOU BEGIN 6 2. Table of Contents CONVENTIONS USED IN THIS MANUAL 2 GENERAL SAFETY INSTRUCTIONS 2 1.
User Guide
Page 7
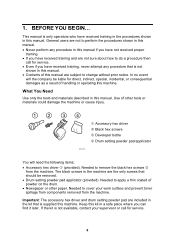
...8226; Newspaper or other tools or materials could damage the machine or cause injury. The black screws in this manual. • Contents of handling or operating this manual. Important: The accessory hex driver and drum setting powder pad are not sure about how to perform the procedures... shown in this machine. This manual is supplied this manual. • Never perform any procedure that is not available, contact your work surface and prevent toner spillage from components removed ...
...8226; Newspaper or other tools or materials could damage the machine or cause injury. The black screws in this manual. • Contents of handling or operating this manual. Important: The accessory hex driver and drum setting powder pad are not sure about how to perform the procedures... shown in this machine. This manual is supplied this manual. • Never perform any procedure that is not available, contact your work surface and prevent toner spillage from components removed ...

User Guide
Page 11
... will allow the fusing unit to cool down the printer controller. After turning off the operation switch, turn off . 3. The operation switch is in this manual, always do not use the machine for your machine. 2. Wait a few seconds, and then disconnect the ground leakage circuit breaker from the machine and fixing...
... will allow the fusing unit to cool down the printer controller. After turning off the operation switch, turn off . 3. The operation switch is in this manual, always do not use the machine for your machine. 2. Wait a few seconds, and then disconnect the ground leakage circuit breaker from the machine and fixing...
User Guide
Page 14
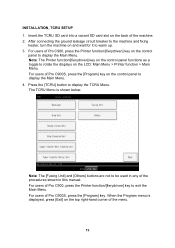
...corner of the procedures shown in this manual. Note: The [Fusing Unit] and [Others] buttons are not to display the TCRU Menu. Press the [TCRU] button to be used in any of the menu. 13 When the Program menu is shown below. For users of Pro C900S, press the [Program] key on ...the control panel to display the Main Menu. 4. For users of Pro C900, press the Printer function/[fierydriven] key on the control panel to display the Main Menu. INSTALLATION,...
...corner of the procedures shown in this manual. Note: The [Fusing Unit] and [Others] buttons are not to display the TCRU Menu. Press the [TCRU] button to be used in any of the menu. 13 When the Program menu is shown below. For users of Pro C900S, press the [Program] key on ...the control panel to display the Main Menu. 4. For users of Pro C900, press the Printer function/[fierydriven] key on the control panel to display the Main Menu. INSTALLATION,...
User Guide
Page 52
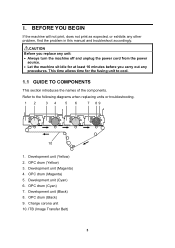
... (Black) 8. OPC drum (Cyan) 7. This time allows time for at least 10 minutes before you carry out any other problem, find the problem in this manual and troubleshoot accordingly. Development unit (Cyan) 6. ITB (Image Transfer Belt) 3
... (Black) 8. OPC drum (Cyan) 7. This time allows time for at least 10 minutes before you carry out any other problem, find the problem in this manual and troubleshoot accordingly. Development unit (Cyan) 6. ITB (Image Transfer Belt) 3
User Guide
Page 82
For your machine may include certain options as a result of handling or operating the machine. Keep this manual in , your safety and benefit, read this manual might be slightly different from the machine. • Certain options might not be liable for quick reference. For details,.... • Depending on the operation and use of this machine. Notes: • Some illustrations in this manual carefully before using the machine. Important • Contents of this manual are in a handy place for direct, indirect, special, incidental, or consequential damages as standard. In no...
For your machine may include certain options as a result of handling or operating the machine. Keep this manual in , your safety and benefit, read this manual might be slightly different from the machine. • Certain options might not be liable for quick reference. For details,.... • Depending on the operation and use of this machine. Notes: • Some illustrations in this manual carefully before using the machine. Important • Contents of this manual are in a handy place for direct, indirect, special, incidental, or consequential damages as standard. In no...

User Guide
Page 84
... errors. [ ]: indicates the names of keys that of the machine, the warm-up mechanism will start automatically. Keep hands away from internal components. SYMBOLS This manual uses the following symbols: RWARNING Indicates a potentially hazardous situation which , if instructions are not followed, could result in minor or moderate injury or damage to...
... errors. [ ]: indicates the names of keys that of the machine, the warm-up mechanism will start automatically. Keep hands away from internal components. SYMBOLS This manual uses the following symbols: RWARNING Indicates a potentially hazardous situation which , if instructions are not followed, could result in minor or moderate injury or damage to...
User Guide
Page 113
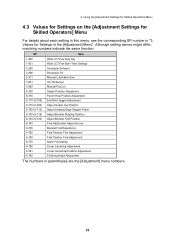
... 6-745 6-755 6-760 6-770 6-780 6-781 6-782 Wide LCT Fan Duty Adj Wide LCT Fan Start Time Settings Developer Exhaust Developer Fill Manual Lubrication Exe Init TD Sensor Manual ProCon Staple Position Adjustment Punch Hole Position Adjustment End Bind Jogger Adjustment Adjust Output Jog Position Adjust Leading Edge Stopper Press Adjust Booklet...
... 6-745 6-755 6-760 6-770 6-780 6-781 6-782 Wide LCT Fan Duty Adj Wide LCT Fan Start Time Settings Developer Exhaust Developer Fill Manual Lubrication Exe Init TD Sensor Manual ProCon Staple Position Adjustment Punch Hole Position Adjustment End Bind Jogger Adjustment Adjust Output Jog Position Adjust Leading Edge Stopper Press Adjust Booklet...


