
User Guide
Page 1
Adjustment Item Menu Guide: TCRU Model Name: Pro C900S/Pro C900 Read this manual carefully before using this machine and keep it handy for future reference. 1
Adjustment Item Menu Guide: TCRU Model Name: Pro C900S/Pro C900 Read this manual carefully before using this machine and keep it handy for future reference. 1
User Guide
Page 5
... be taken when removing misfed paper. • Keep the machine away from the wall outlet, always pull the plug (not the cable). • Do not allow paper clips, staples, or other small metallic objects to an open flame. 2. Consult a doctor if necessary. • If toner or used toner is not damaged under the machine. • When disconnecting the power plug from humidity...
... be taken when removing misfed paper. • Keep the machine away from the wall outlet, always pull the plug (not the cable). • Do not allow paper clips, staples, or other small metallic objects to an open flame. 2. Consult a doctor if necessary. • If toner or used toner is not damaged under the machine. • When disconnecting the power plug from humidity...
User Guide
Page 7
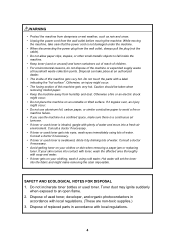
... where you can find it later. c Accessory hex driver d Black hex screws 3 Developer bottle 4 Drum setting powder pad applicator RPG017S You will the company be removed. • Drum setting powder pad applicator (provided). Needed to change without prior notice. Keep this kit in this manual. • Contents of handling or operating this manual. What You Need Use only the tools and materials described in the...
... where you can find it later. c Accessory hex driver d Black hex screws 3 Developer bottle 4 Drum setting powder pad applicator RPG017S You will the company be removed. • Drum setting powder pad applicator (provided). Needed to change without prior notice. Keep this kit in this manual. • Contents of handling or operating this manual. What You Need Use only the tools and materials described in the...

User Guide
Page 9
Enter key 6. Printer function/[fierydriven] 4. ./* key 5. On indicator 8. Number keys 56 8 CONTROL PANEL (Pro C900) 7 8 1 9 2 3 4 1. User Tools 2. Operation Switch 9. Clear key 7. Counter 3.
Enter key 6. Printer function/[fierydriven] 4. ./* key 5. On indicator 8. Number keys 56 8 CONTROL PANEL (Pro C900) 7 8 1 9 2 3 4 1. User Tools 2. Operation Switch 9. Clear key 7. Counter 3.

User Guide
Page 11
... 5. The operation switch is in this manual, always do not use the machine for your machine. 2. 2. Depending on the control panel. (See "CONTROL PANEL".) The main power switch is on the type of controller, the shutdown procedure may be slightly different. Wait a few seconds, and then disconnect the ground leakage circuit breaker from the machine and fixing heater. Press the operation switch to turn off and disconnecting the power cable and...
... 5. The operation switch is in this manual, always do not use the machine for your machine. 2. 2. Depending on the control panel. (See "CONTROL PANEL".) The main power switch is on the type of controller, the shutdown procedure may be slightly different. Wait a few seconds, and then disconnect the ground leakage circuit breaker from the machine and fixing heater. Press the operation switch to turn off and disconnecting the power cable and...
User Guide
Page 14
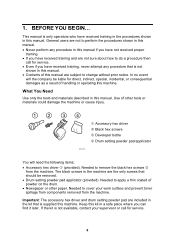
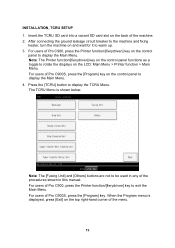
...] buttons are not to be used in any of the machine. 2. Insert the TCRU SD card into a vacant SD card slot on the control panel functions as a toggle to display the TCRU Menu. For users of Pro C900S, press the [Program] key. For users of Pro C900, press the Printer function/[fierydriven] key to display the Main Menu. When the Program menu is shown below. INSTALLATION, TCRU SETUP 1. Note: The Printer function...
...] buttons are not to be used in any of the machine. 2. Insert the TCRU SD card into a vacant SD card slot on the control panel functions as a toggle to display the TCRU Menu. For users of Pro C900S, press the [Program] key. For users of Pro C900, press the Printer function/[fierydriven] key to display the Main Menu. When the Program menu is shown below. INSTALLATION, TCRU SETUP 1. Note: The Printer function...
User Guide
Page 18
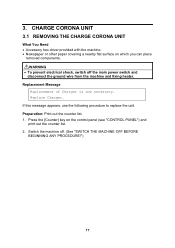
Replacement Message Replacement of Charger is now necessary. If this message appears, use the following procedure to replace the unit. Switch the machine off the main power switch and disconnect the ground wire from the machine and fixing heater. 3. Replace Charger. Press the [Counter] key on which you can place removed components. Preparation: Print out the counter list. 1. RWARNING • To prevent electrical shock, switch off . (See "SWITCH THE MACHINE OFF BEFORE BEGINNING...
Replacement Message Replacement of Charger is now necessary. If this message appears, use the following procedure to replace the unit. Switch the machine off the main power switch and disconnect the ground wire from the machine and fixing heater. 3. Replace Charger. Press the [Counter] key on which you can place removed components. Preparation: Print out the counter list. 1. RWARNING • To prevent electrical shock, switch off . (See "SWITCH THE MACHINE OFF BEFORE BEGINNING...
User Guide
Page 23
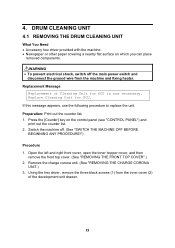
... 1. Replace Cleaning Unit for PCU is now necessary. DRUM CLEANING UNIT 4.1 REMOVING THE DRUM CLEANING UNIT What You Need • Accessory hex driver provided with the machine. • Newspaper or other paper covering a nearby flat surface on the control panel (see "CONTROL PANEL") and print out the counter list. 2. Preparation: Print out the counter list. 1. Remove the charge corona unit. (See "REMOVING THE CHARGE CORONA UNIT.) 3. If this message appears, use the following procedure to replace the unit. Switch the machine off the main power switch and...
... 1. Replace Cleaning Unit for PCU is now necessary. DRUM CLEANING UNIT 4.1 REMOVING THE DRUM CLEANING UNIT What You Need • Accessory hex driver provided with the machine. • Newspaper or other paper covering a nearby flat surface on the control panel (see "CONTROL PANEL") and print out the counter list. 2. Preparation: Print out the counter list. 1. Remove the charge corona unit. (See "REMOVING THE CHARGE CORONA UNIT.) 3. If this message appears, use the following procedure to replace the unit. Switch the machine off the main power switch and...
User Guide
Page 29
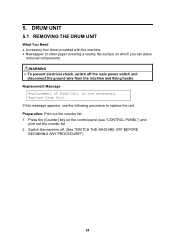
... machine off the main power switch and disconnect the ground wire from the machine and fixing heater. DRUM UNIT 5.1 REMOVING THE DRUM UNIT What You Need • Accessory hex driver provided with the machine. • Newspaper or other paper covering a nearby flat surface on the control panel (see "CONTROL PANEL") and print out the counter list. 2. Replacement Message Replacement of Drum Unit is now necessary. Press the [Counter] key on which you can place removed components. Replace Drum Unit. 5. If this message appears, use...
... machine off the main power switch and disconnect the ground wire from the machine and fixing heater. DRUM UNIT 5.1 REMOVING THE DRUM UNIT What You Need • Accessory hex driver provided with the machine. • Newspaper or other paper covering a nearby flat surface on the control panel (see "CONTROL PANEL") and print out the counter list. 2. Replacement Message Replacement of Drum Unit is now necessary. Press the [Counter] key on which you can place removed components. Replace Drum Unit. 5. If this message appears, use...

User Guide
Page 42
... main power switch and disconnect the ground wire from the machine and fixing heater. 7. RWARNING • To prevent electrical shock, switch off . (See "SWITCH THE MACHINE OFF BEFORE BEGINNING ANY PROCEDURE!") 41 Belt Cleaning Unit. IMAGE TRANSFER BELT CLEANING UNIT 7.1 REMOVING THE IMAGE TRANSFER BELT CLEANING UNIT What You Need • Accessory hex driver provided with machine. • Newspaper or other paper covering a nearby flat surface on the control panel (see "CONTROL PANEL") and print out the counter list. 2. Replace Intermed...
... main power switch and disconnect the ground wire from the machine and fixing heater. 7. RWARNING • To prevent electrical shock, switch off . (See "SWITCH THE MACHINE OFF BEFORE BEGINNING ANY PROCEDURE!") 41 Belt Cleaning Unit. IMAGE TRANSFER BELT CLEANING UNIT 7.1 REMOVING THE IMAGE TRANSFER BELT CLEANING UNIT What You Need • Accessory hex driver provided with machine. • Newspaper or other paper covering a nearby flat surface on the control panel (see "CONTROL PANEL") and print out the counter list. 2. Replace Intermed...
User Guide
Page 43
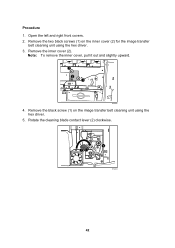
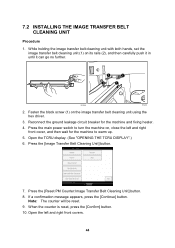
Remove the black screw (1) on the inner cover (2) for the image transfer belt cleaning unit using the hex driver. 5. Open the left and right front covers. 2. Remove the inner cover (2). Note: To remove the inner cover, pull it out and slightly upward. 1 2 1 RPG044 4. Remove the two black screws (1) on the image transfer belt cleaning unit using the hex driver. 3. Rotate the cleaning blade contact lever (2) clockwise. 1 2 RPG038 42 Procedure 1.
Remove the black screw (1) on the inner cover (2) for the image transfer belt cleaning unit using the hex driver. 5. Open the left and right front covers. 2. Remove the inner cover (2). Note: To remove the inner cover, pull it out and slightly upward. 1 2 1 RPG044 4. Remove the two black screws (1) on the image transfer belt cleaning unit using the hex driver. 3. Rotate the cleaning blade contact lever (2) clockwise. 1 2 RPG038 42 Procedure 1.
User Guide
Page 45
... covers. 44 Press the [Reset PM Counter:Image Transfer Belt Cleaning Unit] button. 8. When the counter is reset, press the [Confirm] button. 10. Press the main power switch to warm up. 5. Open the left and right front cover, and then wait for the machine and fixing heater. 4. 7.2 INSTALLING THE IMAGE TRANSFER BELT CLEANING UNIT Procedure 1. While holding the image transfer belt cleaning unit with both hands, set the image transfer belt cleaning unit (1) on the image transfer belt cleaning unit using the hex driver. 3. Press the [Image Transfer Belt Cleaning Unit] button...
... covers. 44 Press the [Reset PM Counter:Image Transfer Belt Cleaning Unit] button. 8. When the counter is reset, press the [Confirm] button. 10. Press the main power switch to warm up. 5. Open the left and right front cover, and then wait for the machine and fixing heater. 4. 7.2 INSTALLING THE IMAGE TRANSFER BELT CLEANING UNIT Procedure 1. While holding the image transfer belt cleaning unit with both hands, set the image transfer belt cleaning unit (1) on the image transfer belt cleaning unit using the hex driver. 3. Press the [Image Transfer Belt Cleaning Unit] button...
User Guide
Page 49
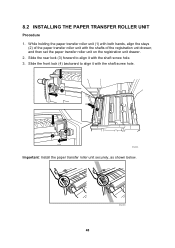
While holding the paper transfer roller unit (1) with both hands, align the stays (2) of the registration unit drawer, and then set the paper transfer roller unit on the registration unit drawer. 2. Slide the front lock (4) backward to align it with the shafts of the paper transfer roller unit with the shaft screw hole. 3 2 1 4 2 RPG066S Important: Install the paper transfer roller unit securely, as shown below. 48 RPG005S 8.2 INSTALLING THE PAPER TRANSFER ROLLER UNIT Procedure 1. Slide the rear lock (3) forward to align it with the shaft screw hole. 3.
While holding the paper transfer roller unit (1) with both hands, align the stays (2) of the registration unit drawer, and then set the paper transfer roller unit on the registration unit drawer. 2. Slide the front lock (4) backward to align it with the shafts of the paper transfer roller unit with the shaft screw hole. 3 2 1 4 2 RPG066S Important: Install the paper transfer roller unit securely, as shown below. 48 RPG005S 8.2 INSTALLING THE PAPER TRANSFER ROLLER UNIT Procedure 1. Slide the rear lock (3) forward to align it with the shaft screw hole. 3.
User Guide
Page 51
... 3 1.1 GUIDE TO COMPONENTS 3 1.2 ADJUSTMENT: USING THE TCRU SD CARD 4 2. TROUBLESHOOTING SERVICE CALL PROBLEMS (SC CODES) ..5 2.1 WHAT ARE SC CODES 5 2.2 SC CODE LIST 5 3. TROUBLESHOOTING PAPER DELIVERY PROBLEMS 29 2 TROUBLESHOOTING IMAGE QUALITY PROBLEMS 7 3.1 IMAGE QUALITY PROBLEMS 7 3.1.1 PROBLEM 1: WHITE SPOTS 7 3.1.2 PROBLEM 2: SHARP SPOTS 9 3.1.3 PROBLEM 3: VERTICAL STRIPES 11 3.1.4 PROBLEM 4: DENSITY TOO LOW 13 3.1.5 PROBLEM 5: DENSITY TOO HIGH 15 3.1.6 PROBLEM 6: DIRTY BACKGROUND 17 3.1.7 PROBLEM 7: PATCHY 19 3.1.8 PROBLEM 8: STREAKS (1 21 3.1.9 PROBLEM 9: STREAKS...
... 3 1.1 GUIDE TO COMPONENTS 3 1.2 ADJUSTMENT: USING THE TCRU SD CARD 4 2. TROUBLESHOOTING SERVICE CALL PROBLEMS (SC CODES) ..5 2.1 WHAT ARE SC CODES 5 2.2 SC CODE LIST 5 3. TROUBLESHOOTING PAPER DELIVERY PROBLEMS 29 2 TROUBLESHOOTING IMAGE QUALITY PROBLEMS 7 3.1 IMAGE QUALITY PROBLEMS 7 3.1.1 PROBLEM 1: WHITE SPOTS 7 3.1.2 PROBLEM 2: SHARP SPOTS 9 3.1.3 PROBLEM 3: VERTICAL STRIPES 11 3.1.4 PROBLEM 4: DENSITY TOO LOW 13 3.1.5 PROBLEM 5: DENSITY TOO HIGH 15 3.1.6 PROBLEM 6: DIRTY BACKGROUND 17 3.1.7 PROBLEM 7: PATCHY 19 3.1.8 PROBLEM 8: STREAKS (1 21 3.1.9 PROBLEM 9: STREAKS...
User Guide
Page 53
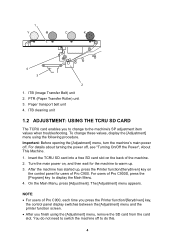
... card enables you finish using the following procedure. The [Adjustment] menu appears. PTR (Paper Transfer Roller) unit 3. On the Main Manu, press [Adjustment]. NOTE: • For users of Pro C900. You do this. 4 Turn the main power on, and then wait for users of Pro C900, each time you press the Printer function/[fierydriven] key, the control panel display switches between the [Adjustment] menu and the printer function screen. • After you to change these values, display the [Adjustment] menu using the [Adjustment] menu, remove...
... card enables you finish using the following procedure. The [Adjustment] menu appears. PTR (Paper Transfer Roller) unit 3. On the Main Manu, press [Adjustment]. NOTE: • For users of Pro C900. You do this. 4 Turn the main power on, and then wait for users of Pro C900, each time you press the Printer function/[fierydriven] key, the control panel display switches between the [Adjustment] menu and the printer function screen. • After you to change these values, display the [Adjustment] menu using the [Adjustment] menu, remove...
User Guide
Page 54
... unit, call for service. Replace the black charge corona unit. 2. Turn off and on again. Check for service. 2.2 SC CODE LIST This table contains a list of the machine under the hinged plastic cover. 3. If an error occurs during operation, the machine displays an SC code ("SCnnn" , where "nnn" is listed in this table, call for the SC code in the following table (see 2.2 SC CODE LIST), call for service. The machine stops and cannot be used...
... unit, call for service. Replace the black charge corona unit. 2. Turn off and on again. Check for service. 2.2 SC CODE LIST This table contains a list of the machine under the hinged plastic cover. 3. If an error occurs during operation, the machine displays an SC code ("SCnnn" , where "nnn" is listed in this table, call for the SC code in the following table (see 2.2 SC CODE LIST), call for service. The machine stops and cannot be used...
User Guide
Page 72
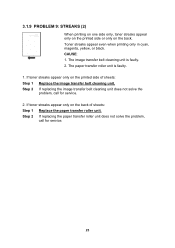
... appear only on the printed side of sheets: Step 1 Replace the paper transfer roller unit. The paper transfer roller unit is faulty. 2. Step 2 If replacing the paper transfer roller unit does not solve the problem, call for service. 23 CAUSE: 1. If toner streaks appear only on the back of sheets: Step 1 Replace the image transfer belt cleaning unit. 3.1.9 PROBLEM 9: STREAKS (2) When printing on one side only, toner streaks appear only on the printed side or only on the back. Toner streaks appear even...
... appear only on the printed side of sheets: Step 1 Replace the paper transfer roller unit. The paper transfer roller unit is faulty. 2. Step 2 If replacing the paper transfer roller unit does not solve the problem, call for service. 23 CAUSE: 1. If toner streaks appear only on the back of sheets: Step 1 Replace the image transfer belt cleaning unit. 3.1.9 PROBLEM 9: STREAKS (2) When printing on one side only, toner streaks appear only on the printed side or only on the back. Toner streaks appear even...
User Guide
Page 77
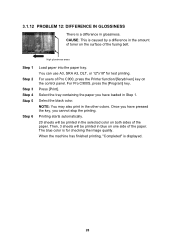
... printing. For Pro C900S, press the [Program] key. Then, 3 sheets will be printed in Step 1. When the machine has finished printing, "Completed" is for test printing. The blue color is displayed. 28 High glossiness areas Step 1 Step 2 Step 3 Step 4 Step 5 Step 6 Load paper into the paper tray. Press [Print]. NOTE: You may also print in glossiness. You can use A3, SRA A3, DLT, or 12"x18" for checking the image...
... printing. For Pro C900S, press the [Program] key. Then, 3 sheets will be printed in Step 1. When the machine has finished printing, "Completed" is for test printing. The blue color is displayed. 28 High glossiness areas Step 1 Step 2 Step 3 Step 4 Step 5 Step 6 Load paper into the paper tray. Press [Print]. NOTE: You may also print in glossiness. You can use A3, SRA A3, DLT, or 12"x18" for checking the image...
User Guide
Page 78
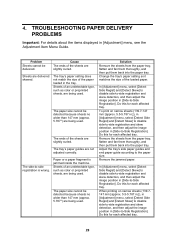
... used . To print on narrow sheets (139.7147 mm [approx. 5.5-5.787 in.]), in [Adjustment] menu, select [Detect Side Regist] and [Detect Skew] to disable side-to-side registration and skew detection, and then adjust the image position in [Side-to -Side Registration]. Change the tray's paper setting so it matches the size of the paper loaded in [Adjustment] menu, see the Adjustment Item Menu Guide. TROUBLESHOOTING PAPER DELIVERY PROBLEMS Important: For details about the items displayed in the tray. The tray's paper setting...
... used . To print on narrow sheets (139.7147 mm [approx. 5.5-5.787 in.]), in [Adjustment] menu, select [Detect Side Regist] and [Detect Skew] to disable side-to-side registration and skew detection, and then adjust the image position in [Side-to -Side Registration]. Change the tray's paper setting so it matches the size of the paper loaded in [Adjustment] menu, see the Adjustment Item Menu Guide. TROUBLESHOOTING PAPER DELIVERY PROBLEMS Important: For details about the items displayed in the tray. The tray's paper setting...
User Guide
Page 90
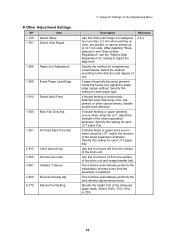
... LCT paper tray. If double feeding is replaced. If double feeding or paper jamming occurs when using the LCT, adjust the duration of the delivered paper stack. Select 100%, 75%, 50%, or 25%. 10 Select the method according to remove dirt from the surface of the drum unit. Specify this to the direction and degree of the sheet separation airstream. The machine automatically performs the print density adjustment process. u Other Adjustment Settings...
... LCT paper tray. If double feeding is replaced. If double feeding or paper jamming occurs when using the LCT, adjust the duration of the delivered paper stack. Select 100%, 75%, 50%, or 25%. 10 Select the method according to remove dirt from the surface of the drum unit. Specify this to the direction and degree of the sheet separation airstream. The machine automatically performs the print density adjustment process. u Other Adjustment Settings...


