User Guide
Page 2
... 1...31 Loading Paper Larger than A4/Letter (Tray1) ...33 Loading Paper into Bypass Tray (optional) ...36 Replacing Consumables Replacing a Print Cartridge ...38 Checking the Remaining Ink ...38 Replacing a Print Cartridge ...40 Handling Print Cartridges...42 Making Printer Settings Making Printer Settings Using the Control Panel ...45 Paper Input Menu...47 Changing...
... 1...31 Loading Paper Larger than A4/Letter (Tray1) ...33 Loading Paper into Bypass Tray (optional) ...36 Replacing Consumables Replacing a Print Cartridge ...38 Checking the Remaining Ink ...38 Replacing a Print Cartridge ...40 Handling Print Cartridges...42 Making Printer Settings Making Printer Settings Using the Control Panel ...45 Paper Input Menu...47 Changing...
User Guide
Page 4
... Not Detected...112 Cover Open / Print Cartridge(s) Not Detected ...113 Cartridge End ...115 Cartridge/Print-head Tank Empty...116 When the Ink Collector Unit is Almost Full/Full...117 Ink Collector Unit Not Detected ...117 Out of Printable Temperature Range...118 Printer Error...118 Network Interface Board Error ...119 Adjusting the Printer...
... Not Detected...112 Cover Open / Print Cartridge(s) Not Detected ...113 Cartridge End ...115 Cartridge/Print-head Tank Empty...116 When the Ink Collector Unit is Almost Full/Full...117 Ink Collector Unit Not Detected ...117 Out of Printable Temperature Range...118 Printer Error...118 Network Interface Board Error ...119 Adjusting the Printer...
User Guide
Page 6
Opening from an Application...157 Printing Printing on Various Paper Types ...160 Printing on Plain Paper ...160 Printing on Inkjet Plain Paper...160 Printing on Inkjet Transparency ...161 Printing on Glossy Paper ...163 Printing on Envelopes ...166 Printing on Thick Paper...168 Canceling Printing ...... Taskbar...171 Adjusting Print Quality...172 Printing Using Preset Print Quality Settings ...172 Printing in Black and White ...172 Saving Colour Ink When Printing...173 Printing with Print Quality Settings You Want...173 Changing Image Printing Method...173 Correcting the Hue of Digital Photos......
Opening from an Application...157 Printing Printing on Various Paper Types ...160 Printing on Plain Paper ...160 Printing on Inkjet Plain Paper...160 Printing on Inkjet Transparency ...161 Printing on Glossy Paper ...163 Printing on Envelopes ...166 Printing on Thick Paper...168 Canceling Printing ...... Taskbar...171 Adjusting Print Quality...172 Printing Using Preset Print Quality Settings ...172 Printing in Black and White ...172 Saving Colour Ink When Printing...173 Printing with Print Quality Settings You Want...173 Changing Image Printing Method...173 Correcting the Hue of Digital Photos......
User Guide
Page 24
...z Envelopes For details about the types of paper. z Inkjet plain paper This extra-white plain paper makes the printed colours appear more vivid. Film for the pigmented inks used because it does not absorb ink. z Inkjet transparency Transparency film for equipment such as overhead projectors is ...designed for dye inks is not recommended because the machine's pigmented inks may not take properly to it or may...
...z Envelopes For details about the types of paper. z Inkjet plain paper This extra-white plain paper makes the printed colours appear more vivid. Film for the pigmented inks used because it does not absorb ink. z Inkjet transparency Transparency film for equipment such as overhead projectors is ...designed for dye inks is not recommended because the machine's pigmented inks may not take properly to it or may...
User Guide
Page 28
...to stack prints soon after opening the package. z Handle sheets by orientating the sheet vertically, so that sheets are printed, we recommend plain or inkjet plain paper. z Store unused paper in direct sunlight. z After printing, some types of paper take longer than 157 g/m2 (297.6 lb.). ... mm(4.2 × 5.9 inches)) paper that sheets are loaded, the leading edge of transparencies may smear or rub off. With duplex printing, the ink may get scratched. Using the printer driver, specify how long to print on it. For details, see the instructions supplied with them. z In ...
...to stack prints soon after opening the package. z Handle sheets by orientating the sheet vertically, so that sheets are printed, we recommend plain or inkjet plain paper. z Store unused paper in direct sunlight. z After printing, some types of paper take longer than 157 g/m2 (297.6 lb.). ... mm(4.2 × 5.9 inches)) paper that sheets are loaded, the leading edge of transparencies may smear or rub off. With duplex printing, the ink may get scratched. Using the printer driver, specify how long to print on it. For details, see the instructions supplied with them. z In ...
User Guide
Page 29
Paper z Only one-sided printing is compatible. z Ink takes time to dry. ually, as they come out. z When using these sheets, see the instructions supplied with them from the output tray individ- z You ... rear position . Thick paper z Use tray 1 to stack prints soon after opening the package. z The ink may smudge. z Remove sheets from sticking together, remove them . otherwise, the ink may smear depending on the paper type, the ink may take a while to dry. z If you want to load paper lighter than 157 g/m2 (297...
Paper z Only one-sided printing is compatible. z Ink takes time to dry. ually, as they come out. z When using these sheets, see the instructions supplied with them from the output tray individ- z You ... rear position . Thick paper z Use tray 1 to stack prints soon after opening the package. z The ink may smudge. z Remove sheets from sticking together, remove them . otherwise, the ink may smear depending on the paper type, the ink may take a while to dry. z If you want to load paper lighter than 157 g/m2 (297...

User Guide
Page 37
Replacing Consumables Replacing Consumables Replacing a Print Cartridge ...38 Checking the Remaining Ink ...38 Replacing a Print Cartridge ...40 Handling Print Cartridges...42 J0106605_1.01 Copyright © 2005, 2006 All rights reserved. 37
Replacing Consumables Replacing Consumables Replacing a Print Cartridge ...38 Checking the Remaining Ink ...38 Replacing a Print Cartridge ...40 Handling Print Cartridges...42 J0106605_1.01 Copyright © 2005, 2006 All rights reserved. 37

User Guide
Page 38
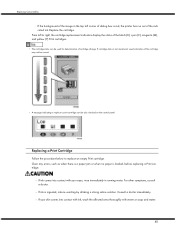
... Status monitor dialog box appears. 38 Replacing Consumables Replacing a Print Cartridge Follow the procedure below to check when to replace a Print cartridge. Checking the Remaining Ink Follow the procedure below to replace Print cartridges using the Status monitor or the cartridge replacement indicators.
... Status monitor dialog box appears. 38 Replacing Consumables Replacing a Print Cartridge Follow the procedure below to check when to replace a Print cartridge. Checking the Remaining Ink Follow the procedure below to replace Print cartridges using the Status monitor or the cartridge replacement indicators.
User Guide
Page 39
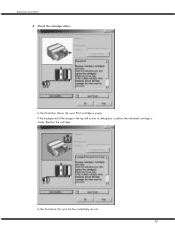
Replacing Consumables 4. Replace the cartridge. Check the cartridge status. If the background of the image in the top left corner of dialog box is yellow, the indicated cartridge is empty. In this illustration, the cyan ink has completely run out. 39 In the illustration above, the cyan Print cartridge is empty.
Replacing Consumables 4. Replace the cartridge. Check the cartridge status. If the background of the image in the top left corner of dialog box is yellow, the indicated cartridge is empty. In this illustration, the cyan ink has completely run out. 39 In the illustration above, the cyan Print cartridge is empty.
User Guide
Page 40
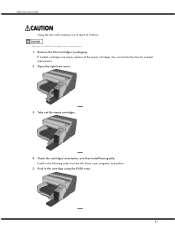
... when there is a paper jam or when no paper is ingested, induce vomiting by drinking a strong saline solution. z If ink comes into contact with ink, wash the affected area thoroughly with your skin comes into contact with water or soap and water. 40 Replacing Consumables If the background... of the image in running water. If cartridge status is not monitored, visual indication of the indicated ink. z If your eyes, rinse immediately in the top left to right, the cartridge replacement indicators display the status of cartridge change. z ...
... when there is a paper jam or when no paper is ingested, induce vomiting by drinking a strong saline solution. z If ink comes into contact with ink, wash the affected area thoroughly with your skin comes into contact with water or soap and water. 40 Replacing Consumables If the background... of the image in running water. If cartridge status is not monitored, visual indication of the indicated ink. z If your eyes, rinse immediately in the top left to right, the cartridge replacement indicators display the status of cartridge change. z ...
User Guide
Page 41
Replacing Consumables z Keep the ink or ink container out of reach of children. If multiple cartridges are empty, replace all the empty cartridges. Check the cartridges' orientation, and then install them gently. Push in the following order from the left: black, cyan, magenta, and yellow. 5. You can shorten the time for needed replacement. 2. Take out the empty cartridges. 4. Open the right front cover. 3. Install in the cartridge using the PUSH area. 41 z Take care to install the cartridges in the correct position. 1. Remove the Print cartridges' packaging.
Replacing Consumables z Keep the ink or ink container out of reach of children. If multiple cartridges are empty, replace all the empty cartridges. Check the cartridges' orientation, and then install them gently. Push in the following order from the left: black, cyan, magenta, and yellow. 5. You can shorten the time for needed replacement. 2. Take out the empty cartridges. 4. Open the right front cover. 3. Install in the cartridge using the PUSH area. 41 z Take care to install the cartridges in the correct position. 1. Remove the Print cartridges' packaging.
User Guide
Page 42
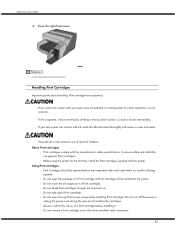
...until the cartridge will be opened before installing it has been installed unless necessary. 42 Close the right front cover. z If ink is ingested, induce vomiting by drinking a strong saline solution. z If your eyes, rinse immediately in the printer. About ...Print cartridges z Print cartridges comply with your skin comes into contact with the manufacturer's safety specifications. Ink may leak out. z p.123 "Recommended Consumables" Handling Print Cartridges Important points about handling Print cartridges are explained. z Do not shake...
...until the cartridge will be opened before installing it has been installed unless necessary. 42 Close the right front cover. z If ink is ingested, induce vomiting by drinking a strong saline solution. z If your eyes, rinse immediately in the printer. About ...Print cartridges z Print cartridges comply with your skin comes into contact with the manufacturer's safety specifications. Ink may leak out. z p.123 "Recommended Consumables" Handling Print Cartridges Important points about handling Print cartridges are explained. z Do not shake...
User Guide
Page 43
z Black and white printing also consumes colour ink. Ink consumption z In addition to printing, ink is consumed when the power is turned on the cartridge size. 43 z Printing stops if one of ink consumed during cleaning depends on , head cleaning is being performed. z The amount of the print... cartridges becomes empty. Printing will stop. If a cartridge containing a colour ink such as cyan, yellow, or magenta becomes empty, you cannot print, even in hot or freezing places. Storing Print cartridges z Avoid storing ...
z Black and white printing also consumes colour ink. Ink consumption z In addition to printing, ink is consumed when the power is turned on the cartridge size. 43 z Printing stops if one of ink consumed during cleaning depends on , head cleaning is being performed. z The amount of the print... cartridges becomes empty. Printing will stop. If a cartridge containing a colour ink such as cyan, yellow, or magenta becomes empty, you cannot print, even in hot or freezing places. Storing Print cartridges z Avoid storing ...
User Guide
Page 46
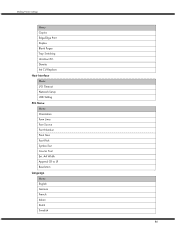
Making Printer Settings Menu Copies Edge-Edge Print Duplex Blank Pages Tray Switching Uni-direct.Prt. Density Ink CU Replace Host Interface Menu I/O Timeout Network Setup USB Setting PCL Menu Menu Orientation Form Lines Font Source Font Number Point Size Font Pitch Symbol Set Courier Font Ext. A4 Width Append CR to LF Resolution Language Menu English German French Italian Dutch Swedish 46
Making Printer Settings Menu Copies Edge-Edge Print Duplex Blank Pages Tray Switching Uni-direct.Prt. Density Ink CU Replace Host Interface Menu I/O Timeout Network Setup USB Setting PCL Menu Menu Orientation Form Lines Font Source Font Number Point Size Font Pitch Symbol Set Courier Font Ext. A4 Width Append CR to LF Resolution Language Menu English German French Italian Dutch Swedish 46
User Guide
Page 49
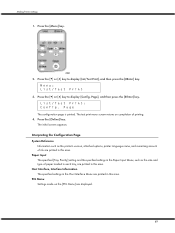
... as the printer's version, attached options, printer language name, and remaining amount of printing. 4. The initial screen appears. PCL Menu Settings made on completion of ink are printed in this area. Making Printer Settings 1. Paper Input The specified [Tray Priority] setting and the specified settings in this area. Page], and then...
... as the printer's version, attached options, printer language name, and remaining amount of printing. 4. The initial screen appears. PCL Menu Settings made on completion of ink are printed in this area. Making Printer Settings 1. Paper Input The specified [Tray Priority] setting and the specified settings in this area. Page], and then...
User Guide
Page 50
...the paper feed setting. Head Position If bidirectionally printed lines are vertically misaligned, or if printed images are printed faintly. Head cleaning consumes ink. Head-flushing You can print a test pattern to dry. Key Repeat You can eject a sheet of duplex-printed copies, select a..., print the test pattern and adjust the print head alignment. Dry-delay(OHP) To prevent inkjet-printed transparencies sticking together, select a print delivery interval to allow an inkjet-printed transparency to dry. De-condensation To remove moisture from inside the machine, you can enable...
...the paper feed setting. Head Position If bidirectionally printed lines are vertically misaligned, or if printed images are printed faintly. Head cleaning consumes ink. Head-flushing You can print a test pattern to dry. Key Repeat You can eject a sheet of duplex-printed copies, select a..., print the test pattern and adjust the print head alignment. Dry-delay(OHP) To prevent inkjet-printed transparencies sticking together, select a print delivery interval to allow an inkjet-printed transparency to dry. De-condensation To remove moisture from inside the machine, you can enable...

User Guide
Page 52
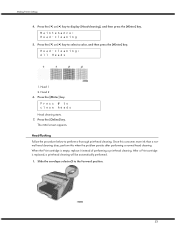
Head cleaning consumes ink. Press the [Menu] key. 3. When the Print cartridge is replaced, a print-head cleaning will be printed or print images are clogged Head-clearning Follow the ... it instead of performing a print-head cleaning. Slide the envelope selector to display [Maintenance], and then press the [#Enter] key. Perform a head cleaning when a particular color cannot be automatically performed. 1. Menu: Maintenance 52 Making Printer Settings When print-heads are blurred.
Head cleaning consumes ink. Press the [Menu] key. 3. When the Print cartridge is replaced, a print-head cleaning will be printed or print images are clogged Head-clearning Follow the ... it instead of performing a print-head cleaning. Slide the envelope selector to display [Maintenance], and then press the [#Enter] key. Perform a head cleaning when a particular color cannot be automatically performed. 1. Menu: Maintenance 52 Making Printer Settings When print-heads are blurred.
User Guide
Page 53
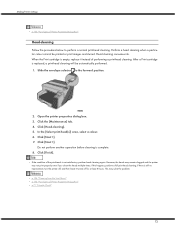
..., a print-head cleaning will be automatically performed. 1. Press the [ ] or [ ] key to clean heads Head cleaning starts. 7. The initial screen appears. Since this consumes more ink than a normal head cleaning does, perform this when the problem persists after performing a normal head cleaning. Slide the envelope selector to perform a thorough print-head... cleaning. Head 1 2. Head-flushing Follow the procedure below to the forward position. 53 Press the [#Enter] key. Press the [ ] or [ ] key to select a color, and then press the [#Enter] key.
..., a print-head cleaning will be automatically performed. 1. Press the [ ] or [ ] key to clean heads Head cleaning starts. 7. The initial screen appears. Since this consumes more ink than a normal head cleaning does, perform this when the problem persists after performing a normal head cleaning. Slide the envelope selector to perform a thorough print-head... cleaning. Head 1 2. Head-flushing Follow the procedure below to the forward position. 53 Press the [#Enter] key. Press the [ ] or [ ] key to select a color, and then press the [#Enter] key.
User Guide
Page 64
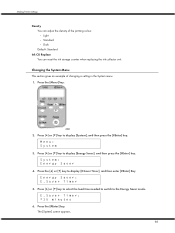
... 4. Press the [ ] or [ ] key to the Energy Saver mode. The [System] screen appears. 64 z Light z Standard z Dark Default: Standard Ink CU Replace You can adjust the density of changing a setting in the System menu. 1. Press the [#Enter] key. Press the [Menu] key. 2. Press...5. Changing the System Menu This section gives an example of the printing colour. Menu: System 3. Making Printer Settings Density You can reset the ink storage counter when replacing the ink collector unit. E.Saver Timer: *15 minutes 6. Press [ ] or [ ] key to display [Energy Saver], and then press the [#...
... 4. Press the [ ] or [ ] key to the Energy Saver mode. The [System] screen appears. 64 z Light z Standard z Dark Default: Standard Ink CU Replace You can adjust the density of changing a setting in the System menu. 1. Press the [#Enter] key. Press the [Menu] key. 2. Press...5. Changing the System Menu This section gives an example of the printing colour. Menu: System 3. Making Printer Settings Density You can reset the ink storage counter when replacing the ink collector unit. E.Saver Timer: *15 minutes 6. Press [ ] or [ ] key to display [Energy Saver], and then press the [#...
User Guide
Page 72
..., a print-head cleaning will be printed or print images are blurred. Click [Head-cleaning]. 5. If this happens, perform a full print head cleaning. Head cleaning consumes ink. After a Print cartridge is complete. 8. When the Print cartridge is empty, replace it turned off for at least 8 hours. Slide the envelope selector to perform...
..., a print-head cleaning will be printed or print images are blurred. Click [Head-cleaning]. 5. If this happens, perform a full print head cleaning. Head cleaning consumes ink. After a Print cartridge is complete. 8. When the Print cartridge is empty, replace it turned off for at least 8 hours. Slide the envelope selector to perform...


