User Guide
Page 2
... Area...30 Loading Paper ...31 Loading Paper into Tray 1...31 Loading Paper Larger than A4/Letter (Tray1) ...33 Loading Paper into Bypass Tray (optional) ...36 Replacing Consumables Replacing a Print Cartridge ...38 Checking the Remaining Ink ...38 Replacing a Print Cartridge ...40 Handling Print Cartridges...42 Making Printer Settings Making Printer Settings Using the Control Panel ...45 Paper Input Menu...47 Changing the Paper Input Menu ...47 List/Test Print Menu ...48 Printing a Configuration Page ...48 Interpreting the Configuration Page ...49 Maintenance Menu ...50 Nozzle Check...51 Head...
... Area...30 Loading Paper ...31 Loading Paper into Tray 1...31 Loading Paper Larger than A4/Letter (Tray1) ...33 Loading Paper into Bypass Tray (optional) ...36 Replacing Consumables Replacing a Print Cartridge ...38 Checking the Remaining Ink ...38 Replacing a Print Cartridge ...40 Handling Print Cartridges...42 Making Printer Settings Making Printer Settings Using the Control Panel ...45 Paper Input Menu...47 Changing the Paper Input Menu ...47 List/Test Print Menu ...48 Printing a Configuration Page ...48 Interpreting the Configuration Page ...49 Maintenance Menu ...50 Nozzle Check...51 Head...
User Guide
Page 5
... the Windows Network Printer ...147 Installing the PCL or RPCS Raster Printer Driver ...147 Using as the NetWare Print Server/Remote Printer ...149 Form Feed...150 Banner Page ...150 Printing after Resetting the Printer...150 If a Message Appears during Installation ...151 Making Option Settings for the Printer ...152 Conditions for Bidirectional Communication...152 If Bidirectional Communication is Disabled...152 Printer Driver Two Types of Printer Properties Dialog Box ...155 Opening the Printer Properties Dialog Box ...156 Opening from the Start Menu...
... the Windows Network Printer ...147 Installing the PCL or RPCS Raster Printer Driver ...147 Using as the NetWare Print Server/Remote Printer ...149 Form Feed...150 Banner Page ...150 Printing after Resetting the Printer...150 If a Message Appears during Installation ...151 Making Option Settings for the Printer ...152 Conditions for Bidirectional Communication...152 If Bidirectional Communication is Disabled...152 Printer Driver Two Types of Printer Properties Dialog Box ...155 Opening the Printer Properties Dialog Box ...156 Opening from the Start Menu...
User Guide
Page 6
Opening from an Application...157 Printing Printing on Various Paper Types ...160 Printing on Plain Paper ...160 Printing on Inkjet Plain Paper...160 Printing on Inkjet Transparency ...161 Printing on Glossy Paper ...163 Printing on Envelopes ...166 Printing on Thick Paper...168 Canceling Printing ...170 Canceling Printing from the Status Monitor...170 Canceling Printing Using the [Job Reset] Key of the Printer 170 Canceling Printing from the Taskbar...171 Adjusting Print Quality...172 Printing Using Preset Print Quality Settings ...172 Printing in Black and White ...172 Saving Colour Ink ...
Opening from an Application...157 Printing Printing on Various Paper Types ...160 Printing on Plain Paper ...160 Printing on Inkjet Plain Paper...160 Printing on Inkjet Transparency ...161 Printing on Glossy Paper ...163 Printing on Envelopes ...166 Printing on Thick Paper...168 Canceling Printing ...170 Canceling Printing from the Status Monitor...170 Canceling Printing Using the [Job Reset] Key of the Printer 170 Canceling Printing from the Taskbar...171 Adjusting Print Quality...172 Printing Using Preset Print Quality Settings ...172 Printing in Black and White ...172 Saving Colour Ink ...
User Guide
Page 19
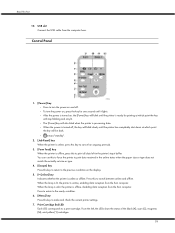
.... Print Cartridge End LED Each LED corresponds to switch between online and offline. When the lamp is unlit, the printer is online, enabling data reception from the host computer. Press to return to the ready condition. 6. [Menu] key Press this to make and check the current printer settings. 7. USB slot Connect the USB cable from the computer here. z means "standby". 2. [Job Reset] key When the printer is online, press this key to cancel an ongoing print job. 3. [Form Feed] key...
.... Print Cartridge End LED Each LED corresponds to switch between online and offline. When the lamp is unlit, the printer is online, enabling data reception from the host computer. Press to return to the ready condition. 6. [Menu] key Press this to make and check the current printer settings. 7. USB slot Connect the USB cable from the computer here. z means "standby". 2. [Job Reset] key When the printer is online, press this key to cancel an ongoing print job. 3. [Form Feed] key...
User Guide
Page 98
... box, change automatically according to the envelope position, on a screen can I make the hue of envelope selector ? Make sure that of displayed images. Try printing with inkjet plain paper? If bidirectional communication is not enabled, the tone of printed images might differ from that the paper type setting of the printer driver matches the type of paper loaded. For details about bidirectional communication settings, see the printer driver Help. 98 Print the nozzle check test pattern and clean the print-heads...
... box, change automatically according to the envelope position, on a screen can I make the hue of envelope selector ? Make sure that of displayed images. Try printing with inkjet plain paper? If bidirectional communication is not enabled, the tone of printed images might differ from that the paper type setting of the printer driver matches the type of paper loaded. For details about bidirectional communication settings, see the printer driver Help. 98 Print the nozzle check test pattern and clean the print-heads...
User Guide
Page 99
...:] to the type of the paper loaded. For envelopes, set the lever to the rear position ; See p.73 "Adjust Printhead Positions", p.71 "Nozzle Check", and p.72 "Head-cleaning". Does the paper size setting match? Have you changed Print Quality? Note, however, that the paper size selected in the [Printout paper size:] list of the printer properties dialog box matches the size of paper. Troubleshooting Positions Do Not Match the Displayed Image If the position...
...:] to the type of the paper loaded. For envelopes, set the lever to the rear position ; See p.73 "Adjust Printhead Positions", p.71 "Nozzle Check", and p.72 "Head-cleaning". Does the paper size setting match? Have you changed Print Quality? Note, however, that the paper size selected in the [Printout paper size:] list of the printer properties dialog box matches the size of paper. Troubleshooting Positions Do Not Match the Displayed Image If the position...
User Guide
Page 100
... open . Close the guide board. 100 alert Please wait... Low Ink The ink runs out. Ink Collector is full/Replace Ink Collector Unit The ink collector unit is able to do when a particular message appears. Make sure you have a new ink collector on . To print, put the printer online. If the message reappears, contact your service representative. Close the top cover or reset the duplex unit correctly. Change the print cartridge. See p.38 "Replacing a Print Cartridge". Change the indicated print cartridge. Troubleshooting Error & Status Messages on the Control Panel...
... open . Close the guide board. 100 alert Please wait... Low Ink The ink runs out. Ink Collector is full/Replace Ink Collector Unit The ink collector unit is able to do when a particular message appears. Make sure you have a new ink collector on . To print, put the printer online. If the message reappears, contact your service representative. Close the top cover or reset the duplex unit correctly. Change the print cartridge. See p.38 "Replacing a Print Cartridge". Change the indicated print cartridge. Troubleshooting Error & Status Messages on the Control Panel...
User Guide
Page 102
... service representative. 102 Close the print cartridge cover. Close Duplex Unit Cover The duplex unit cover is cleaning or flushing its print head. Alternately, press the [Form Feed] key, select a tray containing paper of the specified type, and then change the paper type setting for the tray on the control panel. Maintenance in the duplex unit. Remove Misfeed Top Cover Paper has jammed under the Top Cover". See p.90 "Removing Paper Jammed around the Guide Board". The printer is open . Remove Misfeed Bypass Paper has jammed in the Bypass Tray (optional)". Close the duplex unit...
... service representative. 102 Close the print cartridge cover. Close Duplex Unit Cover The duplex unit cover is cleaning or flushing its print head. Alternately, press the [Form Feed] key, select a tray containing paper of the specified type, and then change the paper type setting for the tray on the control panel. Maintenance in the duplex unit. Remove Misfeed Top Cover Paper has jammed under the Top Cover". See p.90 "Removing Paper Jammed around the Guide Board". The printer is open . Remove Misfeed Bypass Paper has jammed in the Bypass Tray (optional)". Close the duplex unit...
User Guide
Page 136
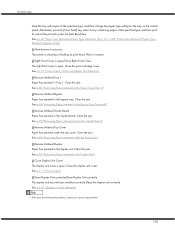
Configure a computer connected to the printer as :] box. 10. Install the printer driver. 7. On the [Start] menu, point to [Settings], and then click [Control Panel]. 2. Click [Shared as:], and then enter a name in the [File] menu, click [Properties]. 4. Make this happens, click [Cancel]. When starting Windows, a wizard for Microsoft Networks] check box. 5. When the CD-ROM is connected. 1. Double-click [Network and Dial-up a print server so that the power is connected, as a client computer and connect it to the...
Configure a computer connected to the printer as :] box. 10. Install the printer driver. 7. On the [Start] menu, point to [Settings], and then click [Control Panel]. 2. Click [Shared as:], and then enter a name in the [File] menu, click [Properties]. 4. Make this happens, click [Cancel]. When starting Windows, a wizard for Microsoft Networks] check box. 5. When the CD-ROM is connected. 1. Double-click [Network and Dial-up a print server so that the power is connected, as a client computer and connect it to the...
User Guide
Page 140
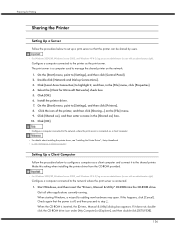
... address entered in [IPP Port Name]. For information about restarting the computer may not work with certain operating system settings. If there is, you still want to make necessary settings. Select the printer model you want to install the printer driver, use . Click [Port:], and then click [Add]. 10. Click [IPP]. 12. Installation starts. 18. Click [Finish] in [Port:]. 16. A message about the settings, see SmartDeviceMonitor for Client Help. 15. The printer name...
... address entered in [IPP Port Name]. For information about restarting the computer may not work with certain operating system settings. If there is, you still want to make necessary settings. Select the printer model you want to install the printer driver, use . Click [Port:], and then click [Add]. 10. Click [IPP]. 12. Installation starts. 18. Click [Finish] in [Port:]. 16. A message about the settings, see SmartDeviceMonitor for Client Help. 15. The printer name...
User Guide
Page 143
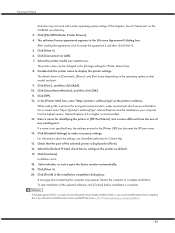
...-ROM into the CD-ROM drive. When screen for Device selection appears, select "RICOH NetworkPrinter Driver C Model". 13. Check that has Manage Printers permission. The printer driver installation starts. 17. Click [Port:], and then click [Add]. 10. Select whether or not to display the printer settings. Click [Next >] in the [] dialog box. The [Port Name] text box automatically obtains a port name. Configure the default printer as an Administrators or Power Users group member. 1. Click [Next...
...-ROM into the CD-ROM drive. When screen for Device selection appears, select "RICOH NetworkPrinter Driver C Model". 13. Check that has Manage Printers permission. The printer driver installation starts. 17. Click [Port:], and then click [Add]. 10. Select whether or not to display the printer settings. Click [Next >] in the [] dialog box. The [Port Name] text box automatically obtains a port name. Configure the default printer as an Administrators or Power Users group member. 1. Click [Next...
User Guide
Page 145
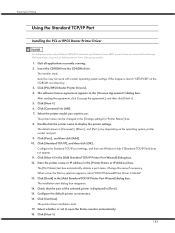
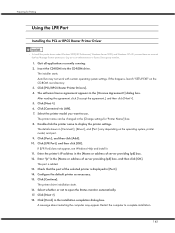
... applications currently running. 2. If this printer driver under Windows 2000/XP Professional, Windows Server 2003, and Windows NT 4.0, you want to display the printer settings. The details shown in the [Name or address of server providing lpd] box. 12. The printer driver installation starts 16. Log on the operating system, printer model, and port. 9. If [LPR Port] does not appear, see Windows Help and install it. 11. Configure the default printer as an Administrators or Power Users group member. 1.
... applications currently running. 2. If this printer driver under Windows 2000/XP Professional, Windows Server 2003, and Windows NT 4.0, you want to display the printer settings. The details shown in the [Name or address of server providing lpd] box. 12. The printer driver installation starts 16. Log on the operating system, printer model, and port. 9. If [LPR Port] does not appear, see Windows Help and install it. 11. Configure the default printer as an Administrators or Power Users group member. 1.
User Guide
Page 149
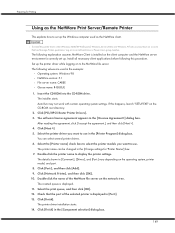
... [Change settings for Printing Using as the NetWare Print Server/Remote Printer This explains how to set up the printer driver while logging on the network tree. Double-click the printer name to use in the [Printer Program] dialog box. Check that has Manage Printers permission. Set up . The installer starts. Auto Run may not work with certain operating system settings. Select the printer driver you want to display the printer settings. Select the [Printer name] check box to select the printer models you...
... [Change settings for Printing Using as the NetWare Print Server/Remote Printer This explains how to set up the printer driver while logging on the network tree. Double-click the printer name to use in the [Printer Program] dialog box. Check that has Manage Printers permission. Set up . The installer starts. Auto Run may not work with certain operating system settings. Select the printer driver you want to display the printer settings. Select the [Printer name] check box to select the printer models you...
User Guide
Page 152
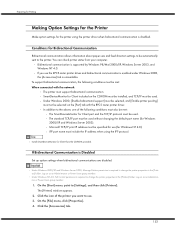
... as an Administrators or Power Users group member. Click the icon of the following conditions must include the IP address when using the printer driver when bidirectional communication is unavailable. z Under Windows 2000/XP and Windows Server 2003, Manage Printers permission is Disabled Set up option settings when bidirectional communications are disabled. On the [Start] menu, point to use (for Windows NT 4.0). On the [File] menu, click [Properties]. 4. You can check printer status from the...
... as an Administrators or Power Users group member. Click the icon of the following conditions must include the IP address when using the printer driver when bidirectional communication is unavailable. z Under Windows 2000/XP and Windows Server 2003, Manage Printers permission is Disabled Set up option settings when bidirectional communications are disabled. On the [Start] menu, point to use (for Windows NT 4.0). On the [File] menu, click [Properties]. 4. You can check printer status from the...

User Guide
Page 158
... Various Paper Types ...160 Printing on Plain Paper ...160 Printing on Inkjet Plain Paper...160 Printing on Inkjet Transparency ...161 Printing on Glossy Paper ...163 Printing on Envelopes ...166 Printing on Thick Paper...168 Canceling Printing ...170 Canceling Printing from the Status Monitor...170 Canceling Printing Using the [Job Reset] Key of the Printer 170 Canceling Printing from the Taskbar...171 Adjusting Print Quality...172 Printing Using Preset Print Quality Settings ...172 Printing in Black and White ...172 Saving Colour Ink When Printing...173 Printing with Print Quality Settings...
... Various Paper Types ...160 Printing on Plain Paper ...160 Printing on Inkjet Plain Paper...160 Printing on Inkjet Transparency ...161 Printing on Glossy Paper ...163 Printing on Envelopes ...166 Printing on Thick Paper...168 Canceling Printing ...170 Canceling Printing from the Status Monitor...170 Canceling Printing Using the [Job Reset] Key of the Printer 170 Canceling Printing from the Taskbar...171 Adjusting Print Quality...172 Printing Using Preset Print Quality Settings ...172 Printing in Black and White ...172 Saving Colour Ink When Printing...173 Printing with Print Quality Settings...
User Guide
Page 185
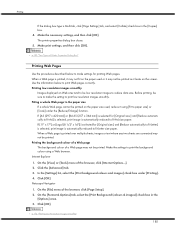
... paper used , reduce it may not be printed on the screen. Netscape Navigator 1. On the [Format & Options] tab, select the [Print Background (colours & images)] check box in the [Copies] box. 4. When a Web page is printed over multiple sheets, images or text where any two sheets are connected may not be printed. On the [View] or [Tools] menu of Printer Properties Dialog Box" Printing Web Pages Use the procedures described below to make the setting to reduce data size. Make...
... paper used , reduce it may not be printed on the screen. Netscape Navigator 1. On the [Format & Options] tab, select the [Print Background (colours & images)] check box in the [Copies] box. 4. When a Web page is printed over multiple sheets, images or text where any two sheets are connected may not be printed. On the [View] or [Tools] menu of Printer Properties Dialog Box" Printing Web Pages Use the procedures described below to make the setting to reduce data size. Make...
User Guide
Page 222
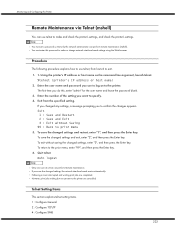
... Configuring the Printer Remote Maintenance via Telnet (mshell) You can use telnet, from the specified setting. To return to make or change network interface board settings using the Web browser. z Following a reset, interrupted and waiting print jobs are cancelled. z You must set a password so that only the network administrator can perform Remote maintenance. Enter the user name and password you want to specify. 4. Enter the number of the setting you use to log on to prior menu 5. To save...
... Configuring the Printer Remote Maintenance via Telnet (mshell) You can use telnet, from the specified setting. To return to make or change network interface board settings using the Web browser. z Following a reset, interrupted and waiting print jobs are cancelled. z You must set a password so that only the network administrator can perform Remote maintenance. Enter the user name and password you want to specify. 4. Enter the number of the setting you use to log on to prior menu 5. To save...
User Guide
Page 229
... [Program], point to interrupt the procedure. 3. On the [File] menu, click [Properties]. From the [Start] button on to the file server as :] during the printer driver installation, this step can set to notify clients of the results of the printer you can be set the printing notification function to receive print notification. Click [OK]. Click [Cancel] to [SmartDeviceMonitor for Client], and then click [Print Server Setting]. The print server setting is configured to enabling network clients to change printer...
... [Program], point to interrupt the procedure. 3. On the [File] menu, click [Properties]. From the [Start] button on to the file server as :] during the printer driver installation, this step can set to notify clients of the results of the printer you can be set the printing notification function to receive print notification. Click [OK]. Click [Cancel] to [SmartDeviceMonitor for Client], and then click [Print Server Setting]. The print server setting is configured to enabling network clients to change printer...
User Guide
Page 231
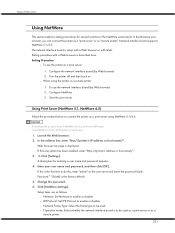
... as a print server using the printer as follows. z Netware: Set Netware to enable or disable. Setup items are as a remote printer 1. Network interface board supports NetWare 5.1/6.5. In the Netware environment, you can connect the printer as a "print server" or as a print server in the NetWare environment. The network interface board is the factory default. 5. Using a Printer Server Using NetWare This section explains setting procedures for entering a user name and password appears. 4. Password " " (blank) is setup with a Web browser or with a Web browser is displayed.
... as a print server using the printer as follows. z Netware: Set Netware to enable or disable. Setup items are as a remote printer 1. Network interface board supports NetWare 5.1/6.5. In the Netware environment, you can connect the printer as a "print server" or as a print server in the NetWare environment. The network interface board is the factory default. 5. Using a Printer Server Using NetWare This section explains setting procedures for entering a user name and password appears. 4. Password " " (blank) is setup with a Web browser or with a Web browser is displayed.
User Guide
Page 242
... this, enter "admin" as the user name and leave the password blank. Enter your network administrator. Click [Apply]. 10. z Supported DHCP server operating systems are sent back and forth, causing communication charges to be configured, see p.48 "List/Test Print Menu". If SSL encryption has been enabled, enter "https://(printer's address or host name)/". 3. A dialog box for entering a user name and password appears. 4. If this is a specification of the router. Password " " (blank) is displayed. Close the Web browser...
... this, enter "admin" as the user name and leave the password blank. Enter your network administrator. Click [Apply]. 10. z Supported DHCP server operating systems are sent back and forth, causing communication charges to be configured, see p.48 "List/Test Print Menu". If SSL encryption has been enabled, enter "https://(printer's address or host name)/". 3. A dialog box for entering a user name and password appears. 4. If this is a specification of the router. Password " " (blank) is displayed. Close the Web browser...


