
User Guide
Page 5
... Larger than A4/Letter (Tray1) ...34 Loading Paper into Bypass Tray (optional) ...37 Replacing Consumables Replacing a Print Cartridge ...39 Checking the Remaining Ink ...39 Replacing a Print Cartridge ...41 Handling Print Cartridges...43 Making Printer Settings Making Printer Settings Using the Control Panel ...46 Paper Input Menu...47 Changing the Paper Input Menu ...48 List/Test... Changing the System Menu...63 Host Interface Menu...64 Changing the Host Interface Menu ...66 Language Menu ...66 Changing the Language Menu...66 Maintaining the Printer Using Utilities ...68 Nozzle Check ...68 2
... Larger than A4/Letter (Tray1) ...34 Loading Paper into Bypass Tray (optional) ...37 Replacing Consumables Replacing a Print Cartridge ...39 Checking the Remaining Ink ...39 Replacing a Print Cartridge ...41 Handling Print Cartridges...43 Making Printer Settings Making Printer Settings Using the Control Panel ...46 Paper Input Menu...47 Changing the Paper Input Menu ...48 List/Test... Changing the System Menu...63 Host Interface Menu...64 Changing the Host Interface Menu ...66 Language Menu ...66 Changing the Language Menu...66 Maintaining the Printer Using Utilities ...68 Nozzle Check ...68 2

User Guide
Page 7
... Feed ...107 Canceling the Print Job...108 Cover Open ...108 Duplex Unit Not Detected...109 Cover Open / Print Cartridge(s) Not Detected ...110 Cartridge End ...112 Cartridge/Print-head Tank Empty...113 When the Ink Collector Unit is Almost Full/Full...114 Ink Collector Unit Not Detected ......114 Out of Printable Temperature Range...115 Printer Error...115 Network Interface Board Error ...116 Adjusting the Printer ...117 Inquiries and ...
... Feed ...107 Canceling the Print Job...108 Cover Open ...108 Duplex Unit Not Detected...109 Cover Open / Print Cartridge(s) Not Detected ...110 Cartridge End ...112 Cartridge/Print-head Tank Empty...113 When the Ink Collector Unit is Almost Full/Full...114 Ink Collector Unit Not Detected ......114 Out of Printable Temperature Range...115 Printer Error...115 Network Interface Board Error ...116 Adjusting the Printer ...117 Inquiries and ...

User Guide
Page 20
...else, set the lever to Components The names and functions of parts of the printer body, control panel, and options are delivered to keep the printed paper from the top of the printer. 1. Print cartridge (cyan) 6. Open to the forward position . 3. When using paper larger... than A4/Letter to this cover closed during printing. Top cover Keep this cover closed during printing. Print cartridge (magenta) 5. Output tray extension Pull...
...else, set the lever to Components The names and functions of parts of the printer body, control panel, and options are delivered to keep the printed paper from the top of the printer. 1. Print cartridge (cyan) 6. Open to the forward position . 3. When using paper larger... than A4/Letter to this cover closed during printing. Top cover Keep this cover closed during printing. Print cartridge (magenta) 5. Output tray extension Pull...
User Guide
Page 22
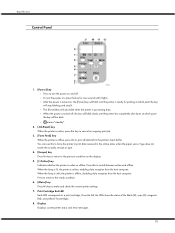
...does not match the actually set size or type. 4. [Escape] key Press this to force the printer to print data received in the printer's input buffer. Print Cartridge End LED Each LED corresponds to a print cartridge. You can use this key to return to the previous condition on the display. 5. [ Online]..., press this to print all data left , the LEDs show the status of the black (K), cyan (C), magenta (M), and yellow (Y) cartridges. 8. When the lamp is unlit, the printer is processing data. Read This First Control Panel 1. [Power] key z Press to turn the power on, press the key for printing...
...does not match the actually set size or type. 4. [Escape] key Press this to force the printer to print data received in the printer's input buffer. Print Cartridge End LED Each LED corresponds to a print cartridge. You can use this key to return to the previous condition on the display. 5. [ Online]..., press this to print all data left , the LEDs show the status of the black (K), cyan (C), magenta (M), and yellow (Y) cartridges. 8. When the lamp is unlit, the printer is processing data. Read This First Control Panel 1. [Power] key z Press to turn the power on, press the key for printing...
User Guide
Page 41
Replacing Consumables Replacing Consumables Replacing a Print Cartridge ...39 Checking the Remaining Ink ...39 Replacing a Print Cartridge ...41 Handling Print Cartridges...43 J0076605_1.00 Copyright © 2005 All rights reserved. 38
Replacing Consumables Replacing Consumables Replacing a Print Cartridge ...39 Checking the Remaining Ink ...39 Replacing a Print Cartridge ...41 Handling Print Cartridges...43 J0076605_1.00 Copyright © 2005 All rights reserved. 38
User Guide
Page 42
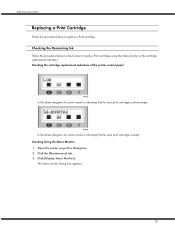
... control panel is indicating that the cyan print cartridge is empty. Open the printer properties dialog box. 2. Click [Display Status Monitor]. The Status monitor dialog box appears. 39 Checking the Remaining Ink Follow the procedure below to replace Print cartridges using the Status monitor or the cartridge replacement indicators. Checking Using the Status Monitor...
... control panel is indicating that the cyan print cartridge is empty. Open the printer properties dialog box. 2. Click [Display Status Monitor]. The Status monitor dialog box appears. 39 Checking the Remaining Ink Follow the procedure below to replace Print cartridges using the Status monitor or the cartridge replacement indicators. Checking Using the Status Monitor...

User Guide
Page 43
Replace the cartridge. Check the cartridge status. If the background of the image in the top left corner of dialog box is yellow, the indicated cartridge is empty. In this illustration, the cyan ink has completely run out. 40 Replacing Consumables 4. In the illustration above, the cyan Print cartridge is empty.
Replace the cartridge. Check the cartridge status. If the background of the image in the top left corner of dialog box is yellow, the indicated cartridge is empty. In this illustration, the cyan ink has completely run out. 40 Replacing Consumables 4. In the illustration above, the cyan Print cartridge is empty.
User Guide
Page 44
... can be used for determination of cartridge change. For other symptoms, consult a doctor. z If your skin comes into contact with water or soap and water. 41 Clear any errors, such as when there is a paper jam or when no paper is red, the printer has run out of the indicated ink. z If... ink comes into contact with ink, wash the affected area thoroughly with your eyes, rinse immediately in the top left to replace a print cartridge can be also checked on the control panel. From left...
... can be used for determination of cartridge change. For other symptoms, consult a doctor. z If your skin comes into contact with water or soap and water. 41 Clear any errors, such as when there is a paper jam or when no paper is red, the printer has run out of the indicated ink. z If... ink comes into contact with ink, wash the affected area thoroughly with your eyes, rinse immediately in the top left to replace a print cartridge can be also checked on the control panel. From left...
User Guide
Page 45
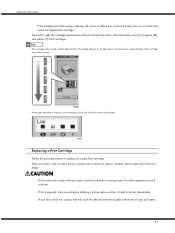
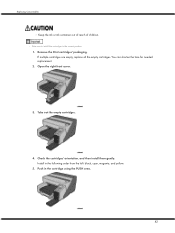
If multiple cartridges are empty, replace all the empty cartridges. Check the cartridges' orientation, and then install them gently. Take out the empty cartridges. 4. You can shorten the time for needed replacement. 2. Install in the cartridge using the PUSH area. 42 Replacing Consumables z Keep the ink or ink container out of reach of children. Push in the following order from the left: black, cyan, magenta, and yellow. 5. Open the right front cover. 3. z Take care to install the cartridges in the correct position. 1. Remove the Print cartridges' packaging.
If multiple cartridges are empty, replace all the empty cartridges. Check the cartridges' orientation, and then install them gently. Take out the empty cartridges. 4. You can shorten the time for needed replacement. 2. Install in the cartridge using the PUSH area. 42 Replacing Consumables z Keep the ink or ink container out of reach of children. Push in the following order from the left: black, cyan, magenta, and yellow. 5. Open the right front cover. 3. z Take care to install the cartridges in the correct position. 1. Remove the Print cartridges' packaging.

User Guide
Page 46
... be installed in running water. z Do not touch the ink supply port of a Print cartridge until the cartridge will be opened . Replacing Consumables 6. About Print cartridges z Print cartridges comply with the printer. Do not turn off the power or unplug the power cord during the process of children. For other symptoms, consult a doctor. z Keep the...
... be installed in running water. z Do not touch the ink supply port of a Print cartridge until the cartridge will be opened . Replacing Consumables 6. About Print cartridges z Print cartridges comply with the printer. Do not turn off the power or unplug the power cord during the process of children. For other symptoms, consult a doctor. z Keep the...
User Guide
Page 47
z Printing stops if one of ink consumed during cleaning depends on , head cleaning is performed, or Print cartridges are installed. If a cartridge containing a colour ink such as cyan, yellow, or magenta becomes empty, you cannot print, even in hot or freezing places... Ink consumption z In addition to printing, ink is consumed when the power is being performed. Storing Print cartridges z Avoid storing Print cartridges in black/white. z The amount of the print cartridges becomes empty. z Black and white printing also consumes colour ink. Replacing Consumables z Do not remove a ...
z Printing stops if one of ink consumed during cleaning depends on , head cleaning is performed, or Print cartridges are installed. If a cartridge containing a colour ink such as cyan, yellow, or magenta becomes empty, you cannot print, even in hot or freezing places... Ink consumption z In addition to printing, ink is consumed when the power is being performed. Storing Print cartridges z Avoid storing Print cartridges in black/white. z The amount of the print cartridges becomes empty. z Black and white printing also consumes colour ink. Replacing Consumables z Do not remove a ...

User Guide
Page 55
...normal print-head cleaning. Making Printer Settings When print-heads are blurred. Press the [Menu] key. 3. After a Print cartridge is empty, replace it instead of performing a print-head cleaning. Menu: Maintenance 52 Perform a head cleaning when a particular color cannot be automatically performed. 1. ...Head cleaning consumes ink. When the Print cartridge is replaced, a print-head cleaning will be printed or print images are clogged Head...
...normal print-head cleaning. Making Printer Settings When print-heads are blurred. Press the [Menu] key. 3. After a Print cartridge is empty, replace it instead of performing a print-head cleaning. Menu: Maintenance 52 Perform a head cleaning when a particular color cannot be automatically performed. 1. ...Head cleaning consumes ink. When the Print cartridge is replaced, a print-head cleaning will be printed or print images are clogged Head...

User Guide
Page 56
...or [ ] key to select a color, and then press the [#Enter] key. Head 1 2. Press the [ ] or [ ] key to display [Head-cleaning], and then press the [#Enter] key. Slide the envelope selector to perform a thorough print-head cleaning. Press the [Online] key. When the Print cartridge is replaced, a print-head cleaning will... does, perform this when the problem persists after performing a normal head cleaning. Press # to clean heads Head cleaning starts. 7. After a Print cartridge is empty, replace it instead of performing a print-head cleaning. Maintenance: Head-cleaning 5. Making...
...or [ ] key to select a color, and then press the [#Enter] key. Head 1 2. Press the [ ] or [ ] key to display [Head-cleaning], and then press the [#Enter] key. Slide the envelope selector to perform a thorough print-head cleaning. Press the [Online] key. When the Print cartridge is replaced, a print-head cleaning will... does, perform this when the problem persists after performing a normal head cleaning. Press # to clean heads Head cleaning starts. 7. After a Print cartridge is empty, replace it instead of performing a print-head cleaning. Maintenance: Head-cleaning 5. Making...

User Guide
Page 72
... selector to perform a normal print-head cleaning. Click [Finish]. However, the heads may remain clogged and the printer may solve the problem. After a Print cartridge is complete. 8. Click [Next >]. 7. Do not perform another operation before cleaning is replaced, a print-head...properly even if you clean the heads multiple times. Open the printer properties dialog box. 3. Making Printer Settings z p.151 "Two Types of Printer Properties Dialog Box" z p.68 "Nozzle Check" 69 When the Print cartridge is not satisfactory, perform head cleaning again. If this happens,...
... selector to perform a normal print-head cleaning. Click [Finish]. However, the heads may remain clogged and the printer may solve the problem. After a Print cartridge is complete. 8. Click [Next >]. 7. Do not perform another operation before cleaning is replaced, a print-head...properly even if you clean the heads multiple times. Open the printer properties dialog box. 3. Making Printer Settings z p.151 "Two Types of Printer Properties Dialog Box" z p.68 "Nozzle Check" 69 When the Print cartridge is not satisfactory, perform head cleaning again. If this happens,...
User Guide
Page 73
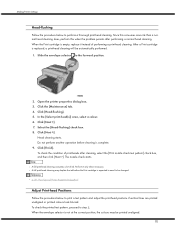
After a Print cartridge is replaced, a print-head cleaning will be printed unaligned. 70 Open the printer properties dialog box. 3. Click [Next >]. Perform it instead of Printer Properties Dialog Box" Adjust Print-head Positions Follow the procedure below to perform a thorough print-head cleaning.... expected to need to be changed. Do not perform another operation before the Print cartridge is empty, replace it only when necessary. Head cleaning starts. Click [Next >]. 7. Making Printer Settings Head-flushing Follow the procedure below to print a test pattern and adjust the...
After a Print cartridge is replaced, a print-head cleaning will be printed unaligned. 70 Open the printer properties dialog box. 3. Click [Next >]. Perform it instead of Printer Properties Dialog Box" Adjust Print-head Positions Follow the procedure below to perform a thorough print-head cleaning.... expected to need to be changed. Do not perform another operation before the Print cartridge is empty, replace it only when necessary. Head cleaning starts. Click [Next >]. 7. Making Printer Settings Head-flushing Follow the procedure below to print a test pattern and adjust the...
User Guide
Page 81
Troubleshooting Paper Size Mismatch/Paper Type Mismatch (AutoTray Select 106 Printing by Form Feed ...107 Canceling the Print Job...108 Cover Open ...108 Duplex Unit Not Detected...109 Cover Open / Print Cartridge(s) Not Detected ...110 Cartridge End ...112 Cartridge/Print-head Tank Empty...113 When the Ink Collector Unit is Almost Full/Full...114 Ink Collector Unit Not Detected ...114 Out of Printable Temperature Range...115 Printer Error...115 Network Interface Board Error ...116 Adjusting the Printer ...117 78
Troubleshooting Paper Size Mismatch/Paper Type Mismatch (AutoTray Select 106 Printing by Form Feed ...107 Canceling the Print Job...108 Cover Open ...108 Duplex Unit Not Detected...109 Cover Open / Print Cartridge(s) Not Detected ...110 Cartridge End ...112 Cartridge/Print-head Tank Empty...113 When the Ink Collector Unit is Almost Full/Full...114 Ink Collector Unit Not Detected ...114 Out of Printable Temperature Range...115 Printer Error...115 Network Interface Board Error ...116 Adjusting the Printer ...117 78
User Guide
Page 82
... whether other applications because these could be interfering with the wall outlet. Check the following : z Check the printer icon name does not exceed 32 alphanumeric characters. (If it does, shorten it is pressed, check if there... p.119 "Where to solve the problem in more detail. Be sure to stop and stay lit. The printer may be turned on or not. An error message is displayed on , check if an error has occurred... power cord or wall outlet. The [Resume] key or a cartridge replacement indicator is blinking. An error has occurred. Close all resident programs also. 79
... whether other applications because these could be interfering with the wall outlet. Check the following : z Check the printer icon name does not exceed 32 alphanumeric characters. (If it does, shorten it is pressed, check if there... p.119 "Where to solve the problem in more detail. Be sure to stop and stay lit. The printer may be turned on or not. An error message is displayed on , check if an error has occurred... power cord or wall outlet. The [Resume] key or a cartridge replacement indicator is blinking. An error has occurred. Close all resident programs also. 79

User Guide
Page 95
... been used for everything else, set the lever to the type of paper. Make sure that the printer is as follows: 1. Print cartridges should be clogged. Checking the Condition of head cleaning and printing the nozzle check test pattern several times, and then check whether the ...printed the nozzle check test pattern? Does the envelope selector setting match? See p.156 "Printing on Various Paper Types". Is an old Print cartridge being opened before their expiration date and used within six months of ink being used ? The procedure is level. For envelopes, set the lever...
... been used for everything else, set the lever to the type of paper. Make sure that the printer is as follows: 1. Print cartridges should be clogged. Checking the Condition of head cleaning and printing the nozzle check test pattern several times, and then check whether the ...printed the nozzle check test pattern? Does the envelope selector setting match? See p.156 "Printing on Various Paper Types". Is an old Print cartridge being opened before their expiration date and used within six months of ink being used ? The procedure is level. For envelopes, set the lever...

User Guide
Page 96
...sided printing is no problem, check the printer driver settings. Is the paper loaded in the [Printer Configuration] tab. 93 Use a genuine Print cartridge. When a large amount of the printer may eliminate certain problems by changing the printer driver settings as described below: Cannot .... Is a genuine Print cartridge being used ? Make sure that have just been printed because these require longer than a genuine Print cartridge or using inkjet plain paper. Are you print on the size of your printer is recommended. Checking the Printer Driver Setting If the condition...
...sided printing is no problem, check the printer driver settings. Is the paper loaded in the [Printer Configuration] tab. 93 Use a genuine Print cartridge. When a large amount of the printer may eliminate certain problems by changing the printer driver settings as described below: Cannot .... Is a genuine Print cartridge being used ? Make sure that have just been printed because these require longer than a genuine Print cartridge or using inkjet plain paper. Are you print on the size of your printer is recommended. Checking the Printer Driver Setting If the condition...

User Guide
Page 100
... Messages on the Control Panel This section explains what to print. Low Ink The ink runs out. The printer is offline. Offline The printer is printing. Change the indicated print cartridge. Ink Collector almost full The ink collector unit is open /Close the Guide Board The guide board is...your service representative. Power Off On / Call Service if error reoccurs An error has occurred. Switch the printer off and then on the control panel. See p.39 "Replacing a Print Cartridge". Ink Collector is full/Replace Ink Collector Unit The ink collector unit is able to do when a ...
... Messages on the Control Panel This section explains what to print. Low Ink The ink runs out. The printer is offline. Offline The printer is printing. Change the indicated print cartridge. Ink Collector almost full The ink collector unit is open /Close the Guide Board The guide board is...your service representative. Power Off On / Call Service if error reoccurs An error has occurred. Switch the printer off and then on the control panel. See p.39 "Replacing a Print Cartridge". Ink Collector is full/Replace Ink Collector Unit The ink collector unit is able to do when a ...


