User Guide
Page 8
... 161 Replacing the Paper Cutter 162 Removing the Old Cutter 162 Installing the New Cutter 164 Replacing the Maintenance Tank 166 Cleaning the Printer 168 Transporting or Storing the Printer 170 Preparing the Printer for Shipment 170 Moving the Printer on the Stand 172 Setting ...
... 161 Replacing the Paper Cutter 162 Removing the Old Cutter 162 Installing the New Cutter 164 Replacing the Maintenance Tank 166 Cleaning the Printer 168 Transporting or Storing the Printer 170 Preparing the Printer for Shipment 170 Moving the Printer on the Stand 172 Setting ...
User Guide
Page 12
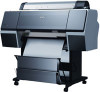
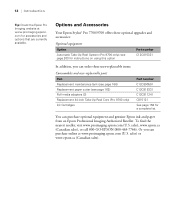
... find the nearest reseller, visit www.proimaging.epson.com (U.S. sales) or www.epson.ca (Canadian sales). 12 12 | Introduction Tip: Check the Epson Pro Imaging website at www.proimaging.epson.com (U.S. Options and Accessories Your Epson Stylus® Pro 7700/9700 offers these user-replaceable items: Consumables and user-replaceable parts Part Replacement maintenance tank (see page 166) Replacement paper cutter...
... find the nearest reseller, visit www.proimaging.epson.com (U.S. sales) or www.epson.ca (Canadian sales). 12 12 | Introduction Tip: Check the Epson Pro Imaging website at www.proimaging.epson.com (U.S. Options and Accessories Your Epson Stylus® Pro 7700/9700 offers these user-replaceable items: Consumables and user-replaceable parts Part Replacement maintenance tank (see page 166) Replacement paper cutter...
User Guide
Page 18
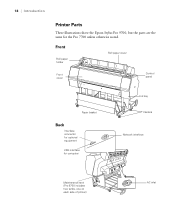
18 | Introduction Printer Parts These illustrations show the Epson Stylus Pro 9700, but the parts are the same for computer Ink bay Casters Network interface Maintenance tank (Pro 9700 includes two tanks, one on each side of printer) 18 AC inlet Front Roll paper holder Roll paper cover Front cover Control panel Paper basket Back Interface connector for optional equipment USB interface for the Pro 7700 unless otherwise noted.
18 | Introduction Printer Parts These illustrations show the Epson Stylus Pro 9700, but the parts are the same for computer Ink bay Casters Network interface Maintenance tank (Pro 9700 includes two tanks, one on each side of printer) 18 AC inlet Front Roll paper holder Roll paper cover Front cover Control panel Paper basket Back Interface connector for optional equipment USB interface for the Pro 7700 unless otherwise noted.
User Guide
Page 19
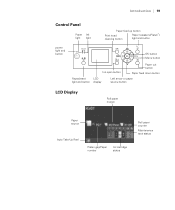
Introduction | 19 Control Panel Paper Ink light light Paper feed up button Print head cleaning button Paper release (ePlaten™) light and button power light and button OK button Menu button Ink open button Paper cut button Paper feed down button Pause/reset LCD light and button display Left arrow or paper source button LCD Display Roll paper margin Paper source Auto Take-Up Reel Platen gap/Paper number Ink cartridge status Roll paper counter Maintenance tank status 19
Introduction | 19 Control Panel Paper Ink light light Paper feed up button Print head cleaning button Paper release (ePlaten™) light and button power light and button OK button Menu button Ink open button Paper cut button Paper feed down button Pause/reset LCD light and button display Left arrow or paper source button LCD Display Roll paper margin Paper source Auto Take-Up Reel Platen gap/Paper number Ink cartridge status Roll paper counter Maintenance tank status 19
User Guide
Page 43
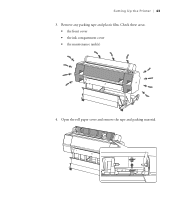
Open the roll paper cover and remove the tape and packing material. 43 Remove any packing tape and plastic film. Setting Up the Printer | 43 3. Check these areas: • the front cover • the ink compartment cover • the maintenance tank(s) 4.
Open the roll paper cover and remove the tape and packing material. 43 Remove any packing tape and plastic film. Setting Up the Printer | 43 3. Check these areas: • the front cover • the ink compartment cover • the maintenance tank(s) 4.

User Guide
Page 48
... the appropriate port and you may damage the printer. 6. Make sure that both the printer and the computer are turned off the printer, remove the maintenance tank, or open the front cover or ink covers while the P power light is completed, you need a standard RJ-45 CAT-5 network cable. After ink charging...
... the appropriate port and you may damage the printer. 6. Make sure that both the printer and the computer are turned off the printer, remove the maintenance tank, or open the front cover or ink covers while the P power light is completed, you need a standard RJ-45 CAT-5 network cable. After ink charging...
User Guide
Page 149
...head • Replacing ink cartridges • Changing the date and time • Performing additional maintenance tasks • Replacing the paper cutter blade • Replacing the maintenance tank • Cleaning the printer • Transporting or storing the printer In addition to the ..., and the status of printer settings. 149 Chapter 6: Maintaining and Transporting the Printer The Epson Stylus Pro 7700 and Pro 9700 require little maintenance to fine-tune a variety of your maintenance tank(s), and other information. You can print out a status check (described in this chapter, ...
...head • Replacing ink cartridges • Changing the date and time • Performing additional maintenance tasks • Replacing the paper cutter blade • Replacing the maintenance tank • Cleaning the printer • Transporting or storing the printer In addition to the ..., and the status of printer settings. 149 Chapter 6: Maintaining and Transporting the Printer The Epson Stylus Pro 7700 and Pro 9700 require little maintenance to fine-tune a variety of your maintenance tank(s), and other information. You can print out a status check (described in this chapter, ...
User Guide
Page 150
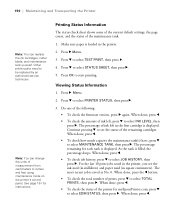
..., and the status of the following: • To check the firmware version, press r again. Press r Menu. 3. Press d to select MAINTENANCE TANK, then press r. Viewing Status Information 1. The percentage remaining for myEpsonPrinter.com, press d to select EDM STATUS, then press r. When done, press... l. • To check how much capacity the maintenance tank(s) have, press d to select TEST PRINT, then press r. 4. The most recent job is filled, the percentage drops. When done, press...
..., and the status of the following: • To check the firmware version, press r again. Press r Menu. 3. Press d to select MAINTENANCE TANK, then press r. Viewing Status Information 1. The percentage remaining for myEpsonPrinter.com, press d to select EDM STATUS, then press r. When done, press... l. • To check how much capacity the maintenance tank(s) have, press d to select TEST PRINT, then press r. 4. The most recent job is filled, the percentage drops. When done, press...

User Guide
Page 151
... folder. Follow the steps below to use the utility to add the icon. Click the Utility tab. • Mac OS X: Open the EPSON Printer Utility3 in the printer and the level of the following to exit the menu. See page 110 to check the status. 1. Right-click...Vista: Click , select Control Panel, select Hardware and Sound, and click Printers. Select your printer icon and select Printing Preferences. Do one of the maintenance tank(s). For more information about the Printer Status menu, see page 217. Right-click your printer and click OK. 2. Maintaining and Transporting the Printer | 151...
... folder. Follow the steps below to use the utility to add the icon. Click the Utility tab. • Mac OS X: Open the EPSON Printer Utility3 in the printer and the level of the following to exit the menu. See page 110 to check the status. 1. Right-click...Vista: Click , select Control Panel, select Hardware and Sound, and click Printers. Select your printer icon and select Printing Preferences. Do one of the maintenance tank(s). For more information about the Printer Status menu, see page 217. Right-click your printer and click OK. 2. Maintaining and Transporting the Printer | 151...
User Guide
Page 152
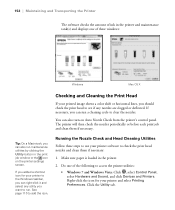
... and click Devices and Printers. Click the Utility tab. 152 Tip: On a Macintosh, you can also turn on the printer settings screen. You can run maintenance utilities by clicking the Utility button in the print job window or the icon on Auto Nozzle Check from the printer's control panel. If necessary...one of the following to add the icon. 152 | Maintaining and Transporting the Printer The software checks the amount of ink in the printer and maintenance tank(s) and displays one of these steps to use your printer software to check the print head nozzles and clean them if necessary.
... and click Devices and Printers. Click the Utility tab. 152 Tip: On a Macintosh, you can also turn on the printer settings screen. You can run maintenance utilities by clicking the Utility button in the print job window or the icon on Auto Nozzle Check from the printer's control panel. If necessary...one of the following to add the icon. 152 | Maintaining and Transporting the Printer The software checks the amount of ink in the printer and maintenance tank(s) and displays one of these steps to use your printer software to check the print head nozzles and clean them if necessary.
User Guide
Page 166
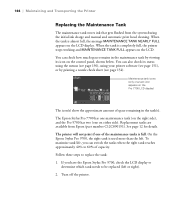
... the Maintenance Tank The maintenance tank stores ink that gets flushed from Epson (part number C12C890191). When the tank is used more than the left or right). 2. The Epson Stylus Pro 7700 has one maintenance tank (on the Pro 7700 LCD display) The icon(s) show the approximate amount of the maintenance tanks is almost full, the message MAINTENANCE TANK NEARLY FULL appears on the LCD. On the Epson Stylus Pro 9700...
... the Maintenance Tank The maintenance tank stores ink that gets flushed from Epson (part number C12C890191). When the tank is used more than the left or right). 2. The Epson Stylus Pro 7700 has one maintenance tank (on the Pro 7700 LCD display) The icon(s) show the approximate amount of the maintenance tanks is almost full, the message MAINTENANCE TANK NEARLY FULL appears on the LCD. On the Epson Stylus Pro 9700...
User Guide
Page 167
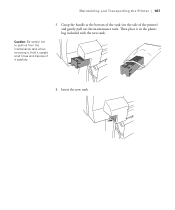
Then place it . Maintaining and Transporting the Printer | 167 Caution: Be careful not to spill ink from the maintenance tank when removing it in the plastic bag included with the new tank. 4. Hold it carefully. 3. Insert the new tank. 167 Grasp the handle at the bottom of the tank (on the side of it upright at all times and dispose of the printer) and gently pull out the maintenance tank.
Then place it . Maintaining and Transporting the Printer | 167 Caution: Be careful not to spill ink from the maintenance tank when removing it in the plastic bag included with the new tank. 4. Hold it carefully. 3. Insert the new tank. 167 Grasp the handle at the bottom of the tank (on the side of it upright at all times and dispose of the printer) and gently pull out the maintenance tank.
User Guide
Page 177
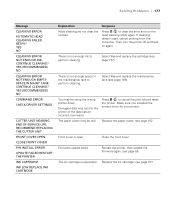
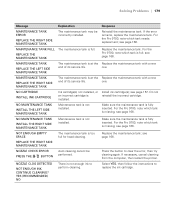
... INK CARTRIDGE INK LOW REPLACE INK CARTRIDGE Explanation Response Head cleaning did not clear the nozzles. There is not enough space in the maintenance tank to perform cleaning. There is not enough ink to clear the error and run the head cleaning utility again. Select Yes and replace the... maintenance tank (see page 157). You may be using the wrong printer driver. Make sure you installed the correct driver for your printer. The paper ...
... INK CARTRIDGE INK LOW REPLACE INK CARTRIDGE Explanation Response Head cleaning did not clear the nozzles. There is not enough space in the maintenance tank to perform cleaning. There is not enough ink to clear the error and run the head cleaning utility again. Select Yes and replace the... maintenance tank (see page 157). You may be using the wrong printer driver. Make sure you installed the correct driver for your printer. The paper ...

User Guide
Page 178
... have a bad Remove and reinstall the ink cartridge; Epson ink cartridge; error remains, replace the cartridge. see page 157. see page 166. 178 For the Pro 9700, note which tank needs replacement; Replace the cartridge(s) before cleaning; see page 157. MAINTENANCE TANK ERROR REPLACE THE LEFT SIDE MAINTENANCE TANK The maintenance tank may have replacement cartridges available; 178 | Solving...
... have a bad Remove and reinstall the ink cartridge; Epson ink cartridge; error remains, replace the cartridge. see page 157. see page 166. 178 For the Pro 9700, note which tank needs replacement; Replace the cartridge(s) before cleaning; see page 157. MAINTENANCE TANK ERROR REPLACE THE LEFT SIDE MAINTENANCE TANK The maintenance tank may have replacement cartridges available; 178 | Solving...
User Guide
Page 179
... MAINTENANCE TANK INSTALL THE RIGHT SIDE MAINTENANCE TANK Maintenance tank is missing; Solving Problems | 179 Message Explanation Response MAINTENANCE TANK ERROR REPLACE THE RIGHT SIDE MAINTENANCE TANK The maintenance tank may be performed. Reinstall the maintenance tank. If the error remains, replace the maintenance tank. see page 157. MAINTENANCE TANK FULL REPLACE THE MAINTENANCE TANK The maintenance tank is full; For the Pro 9700, note which tank needs replacement; MAINTENANCE TANK REPLACE THE LEFT SIDE MAINTENANCE TANK The maintenance tank...
... MAINTENANCE TANK INSTALL THE RIGHT SIDE MAINTENANCE TANK Maintenance tank is missing; Solving Problems | 179 Message Explanation Response MAINTENANCE TANK ERROR REPLACE THE RIGHT SIDE MAINTENANCE TANK The maintenance tank may be performed. Reinstall the maintenance tank. If the error remains, replace the maintenance tank. see page 157. MAINTENANCE TANK FULL REPLACE THE MAINTENANCE TANK The maintenance tank is full; For the Pro 9700, note which tank needs replacement; MAINTENANCE TANK REPLACE THE LEFT SIDE MAINTENANCE TANK The maintenance tank...
User Guide
Page 180
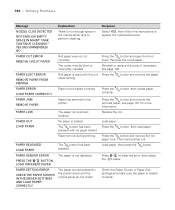
... make sure the paper is not loaded correctly. Paper ran out during printing. Press the button, then load paper. Press to replace the maintenance tank. Roll paper was not cut sheet setting. Paper is loaded correctly. 180 PAPER RELEASED LOAD PAPER The button has been pressed. PRESS THE... OUT LOAD PAPER Explanation There is not detected. Remove the uncut paper. PAPER SENSOR ERROR The paper is not enough space in the maintenance tank to perform cleaning. Press the button and remove the paper. The cutter may be blunt or incorrectly installed. No paper is loaded. ...
... make sure the paper is not loaded correctly. Paper ran out during printing. Press the button, then load paper. Press to replace the maintenance tank. Roll paper was not cut sheet setting. Paper is loaded correctly. 180 PAPER RELEASED LOAD PAPER The button has been pressed. PRESS THE... OUT LOAD PAPER Explanation There is not detected. Remove the uncut paper. PAPER SENSOR ERROR The paper is not enough space in the maintenance tank to perform cleaning. Press the button and remove the paper. The cutter may be blunt or incorrectly installed. No paper is loaded. ...
User Guide
Page 181
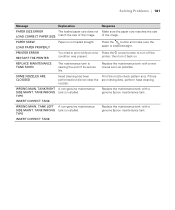
... has been Print the nozzle check pattern and, if there performed but did not clear the are missing dots, perform head cleaning. TANK WRONG tank is not loaded straight. Replace the maintenance tank with a genuine Epson maintenance tank. TYPE Replace the maintenance tank with a genuine Epson maintenance tank. TANK RIGHT A non-genuine maintenance SIDE MAINT. nozzles. PAPER SKEW LOAD PAPER PROPERLY Paper is installed...
... has been Print the nozzle check pattern and, if there performed but did not clear the are missing dots, perform head cleaning. TANK WRONG tank is not loaded straight. Replace the maintenance tank with a genuine Epson maintenance tank. TYPE Replace the maintenance tank with a genuine Epson maintenance tank. TANK RIGHT A non-genuine maintenance SIDE MAINT. nozzles. PAPER SKEW LOAD PAPER PROPERLY Paper is installed...
User Guide
Page 216
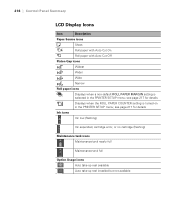
... is selected in the PRINTER SETUP menu; see page 217 for details Ink icons Ink low (flashing) Ink expended, cartridge error, or no cartridge (flashing) Maintenance tank icons Maintenance tank nearly full Maintenance tank full Option Usage icons Auto take-up reel available Auto take-up reel installed but not available 216
... is selected in the PRINTER SETUP menu; see page 217 for details Ink icons Ink low (flashing) Ink expended, cartridge error, or no cartridge (flashing) Maintenance tank icons Maintenance tank nearly full Maintenance tank full Option Usage icons Auto take-up reel available Auto take-up reel installed but not available 216
User Guide
Page 218
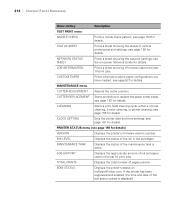
...SETTING Sets the printer date and time settings; see page 150 for details. STATUS SHEET Prints a sheet showing the status of the maintenance tank or tanks. see page 150 for details. CUTTER REPLACEMENT Starts procedure to replace the paper cutter blade; PRINTER STATUS menu (see the on myEpsonPrinter...ADJUSTMENT Adjusts the cutter position. see page 82 for details. see page 161 for details. see page 155 for details. MAINTENANCE TANK Displays the status of various printer parts and settings; JOB HISTORY Displays the approximate amount of the last status upload is...
...SETTING Sets the printer date and time settings; see page 150 for details. STATUS SHEET Prints a sheet showing the status of the maintenance tank or tanks. see page 150 for details. CUTTER REPLACEMENT Starts procedure to replace the paper cutter blade; PRINTER STATUS menu (see the on myEpsonPrinter...ADJUSTMENT Adjusts the cutter position. see page 82 for details. see page 161 for details. see page 155 for details. MAINTENANCE TANK Displays the status of various printer parts and settings; JOB HISTORY Displays the approximate amount of the last status upload is...
User Guide
Page 223
... 117, 139 to 140 monitoring print jobs, 125 page setup options, 113 to 116 roll paper settings, 121 to 122 Maintenance, 149 to 170 Maintenance menu, 156, 162 Maintenance mode, 161 to 162 Maintenance tank checking status, 149 to 152 ordering, 12 replacing, 166 to 167 Manuals, how to use, 11 Margins default, 201 incorrect... 117, 139 to 140 Windows, 88, 100 to 103 Memory, requirements, 13 Menus Custom Paper, 82 to 84, 219 to 220 Head Alignment, 157, 220 Maintenance, 156, 162, 218 Network Setup, 220 Printer Setup, 154, 217 Printer Status, 55, 150 to 151, 218 setting summary, 217 to 220 Test Print, ...
... 117, 139 to 140 monitoring print jobs, 125 page setup options, 113 to 116 roll paper settings, 121 to 122 Maintenance, 149 to 170 Maintenance menu, 156, 162 Maintenance mode, 161 to 162 Maintenance tank checking status, 149 to 152 ordering, 12 replacing, 166 to 167 Manuals, how to use, 11 Margins default, 201 incorrect... 117, 139 to 140 Windows, 88, 100 to 103 Memory, requirements, 13 Menus Custom Paper, 82 to 84, 219 to 220 Head Alignment, 157, 220 Maintenance, 156, 162, 218 Network Setup, 220 Printer Setup, 154, 217 Printer Status, 55, 150 to 151, 218 setting summary, 217 to 220 Test Print, ...