User Guide
Page 10
... messages...249 Answering ...249 Change to modem, fax is set up ...252 Insert Tray ...252 Install Tray ...252 Invalid PIN ...252 Load with ...252 Load manual feeder with ...253 Memory full, cannot print faxes ...253 Network/Network ...253 No analog phone line connected to ...250 Check tray connection...250 Close front...
... messages...249 Answering ...249 Change to modem, fax is set up ...252 Insert Tray ...252 Install Tray ...252 Invalid PIN ...252 Load with ...252 Load manual feeder with ...253 Memory full, cannot print faxes ...253 Network/Network ...253 No analog phone line connected to ...250 Check tray connection...250 Close front...
User Guide
Page 21
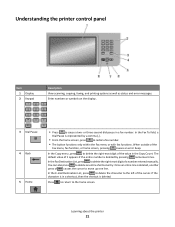
In the Fax To field, a Dial Pause is deleted, another press of causes the cursor to delete the right-most digit of a number entered manually. In the Fax Destination List, press to redial a fax number. • The button functions only within the Fax menu or with fax functions. If the ...
In the Fax To field, a Dial Pause is deleted, another press of causes the cursor to delete the right-most digit of a number entered manually. In the Fax Destination List, press to redial a fax number. • The button functions only within the Fax menu or with fax functions. If the ...
User Guide
Page 51
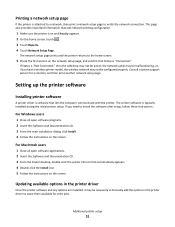
... communicate with the printer. Updating available options in the printer driver Once the printer software and any options are installed, it may be necessary to manually add the options in the printer driver to verify the network connection. Additional printer setup 51 Consult a system support person for print jobs. The printer...
... communicate with the printer. Updating available options in the printer driver Once the printer software and any options are installed, it may be necessary to manually add the options in the printer driver to verify the network connection. Additional printer setup 51 Consult a system support person for print jobs. The printer...
User Guide
Page 72
The Paper Type setting must be set manually from the Paper Size menu. the largest size is Plain Paper. It also includes information about paper orientation, setting the Paper Size and Paper Type, .... 6 Touch Submit. 7 Touch to return to the home screen. Set the Paper Size for the standard 250 tray and the multipurpose feeder must be set manually for all of the following Universal size settings for the desired tray until Universal Setup appears, and then touch Universal Setup. 5 Touch the left or...
The Paper Type setting must be set manually from the Paper Size menu. the largest size is Plain Paper. It also includes information about paper orientation, setting the Paper Size and Paper Type, .... 6 Touch Submit. 7 Touch to return to the home screen. Set the Paper Size for the standard 250 tray and the multipurpose feeder must be set manually for all of the following Universal size settings for the desired tray until Universal Setup appears, and then touch Universal Setup. 5 Touch the left or...
User Guide
Page 73
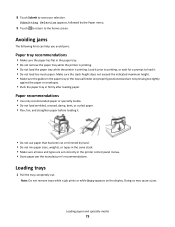
Make sure the stack height does not exceed the indicated maximum height. • Make sure the guides in the paper tray or the manual feeder are properly positioned and are set correctly in the printer control panel menus. • Store paper per the manufacturer's recommendations. Note: Do not remove ...
Make sure the stack height does not exceed the indicated maximum height. • Make sure the guides in the paper tray or the manual feeder are properly positioned and are set correctly in the printer control panel menus. • Store paper per the manufacturer's recommendations. Note: Do not remove ...
User Guide
Page 82
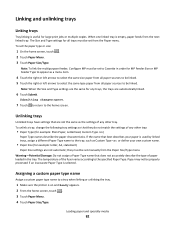
... unlinking the tray. 1 Make sure the printer is empty, paper feeds from the Paper Size/Type menu. Loading paper and specialty media 82 To set manually from the next linked tray. they do not match the settings of any other tray. Paper may not be linked. Warning-Potential Damage: Do not...
... unlinking the tray. 1 Make sure the printer is empty, paper feeds from the Paper Size/Type menu. Loading paper and specialty media 82 To set manually from the next linked tray. they do not match the settings of any other tray. Paper may not be linked. Warning-Potential Damage: Do not...
User Guide
Page 88
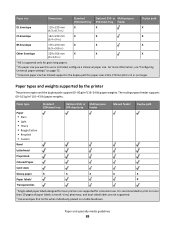
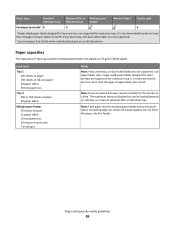
...; Plain • Light • Heavy • Rough/Cotton • Recycled • Custom Bond Standard 250-sheet tray Optional 250- or Multipurpose 550-sheet tray feeder Manual feeder Duplex path Letterhead Preprinted Colored Paper Card stock Glossy paper X X X X X Paper labels1 X Transparencies 1 Single-sided paper labels designed for laser printers are not supported...
...; Plain • Light • Heavy • Rough/Cotton • Recycled • Custom Bond Standard 250-sheet tray Optional 250- or Multipurpose 550-sheet tray feeder Manual feeder Duplex path Letterhead Preprinted Colored Paper Card stock Glossy paper X X X X X Paper labels1 X Transparencies 1 Single-sided paper labels designed for laser printers are not supported...
User Guide
Page 89
... are supported for laser printers are not supported. The maximum amount of paper labels per month. or Multipurpose 250-sheet tray 550-sheet tray feeder Manual feeder Duplex path Envelopes (smooth)2 X X X 1 Single-sided paper labels designed for occasional use . Paper type Standard Optional 250- Paper and specialty media guidelines 89 Load...
... are supported for laser printers are not supported. The maximum amount of paper labels per month. or Multipurpose 250-sheet tray 550-sheet tray feeder Manual feeder Duplex path Envelopes (smooth)2 X X X 1 Single-sided paper labels designed for occasional use . Paper type Standard Optional 250- Paper and specialty media guidelines 89 Load...
User Guide
Page 100
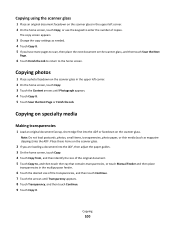
... the upper left corner. 2 On the home screen, touch Copy, or use the keypad to , and then touch the tray that contains transparencies, or touch Manual Feeder and then place transparencies in the upper left corner. 2 On the home screen, touch Copy. 3 Touch the Content arrows until Transparency appears. 8 Touch Transparency...
... the upper left corner. 2 On the home screen, touch Copy, or use the keypad to , and then touch the tray that contains transparencies, or touch Manual Feeder and then place transparencies in the upper left corner. 2 On the home screen, touch Copy. 3 Touch the Content arrows until Transparency appears. 8 Touch Transparency...
User Guide
Page 101
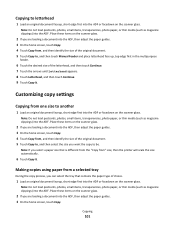
... items on the scanner glass. Customizing copy settings Copying from , and then identify the size of the original document. 5 Touch Copy to, and then touch Manual Feeder and place letterhead face up, top edge first in the multipurpose feeder. 6 Touch the desired size of the original document. 5 Touch Copy to, and...
... items on the scanner glass. Customizing copy settings Copying from , and then identify the size of the original document. 5 Touch Copy to, and then touch Manual Feeder and place letterhead face up, top edge first in the multipurpose feeder. 6 Touch the desired size of the original document. 5 Touch Copy to, and...
User Guide
Page 102
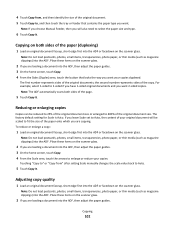
... the paper (duplexing) 1 Load an original document faceup, short edge first into the ADF, then adjust the paper guides. 4 Touch Copy from " after setting Scale manually changes the scale value back to enlarge or reduce your copies. If you leave Scale set to Auto, the content of your original document will... the paper guides. 3 On the home screen, touch Copy. 4 From the Scale area, touch the arrows to Auto. 5 Touch Copy It. Note: If you choose Manual Feeder, then you want your copies duplexed.
... the paper (duplexing) 1 Load an original document faceup, short edge first into the ADF, then adjust the paper guides. 4 Touch Copy from " after setting Scale manually changes the scale value back to enlarge or reduce your copies. If you leave Scale set to Auto, the content of your original document will... the paper guides. 3 On the home screen, touch Copy. 4 From the Scale area, touch the arrows to Auto. 5 Touch Copy It. Note: If you choose Manual Feeder, then you want your copies duplexed.
User Guide
Page 107
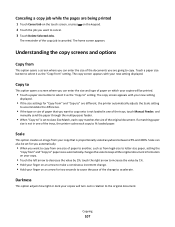
... your new setting displayed. • If the size settings for you automatically. • When you want to copy from one of the trays, touch Manual Feeder, and manually send the paper through the multipurpose feeder. • When "Copy to" is set for "Copy from This option opens a screen where you can enter...
... your new setting displayed. • If the size settings for you automatically. • When you want to copy from one of the trays, touch Manual Feeder, and manually send the paper through the multipurpose feeder. • When "Copy to" is set for "Copy from This option opens a screen where you can enter...
User Guide
Page 128
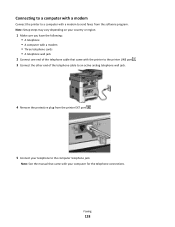
Connecting to a computer with a modem Connect the printer to a computer with a modem to the computer telephone jack. Note: See the manual that came with the printer to the printer LINE port . 3 Connect the other end of the telephone cable that came with your telephone to send ...
Connecting to a computer with a modem Connect the printer to a computer with a modem to the computer telephone jack. Note: See the manual that came with the printer to the printer LINE port . 3 Connect the other end of the telephone cable that came with your telephone to send ...
User Guide
Page 130
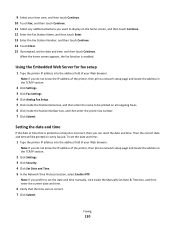
... can reset the date and time. When the home screen appears, the fax function is incorrect, then you prefer to set the date and time manually, click inside the Station Number box, and then enter the printer fax number. 7 Click Submit. Using the Embedded Web Server for fax setup 1 Type the... Network Time Protocol section, select Enable NTP. Faxing 130 Then the correct date and time will be printed on all outgoing faxes. 6 Click inside the Manually Set Date & Time box, and then enter the current date and time. 6 Verify that is printed on every fax job. Note: If you want to...
... can reset the date and time. When the home screen appears, the fax function is incorrect, then you prefer to set the date and time manually, click inside the Station Number box, and then enter the printer fax number. 7 Click Submit. Using the Embedded Web Server for fax setup 1 Type the... Network Time Protocol section, select Enable NTP. Faxing 130 Then the correct date and time will be printed on all outgoing faxes. 6 Click inside the Manually Set Date & Time box, and then enter the current date and time. 6 Verify that is printed on every fax job. Note: If you want to...
User Guide
Page 140
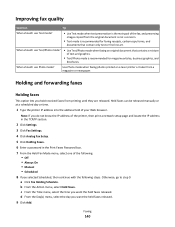
...; Text mode is recommended for faxing receipts, carbon copy forms, and documents that contain only text or fine line art. Held faxes can be released manually or at a scheduled day or time. 1 Type the printer IP address into the address field of the following: • Off • Always On •...
...; Text mode is recommended for faxing receipts, carbon copy forms, and documents that contain only text or fine line art. Held faxes can be released manually or at a scheduled day or time. 1 Type the printer IP address into the address field of the following: • Off • Always On •...
User Guide
Page 152
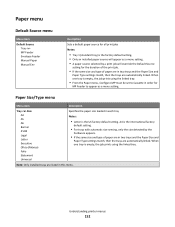
...) Folio Statement Universal Specifies the paper size loaded in this menu. Paper menu Default Source menu Menu item Default Source Tray MP Feeder Envelope Feeder Manual Paper Manual Env Description Sets a default paper source for all print jobs Notes: • Tray 1 (standard tray) is the factory default setting. • Only an installed...
...) Folio Statement Universal Specifies the paper size loaded in this menu. Paper menu Default Source menu Menu item Default Source Tray MP Feeder Envelope Feeder Manual Paper Manual Env Description Sets a default paper source for all print jobs Notes: • Tray 1 (standard tray) is the factory default setting. • Only an installed...
User Guide
Page 154
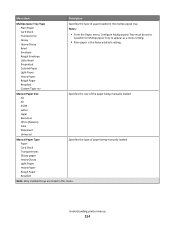
... A4 A5 JIS B5 Letter Legal Executive Oficio (México) Folio Statement Universal Specifies the size of the paper being manually loaded Note: Only installed trays are listed in the multipurpose tray Notes: • From the Paper menu, Configure Multipurpose Tray must... Envelope Rough Envelope Letterhead Preprinted Colored Paper Light Paper Heavy Paper Rough Paper Recycled Custom Type Specifies the type of paper being manually loaded Manual Paper Type Paper Card Stock Transparencies Glossy paper Heavy Glossy Light Paper Heavy Paper Rough Paper Recycled Specifies the type of paper ...
... A4 A5 JIS B5 Letter Legal Executive Oficio (México) Folio Statement Universal Specifies the size of the paper being manually loaded Note: Only installed trays are listed in the multipurpose tray Notes: • From the Paper menu, Configure Multipurpose Tray must... Envelope Rough Envelope Letterhead Preprinted Colored Paper Light Paper Heavy Paper Rough Paper Recycled Custom Type Specifies the type of paper being manually loaded Manual Paper Type Paper Card Stock Transparencies Glossy paper Heavy Glossy Light Paper Heavy Paper Rough Paper Recycled Specifies the type of paper ...
User Guide
Page 155
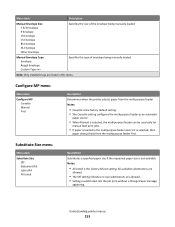
...Envelope C5 Envelope B5 Envelope DL Envelope Other Envelope Specifies the size of the envelope being manually loaded Manual Envelope Type Envelope Rough Envelope Custom Type Specifies the type of envelope being manually loaded Note: Only installed trays are allowed. • Setting a substitution lets the ... listed in the multipurpose feeder and First is the factory default setting. Configure MP menu Menu item Configure MP Cassette Manual First Description Determines when the printer selects paper from the multipurpose feeder first. Substitute Size menu Menu item Substitute Size ...
...Envelope C5 Envelope B5 Envelope DL Envelope Other Envelope Specifies the size of the envelope being manually loaded Manual Envelope Type Envelope Rough Envelope Custom Type Specifies the type of envelope being manually loaded Note: Only installed trays are allowed. • Setting a substitution lets the ... listed in the multipurpose feeder and First is the factory default setting. Configure MP menu Menu item Configure MP Cassette Manual First Description Determines when the printer selects paper from the multipurpose feeder first. Substitute Size menu Menu item Substitute Size ...
User Guide
Page 166
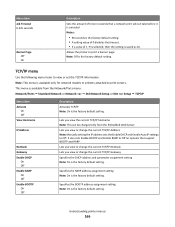
... parameter assignment setting Note: On is the factory default setting. Understanding printer menus 166 Lets you view or change the current TCP/IP Address Note: Manually setting the IP address sets the Enable DHCP and Enable Auto IP settings to print servers. Menu item Job Timeout 0-225 seconds Banner Page Off...
... parameter assignment setting Note: On is the factory default setting. Understanding printer menus 166 Lets you view or change the current TCP/IP Address Note: Manually setting the IP address sets the Enable DHCP and Enable Auto IP settings to print servers. Menu item Job Timeout 0-225 seconds Banner Page Off...
User Guide
Page 177
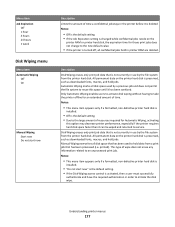
...option may decrease printer performance, especially if the printer requires hard disk space faster than it can be wiped and returned to service. Manual Wiping overwrites all disk space used to initiate the disk wipe. Understanding printer menus 177 Automatic Wiping marks all disk space that is preserved..., and held jobs. Menu item Job Expiration Off 1 hour 4 hours 24 hours 1 week Disk Wiping menu Menu item Automatic Wiping Off On Manual Wiping Start now Do not start now" is the default setting. • If the Disk Wiping access control is turned off, all confidential jobs...
...option may decrease printer performance, especially if the printer requires hard disk space faster than it can be wiped and returned to service. Manual Wiping overwrites all disk space used to initiate the disk wipe. Understanding printer menus 177 Automatic Wiping marks all disk space that is preserved..., and held jobs. Menu item Job Expiration Off 1 hour 4 hours 24 hours 1 week Disk Wiping menu Menu item Automatic Wiping Off On Manual Wiping Start now Do not start now" is the default setting. • If the Disk Wiping access control is turned off, all confidential jobs...


