Quick Guide
Page 1
Quick Guide Names and Locations Using the Copier Function Using the Scanner Function Using the Fax Function Troubleshooting Removing Paper Jams Print Cartridge For safe and correct use, be sure to read "Safety Information" before using the machine.
Quick Guide Names and Locations Using the Copier Function Using the Scanner Function Using the Fax Function Troubleshooting Removing Paper Jams Print Cartridge For safe and correct use, be sure to read "Safety Information" before using the machine.
Quick Guide
Page 2
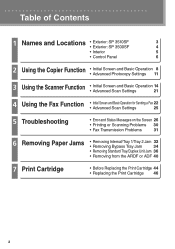
Table of Contents 1 Names and Locations • Exterior: SP 3510SF • Exterior: SP 3500SF 3 4 • Interior 5 • Control Panel 6 2 Using the Copier Function • Initial Screen and Basic Operation 8 • Advanced Photocopy Settings 11 ...Advanced Scan Settings 21 4 Using the Fax Function • Initial Screen and Basic Operation for Sending a Fax 22 • Advanced Scan Settings 25 5 Troubleshooting • Error and Status Messages on the Screen 26 • Printing or Scanning Problems 30 • Fax Transmission Problems 31 6 Removing Paper Jams ...
Table of Contents 1 Names and Locations • Exterior: SP 3510SF • Exterior: SP 3500SF 3 4 • Interior 5 • Control Panel 6 2 Using the Copier Function • Initial Screen and Basic Operation 8 • Advanced Photocopy Settings 11 ...Advanced Scan Settings 21 4 Using the Fax Function • Initial Screen and Basic Operation for Sending a Fax 22 • Advanced Scan Settings 25 5 Troubleshooting • Error and Status Messages on the Screen 26 • Printing or Scanning Problems 30 • Fax Transmission Problems 31 6 Removing Paper Jams ...

Quick Guide
Page 26
Troubleshooting Error and Status Messages on the Screen "X" indicates the parts of the paper in the tray. Check Paper Type The paper type set for the ...
Troubleshooting Error and Status Messages on the Screen "X" indicates the parts of the paper in the tray. Check Paper Type The paper type set for the ...
Quick Guide
Page 28
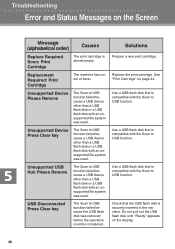
... Scan to USB function failed because the USB flash disk was used . Use a USB flash disk that is compatible with the Scan to USB function. Troubleshooting Error and Status Messages on page 44. Solutions Prepare a new print cartridge. Do not pull out the USB flash disk until "Ready" appears on the...
... Scan to USB function failed because the USB flash disk was used . Use a USB flash disk that is compatible with the Scan to USB function. Troubleshooting Error and Status Messages on page 44. Solutions Prepare a new print cartridge. Do not pull out the USB flash disk until "Ready" appears on the...

Quick Guide
Page 30
... Guide. Clean the parts indicated with arrows with a soft damp cloth and then wipe the same parts with a dry cloth to remove any remaining moisture. Troubleshooting Printing or Scanning Problems v Images are dirty Ink or correction fluid on the original is not dry. Exposure Glass ARDF/ADF CMF093 CMF094 30 Before...
... Guide. Clean the parts indicated with arrows with a soft damp cloth and then wipe the same parts with a dry cloth to remove any remaining moisture. Troubleshooting Printing or Scanning Problems v Images are dirty Ink or correction fluid on the original is not dry. Exposure Glass ARDF/ADF CMF093 CMF094 30 Before...

Quick Guide
Page 31
... details, see "Loading Paper", User Guide. For more details, see "Placing Originals", User Guide. v Cannot print the received faxes • The paper tray is empty. Troubleshooting Fax Transmission Problems v Cannot send or receive faxes The modular cable may be disconnected. v A fax you cannot solve the problem, contact your local sales or...
... details, see "Loading Paper", User Guide. For more details, see "Placing Originals", User Guide. v Cannot print the received faxes • The paper tray is empty. Troubleshooting Fax Transmission Problems v Cannot send or receive faxes The modular cable may be disconnected. v A fax you cannot solve the problem, contact your local sales or...

Quick Guide
Page 51
Quick Guide Names and Locations Using the Copier Function Using the Scanner Function Using the Fax Function Troubleshooting Removing Paper Jams Print Cartridge © 2011 EN GB EN US M119-8511
Quick Guide Names and Locations Using the Copier Function Using the Scanner Function Using the Fax Function Troubleshooting Removing Paper Jams Print Cartridge © 2011 EN GB EN US M119-8511
Quick Guide
Page 60
Troubleshooting Overview...361 Common Problems...362 Paper Feed Problems...363 Removing Printing Jams...365 Removing Scanning Jams (Type 2 model 375 Removing Scanning Jams (Type 1 model 379 ...
Troubleshooting Overview...361 Common Problems...362 Paper Feed Problems...363 Removing Printing Jams...365 Removing Scanning Jams (Type 2 model 375 Removing Scanning Jams (Type 1 model 379 ...
Quick Guide
Page 65
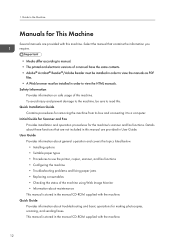
...sending faxes. 1. Safety Information Provides information on safe usage of the machine using Web Image Monitor • Information about troubleshooting and basic operations for This Machine Several manuals are provided with this machine. User Guide Provides information about general operation ...avoid injury and prevent damage to use the printer, copier, scanner, and fax functions • Configuring the machine • Troubleshooting problems and fixing paper jams • Replacing consumables • Checking the status of this machine. Quick Guide Provides information about...
...sending faxes. 1. Safety Information Provides information on safe usage of the machine using Web Image Monitor • Information about troubleshooting and basic operations for This Machine Several manuals are provided with this machine. User Guide Provides information about general operation ...avoid injury and prevent damage to use the printer, copier, scanner, and fax functions • Configuring the machine • Troubleshooting problems and fixing paper jams • Replacing consumables • Checking the status of this machine. Quick Guide Provides information about...

Quick Guide
Page 414
9. Overview Troubleshooting is divided into the following sections: • p.362 "Common Problems" • p.363 "Paper Feed Problems" • p.384 "Print Quality Problems" • p.385 "Printer Problems" • p.390 "Copier Problems" • p.392 "Scanner Problems" • p.393 "Fax Problems" • p.399 "Error and Status Messages on the Screen" • p.409 "Replacing the Print Cartridge" 361 Troubleshooting This chapter provides a guide for solving problems in operating the machine.
9. Overview Troubleshooting is divided into the following sections: • p.362 "Common Problems" • p.363 "Paper Feed Problems" • p.384 "Print Quality Problems" • p.385 "Printer Problems" • p.390 "Copier Problems" • p.392 "Scanner Problems" • p.393 "Fax Problems" • p.399 "Error and Status Messages on the Screen" • p.409 "Replacing the Print Cartridge" 361 Troubleshooting This chapter provides a guide for solving problems in operating the machine.
Quick Guide
Page 415
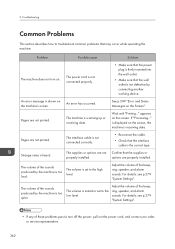
..., and contact your sales or service representative. 362 See p.399 "Error and Status Messages on the machine's screen. Strange noise is muted or set to troubleshoot common problems that the supplies or properly installed. The volume of the sounds produced by the machine is too loud. The volume of the sounds... power plug is firmly inserted into the wall outlet. • Make sure that the interface cable is not defective by the machine is too quiet. Troubleshooting Common Problems This section describes how to the high level.
..., and contact your sales or service representative. 362 See p.399 "Error and Status Messages on the machine's screen. Strange noise is muted or set to troubleshoot common problems that the supplies or properly installed. The volume of the sounds produced by the machine is too loud. The volume of the sounds... power plug is firmly inserted into the wall outlet. • Make sure that the interface cable is not defective by the machine is too quiet. Troubleshooting Common Problems This section describes how to the high level.

Quick Guide
Page 417
.... CER091 364 See p.84 "Paper and Other Media". • Paper is damp. Use paper that has been stored properly. Images are fed at one time. Troubleshooting Problem Multiple sheets of paper. Solution • Fan the paper well before loading. 9.
.... CER091 364 See p.84 "Paper and Other Media". • Paper is damp. Use paper that has been stored properly. Images are fed at one time. Troubleshooting Problem Multiple sheets of paper. Solution • Fan the paper well before loading. 9.

Quick Guide
Page 419
If there is loaded in until it stops. 3. Carefully pull out the print cartridge horizontally, holding its center. Troubleshooting 1. Doing so can cause remaining toner to leak. • Place the print cartridge on paper or similar material to open the front cover, and then ...
If there is loaded in until it stops. 3. Carefully pull out the print cartridge horizontally, holding its center. Troubleshooting 1. Doing so can cause remaining toner to leak. • Place the print cartridge on paper or similar material to open the front cover, and then ...

Quick Guide
Page 421
... the front cover, and then carefully lower it . • The inside of this machine's internal components get very hot. For this machine becomes very hot. 9. Troubleshooting Removing bypass tray jam If "Misfeed: Bypass Tray" appears on the display, follow the procedure below to trap or injure your fingers. 1. If paper is...
... the front cover, and then carefully lower it . • The inside of this machine's internal components get very hot. For this machine becomes very hot. 9. Troubleshooting Removing bypass tray jam If "Misfeed: Bypass Tray" appears on the display, follow the procedure below to trap or injure your fingers. 1. If paper is...

Quick Guide
Page 423
... trap or injure your fingers. 370 Not doing so could result in burns. • When removing jammed paper, make sure not to remove it closes. 9. Troubleshooting 7. CMF072 • When closing the cover, check that the error is cleared. For this machine becomes very hot. Using both hands, carefully push up the...
... trap or injure your fingers. 370 Not doing so could result in burns. • When removing jammed paper, make sure not to remove it closes. 9. Troubleshooting 7. CMF072 • When closing the cover, check that the error is cleared. For this machine becomes very hot. Using both hands, carefully push up the...

Quick Guide
Page 425
Pushing the lever lowers the duplex transport unit. 372 CMF078 CMF067 5. 9. If there is jammed paper, remove it carefully. Pull tray 1 out completely with both hands. CMF077 Place the tray on a flat surface. 6. Pull tray 1 halfway out, and check for jammed paper. Push the lever. Troubleshooting 4.
Pushing the lever lowers the duplex transport unit. 372 CMF078 CMF067 5. 9. If there is jammed paper, remove it carefully. Pull tray 1 out completely with both hands. CMF077 Place the tray on a flat surface. 6. Pull tray 1 halfway out, and check for jammed paper. Push the lever. Troubleshooting 4.

Quick Guide
Page 427
CMF069 • Do not shake the removed print cartridge. When the cartridge can cause remaining toner to avoid dirtying your workspace. 12. Lifting the guide plate, remove the jammed paper carefully. Carefully pull out the print cartridge horizontally, holding its center. Then push down on paper or similar material to leak. • Place the print cartridge on the cartridge until it fully in horizontally. Slide the print cartridge in . Troubleshooting 11. Doing so can go no further, raise it slightly and push it clicks into place. 374 CMF071 CMF070 13. 9.
CMF069 • Do not shake the removed print cartridge. When the cartridge can cause remaining toner to avoid dirtying your workspace. 12. Lifting the guide plate, remove the jammed paper carefully. Carefully pull out the print cartridge horizontally, holding its center. Then push down on paper or similar material to leak. • Place the print cartridge on the cartridge until it fully in horizontally. Slide the print cartridge in . Troubleshooting 11. Doing so can go no further, raise it slightly and push it clicks into place. 374 CMF071 CMF070 13. 9.

Quick Guide
Page 429
9. If you . 376 CMF116 CMF083 4. Be careful not to unlock the paper feed roller. CMF082 3. Lift the paper feed roller slightly and pull it . Troubleshooting 2. Gently pull the jammed original to remove it out toward you cannot pull out the jammed original easily, move the lever slightly to the machine rear, and then raise it to pull the original too hard, as it may rip.
9. If you . 376 CMF116 CMF083 4. Be careful not to unlock the paper feed roller. CMF082 3. Lift the paper feed roller slightly and pull it . Troubleshooting 2. Gently pull the jammed original to remove it out toward you cannot pull out the jammed original easily, move the lever slightly to the machine rear, and then raise it to pull the original too hard, as it may rip.

Quick Guide
Page 431
CMF117 9. Close the ARDF cover. CMF090 11. Lift the ARDF, and if there is original remaining in with the roller part facing downwards. CMF089 10. Be careful not to remove it. Lower the lever to lock the paper feed roller. Put the paper feed roller back in the ARDF, gently pull the jammed original to hold the input tray when lifting the ARDF, for the tray might be damaged. 378 9. Troubleshooting 8.
CMF117 9. Close the ARDF cover. CMF090 11. Lift the ARDF, and if there is original remaining in with the roller part facing downwards. CMF089 10. Be careful not to remove it. Lower the lever to lock the paper feed roller. Put the paper feed roller back in the ARDF, gently pull the jammed original to hold the input tray when lifting the ARDF, for the tray might be damaged. 378 9. Troubleshooting 8.

Quick Guide
Page 433
CMF119 3. If you cannot pull out the jammed original easily, move the lever slightly to unlock the paper feed roller. Lift the paper feed roller slightly and pull it to the machine rear, and then raise it out toward you. 380 CMF084 CMF120 4. 9. Be careful not to remove it may rip. Gently pull the jammed original to pull the original too hard, as it . Troubleshooting 2.
CMF119 3. If you cannot pull out the jammed original easily, move the lever slightly to unlock the paper feed roller. Lift the paper feed roller slightly and pull it to the machine rear, and then raise it out toward you. 380 CMF084 CMF120 4. 9. Be careful not to remove it may rip. Gently pull the jammed original to pull the original too hard, as it . Troubleshooting 2.


