Operating Instructions
Page 5
... NetWare server 50 Registering the Path to the Selected Destination in the Address Book 23 Specifying the E-mail Sender 24 Selecting a Sender from the List 24 Using a Registration Number to Specify a Sender Name 25 Selecting the Sender by Searching the Machine's Address Book 26 Specifying the E-mail Subject 27 Specifying the E-mail Message 28 Selecting...
... NetWare server 50 Registering the Path to the Selected Destination in the Address Book 23 Specifying the E-mail Sender 24 Selecting a Sender from the List 24 Using a Registration Number to Specify a Sender Name 25 Selecting the Sender by Searching the Machine's Address Book 26 Specifying the E-mail Subject 27 Specifying the E-mail Message 28 Selecting...
Operating Instructions
Page 6
...Selecting Destinations Registered in the Destination List of the Delivery Server ....85 Specifying the Sender 88 Selecting a Sender from the Sender List 88 Selecting the Sender by Entering the Registration Number 89 Selecting a Sender by Scan to Use the Network TWAIN Scanner 95 Installing the TWAIN Driver from...Stored Files 69 Managing Stored Files 71 Deleting a Stored File 71 Changing Information for a Stored File 61 Specifying a User Name 61 Specifying a File Name 62 Specifying a Password 63 Displaying the List of Stored Files 64 List of Stored Files 64 Searching the List of ...
...Selecting Destinations Registered in the Destination List of the Delivery Server ....85 Specifying the Sender 88 Selecting a Sender from the Sender List 88 Selecting the Sender by Entering the Registration Number 89 Selecting a Sender by Scan to Use the Network TWAIN Scanner 95 Installing the TWAIN Driver from...Stored Files 69 Managing Stored Files 71 Deleting a Stored File 71 Changing Information for a Stored File 61 Specifying a User Name 61 Specifying a File Name 62 Specifying a Password 63 Displaying the List of Stored Files 64 List of Stored Files 64 Searching the List of ...
Operating Instructions
Page 13
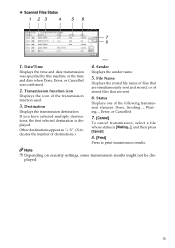
Transmission function icon Displays the icon of destinations.) 4. Sender Displays the sender name. 5. Status Displays one of stored files that are simultaneously sent and stored, or of the following transmission statuses: Done, Sending..., ...the number of the transmission function used. 3. Note ❒ Depending on security settings, some transmission results might not be displayed. 5 File Name Displays the stored file name of files that are sent. 6. ❖ Scanned Files Status ARQ004S 1. If you have selected multiple destinations, the first selected destination is...
Transmission function icon Displays the icon of destinations.) 4. Sender Displays the sender name. 5. Status Displays one of stored files that are simultaneously sent and stored, or of the following transmission statuses: Done, Sending..., ...the number of the transmission function used. 3. Note ❒ Depending on security settings, some transmission results might not be displayed. 5 File Name Displays the stored file name of files that are sent. 6. ❖ Scanned Files Status ARQ004S 1. If you have selected multiple destinations, the first selected destination is...
Operating Instructions
Page 19
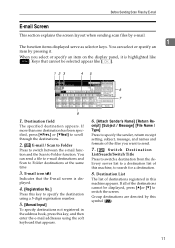
... using a 5-digit registration number. 5. [Manual Input] To specify destinations not registered in this machine, to specify the sender, return receipt setting, subject, message, and names and formats of the files you select or specify an item on the display panel, it . Keys that the E-mail...an item by pressing it is displayed. 4. [Registration No.] Press this key to specify the destination using the soft keyboard that appears. 6. [Attach Sender's Name] [Return Re- Destination List The list of the destinations cannot be selected appear like [ ]. When you want to send. 7. [ ] Switch...
... using a 5-digit registration number. 5. [Manual Input] To specify destinations not registered in this machine, to specify the sender, return receipt setting, subject, message, and names and formats of the files you select or specify an item on the display panel, it . Keys that the E-mail...an item by pressing it is displayed. 4. [Registration No.] Press this key to specify the destination using the soft keyboard that appears. 6. [Attach Sender's Name] [Return Re- Destination List The list of the destinations cannot be selected appear like [ ]. When you want to send. 7. [ ] Switch...

Operating Instructions
Page 20
For details, see "Specifying the E-mail Sender". 12 entation. For details, see "Various Scan Settings". G If necessary, press [File Name / Type] to specify scanner settings such as file name and file format. For details, see "Specifying E-mail Destinations". D If necessary, press [Scan ... screen or Scan to Folder screen appears, switch to specify settings such as original ori- I To specify the e-mail sender, press [Attach Sender's Name]. H Specify the destination. C Place originals. For details, see "Switching to scan one or both sides of Original ...
For details, see "Specifying the E-mail Sender". 12 entation. For details, see "Various Scan Settings". G If necessary, press [File Name / Type] to specify scanner settings such as file name and file format. For details, see "Specifying E-mail Destinations". D If necessary, press [Scan ... screen or Scan to Folder screen appears, switch to specify settings such as original ori- I To specify the e-mail sender, press [Attach Sender's Name]. H Specify the destination. C Place originals. For details, see "Switching to scan one or both sides of Original ...

Operating Instructions
Page 21
... field, and then press the {Clear / Stop} key. Note, however, that the [Return Receipt] notification e-mail may be specified as [Attach Sender's Name]. ❒ To use the Check Modes screen to make settings for the Return Receipt function. K If necessary, specify the e-mail subject. 1 For...Receipt] is opened by E-mail J If necessary, press [Return Receipt] to check the settings such as the default sender name. For details about [Administrator's E-mail Address] and [Auto Specify Sender Name], see "Check Modes". ❒ To cancel scanning, press the {Clear / Stop} key or [Stop] on ...
... field, and then press the {Clear / Stop} key. Note, however, that the [Return Receipt] notification e-mail may be specified as [Attach Sender's Name]. ❒ To use the Check Modes screen to make settings for the Return Receipt function. K If necessary, specify the e-mail subject. 1 For...Receipt] is opened by E-mail J If necessary, press [Return Receipt] to check the settings such as the default sender name. For details about [Administrator's E-mail Address] and [Auto Specify Sender Name], see "Check Modes". ❒ To cancel scanning, press the {Clear / Stop} key or [Stop] on ...
Operating Instructions
Page 22
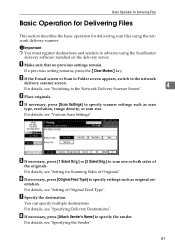
Sending Scan Files by E-mail Reference p.15 "Switching to the E-mail Screen" p.99 "Various Scan Settings" 1 p.110 "Setting for Scanning Sides of Originals" p.112 "Setting of Original Feed Type" p.122 "Setting File Type and File Name" p.16 "Specifying E-mail Destinations" p.28 "Specifying the E-mail Message" p.27 "Specifying the E-mail Subject" p.24 "Specifying the E-mail Sender" p.3 "Check Modes" p.30 "Simultaneous Storage and Sending by E-mail" 14
Sending Scan Files by E-mail Reference p.15 "Switching to the E-mail Screen" p.99 "Various Scan Settings" 1 p.110 "Setting for Scanning Sides of Originals" p.112 "Setting of Original Feed Type" p.122 "Setting File Type and File Name" p.16 "Specifying E-mail Destinations" p.28 "Specifying the E-mail Message" p.27 "Specifying the E-mail Subject" p.24 "Specifying the E-mail Sender" p.3 "Check Modes" p.30 "Simultaneous Storage and Sending by E-mail" 14
Operating Instructions
Page 32
... the protection code you send e-mail without specifying the sender. A Press [Attach Sender's Name]. 24 For details, see General Settings Guide. ❒ In [System Settings], you must be specified as the default sender name. This lets you entered is correct, the sender name is displayed. Enter the protection code, and then press [OK]. Sending Scan Files by...
... the protection code you send e-mail without specifying the sender. A Press [Attach Sender's Name]. 24 For details, see General Settings Guide. ❒ In [System Settings], you must be specified as the default sender name. This lets you entered is correct, the sender name is displayed. Enter the protection code, and then press [OK]. Sending Scan Files by...
Operating Instructions
Page 33
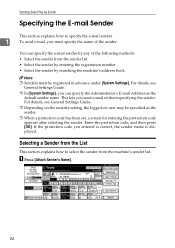
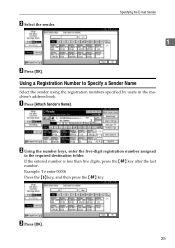
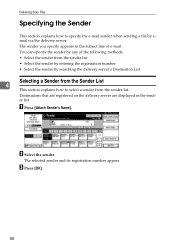
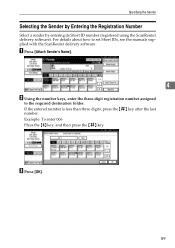
Specifying the E-mail Sender 1 C Press [OK]. C Press [OK]. 25 B Using the number keys, enter the five-digit registration number assigned to Specify a Sender Name Select the sender using the registration numbers specified by users in the machine's address book. Example: To enter 00006 Press the {6} key, and then press the {q} key. A Press [Attach Sender's Name]. Using a Registration Number to the required destination folder. B Select the sender. If the entered number is less than five digits, press the {q} key after the last number.
Specifying the E-mail Sender 1 C Press [OK]. C Press [OK]. 25 B Using the number keys, enter the five-digit registration number assigned to Specify a Sender Name Select the sender using the registration numbers specified by users in the machine's address book. Example: To enter 00006 Press the {6} key, and then press the {q} key. A Press [Attach Sender's Name]. Using a Registration Number to the required destination folder. B Select the sender. If the entered number is less than five digits, press the {q} key after the last number.
Operating Instructions
Page 34
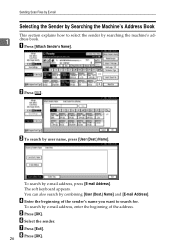
To search by e-mail address, enter the beginning of the sender's name you want to select the sender by searching the machine's ad- 1 dress book. D Enter the beginning of the address. F Select the sender. G Press [Exit]. 26 H Press [OK]. A Press [Attach Sender's Name]. The soft keyboard appears. To search by e-mail address, press [E-mail Address]. B Press [ ]. You...
To search by e-mail address, enter the beginning of the sender's name you want to select the sender by searching the machine's ad- 1 dress book. D Enter the beginning of the address. F Select the sender. G Press [Exit]. 26 H Press [OK]. A Press [Attach Sender's Name]. The soft keyboard appears. To search by e-mail address, press [E-mail Address]. B Press [ ]. You...
Operating Instructions
Page 68
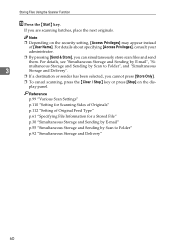
... the next originals. For details, see "Simultaneous Storage and Sending by Scan to Folder", and "Simultaneous 3 Storage and Delivery". ❒ If a destination or sender has been selected, you cannot press [Store Only]. ❒ To cancel scanning, press the {Clear / Stop} key or press [Stop] on the security setting... "Simultaneous Storage and Delivery" 60 Reference p.99 "Various Scan Settings" p.110 "Setting for Scanning Sides of Originals" p.112 "Setting of [User Name]. Note ❒ Depending on the display panel. Storing Files Using the Scanner Function J Press the {Start} key.
... the next originals. For details, see "Simultaneous Storage and Sending by Scan to Folder", and "Simultaneous 3 Storage and Delivery". ❒ If a destination or sender has been selected, you cannot press [Store Only]. ❒ To cancel scanning, press the {Clear / Stop} key or press [Stop] on the security setting... "Simultaneous Storage and Delivery" 60 Reference p.99 "Various Scan Settings" p.110 "Setting for Scanning Sides of Originals" p.112 "Setting of [User Name]. Note ❒ Depending on the display panel. Storing Files Using the Scanner Function J Press the {Start} key.
Operating Instructions
Page 88
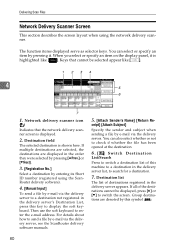
...Then use the soft keyboard to send a file by e-mail via the delivery server, see the ScanRouter delivery software manuals. 5. [Attach Sender's Name] [Return Re- Group destinations are displayed in the delivery server list, to switch the screen. You can also select whether or not to...Network delivery scanner icon () Indicates that cannot be displayed, press [U] or [T] to search for a destination. 7. ceipt] [Attach Subject] Specify the sender and subject when sending a file by this machine to a destination in the order they were selected by pressing [UPrev.] or [TNext]. 3. [...
...Then use the soft keyboard to send a file by e-mail via the delivery server, see the ScanRouter delivery software manuals. 5. [Attach Sender's Name] [Return Re- Group destinations are displayed in the delivery server list, to switch the screen. You can also select whether or not to...Network delivery scanner icon () Indicates that cannot be displayed, press [U] or [T] to search for a destination. 7. ceipt] [Attach Subject] Specify the sender and subject when sending a file by this machine to a destination in the order they were selected by pressing [UPrev.] or [TNext]. 3. [...
Operating Instructions
Page 89
... setting remains, press the {Clear Modes} key. C Place originals. For details, see "Specifying the Sender". 81 You can specify multiple destinations. G Specify the destination. entation. For details, see "Switching to specify the sender. H If necessary, press [Attach Sender's Name] to the Network Delivery Scanner Screen". D If necessary, press [Scan Settings] to scan one or...
... setting remains, press the {Clear Modes} key. C Place originals. For details, see "Specifying the Sender". 81 You can specify multiple destinations. G Specify the destination. entation. For details, see "Switching to specify the sender. H If necessary, press [Attach Sender's Name] to the Network Delivery Scanner Screen". D If necessary, press [Scan Settings] to scan one or...
Operating Instructions
Page 96
... sender. A Press [Attach Sender's Name]. C Press [OK]. 88 Destinations that are registered on the delivery server are displayed in the subject line of the following methods: • Select the sender from the sender list • Select the sender by entering the registration number • Select the sender by searching the delivery server's Destination List Selecting a Sender from the sender...
... sender. A Press [Attach Sender's Name]. C Press [OK]. 88 Destinations that are registered on the delivery server are displayed in the subject line of the following methods: • Select the sender from the sender list • Select the sender by entering the registration number • Select the sender by searching the delivery server's Destination List Selecting a Sender from the sender...
Operating Instructions
Page 97
If the entered number is less than three digits, press the {q} key after the last number. C Press [OK]. 89 A Press [Attach Sender's Name]. 4 B Using the number keys, enter the three-digit registration number assigned to set Short IDs, see the manuals supplied with the ScanRouter delivery... details about how to the required destination folder. Example: To enter 006 Press the {6} key, and then press the {q} key. Specifying the Sender Selecting the Sender by Entering the Registration Number Select a sender by entering its Short ID number (registered using the ScanRouter delivery software).
If the entered number is less than three digits, press the {q} key after the last number. C Press [OK]. 89 A Press [Attach Sender's Name]. 4 B Using the number keys, enter the three-digit registration number assigned to set Short IDs, see the manuals supplied with the ScanRouter delivery... details about how to the required destination folder. Example: To enter 006 Press the {6} key, and then press the {q} key. Specifying the Sender Selecting the Sender by Entering the Registration Number Select a sender by entering its Short ID number (registered using the ScanRouter delivery software).
Operating Instructions
Page 98
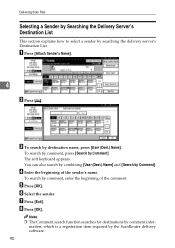
... the beginning of the comment. To search by Comment]. G Press [Exit]. To search by comment, press [Search by comment, enter the beginning of the sender's name. Delivering Scan Files Selecting a Sender by Searching the Delivery Server's Destination List This section explains how to select a sender by searching the delivery server's Destination List. A Press [Attach...
... the beginning of the comment. To search by Comment]. G Press [Exit]. To search by comment, press [Search by comment, enter the beginning of the sender's name. Delivering Scan Files Selecting a Sender by Searching the Delivery Server's Destination List This section explains how to select a sender by searching the delivery server's Destination List. A Press [Attach...
Operating Instructions
Page 155
... delivery server's destination list, 86 Searching the list of stored files, 66 Searching the machine's address book, 18 Selecting destinations, 16, 41, 85 Sender, 24, 25, 26, 88 Sender name, 24, 25, 26, 88, 89, 90 Sending by Scan to Folder, 33 Sending files FTP, 48 NetWare server, 50 shared network folder, 44...
... delivery server's destination list, 86 Searching the list of stored files, 66 Searching the machine's address book, 18 Selecting destinations, 16, 41, 85 Sender, 24, 25, 26, 88 Sender name, 24, 25, 26, 88, 89, 90 Sending by Scan to Folder, 33 Sending files FTP, 48 NetWare server, 50 shared network folder, 44...
Operating Instructions
Page 28
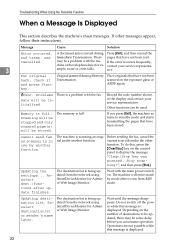
... messages. Message Cause Solution Error occurred, A document jam occurred during Memory Place originals that have been stored. The memory is displayed. 22 Stop scan- or sender's name later.
... messages. Message Cause Solution Error occurred, A document jam occurred during Memory Place originals that have been stored. The memory is displayed. 22 Stop scan- or sender's name later.

Operating Instructions
Page 29
...sending by e-mail and some destinations for the message displayed on the Scan to use this function. Specify sender's name. Make settings correctly for the user name and the password for LDAP server authentication. Connection with A network error has occurred and Try the operation once... more . Check the information of [System Settings]. A sender's name should be displayed. When a Message Is Displayed Message Cause Solution You do not have privileges to Folder screen. Contact the administrator...
...sending by e-mail and some destinations for the message displayed on the Scan to use this function. Specify sender's name. Make settings correctly for the user name and the password for LDAP server authentication. Connection with A network error has occurred and Try the operation once... more . Check the information of [System Settings]. A sender's name should be displayed. When a Message Is Displayed Message Cause Solution You do not have privileges to Folder screen. Contact the administrator...
Operating Instructions
Page 40
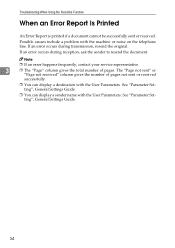
..., contact your service representative. 3 ❒ The "Page" column gives the total number of pages not sent or received successfully. ❒ You can display a sender name with the User Parameters. Troubleshooting When Using the Facsimile Function When an Error Report Is Printed An Error Report is printed if a document cannot be... successfully sent or received. See "Parameter Setting", General Settings Guide. 34 If an error occurs during reception, ask the sender to resend the document. If an error occurs during transmission, resend the original.
..., contact your service representative. 3 ❒ The "Page" column gives the total number of pages not sent or received successfully. ❒ You can display a sender name with the User Parameters. Troubleshooting When Using the Facsimile Function When an Error Report Is Printed An Error Report is printed if a document cannot be... successfully sent or received. See "Parameter Setting", General Settings Guide. 34 If an error occurs during reception, ask the sender to resend the document. If an error occurs during transmission, resend the original.


