User's Guide
Page 2
SmarThru allows you to scan and edit images and to scan for setting up your machine for direct, indirect incidental or consequential damages as a printer, a scanner, a copier, and a facsimile, and information for maintaining and troubleshooting the machine. SmarThru also lets you access scanned images that you can then email from your ...
SmarThru allows you to scan and edit images and to scan for setting up your machine for direct, indirect incidental or consequential damages as a printer, a scanner, a copier, and a facsimile, and information for maintaining and troubleshooting the machine. SmarThru also lets you access scanned images that you can then email from your ...

User's Guide
Page 14
... Option 6.9 Scanning Using Network Scan 6.10 Setting Network Scan Timeout 6.11 Using the Network Scan Driver 6.12 Adding a Scanner 6.12 Removing a Scanner 6.13 Setting the properties 6.14 Scanning using the Network Scan driver 6.17 Scanner Icons 6.17 Chapter 7: FAXING Changing the Fax Setup options 7.2 Available Fax Setup Options 7.3 Loading a Document 7.6 Selecting the Paper...
... Option 6.9 Scanning Using Network Scan 6.10 Setting Network Scan Timeout 6.11 Using the Network Scan Driver 6.12 Adding a Scanner 6.12 Removing a Scanner 6.13 Setting the properties 6.14 Scanning using the Network Scan driver 6.17 Scanner Icons 6.17 Chapter 7: FAXING Changing the Fax Setup options 7.2 Available Fax Setup Options 7.3 Loading a Document 7.6 Selecting the Paper...

User's Guide
Page 17
Appendix B: INSTALLING MACHINE OPTIONS Installing Memory DIMM B.2 Removing a Memory DIMM B.4 Installing an Optional Tray B.5 Setting Tray 2 in the Printer Properties B.7 Appendix C: SPECIFICATIONS General Specifications C.2 Scanner and Copier Specifications C.3 Printer Specifications C.4 Facsimile Specifications C.5 Paper Specifications C.6 Overview C.6 Supported Sizes of Paper C.7 Guidelines for Using Paper C.8 Paper Specifications C.9 Paper Output Capacity C.9 Paper Storage Environment C.9 xvi
Appendix B: INSTALLING MACHINE OPTIONS Installing Memory DIMM B.2 Removing a Memory DIMM B.4 Installing an Optional Tray B.5 Setting Tray 2 in the Printer Properties B.7 Appendix C: SPECIFICATIONS General Specifications C.2 Scanner and Copier Specifications C.3 Printer Specifications C.4 Facsimile Specifications C.5 Paper Specifications C.6 Overview C.6 Supported Sizes of Paper C.7 Guidelines for Using Paper C.8 Paper Specifications C.9 Paper Output Capacity C.9 Paper Storage Environment C.9 xvi
User's Guide
Page 20
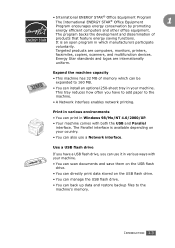
... you have a USB flash drive, you have to add paper to the machine's memory. Energy Star standards and logos are computers, monitors, printers, facsimiles, copiers, scanners, and multifunction devices. INTRODUCTION 1.3 • International ENERGY STAR® Office Equipment Program The International ENERGY STAR® Office Equipment 1 Program encourages energy conservation by promoting...
... you have a USB flash drive, you have to add paper to the machine's memory. Energy Star standards and logos are computers, monitors, printers, facsimiles, copiers, scanners, and multifunction devices. INTRODUCTION 1.3 • International ENERGY STAR® Office Equipment Program The International ENERGY STAR® Office Equipment 1 Program encourages energy conservation by promoting...
User's Guide
Page 23
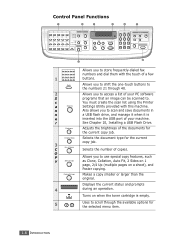
... on 1 page, 2/4 Up (multiple pages on when the toner cartridge is inserted into the USB port of Copies Text Text/Photo Photo Shift Original Type Scanner Scan-to Special Copy Reduce/Enlarge Enter Clear/Stop Menu Upper Level Start Symbols Facsimile Resolution Broadcasting Facsimile Phone Book Redial/Pause On Hook Dial...
... on 1 page, 2/4 Up (multiple pages on when the toner cartridge is inserted into the USB port of Copies Text Text/Photo Photo Shift Original Type Scanner Scan-to Special Copy Reduce/Enlarge Enter Clear/Stop Menu Upper Level Start Symbols Facsimile Resolution Broadcasting Facsimile Phone Book Redial/Pause On Hook Dial...
User's Guide
Page 27
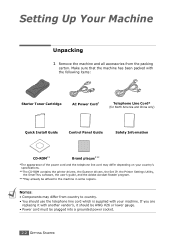
... line cord may differ from the packing carton. If you are replacing it with your country's specifications. **The CD-ROM contains the printer drivers, the Scanner drivers, the Set IP, the Printer Settings Utility, the SmarThru software, the user's guide, and the Adobe Acrobat Reader program. ***May already be plugged into...
... line cord may differ from the packing carton. If you are replacing it with your country's specifications. **The CD-ROM contains the printer drivers, the Scanner drivers, the Set IP, the Printer Settings Utility, the SmarThru software, the user's guide, and the Adobe Acrobat Reader program. ***May already be plugged into...
User's Guide
Page 28
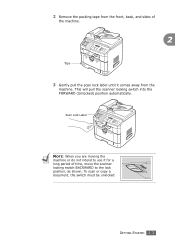
To scan or copy a document, the switch must be unlocked. GETTING STARTED 2.3 2 Remove the packing tape from the machine. This will pull the scanner locking switch into the FORWARD (Unlocked) position automatically. Scan Lock Label NOTE: When you are moving the machine or do not intend to use it comes away from the front, back, and sides of the machine. 2 Tape 3 Gently pull the scan lock label until it for a long period of time, move the scanner locking switch BACKWARD to the lock position, as shown.
To scan or copy a document, the switch must be unlocked. GETTING STARTED 2.3 2 Remove the packing tape from the machine. This will pull the scanner locking switch into the FORWARD (Unlocked) position automatically. Scan Lock Label NOTE: When you are moving the machine or do not intend to use it comes away from the front, back, and sides of the machine. 2 Tape 3 Gently pull the scan lock label until it for a long period of time, move the scanner locking switch BACKWARD to the lock position, as shown.
User's Guide
Page 51
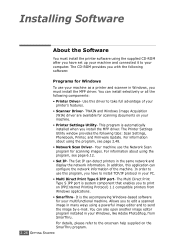
Your machine use the Network Scan program for your printer's features. • Scanner Driver- In addition, this driver to print on IPP(Internet Printing Protocol) 1.1 compatible printers from SmarThru. The Multi Direct Print Type S IPP port is system ..., Printer, and Firmware Update. It is automatically installed when you have set up your machine and connected it to use your machine as a printer and scanner in your PC. • Multi Direct Print Type S IPP port- You can detect printers in your Windows, like Adobe PhotoShop, from Windows applications. • SmarThru...
Your machine use the Network Scan program for your printer's features. • Scanner Driver- In addition, this driver to print on IPP(Internet Printing Protocol) 1.1 compatible printers from SmarThru. The Multi Direct Print Type S IPP port is system ..., Printer, and Firmware Update. It is automatically installed when you have set up your machine and connected it to use your machine as a printer and scanner in your PC. • Multi Direct Print Type S IPP port- You can detect printers in your Windows, like Adobe PhotoShop, from Windows applications. • SmarThru...
User's Guide
Page 54
... that your machine is connected to your CD-ROM drive.The CD-ROM should automatically run, and an installation window appears. All components (Printer Driver, Scanner Driver and Printer Settings Utility) necessary for Network Printing" on . 2 Insert the supplied CD-ROM into your computer's parallel port or USB port before installing...
... that your machine is connected to your CD-ROM drive.The CD-ROM should automatically run, and an installation window appears. All components (Printer Driver, Scanner Driver and Printer Settings Utility) necessary for Network Printing" on . 2 Insert the supplied CD-ROM into your computer's parallel port or USB port before installing...
User's Guide
Page 59
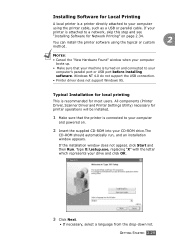
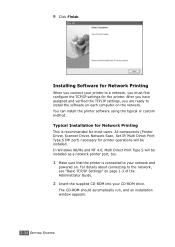
Typical Installation for Network Printing This is connected to your CD-ROM drive. All components (Printer Driver, Scanner Driver, Network Scan, Set IP, Multi Direct Print Type S IPP port) necessary for most users. You can install the printer software using the typical or ...
Typical Installation for Network Printing This is connected to your CD-ROM drive. All components (Printer Driver, Scanner Driver, Network Scan, Set IP, Multi Direct Print Type S IPP port) necessary for most users. You can install the printer software using the typical or ...

User's Guide
Page 68
NOTES: If your installation fails or the software does not work properly. b. If the test page prints out correctly, click Yes. Printer driver, Scanner driver, Printer Settings Utility and Set IP programs could be printed at the end of the installation. 4 Select the components you to connect the printer ...
NOTES: If your installation fails or the software does not work properly. b. If the test page prints out correctly, click Yes. Printer driver, Scanner driver, Printer Settings Utility and Set IP programs could be printed at the end of the installation. 4 Select the components you to connect the printer ...
User's Guide
Page 69
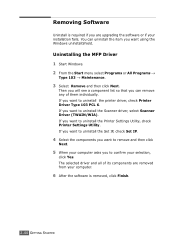
... remove any of its components are upgrading the software or if your computer. 6 After the software is required if you want to uninstall the Scanner driver, select Scanner Driver (TWAIN/WIA). If you want to uninstall the Printer Settings Utility, check Printer Settings Utility. The selected driver and all of them individually...
... remove any of its components are upgrading the software or if your computer. 6 After the software is required if you want to uninstall the Scanner driver, select Scanner Driver (TWAIN/WIA). If you want to uninstall the Printer Settings Utility, check Printer Settings Utility. The selected driver and all of them individually...
User's Guide
Page 136
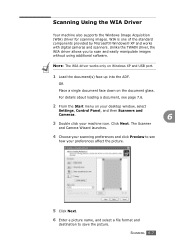
...and USB port. 1 Load the document(s) face up into the ADF. NOTE: The WIA driver works only on the document glass. The Scanner and Camera Wizard launches. 4 Choose your scanning preferences and click Preview to see page 7.6. 2 From the Start menu on your desktop ...window, select Settings, Control Panel, and then Scanners and Cameras. 6 3 Double click your preferences affect the picture. 5 Click Next. 6 Enter a picture name, and select a file format and destination...
...and USB port. 1 Load the document(s) face up into the ADF. NOTE: The WIA driver works only on the document glass. The Scanner and Camera Wizard launches. 4 Choose your scanning preferences and click Preview to see page 7.6. 2 From the Start menu on your desktop ...window, select Settings, Control Panel, and then Scanners and Cameras. 6 3 Double click your preferences affect the picture. 5 Click Next. 6 Enter a picture name, and select a file format and destination...
User's Guide
Page 141
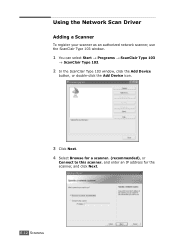
and enter an IP address for a scanner. (recommended), or Connect to this scanner. Using the Network Scan Driver Adding a Scanner To register your scanner as an authorized network scanner, use the ScanClair Type 103 window. 1 You can select Start → Programs → ScanClair Type 103 → ScanClair Type 103. 2 In the ScanClair Type 103 window, click the Add Device button, or double-click the Add Device icon. 3 Click Next. 4 Select Browse for the scanner, and click Next. 6.12 SCANNING
and enter an IP address for a scanner. (recommended), or Connect to this scanner. Using the Network Scan Driver Adding a Scanner To register your scanner as an authorized network scanner, use the ScanClair Type 103 window. 1 You can select Start → Programs → ScanClair Type 103 → ScanClair Type 103. 2 In the ScanClair Type 103 window, click the Add Device button, or double-click the Add Device icon. 3 Click Next. 4 Select Browse for the scanner, and click Next. 6.12 SCANNING
User's Guide
Page 142
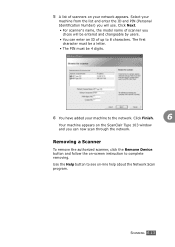
... appears. Click Finish. 6 Your machine appears on -screen instruction to the network. SCANNING 6.13 Click Next. • For scanner's name, the model name of scanner you will be 4 digits. 6 You have added your machine from the list and enter the ID and PIN (Personal Identification ...Number) you chose will use. Select your machine to complete removing. Use the Help button to 8 characters. 5 A list of scanners on -line help about the Network Scan program. The first character must be a letter. • The PIN must be entered and changeable by ...
... appears. Click Finish. 6 Your machine appears on -screen instruction to the network. SCANNING 6.13 Click Next. • For scanner's name, the model name of scanner you will be 4 digits. 6 You have added your machine from the list and enter the ID and PIN (Personal Identification ...Number) you chose will use. Select your machine to complete removing. Use the Help button to 8 characters. 5 A list of scanners on -line help about the Network Scan program. The first character must be a letter. • The PIN must be entered and changeable by ...
User's Guide
Page 143
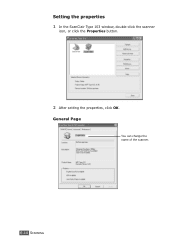
General Page You can change the name of the scanner. 6.14 SCANNING Setting the properties 1 In the ScanClair Type 103 window, double-click the scanner icon, or click the Properties button. 2 After setting the properties, click OK.
General Page You can change the name of the scanner. 6.14 SCANNING Setting the properties 1 In the ScanClair Type 103 window, double-click the scanner icon, or click the Properties button. 2 After setting the properties, click OK.

User's Guide
Page 144
SCANNING 6.15 Server Page You can open the scanned document immediately after scanning. You can check the scanner's information. You can set the 6 destination where scanned files are to be stored. Advanced Page You can select the file name format.
SCANNING 6.15 Server Page You can open the scanned document immediately after scanning. You can check the scanner's information. You can set the 6 destination where scanned files are to be stored. Advanced Page You can select the file name format.

User's Guide
Page 145
For some scanners, the Scan Area option is not available. You can select scan color, scan resolution, and file type. Using Quick Sets 1 Select the setting you want ...
For some scanners, the Scan Area option is not available. You can select scan color, scan resolution, and file type. Using Quick Sets 1 Select the setting you want ...

User's Guide
Page 146
... in the Advanced Page in the Network Scan program's Properties screen. Scanner Icons 6 SCANNING 6.17 See the next page. 2 Configure the network scanner settings. Scanning using the Network Scan driver 1 Check the scanner's status by checking the scanner icon. See "Setting the properties" on page 6.14. 3 Load... the document you want to scan to the scanner you want to use. 4 Start scanning according to the recommendations of the User's Guide supplied with your scanner. 5 Scanning is started and the scanned document is sent to the location you specified....
... in the Advanced Page in the Network Scan program's Properties screen. Scanner Icons 6 SCANNING 6.17 See the next page. 2 Configure the network scanner settings. Scanning using the Network Scan driver 1 Check the scanner's status by checking the scanner icon. See "Setting the properties" on page 6.14. 3 Load... the document you want to scan to the scanner you want to use. 4 Start scanning according to the recommendations of the User's Guide supplied with your scanner. 5 Scanning is started and the scanned document is sent to the location you specified....
User's Guide
Page 218
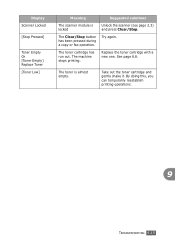
... [Stop Pressed] Toner Empty Or [Toner Empty] Replace Toner [Toner Low] Meaning Suggested solutions The scanner module is almost empty. The machine stops printing. The toner is locked Unlock the scanner (see page 2.3) and press Clear/Stop. Try again. By doing this, you can temporarily reestablish printing operations. 9 TROUBLESHOOTING 9.15 Replace the...
... [Stop Pressed] Toner Empty Or [Toner Empty] Replace Toner [Toner Low] Meaning Suggested solutions The scanner module is almost empty. The machine stops printing. The toner is locked Unlock the scanner (see page 2.3) and press Clear/Stop. Try again. By doing this, you can temporarily reestablish printing operations. 9 TROUBLESHOOTING 9.15 Replace the...


