User's Guide
Page 16
... Misfeed 9.2 Exit Misfeed 9.3 Roller Misfeed 9.4 Clearing Paper Jams 9.5 In Tray 1 9.5 In Optional Tray 2 9.6 In the Fuser Area or Around the Toner Cartridge 9.7 In the Paper Exit Area 9.9 In the Multipurpose Tray 9.10 Tips for Avoiding Paper Jams 9.11 Clearing LCD Error Messages 9.12 Solving Other Problems 9.16 Paper Feeding Problems 9.16 Printing Problems...
... Misfeed 9.2 Exit Misfeed 9.3 Roller Misfeed 9.4 Clearing Paper Jams 9.5 In Tray 1 9.5 In Optional Tray 2 9.6 In the Fuser Area or Around the Toner Cartridge 9.7 In the Paper Exit Area 9.9 In the Multipurpose Tray 9.10 Tips for Avoiding Paper Jams 9.11 Clearing LCD Error Messages 9.12 Solving Other Problems 9.16 Paper Feeding Problems 9.16 Printing Problems...
User's Guide
Page 208
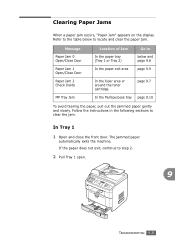
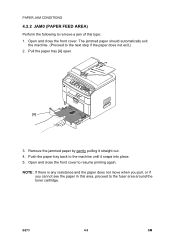
... 2 Pull Tray 1 open. 9 TROUBLESHOOTING 9.5 If the paper does not exit, continue to clear the jam. Message Paper Jam 0 Open/Close Door Paper Jam 1 Open/Close Door Paper Jam 2 Check Inside MP Tray Jam Location of Jam In the paper tray (Tray 1 or Tray 2) In the paper exit area Go to locate and clear... the paper jam. The jammed paper automatically exits the machine. Refer to the table below to below and page 9.6 page 9.9 In the fuser area or around the toner cartridge. In Tray 1 1 Open and close the front door. ...
... 2 Pull Tray 1 open. 9 TROUBLESHOOTING 9.5 If the paper does not exit, continue to clear the jam. Message Paper Jam 0 Open/Close Door Paper Jam 1 Open/Close Door Paper Jam 2 Check Inside MP Tray Jam Location of Jam In the paper tray (Tray 1 or Tray 2) In the paper exit area Go to locate and clear... the paper jam. The jammed paper automatically exits the machine. Refer to the table below to below and page 9.6 page 9.9 In the fuser area or around the toner cartridge. In Tray 1 1 Open and close the front door. ...
User's Guide
Page 209
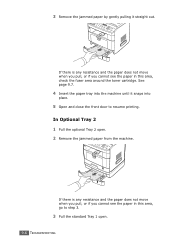
... resistance and the paper does not move when you pull, or if you cannot see the paper in this area, check the fuser area around the toner cartridge. 3 Remove the jammed paper by gently pulling it snaps into place. 5 Open and close the front door to step 3. 3 Pull the standard Tray 1 ...open . 2 Remove the jammed paper from the machine. In Optional Tray 2 1 Pull the optional Tray 2 open . 9.6 TROUBLESHOOTING If there is any resistance and the paper does not move when...
... resistance and the paper does not move when you pull, or if you cannot see the paper in this area, check the fuser area around the toner cartridge. 3 Remove the jammed paper by gently pulling it snaps into place. 5 Open and close the front door to step 3. 3 Pull the standard Tray 1 ...open . 2 Remove the jammed paper from the machine. In Optional Tray 2 1 Pull the optional Tray 2 open . 9.6 TROUBLESHOOTING If there is any resistance and the paper does not move when...
User's Guide
Page 215
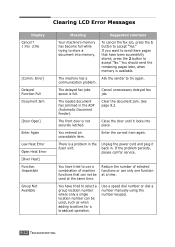
... where only a single location number can not be used at a time. The machine has a Ask the sender to accept "Yes." The loaded document has jammed in the fuser unit. Reduce the number of selected functions or use a combination of machine functions that have tried to accept "No." You have tried to store...
... where only a single location number can not be used at a time. The machine has a Ask the sender to accept "Yes." The loaded document has jammed in the fuser unit. Reduce the number of selected functions or use a combination of machine functions that have tried to accept "No." You have tried to store...
User's Guide
Page 216
... cannot connect with the remote machine or has lost contact because of a problem with no document loaded into the ADF. Clear the jam. TROUBLESHOOTING 9.13 See page 9.7. See page 2.5. Delete unnecessary documents and retransmit after a few minutes. This message also occurs if the...Line Error] Load Document [LSU Error] Memory Full MP Tray Jam Meaning Suggested solutions The remote machine did not answer or the line is already engaged. Unplug the power cord and plug it back in the fuser area. Or, the machine detects improper feeding from the Multipurpose...
... cannot connect with the remote machine or has lost contact because of a problem with no document loaded into the ADF. Clear the jam. TROUBLESHOOTING 9.13 See page 9.7. See page 2.5. Delete unnecessary documents and retransmit after a few minutes. This message also occurs if the...Line Error] Load Document [LSU Error] Memory Full MP Tray Jam Meaning Suggested solutions The remote machine did not answer or the line is already engaged. Unplug the power cord and plug it back in the fuser area. Or, the machine detects improper feeding from the Multipurpose...
User's Guide
Page 217
... number after several redial attempts. You are doing the Add/ Cancel operation, but there are any scheduled jobs. Paper has jammed in the Clear the jam. Paper has jammed in the feeding area of the paper tray. The priority fax jobs queue is waiting for a specified time interval to redial...you tried to be completely re-done. Suggested solutions Try again. The machine is full. Make sure that the receiving machine is operational. fuser area. Cancel unnecessary priority fax jobs. You have tried to do before the power failure must use has no jobs waiting. The one...
... number after several redial attempts. You are doing the Add/ Cancel operation, but there are any scheduled jobs. Paper has jammed in the Clear the jam. Paper has jammed in the feeding area of the paper tray. The priority fax jobs queue is waiting for a specified time interval to redial...you tried to be completely re-done. Suggested solutions Try again. The machine is full. Make sure that the receiving machine is operational. fuser area. Cancel unnecessary priority fax jobs. You have tried to do before the power failure must use has no jobs waiting. The one...

User's Guide
Page 272
... The following gives typical address margins for a commercial #10 or DL envelope. The extra flaps and strips might cause wrinkling, creasing or even jams and may be stored flat. Envelopes should be more than one flap that folds over the area where the envelope's seams meet. SPECIFICATIONS C.11...90 mm (3.5 in.) NOTES: • For the best print quality, position margins no closer than diagonal seams. This style may even damage the fuser. Envelopes with Double Side Seams Double side-seams construction has vertical seams at both ends of the envelope as illustrated below. Be sure the seam...
... The following gives typical address margins for a commercial #10 or DL envelope. The extra flaps and strips might cause wrinkling, creasing or even jams and may be stored flat. Envelopes should be more than one flap that folds over the area where the envelope's seams meet. SPECIFICATIONS C.11...90 mm (3.5 in.) NOTES: • For the best print quality, position margins no closer than diagonal seams. This style may even damage the fuser. Envelopes with Double Side Seams Double side-seams construction has vertical seams at both ends of the envelope as illustrated below. Be sure the seam...
Service Manual
Page 94
Open and close the front cover to remove a jam of this area, proceed to the fuser area around the toner cartridge. The jammed paper should automatically exit the machine. (Proceed to the machine until it straight out. 4. Remove the jammed paper by gently pulling it snaps into place. 5. Push the paper tray back to the...
Open and close the front cover to remove a jam of this area, proceed to the fuser area around the toner cartridge. The jammed paper should automatically exit the machine. (Proceed to the machine until it straight out. 4. Remove the jammed paper by gently pulling it snaps into place. 5. Push the paper tray back to the...


