User Guide
Page 3
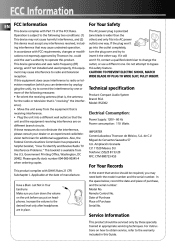
... only fits into the outlet completely, turn down the volume on headphones. Remote Control No. In accordance with DHHS Rules 21 CFR Subchapter J. Please specify stock number 004-000-00345-4 when ordering copies. Technical specification Product: Compact Audio System Brand: RCA Model: RS2302 Electrical Consumption: Power Supply: 120V~ 60 Hz Power consumption: 110 Watts IMPORTER...
... only fits into the outlet completely, turn down the volume on headphones. Remote Control No. In accordance with DHHS Rules 21 CFR Subchapter J. Please specify stock number 004-000-00345-4 when ordering copies. Technical specification Product: Compact Audio System Brand: RCA Model: RS2302 Electrical Consumption: Power Supply: 120V~ 60 Hz Power consumption: 110 Watts IMPORTER...
User Guide
Page 4
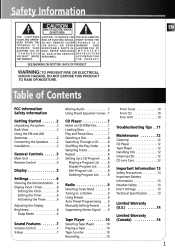
...L E PA R T S I N S I N G T H E P R O D U C T. Table of Contents FCC Information Safety Information Getting Started ...2 Unpacking the system ...2 Back View ...2 Using the FM and AM Antennas ...2 Connecting the Speakers ...2 Installation ...2 Muting Audio ...7 Using Preset Equalizer Curves .7 From Tuner ...10 From... ...8 Troubleshooting Tips . .11 Maintenance ...12 Cleaning ...12 CD Player ...12 Tape Player ...12 Handling CDs ...12 Cleaning CDs ...12 CD Lens Care ...12 General Controls ...3 Main Unit ...3 Remote Control ...4 Display ...5 Settings ...6 Showing the Demonstration . .6 Display...
...L E PA R T S I N S I N G T H E P R O D U C T. Table of Contents FCC Information Safety Information Getting Started ...2 Unpacking the system ...2 Back View ...2 Using the FM and AM Antennas ...2 Connecting the Speakers ...2 Installation ...2 Muting Audio ...7 Using Preset Equalizer Curves .7 From Tuner ...10 From... ...8 Troubleshooting Tips . .11 Maintenance ...12 Cleaning ...12 CD Player ...12 Tape Player ...12 Handling CDs ...12 Cleaning CDs ...12 CD Lens Care ...12 General Controls ...3 Main Unit ...3 Remote Control ...4 Display ...5 Settings ...6 Showing the Demonstration . .6 Display...
User Guide
Page 5
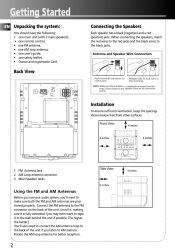
... 5 CD-R / RW COMPATIBLE 5 DISC CHANGER 1. AM Loop antenna connector. 3. Uncoil it, making sure it to AM stations. Rotate the AM loop antenna for better reception. 2 Getting Started EN Unpacking the system: You should have the following: • one main unit (with 2 main speakers); • one remote control; •...are positioned properly. Main Speaker Jacks Side View 4 inches 2 inches Using the FM and AM Antennas Before you use your audio system, you may even want to the black jacks. Antenna and Speaker Wire Connection Back View Push terminal tab down to insert wire...
... 5 CD-R / RW COMPATIBLE 5 DISC CHANGER 1. AM Loop antenna connector. 3. Uncoil it, making sure it to AM stations. Rotate the AM loop antenna for better reception. 2 Getting Started EN Unpacking the system: You should have the following: • one main unit (with 2 main speakers); • one remote control; •...are positioned properly. Main Speaker Jacks Side View 4 inches 2 inches Using the FM and AM Antennas Before you use your audio system, you may even want to the black jacks. Antenna and Speaker Wire Connection Back View Push terminal tab down to insert wire...
User Guide
Page 7
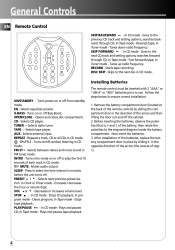
... - Plays and pauses tape playback. 1. Remove the battery compartment door (located at the back of the remote control) by sliding it in CD mode. In CD mode - searches backward through CD; In Tape mode - Goes to ensure correct installation. EQ - X-BASS - TUNER - FM ST • - SLEEP - In Clock or TImer mode - VOL or - In Tuner...
... - Plays and pauses tape playback. 1. Remove the battery compartment door (located at the back of the remote control) by sliding it in CD mode. In CD mode - searches backward through CD; In Tape mode - Goes to ensure correct installation. EQ - X-BASS - TUNER - FM ST • - SLEEP - In Clock or TImer mode - VOL or - In Tuner...
User Guide
Page 9
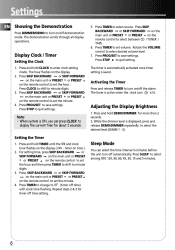
... PRESET or PRESET on /off automatically. Display Clock / Timer Setting the Clock 1. The hour flashes on time ). 2. Press CLOCK to shift to select between CD / TUNER / TAPE . 6. Press STOP to select among OFF, 120, 90, 60, 45, 30, 15 and 5 minutes. 6 Adjusting the Display Brightness...set the minute . 4. Press STOP to save settings. Note: • When system is saved. Press PROG/SET to quit setting. While the dimmer level is lit. Press and hold CLOCK to turn on the remote control to minute digits. 3. Settings EN Showing the Demonstration Press DIMMER/DEMO to enter ...
... PRESET or PRESET on /off automatically. Display Clock / Timer Setting the Clock 1. The hour flashes on time ). 2. Press CLOCK to shift to select between CD / TUNER / TAPE . 6. Press STOP to select among OFF, 120, 90, 60, 45, 30, 15 and 5 minutes. 6 Adjusting the Display Brightness...set the minute . 4. Press STOP to save settings. Note: • When system is saved. Press PROG/SET to quit setting. While the dimmer level is lit. Press and hold CLOCK to turn on the remote control to minute digits. 3. Settings EN Showing the Demonstration Press DIMMER/DEMO to enter ...
User Guide
Page 10
..., CLASS and CUSTOM. The display shows the selection briefly. While CUSTOM is flashing on the remote control to close the tray. 7 Press SOURCE repeatedly on the main unit or CD on the remote control to turn on the remote control again to close disc compartment. This may result in stop mode to begin playback. •... that is displayed, press SKIP BACKWARD or SKIP FORWARD on the main unit or PRESET or PRESET on the remote control to adjust volume level. Note: Be sure to the CD-R/RW disc, do not open the disc compartment door while the disc is loaded and ready to open the...
..., CLASS and CUSTOM. The display shows the selection briefly. While CUSTOM is flashing on the remote control to close the tray. 7 Press SOURCE repeatedly on the main unit or CD on the remote control to turn on the remote control again to close disc compartment. This may result in stop mode to begin playback. •... that is displayed, press SKIP BACKWARD or SKIP FORWARD on the main unit or PRESET or PRESET on the remote control to adjust volume level. Note: Be sure to the CD-R/RW disc, do not open the disc compartment door while the disc is loaded and ready to open the...
User Guide
Page 11
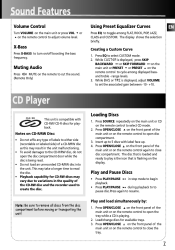
... / SKIP FORWARD on the main unit or or on the remote control to enter program mode. Press PROG/SET repeatedly to force closing of tracks in the program list. They system displays the message CLEAR. Setting Up a CD Program You can create a program of each track assignment in random...into program memory. The system displays the next available program number 00 PR:01. 2. CD Player EN Selecting a Disc • Press DISC 1, DISC 2, DISC 3, DISC 4, or DISC 5 on the main unit to directly access the corresponding disc. • Press DISC SKIP on the remote control to store into memory...
... / SKIP FORWARD on the main unit or or on the remote control to enter program mode. Press PROG/SET repeatedly to force closing of tracks in the program list. They system displays the message CLEAR. Setting Up a CD Program You can create a program of each track assignment in random...into program memory. The system displays the next available program number 00 PR:01. 2. CD Player EN Selecting a Disc • Press DISC 1, DISC 2, DISC 3, DISC 4, or DISC 5 on the main unit to directly access the corresponding disc. • Press DISC SKIP on the remote control to store into memory...
User Guide
Page 12
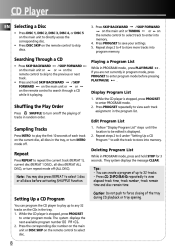
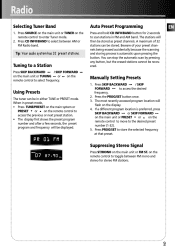
... the button. When in preset mode, • Press TUNE/PRESET on the main system or PRESET or on the remote control to access the desired frequency. 2. Press SOURCE on the main unit or TUNER on the remote control to the desired preset number (1-32). 5. Manually Setting Presets 1. You can be stored...be displayed. The most recently accessed program location will then be recovered. Press CD INFO/BAND to select between FM mono and stereo for 2 seconds to toggle between AM or FM Radio band. on the remote control to move to access the previous or next preset station. • The...
... the button. When in preset mode, • Press TUNE/PRESET on the main system or PRESET or on the remote control to access the desired frequency. 2. Press SOURCE on the main unit or TUNER on the remote control to the desired preset number (1-32). 5. Manually Setting Presets 1. You can be stored...be displayed. The most recently accessed program location will then be recovered. Press CD INFO/BAND to select between FM mono and stereo for 2 seconds to toggle between AM or FM Radio band. on the remote control to move to access the previous or next preset station. • The...
User Guide
Page 13
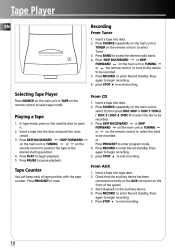
...select tape mode. press STOP to end recording. FULL LOGIC CASSETTE DECK Selecting Tape Player Press SOURCE on the main unit or TAPE on the remote control to be recorded. 3. press STOP to end recording. Playing a Tape 1. Insert a tape into deck. 2. From AUX 1. Check that ...TUNING or the remote control to tune to the station to open it. 2. or Press PROG/SET to begin recording. 6. Press PLAY to enter Record standby. Press RECORD to begin recording. 5. Press RECORD to reset. Tape Counter You can keep track of the system. 3. From CD 1. Tape Player...
...select tape mode. press STOP to end recording. FULL LOGIC CASSETTE DECK Selecting Tape Player Press SOURCE on the main unit or TAPE on the remote control to be recorded. 3. press STOP to end recording. Playing a Tape 1. Insert a tape into deck. 2. From AUX 1. Check that ...TUNING or the remote control to tune to the station to open it. 2. or Press PROG/SET to begin recording. 6. Press PLAY to enter Record standby. Press RECORD to begin recording. 5. Press RECORD to reset. Tape Counter You can keep track of the system. 3. From CD 1. Tape Player...
User Guide
Page 14
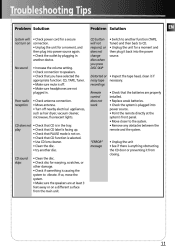
... not respond, or does not change discs when you have selected the appropriate function: CD, TAPE, Tuner. • Make sure mute is causing the system to vibrate. recordings Remote control does not work • Check that you press DISC SKIP • Switch to another device. "ERROR" message &#...speakers. • Check that the batteries are not plugged in another function (TAPE, Tuner) and then back to the system. • Remove any obstacles between the remote and the system. CD sound skips • Clean the disc. • Check disc for a moment, and then plug into power source....
... not respond, or does not change discs when you have selected the appropriate function: CD, TAPE, Tuner. • Make sure mute is causing the system to vibrate. recordings Remote control does not work • Check that you press DISC SKIP • Switch to another device. "ERROR" message &#...speakers. • Check that the batteries are not plugged in another function (TAPE, Tuner) and then back to the system. • Remove any obstacles between the remote and the system. CD sound skips • Clean the disc. • Check disc for a moment, and then plug into power source....
User Guide
Page 16
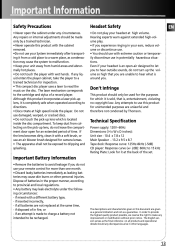
... size - 10.4 x 7.8 x 12 Main Speaker - 13.2 x 9.5 x 8.7 Tape deck: Response curve: 125Hz-8kHz (-5dB) CD player: Response curve (+/- 2dB): 60Hz to dripping and splashing. if disposed of time. Important Information Safety Precautions • Never open the ...System immediately after transporting it is sold, that you do not turn up the volume so high that is made only by Thomson. To keep dust from a cold place to a warm place, as a guarantee. Any repairs or internal adjustments should any circumstances. Hearing experts warn against extended high-volume play your remote control...
... size - 10.4 x 7.8 x 12 Main Speaker - 13.2 x 9.5 x 8.7 Tape deck: Response curve: 125Hz-8kHz (-5dB) CD player: Response curve (+/- 2dB): 60Hz to dripping and splashing. if disposed of time. Important Information Safety Precautions • Never open the ...System immediately after transporting it is sold, that you do not turn up the volume so high that is made only by Thomson. To keep dust from a cold place to a warm place, as a guarantee. Any repairs or internal adjustments should any circumstances. Hearing experts warn against extended high-volume play your remote control...

