User Guide
Page 3
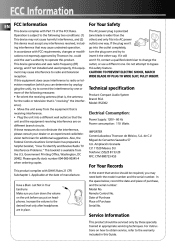
...outlet completely, turn down the volume on the unit before you put on different branch circuits. Technical specification Product: Compact Audio System Brand: RCA Model: RS2302 Electrical Consumption: Power Supply: 120V~ 60 Hz Power consumption: 110 Watts IMPORTER Comercializadora Thomson de México, S.A. For instructions... bypass this product. CAUTION: TO PREVENT ELECTRIC SHOCK, MATCH WIDE BLADE OF PLUG TO WIDE SLOT, FULLY INSERT. Remote Control No. Date of Purchase Place of the following two conditions: (1) This device may not cause harmful interference, and (2) this Guide.
...outlet completely, turn down the volume on the unit before you put on different branch circuits. Technical specification Product: Compact Audio System Brand: RCA Model: RS2302 Electrical Consumption: Power Supply: 120V~ 60 Hz Power consumption: 110 Watts IMPORTER Comercializadora Thomson de México, S.A. For instructions... bypass this product. CAUTION: TO PREVENT ELECTRIC SHOCK, MATCH WIDE BLADE OF PLUG TO WIDE SLOT, FULLY INSERT. Remote Control No. Date of Purchase Place of the following two conditions: (1) This device may not cause harmful interference, and (2) this Guide.
User Guide
Page 4
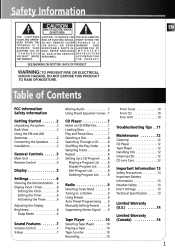
... C I D E . NO USERS E RV I C E A B L E PA R T S I N S I N G TO QUALIFIED SERVICE PERSONNEL. Table of Contents FCC Information Safety Information Getting Started ...2 Unpacking the system ...2 Back View ...2 Using the FM and AM Antennas ...2 Connecting the Speakers ...2 Installation ...2 Muting Audio ...7 Using Preset Equalizer Curves .7 From Tuner ...10 From... . .11 Maintenance ...12 Cleaning ...12 CD Player ...12 Tape Player ...12 Handling CDs ...12 Cleaning CDs ...12 CD Lens Care ...12 General Controls ...3 Main Unit ...3 Remote Control ...4 Display ...5 Settings ...6 Showing the...
... C I D E . NO USERS E RV I C E A B L E PA R T S I N S I N G TO QUALIFIED SERVICE PERSONNEL. Table of Contents FCC Information Safety Information Getting Started ...2 Unpacking the system ...2 Back View ...2 Using the FM and AM Antennas ...2 Connecting the Speakers ...2 Installation ...2 Muting Audio ...7 Using Preset Equalizer Curves .7 From Tuner ...10 From... . .11 Maintenance ...12 Cleaning ...12 CD Player ...12 Tape Player ...12 Handling CDs ...12 Cleaning CDs ...12 CD Lens Care ...12 General Controls ...3 Main Unit ...3 Remote Control ...4 Display ...5 Settings ...6 Showing the...
User Guide
Page 5
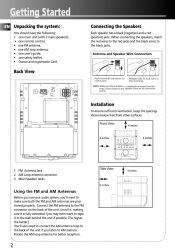
...inches VOLUME DEMO/DIMMER ON/STANDBY SOURCE TUNE/PRESET 4 inches RECORD EQ X-BASS CLOCK TIMER SLEEP SHUFFLE REPEAT INTRO CD INFO PROG/SET ST/MONO BAND DISC 1 DISC 2 DISC 3 DISC 4 DISC 5 CD-R / RW COMPATIBLE 5 DISC CHANGER 1. When connecting the speakers, match the red wires to the red jacks and...the unit if you 'll want to tape it to the black jacks. Getting Started EN Unpacking the system: You should have the following: • one main unit (with 2 main speakers); • one remote control; • one FM antenna; • one AM loop antenna; • one user's guide;...
...inches VOLUME DEMO/DIMMER ON/STANDBY SOURCE TUNE/PRESET 4 inches RECORD EQ X-BASS CLOCK TIMER SLEEP SHUFFLE REPEAT INTRO CD INFO PROG/SET ST/MONO BAND DISC 1 DISC 2 DISC 3 DISC 4 DISC 5 CD-R / RW COMPATIBLE 5 DISC CHANGER 1. When connecting the speakers, match the red wires to the red jacks and...the unit if you 'll want to tape it to the black jacks. Getting Started EN Unpacking the system: You should have the following: • one main unit (with 2 main speakers); • one remote control; • one FM antenna; • one AM loop antenna; • one user's guide;...
User Guide
Page 7
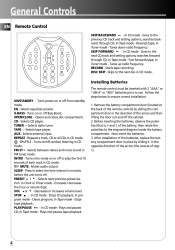
...the arrow and then lifting the door out and off to use. General Controls EN Remote Control SKIP BACKWARD - Goes to ensure correct installation. In Tape mode - Tunes up radio frequency. Selects radio tuner. In CD mode - Now insert the batteries. 3. TUNER - AUX - Stops tape playback. ...SKIP - Turns intro mode on /off random listening in the direction of the remote control) by sliding it in CD mode. Clears program; In CD mode - ON/STANDBY - REPEAT - PRESET / - VOL or - ON CD STANDBY REPEAT EQ TUNER SLEEP VOL X-BASS TAPE FM ST OPEN/CLOSE AUX INTRO ...
...the arrow and then lifting the door out and off to use. General Controls EN Remote Control SKIP BACKWARD - Goes to ensure correct installation. In Tape mode - Tunes up radio frequency. Selects radio tuner. In CD mode - Now insert the batteries. 3. TUNER - AUX - Stops tape playback. ...SKIP - Turns intro mode on /off random listening in the direction of the remote control) by sliding it in CD mode. Clears program; In CD mode - ON/STANDBY - REPEAT - PRESET / - VOL or - ON CD STANDBY REPEAT EQ TUNER SLEEP VOL X-BASS TAPE FM ST OPEN/CLOSE AUX INTRO ...
User Guide
Page 9
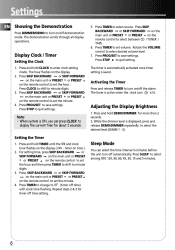
... . Rotate the VOLUME control to select source. Press SKIP BACKWARD or SKIP FORWARD on the main unit or PRESET or PRESET on the remote control to select between CD / TUNER / TAPE . 6. Press CLOCK to shift to select among OFF, 120, 90, 60, 45, 30, 15 and 5 minutes. 6... & 3 for more than 2 seconds. 2. The timer is automatically activated once timer setting is lit. Adjusting the Display Brightness 1. Note: • When system is displayed, press and release DEMO/DIMMER repeatedly to select the desired level (DIMM 1 - 3). For setting time, press SKIP BACKWARD or SKIP FORWARD on the...
... . Rotate the VOLUME control to select source. Press SKIP BACKWARD or SKIP FORWARD on the main unit or PRESET or PRESET on the remote control to select between CD / TUNER / TAPE . 6. Press CLOCK to shift to select among OFF, 120, 90, 60, 45, 30, 15 and 5 minutes. 6... & 3 for more than 2 seconds. 2. The timer is automatically activated once timer setting is lit. Adjusting the Display Brightness 1. Note: • When system is displayed, press and release DEMO/DIMMER repeatedly to select the desired level (DIMM 1 - 3). For setting time, press SKIP BACKWARD or SKIP FORWARD on the...
User Guide
Page 10
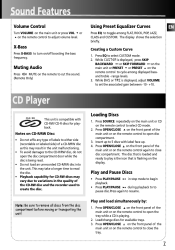
... the unit! Using Preset Equalizer Curves Press EQ to cut the sound. (Remote Only) CD Player CD-R / RW Loading Discs This unit is displayed, press SKIP BACKWARD or SKIP FORWARD on the main unit or PRESET or PRESET on the remote control to close disc compartment. Creating a Custom Curve 1. Muting Audio Press ... Press OPEN/CLOSE on the front panel of the main unit or on the display. The disc that is flashing on the remote control to open the tray while a CD is loaded and ready to open the disc compartment door while the disc is being read the disc. • Playback capability ...
... the unit! Using Preset Equalizer Curves Press EQ to cut the sound. (Remote Only) CD Player CD-R / RW Loading Discs This unit is displayed, press SKIP BACKWARD or SKIP FORWARD on the main unit or PRESET or PRESET on the remote control to close disc compartment. Creating a Custom Curve 1. Muting Audio Press ... Press OPEN/CLOSE on the front panel of the main unit or on the display. The disc that is flashing on the remote control to open the tray while a CD is loaded and ready to open the disc compartment door while the disc is being read the disc. • Playback capability ...
User Guide
Page 11
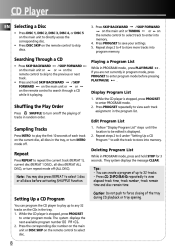
.... 4. Playing a Program List While in PROGRAM mode, press and hold SKIP BACKWARD / SKIP FORWARD on the main unit or or on the remote control to search through a CD while it is displayed. 2. Shuffling the Play Order Press SHUFFLE to turn repeat mode off the playing of each track assignment in program... the main unit or TUNING or on /off (ALL DISC). Press the corresponding disc number on the main unit or DISC SKIP on the remote control to skip discs. 3. The system displays the next available program number 00 PR:01. 2. Display Program List 1. Tips: • You can program the...
.... 4. Playing a Program List While in PROGRAM mode, press and hold SKIP BACKWARD / SKIP FORWARD on the main unit or or on the remote control to search through a CD while it is displayed. 2. Shuffling the Play Order Press SHUFFLE to turn repeat mode off the playing of each track assignment in program... the main unit or TUNING or on /off (ALL DISC). Press the corresponding disc number on the main unit or DISC SKIP on the remote control to skip discs. 3. The system displays the next available program number 00 PR:01. 2. Display Program List 1. Tips: • You can program the...
User Guide
Page 12
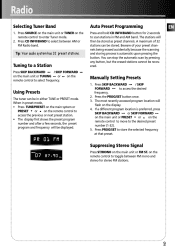
... Using Presets The tuner can be in FM and AM band. When in preset mode, • Press TUNE/PRESET on the main system or PRESET or on the remote control to access the desired frequency. 2. A maximum of your preset channels being erased accidentally because the scanning and storing process is preferred...or PRESET mode. PR 01 FM Suppressing Stereo Signal PROG 07 87.90 MHz Press ST/MONO on the remote control to enter Tuner mode. 2. Auto Preset Programming Press and hold CD INFO/BAND button for 2 seconds to select between FM mono and stereo for stereo FM stations. 9 Radio...
... Using Presets The tuner can be in FM and AM band. When in preset mode, • Press TUNE/PRESET on the main system or PRESET or on the remote control to access the desired frequency. 2. A maximum of your preset channels being erased accidentally because the scanning and storing process is preferred...or PRESET mode. PR 01 FM Suppressing Stereo Signal PROG 07 87.90 MHz Press ST/MONO on the remote control to enter Tuner mode. 2. Auto Preset Programming Press and hold CD INFO/BAND button for 2 seconds to select between FM mono and stereo for stereo FM stations. 9 Radio...
User Guide
Page 13
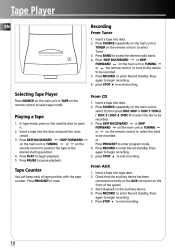
...Press RECORD to begin recording. 6. Press STOP to open it. 2. In tape mode, press on the remote control to access the desired radio band. 4.. Press PAUSE to enter program mode. 4. From CD 1. or Press PROG/SET to pause playback. From AUX 1. Playing a Tape 1. Check that the auxiliary ...a tape into tape deck. 2. Insert a tape into deck . 2. Tape Counter You can keep track of the system. 3. Press SOURCE repeatedly on the main unit or TUNER on the main unit to select CD then press DISC SKIP or DISC1 / DISC2 / DISC 3 / DISC 4 /DISC 5 to select the disc to...
...Press RECORD to begin recording. 6. Press STOP to open it. 2. In tape mode, press on the remote control to access the desired radio band. 4.. Press PAUSE to enter program mode. 4. From CD 1. or Press PROG/SET to pause playback. From AUX 1. Playing a Tape 1. Check that the auxiliary ...a tape into tape deck. 2. Insert a tape into deck . 2. Tape Counter You can keep track of the system. 3. Press SOURCE repeatedly on the main unit or TUNER on the main unit to select CD then press DISC SKIP or DISC1 / DISC2 / DISC 3 / DISC 4 /DISC 5 to select the disc to...
User Guide
Page 14
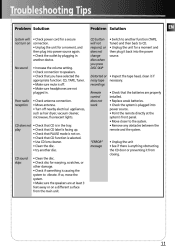
...; Clean the disc. • try another disc. play • Check that CD label is facing up. • Check that the batteries are at the system's front panel. • Move closer to the system. • Remove any obstacles between the remote and the system. EN Distorted or • Inspect the tape head, clean it from the...
...; Clean the disc. • try another disc. play • Check that CD label is facing up. • Check that the batteries are at the system's front panel. • Move closer to the system. • Remove any obstacles between the remote and the system. EN Distorted or • Inspect the tape head, clean it from the...
User Guide
Page 16
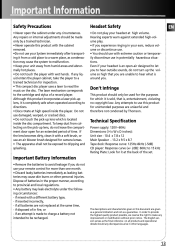
...to dripping and splashing. Hearing experts warn against extended high-volume play your remote control for more than one month. • Discard leaky batteries immediately as... x 7.8 x 12 Main Speaker - 13.2 x 9.5 x 8.7 Tape deck: Response curve: 125Hz-8kHz (-5dB) CD player: Response curve (+/- 2dB): 60Hz to hear outside sounds, do not turn up lens which it at high speed ... notice. Important Battery Information • Remove the batteries to malfunction. • Keep your System immediately after transporting it with a different battery type, - The English version serves as a...
...to dripping and splashing. Hearing experts warn against extended high-volume play your remote control for more than one month. • Discard leaky batteries immediately as... x 7.8 x 12 Main Speaker - 13.2 x 9.5 x 8.7 Tape deck: Response curve: 125Hz-8kHz (-5dB) CD player: Response curve (+/- 2dB): 60Hz to hear outside sounds, do not turn up lens which it at high speed ... notice. Important Battery Information • Remove the batteries to malfunction. • Keep your System immediately after transporting it with a different battery type, - The English version serves as a...


