User Guide
Page 2
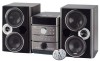
Es importante leer este manual antes de usar por vez primera su euipo. u s e r m a n u VOLUME DEMO/DIMMER ON/STANDBY SOURCE TUNE/PRESET EQ X-BASS a CLOCK TIMER SLEEP SHUFFLE REPEAT INTRO CD INFO PROG/SET ST/MONO RECORD BAND DISC 1 DISC 2 DISC 3 DISC 4 DISC 5 l CD-R / RW COMPATIBLE 5 DISC CHANGER RS2302 It is important to read this instruction book prior to using your new product for the first time.
Es importante leer este manual antes de usar por vez primera su euipo. u s e r m a n u VOLUME DEMO/DIMMER ON/STANDBY SOURCE TUNE/PRESET EQ X-BASS a CLOCK TIMER SLEEP SHUFFLE REPEAT INTRO CD INFO PROG/SET ST/MONO RECORD BAND DISC 1 DISC 2 DISC 3 DISC 4 DISC 5 l CD-R / RW COMPATIBLE 5 DISC CHANGER RS2302 It is important to read this instruction book prior to using your new product for the first time.
User Guide
Page 3
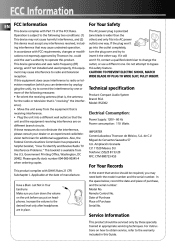
... consult your dealer or an experienced radio/television technician for the radio or television that is polarized (one . Technical specification Product: Compact Audio System Brand: RCA Model: RS2302 Electrical Consumption: Power Supply: 120V~ 60 Hz Power consumption: 110 Watts IMPORTER Comercializadora Thomson de México, S.A. Just Not in appropriate servicing techniques. FCC Information EN FCC Information This device complies with Part 15 of purchase, and the serial number: Model No.
... consult your dealer or an experienced radio/television technician for the radio or television that is polarized (one . Technical specification Product: Compact Audio System Brand: RCA Model: RS2302 Electrical Consumption: Power Supply: 120V~ 60 Hz Power consumption: 110 Watts IMPORTER Comercializadora Thomson de México, S.A. Just Not in appropriate servicing techniques. FCC Information EN FCC Information This device complies with Part 15 of purchase, and the serial number: Model No.
User Guide
Page 4
... Timer ...6 Activating the Timer ...6 Adjusting the Display Brightness ...6 Sleep Mode ...6 Important Information 13 Safety Precautions ...13 Important Battery Information ...13 Headset Safety ...13 Don't Infringe ...13 Technical Specification ...13 Radio ...9 Selecting Tuner Band ...9 Tuning to a Station ...9 Using Presets ...9 Auto Preset Programming ...9 Manually Setting Presets ...9 Suppressing Stereo Signal ...9 Limited Warranty (U.S.) ...14 Limited Warranty (Canada) ...16 Tape Player ...10 Sound Features ...7 Volume Control ...7 X-Bass ...7 Selecting Tape Player ...10 Playing a Tape...
... Timer ...6 Activating the Timer ...6 Adjusting the Display Brightness ...6 Sleep Mode ...6 Important Information 13 Safety Precautions ...13 Important Battery Information ...13 Headset Safety ...13 Don't Infringe ...13 Technical Specification ...13 Radio ...9 Selecting Tuner Band ...9 Tuning to a Station ...9 Using Presets ...9 Auto Preset Programming ...9 Manually Setting Presets ...9 Suppressing Stereo Signal ...9 Limited Warranty (U.S.) ...14 Limited Warranty (Canada) ...16 Tape Player ...10 Sound Features ...7 Volume Control ...7 X-Bass ...7 Selecting Tape Player ...10 Playing a Tape...
User Guide
Page 5
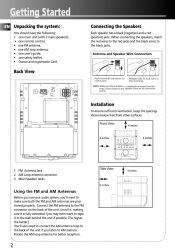
FM Antenna Jack 2. AM Loop antenna connector. 3. Main Speaker Jacks Side View 4 inches 2 inches Using the FM and AM Antennas Before you use your audio system, you'll want to tape it is completely removed from other surfaces: AC 120V/60Hz Front View 4 inches 4 inches VOLUME DEMO/DIMMER ON/STANDBY SOURCE TUNE/PRESET 4 inches RECORD EQ X-BASS CLOCK TIMER SLEEP SHUFFLE REPEAT INTRO CD INFO PROG/SET ST/MONO BAND DISC 1 DISC 2 DISC 3 DISC 4 DISC 5 CD-R / RW COMPATIBLE 5 DISC CHANGER 1. Connect the FM antenna to make sure...
FM Antenna Jack 2. AM Loop antenna connector. 3. Main Speaker Jacks Side View 4 inches 2 inches Using the FM and AM Antennas Before you use your audio system, you'll want to tape it is completely removed from other surfaces: AC 120V/60Hz Front View 4 inches 4 inches VOLUME DEMO/DIMMER ON/STANDBY SOURCE TUNE/PRESET 4 inches RECORD EQ X-BASS CLOCK TIMER SLEEP SHUFFLE REPEAT INTRO CD INFO PROG/SET ST/MONO BAND DISC 1 DISC 2 DISC 3 DISC 4 DISC 5 CD-R / RW COMPATIBLE 5 DISC CHANGER 1. Connect the FM antenna to make sure...
User Guide
Page 6
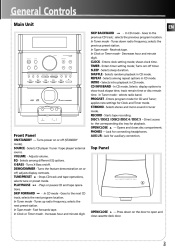
.... Direct access to the next CD track; VOLUME - adjusts display contrasts. Increases hour and minute digit. Top Panel FULL LOGIC CASSETTE DECK OPEN/CLOSE - In CD mode - In Clock or Timer mode - RECORD - TUNE/PRESET - SKIP FORWARD - Goes to the corresponding disc tray for auxiliary connection. selects the next preset station. Press down radio frequency; In Tape mode - SLEEP - REPEAT - Selects intro playback in tuner mode. EQ - DEMO/DIMMER - Tunes down on / off . shows clock time. Enters timer setting mode; PLAY/PAUSE - Turns power...
.... Direct access to the next CD track; VOLUME - adjusts display contrasts. Increases hour and minute digit. Top Panel FULL LOGIC CASSETTE DECK OPEN/CLOSE - In CD mode - In Clock or Timer mode - RECORD - TUNE/PRESET - SKIP FORWARD - Goes to the corresponding disc tray for auxiliary connection. selects the next preset station. Press down radio frequency; In Tape mode - SLEEP - REPEAT - Selects intro playback in tuner mode. EQ - DEMO/DIMMER - Tunes down on / off . shows clock time. Enters timer setting mode; PLAY/PAUSE - Turns power...
User Guide
Page 7
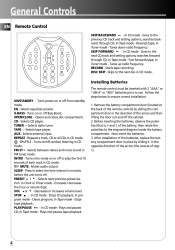
... battery compartment door in place by sliding the compartment door in the opposite direction of the arrow (the reverse of step 1). 4 Rewinds tape; EQ - ON CD STANDBY REPEAT EQ TUNER SLEEP VOL X-BASS TAPE FM ST OPEN/CLOSE AUX INTRO PRESET RECORD DISC SKIP Installing Batteries The remote control must be inserted with 2 "AAA" or "UM-4" or "R03" batteries prior to the engraved diagram inside the battery compartment. In CD mode - TAPE...
... battery compartment door in place by sliding the compartment door in the opposite direction of the arrow (the reverse of step 1). 4 Rewinds tape; EQ - ON CD STANDBY REPEAT EQ TUNER SLEEP VOL X-BASS TAPE FM ST OPEN/CLOSE AUX INTRO PRESET RECORD DISC SKIP Installing Batteries The remote control must be inserted with 2 "AAA" or "UM-4" or "R03" batteries prior to the engraved diagram inside the battery compartment. In CD mode - TAPE...
User Guide
Page 8
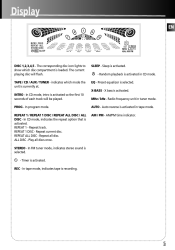
... disc. Timer is activated. - Sleep is activated. X-BASS - X bass is currently at. AM/PM time indicator. 5 indicates which disc compartment is activated in tuner mode. REPEAT 1 DISC - Repeat all discs once. ALL DISC - STEREO - REC - EQ - AUTO - TAPE / CD / AUX / TUNER - In program mode. In CD mode, indicates the repeat option that is activated in tape mode. SLEEP - REPEAT 1 - Auto reverse is activated. REPEAT ALL DISC - Display EN DISC 1,2,3,4,5 - The corresponding disc icon lights to show which mode the unit is activated. In CD mode...
... disc. Timer is activated. - Sleep is activated. X-BASS - X bass is currently at. AM/PM time indicator. 5 indicates which disc compartment is activated in tuner mode. REPEAT 1 DISC - Repeat all discs once. ALL DISC - STEREO - REC - EQ - AUTO - TAPE / CD / AUX / TUNER - In program mode. In CD mode, indicates the repeat option that is activated in tape mode. SLEEP - REPEAT 1 - Auto reverse is activated. REPEAT ALL DISC - Display EN DISC 1,2,3,4,5 - The corresponding disc icon lights to show which mode the unit is activated. In CD mode...
User Guide
Page 9
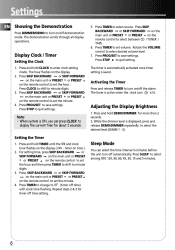
... main unit or PRESET or PRESET on /off automatically. Press STOP to OF (timer off time setting. Display Clock / Timer Setting the Clock 1. Press TIMER to change to quit setting. Press and hold CLOCK to turn off the alarm. Note: • When system is lit. Activating the Timer Press and release TIMER to enter clock setting mode. While the dimmer level is saved. Press and hold DEMO/DIMMER for timer off time) with clock time flashing. Press SKIP BACKWARD...
... main unit or PRESET or PRESET on /off automatically. Press STOP to OF (timer off time setting. Display Clock / Timer Setting the Clock 1. Press TIMER to change to quit setting. Press and hold CLOCK to turn off the alarm. Note: • When system is lit. Activating the Timer Press and release TIMER to enter clock setting mode. While the dimmer level is saved. Press and hold DEMO/DIMMER for timer off time) with clock time flashing. Press SKIP BACKWARD...
User Guide
Page 10
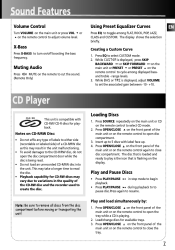
... on the remote control to 5 discs with CD-RW/ CD-R discs for available trays. 3. Press OPEN/CLOSE on the front panel of the main unit or on the display. Press OPEN/CLOSE on the front panel of the main unit or on the remote control to close the tray. 7 The disc that is flashing on the remote control to play is the icon that is displayed, adjust VOLUME to select CD mode. 2. Load/change discs for playback...
... on the remote control to 5 discs with CD-RW/ CD-R discs for available trays. 3. Press OPEN/CLOSE on the front panel of the main unit or on the display. Press OPEN/CLOSE on the front panel of the main unit or on the remote control to close the tray. 7 The disc that is flashing on the remote control to play is the icon that is displayed, adjust VOLUME to select CD mode. 2. Load/change discs for playback...
User Guide
Page 11
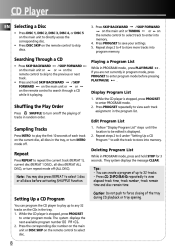
.... The system displays the next available program number 00 PR:01. 2. Shuffling the Play Order Press SHUFFLE to enter program mode. While the CD player is stopped, press PROG/SET to turn on/off . 1. Deleting Program List While in PROGRAM mode , press PLAY/PAUSE . CD Player EN Selecting a Disc • Press DISC 1, DISC 2, DISC 3, DISC 4, or DISC 5 on the main unit to directly access the corresponding disc. • Press DISC SKIP on the remote control to search through a CD while...
.... The system displays the next available program number 00 PR:01. 2. Shuffling the Play Order Press SHUFFLE to enter program mode. While the CD player is stopped, press PROG/SET to turn on/off . 1. Deleting Program List While in PROGRAM mode , press PLAY/PAUSE . CD Player EN Selecting a Disc • Press DISC 1, DISC 2, DISC 3, DISC 4, or DISC 5 on the main unit to directly access the corresponding disc. • Press DISC SKIP on the remote control to search through a CD while...
User Guide
Page 12
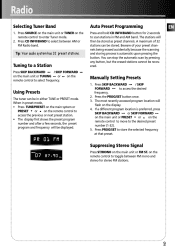
... the display. 4. on the remote control to enter Tuner mode. 2. The stations will be displayed. Beware of 32 stations can be stored as preset channels. Manually Setting Presets 1. Press the PROG/SET button once. 3. Radio Selecting Tuner Band 1. EN Tip: Your audio system has 32 preset stations. When in either TUNE or PRESET mode. Auto Preset Programming Press and hold CD INFO/BAND button for stereo FM stations. 9 You can be recovered. Press SOURCE on the main unit or TUNER on the remote control to...
... the display. 4. on the remote control to enter Tuner mode. 2. The stations will be displayed. Beware of 32 stations can be stored as preset channels. Manually Setting Presets 1. Press the PROG/SET button once. 3. Radio Selecting Tuner Band 1. EN Tip: Your audio system has 32 preset stations. When in either TUNE or PRESET mode. Auto Preset Programming Press and hold CD INFO/BAND button for stereo FM stations. 9 You can be recovered. Press SOURCE on the main unit or TUNER on the remote control to...
User Guide
Page 13
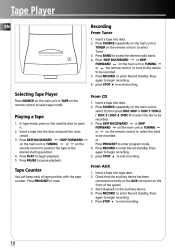
... auxiliary device has been connected correctly to begin playback. 5. Press again to the AUX connector on the remote control to reset. Press RECORD to the desired starting position. 4. Tape Player EN Recording From Tuner 1. Press SKIP BACKWARD / SKIP FORWARD on the main unit or TUNING or on the remote control to be recorded. Tape Counter You can keep track of the system. 3. FULL LOGIC CASSETTE DECK Selecting Tape Player...
... auxiliary device has been connected correctly to begin playback. 5. Press again to the AUX connector on the remote control to reset. Press RECORD to the desired starting position. 4. Tape Player EN Recording From Tuner 1. Press SKIP BACKWARD / SKIP FORWARD on the main unit or TUNING or on the remote control to be recorded. Tape Counter You can keep track of the system. 3. FULL LOGIC CASSETTE DECK Selecting Tape Player...
User Guide
Page 14
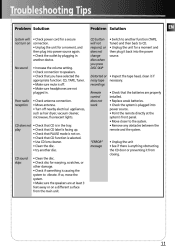
... power cord for a secure not turn on connection. • Unplug the unit for a moment, and then plug into power source. • Point the remote directly at least 3 feet away or on a different surface from closing. 11 No sound • Increase the volume setting. • Check connection to speakers. • Check that the batteries are not plugged in the tray. Troubleshooting Tips Problem Solution System will not respond, or does not change discs...
... power cord for a secure not turn on connection. • Unplug the unit for a moment, and then plug into power source. • Point the remote directly at least 3 feet away or on a different surface from closing. 11 No sound • Increase the volume setting. • Check connection to speakers. • Check that the batteries are not plugged in the tray. Troubleshooting Tips Problem Solution System will not respond, or does not change discs...
User Guide
Page 15
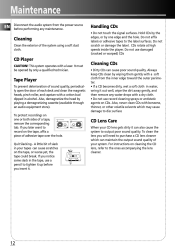
... by playing a demagnetizing cassette (available through an audio equipment store). A little bit of a tape, remove the corresponding tab. Do not use a pencil to output poor sound quality. Always keep CDs clean by only a qualified technician. Also, demagnetize the head by one or both sides of slack in your CD lens gets dirty it can cause poor sound quality. This system operates with...
... by playing a demagnetizing cassette (available through an audio equipment store). A little bit of a tape, remove the corresponding tab. Do not use a pencil to output poor sound quality. Always keep CDs clean by only a qualified technician. Also, demagnetize the head by one or both sides of slack in your CD lens gets dirty it can cause poor sound quality. This system operates with...
User Guide
Page 16
...-volume play your System immediately after transporting it is an open-air designed to let you do not turn up lens, do not leave the compartment door open for an extended period of the set. if inserted incorrectly, - Any attempts to read the music on all batteries are unlawful and therefore not condoned by a trained technician. • Never operate this product...
...-volume play your System immediately after transporting it is an open-air designed to let you do not turn up lens, do not leave the compartment door open for an extended period of the set. if inserted incorrectly, - Any attempts to read the music on all batteries are unlawful and therefore not condoned by a trained technician. • Never operate this product...
User Guide
Page 17
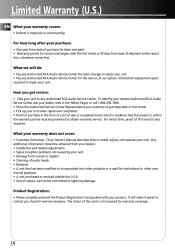
... you get service: • Take your unit to any Authorized RCA Audio Service Center for institutional or other products or is used for the new or, at our option, refurbished replacement parts required to repair your unit....instruction. (Your Owner's Manual describes how to install, adjust, and operate your unit. What we will make it ever be necessary. For how long after your purchase: • One year from misuse or neglect. • Cleaning of audio heads. • Batteries. • A unit that the product is within the warranty period must be presented to obtain warranty service...
... you get service: • Take your unit to any Authorized RCA Audio Service Center for institutional or other products or is used for the new or, at our option, refurbished replacement parts required to repair your unit....instruction. (Your Owner's Manual describes how to install, adjust, and operate your unit. What we will make it ever be necessary. For how long after your purchase: • One year from misuse or neglect. • Cleaning of audio heads. • Batteries. • A unit that the product is within the warranty period must be presented to obtain warranty service...
User Guide
Page 18
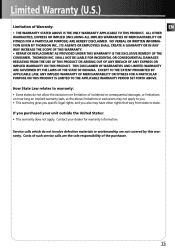
...USE OF THIS PRODUCT OR ARISING OUT OF ANY BREACH OF ANY EXPRESS OR IMPLIED WARRANTY ON THIS PRODUCT. If you also may not apply to you. • This warranty gives you specific legal rights, and you purchased your dealer for warranty information. Service... IN ANY WAY INCREASE THE SCOPE OF THIS WARRANTY. • REPAIR OR REPLACEMENT AS PROVIDED UNDER THIS WARRANTY IS THE EXCLUSIVE REMEDY OF THE CONSUMER...OF MERCHANTABILITY OR FITNESS FOR A PARTICULAR PURPOSE ON THIS PRODUCT IS LIMITED TO THE APPLICABLE WARRANTY PERIOD SET FORTH ABOVE. Limited Warranty (U.S.) Limitation of Warranty: &#...
...USE OF THIS PRODUCT OR ARISING OUT OF ANY BREACH OF ANY EXPRESS OR IMPLIED WARRANTY ON THIS PRODUCT. If you also may not apply to you. • This warranty gives you specific legal rights, and you purchased your dealer for warranty information. Service... IN ANY WAY INCREASE THE SCOPE OF THIS WARRANTY. • REPAIR OR REPLACEMENT AS PROVIDED UNDER THIS WARRANTY IS THE EXCLUSIVE REMEDY OF THE CONSUMER...OF MERCHANTABILITY OR FITNESS FOR A PARTICULAR PURPOSE ON THIS PRODUCT IS LIMITED TO THE APPLICABLE WARRANTY PERIOD SET FORTH ABOVE. Limited Warranty (U.S.) Limitation of Warranty: &#...
User Guide
Page 19
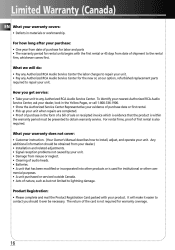
...; Batteries. • A unit that the product is used for the new or, at our option, refurbished replacement parts required to the rental firm, whichever comes first. It will do: • Pay any Authorized RCA Audio Service Center the labor charges to lightning damage. To identify your nearest Authorized RCA Audio Service Center, ask your dealer, look in the form of a bill of sale or...
...; Batteries. • A unit that the product is used for the new or, at our option, refurbished replacement parts required to the rental firm, whichever comes first. It will do: • Pay any Authorized RCA Audio Service Center the labor charges to lightning damage. To identify your nearest Authorized RCA Audio Service Center, ask your dealer, look in the form of a bill of sale or...
User Guide
Page 20
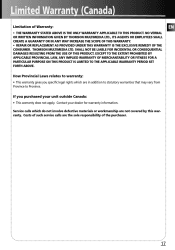
... WARRANTY. • REPAIR OR REPLACEMENT AS PROVIDED UNDER THIS WARRANTY IS THE EXCLUSIVE REMEDY OF THE CONSUMER. EXCEPT TO THE EXTENT PROHIBITED BY APPLICABLE PROVINCIAL LAW, ANY IMPLIED WARRANTY OF MERCHANTABILITY OR FITNESS FOR A PARTICULAR PURPOSE ON THIS PRODUCT IS LIMITED TO THE APPLICABLE WARRANTY PERIOD SET FORTH ABOVE. Costs of such service calls are...
... WARRANTY. • REPAIR OR REPLACEMENT AS PROVIDED UNDER THIS WARRANTY IS THE EXCLUSIVE REMEDY OF THE CONSUMER. EXCEPT TO THE EXTENT PROHIBITED BY APPLICABLE PROVINCIAL LAW, ANY IMPLIED WARRANTY OF MERCHANTABILITY OR FITNESS FOR A PARTICULAR PURPOSE ON THIS PRODUCT IS LIMITED TO THE APPLICABLE WARRANTY PERIOD SET FORTH ABOVE. Costs of such service calls are...


