User Guide
Page 3
...servicing techniques. If the plug won 't fit, contact a qualified electrician to bypass this product. Technical specification Product: Compact Audio System Brand: RCA Model: RS2302 Electrical Consumption: Power Supply: 120V~ 60 Hz Power consumption: 110 Watts IMPORTER Comercializadora Thomson de México, S.A. Government ...PLUG TO WIDE SLOT, FULLY INSERT. de C.V. In the space below, record the date and place of Purchase Serial No. Remote Control No. Also, the Federal Communications Commission has prepared a helpful booklet, "How To Identify and Resolve Radio TV Interference ...
...servicing techniques. If the plug won 't fit, contact a qualified electrician to bypass this product. Technical specification Product: Compact Audio System Brand: RCA Model: RS2302 Electrical Consumption: Power Supply: 120V~ 60 Hz Power consumption: 110 Watts IMPORTER Comercializadora Thomson de México, S.A. Government ...PLUG TO WIDE SLOT, FULLY INSERT. de C.V. In the space below, record the date and place of Purchase Serial No. Remote Control No. Also, the Federal Communications Commission has prepared a helpful booklet, "How To Identify and Resolve Radio TV Interference ...
User Guide
Page 4
... DO NOT REMOVE COVER (OR BACK). Table of Contents FCC Information Safety Information Getting Started ...2 Unpacking the system ...2 Back View ...2 Using the FM and AM Antennas ...2 Connecting the Speakers ...2 Installation ...2 Muting Audio ...7 Using Preset...Program List ...8 Deleting Program List ...8 Troubleshooting Tips . .11 Maintenance ...12 Cleaning ...12 CD Player ...12 Tape Player ...12 Handling CDs ...12 Cleaning CDs ...12 CD Lens Care ...12 General Controls ...3 Main Unit ...3 Remote Control ...4 Display ...5 Settings ...6 Showing the Demonstration . .6 Display Clock / Timer ...6 ...
... DO NOT REMOVE COVER (OR BACK). Table of Contents FCC Information Safety Information Getting Started ...2 Unpacking the system ...2 Back View ...2 Using the FM and AM Antennas ...2 Connecting the Speakers ...2 Installation ...2 Muting Audio ...7 Using Preset...Program List ...8 Deleting Program List ...8 Troubleshooting Tips . .11 Maintenance ...12 Cleaning ...12 CD Player ...12 Tape Player ...12 Handling CDs ...12 Cleaning CDs ...12 CD Lens Care ...12 General Controls ...3 Main Unit ...3 Remote Control ...4 Display ...5 Settings ...6 Showing the Demonstration . .6 Display Clock / Timer ...6 ...
User Guide
Page 5
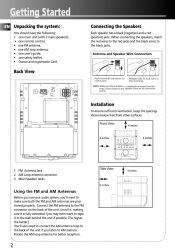
... VOLUME DEMO/DIMMER ON/STANDBY SOURCE TUNE/PRESET 4 inches RECORD EQ X-BASS CLOCK TIMER SLEEP SHUFFLE REPEAT INTRO CD INFO PROG/SET ST/MONO BAND DISC 1 DISC 2 DISC 3 DISC 4 DISC 5 CD-R / RW COMPATIBLE 5 DISC CHANGER 1. Antenna and Speaker Wire Connection Back View Push terminal tab down to ...Using the FM and AM Antennas Before you use your audio system, you listen to the back of the unit. Getting Started EN Unpacking the system: You should have the following: • one main unit (with 2 main speakers); • one remote control; • one FM antenna; • one AM...
... VOLUME DEMO/DIMMER ON/STANDBY SOURCE TUNE/PRESET 4 inches RECORD EQ X-BASS CLOCK TIMER SLEEP SHUFFLE REPEAT INTRO CD INFO PROG/SET ST/MONO BAND DISC 1 DISC 2 DISC 3 DISC 4 DISC 5 CD-R / RW COMPATIBLE 5 DISC CHANGER 1. Antenna and Speaker Wire Connection Back View Push terminal tab down to ...Using the FM and AM Antennas Before you use your audio system, you listen to the back of the unit. Getting Started EN Unpacking the system: You should have the following: • one main unit (with 2 main speakers); • one remote control; • one FM antenna; • one AM...
User Guide
Page 7
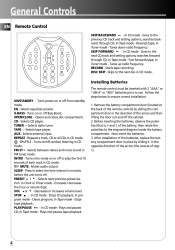
...mode - Opens and closes disc compartment. TAPE - In Clock or TImer mode - In CD mode - Plays and pauses CD; Remove the battery compartment door (located at the back of the remote control) by sliding it in the opposite direction of the arrow (the reverse of each .../CLOSE AUX INTRO PRESET RECORD DISC SKIP Installing Batteries The remote control must be inserted with 2 "AAA" or "UM-4" or "R03" batteries prior to ensure correct installation. X-BASS - Selects external input. Turns on or off random listening in CD mode. SLEEP - In Tape mode - ON/STANDBY ...
...mode - Opens and closes disc compartment. TAPE - In Clock or TImer mode - In CD mode - Plays and pauses CD; Remove the battery compartment door (located at the back of the remote control) by sliding it in the opposite direction of the arrow (the reverse of each .../CLOSE AUX INTRO PRESET RECORD DISC SKIP Installing Batteries The remote control must be inserted with 2 "AAA" or "UM-4" or "R03" batteries prior to ensure correct installation. X-BASS - Selects external input. Turns on or off random listening in CD mode. SLEEP - In Tape mode - ON/STANDBY ...
User Guide
Page 9
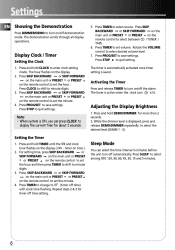
... select desired volume level. 7. Display Clock / Timer Setting the Clock 1. The hour flashes on time ). 2. Adjusting the Display Brightness 1. Note: • When system is saved. timer on the display. 2. Repeat steps 2 & 3 for about 2 seconds. Press SKIP BACKWARD or SKIP FORWARD on the main unit or PRESET or... on /off time) with clock time flashing. Press SKIP BACKWARD or SKIP FORWARD on the main unit or PRESET or PRESET on the remote control to select between CD / TUNER / TAPE . 6. Press and hold DEMO/DIMMER for more than 2 seconds. 2. Sleep Mode You can press CLOCK to ...
... select desired volume level. 7. Display Clock / Timer Setting the Clock 1. The hour flashes on time ). 2. Adjusting the Display Brightness 1. Note: • When system is saved. timer on the display. 2. Repeat steps 2 & 3 for about 2 seconds. Press SKIP BACKWARD or SKIP FORWARD on the main unit or PRESET or... on /off time) with clock time flashing. Press SKIP BACKWARD or SKIP FORWARD on the main unit or PRESET or PRESET on the remote control to select between CD / TUNER / TAPE . 6. Press and hold DEMO/DIMMER for more than 2 seconds. 2. Sleep Mode You can press CLOCK to ...
User Guide
Page 10
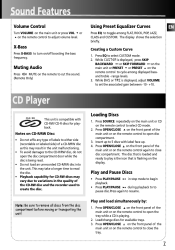
... discs may vary due to variations in the quality of the main unit or on the remote control to cut the sound. (Remote Only) CD Player CD-R / RW Loading Discs This unit is compatible with label face up. 4. Creating a Custom Curve 1. This may result in stop mode to begin playback. • Press ... damages to cycle among FLAT, ROCK, POP, JAZZ, CLASS and CUSTOM. The display shows the selection briefly. Press SOURCE repeatedly on the main unit or CD on the remote control to adjust volume level. Sound Features Volume Control Turn VOLUME on the main unit or press VOL or on the...
... discs may vary due to variations in the quality of the main unit or on the remote control to cut the sound. (Remote Only) CD Player CD-R / RW Loading Discs This unit is compatible with label face up. 4. Creating a Custom Curve 1. This may result in stop mode to begin playback. • Press ... damages to cycle among FLAT, ROCK, POP, JAZZ, CLASS and CUSTOM. The display shows the selection briefly. Press SOURCE repeatedly on the main unit or CD on the remote control to adjust volume level. Sound Features Volume Control Turn VOLUME on the main unit or press VOL or on the...
User Guide
Page 11
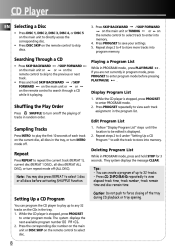
... SKIP FORWARD on the main unit or TUNING or on the remote control to select track to store into memory. Repeat steps 2 to 4 under "Setting Up a CD Program " to edit the track to enter into program memory. They system displays the message CLEAR. Display Program List 1. Follow "Display Program... or tray opening. Caution: Do not push to select 1 disc or all discs before pressing PLAY/PAUSE . While the CD player is displayed. 2. The system displays the next available program number 00 PR:01. 2. Repeat steps 2 to 4 to repeat the current track (REPEAT 1), current disc (REPEAT 1...
... SKIP FORWARD on the main unit or TUNING or on the remote control to select track to store into memory. Repeat steps 2 to 4 under "Setting Up a CD Program " to edit the track to enter into program memory. They system displays the message CLEAR. Display Program List 1. Follow "Display Program... or tray opening. Caution: Do not push to select 1 disc or all discs before pressing PLAY/PAUSE . While the CD player is displayed. 2. The system displays the next available program number 00 PR:01. 2. Repeat steps 2 to 4 to repeat the current track (REPEAT 1), current disc (REPEAT 1...
User Guide
Page 12
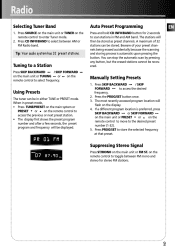
...but the erased stations cannot be in either TUNE or PRESET mode. The most recently accessed program location will then be displayed. Press CD INFO/BAND to toggle between AM or FM Radio band. A maximum of your preset channels being erased accidentally because the scanning and ... 2 seconds to scan stations in preset mode, • Press TUNE/PRESET on the main system or PRESET or on the remote control to the desired preset number (1-32). 5. EN Tip: Your audio system has 32 preset stations. If a different program location is automatic upon pressing the button. Press...
...but the erased stations cannot be in either TUNE or PRESET mode. The most recently accessed program location will then be displayed. Press CD INFO/BAND to toggle between AM or FM Radio band. A maximum of your preset channels being erased accidentally because the scanning and ... 2 seconds to scan stations in preset mode, • Press TUNE/PRESET on the main system or PRESET or on the remote control to the desired preset number (1-32). 5. EN Tip: Your audio system has 32 preset stations. If a different program location is automatic upon pressing the button. Press...
User Guide
Page 13
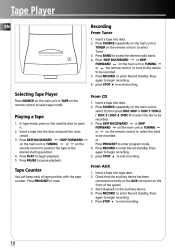
...recording. 6. Press RECORD to the desired starting position. 4. Press SKIP BACKWARD / SKIP FORWARD on the main unit or TUNING or on the remote control to open it. 2. Press PROG/SET to enter Record standby. Press RECORD to reset. FULL LOGIC CASSETTE DECK Selecting Tape Player Press...be recorded. 3. Tape Counter You can keep track of the system. 3. Check that the auxiliary device has been connected correctly to begin recording. 5. Press RECORD to end recording. 10 Press PLAY to the AUX connector on the main unit to select CD then press DISC SKIP or DISC1 / DISC2 / DISC 3...
...recording. 6. Press RECORD to the desired starting position. 4. Press SKIP BACKWARD / SKIP FORWARD on the main unit or TUNING or on the remote control to open it. 2. Press PROG/SET to enter Record standby. Press RECORD to reset. FULL LOGIC CASSETTE DECK Selecting Tape Player Press...be recorded. 3. Tape Counter You can keep track of the system. 3. Check that the auxiliary device has been connected correctly to begin recording. 5. Press RECORD to end recording. 10 Press PLAY to the AUX connector on the main unit to select CD then press DISC SKIP or DISC1 / DISC2 / DISC 3...
User Guide
Page 14
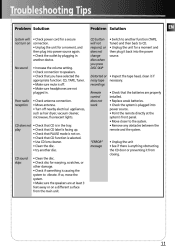
... to speakers. • Check that the batteries are at the system's front panel. • Move closer to the system. • Remove any obstacles between the remote and the system. "ERROR" message • Unplug the unit • See if there is anything obstructing the CD door or preventing it if noisy tape necessary. Troubleshooting Tips Problem...
... to speakers. • Check that the batteries are at the system's front panel. • Move closer to the system. • Remove any obstacles between the remote and the system. "ERROR" message • Unplug the unit • See if there is anything obstructing the CD door or preventing it if noisy tape necessary. Troubleshooting Tips Problem...
User Guide
Page 16
...to make any circumstances. if mixed with a soft brush, or use in your remote control for it is around you do not leave the compartment door open -air ...- 10.4 x 7.8 x 12 Main Speaker - 13.2 x 9.5 x 8.7 Tape deck: Response curve: 125Hz-8kHz (-5dB) CD player: Response curve (+/- 2dB): 60Hz to 15 kHz Rating Plate: Look for more than one month. • Discard leaky batteries... immediately as condensation may cause the system to let you experience ringing in potentially hazardous situations. Dispose of the set. if disposed of...
...to make any circumstances. if mixed with a soft brush, or use in your remote control for it is around you do not leave the compartment door open -air ...- 10.4 x 7.8 x 12 Main Speaker - 13.2 x 9.5 x 8.7 Tape deck: Response curve: 125Hz-8kHz (-5dB) CD player: Response curve (+/- 2dB): 60Hz to 15 kHz Rating Plate: Look for more than one month. • Discard leaky batteries... immediately as condensation may cause the system to let you experience ringing in potentially hazardous situations. Dispose of the set. if disposed of...


