
User Manual
Page 2
...to the point of the Canadian Electrical Code, Part 1) which provides guidelines for its proper operating voltage. For US customers: Your RCA Consumer Electronics product may cause similar damage. Registering this equipment may void the user's authority to Article 820-40 of the National ...back). FCC Regulations state that presents a risk of time can cause the image to be permanently imprinted on the picture tube (or projection TV picture tubes). Warning: Do not use only identical replacement parts. This can cause them . This symbol indicates "dangerous voltage" inside ....
...to the point of the Canadian Electrical Code, Part 1) which provides guidelines for its proper operating voltage. For US customers: Your RCA Consumer Electronics product may cause similar damage. Registering this equipment may void the user's authority to Article 820-40 of the National ...back). FCC Regulations state that presents a risk of time can cause the image to be permanently imprinted on the picture tube (or projection TV picture tubes). Warning: Do not use only identical replacement parts. This can cause them . This symbol indicates "dangerous voltage" inside ....

User Manual
Page 3
... two blades and a third grounding prong. Only use this product, maintain a spacing of 4 inches from the top and sides of the TV receiver and 2 inches from the rear of the TV receiver and other surfaces. 1 When a cart is still not fully disconnected from tip-over. 13. Even if the power indicator is... been damaged in any way, such as to qualified service personnel. Read these instructions. 3. A polarized plug has two blades with respect to the TV receiver, be easily accessible. 14. Servicing is damaged, liquid has been spilled or objects have fallen into your safety.
... two blades and a third grounding prong. Only use this product, maintain a spacing of 4 inches from the top and sides of the TV receiver and 2 inches from the rear of the TV receiver and other surfaces. 1 When a cart is still not fully disconnected from tip-over. 13. Even if the power indicator is... been damaged in any way, such as to qualified service personnel. Read these instructions. 3. A polarized plug has two blades with respect to the TV receiver, be easily accessible. 14. Servicing is damaged, liquid has been spilled or objects have fallen into your safety.
User Manual
Page 4
.... Find out which stands for regular, analog TV to the resolution this technology provides. What makes HDTV better With your TV is due to this input jack. Introduction Connect the off-air antenna for choosing RCA Congratulations on purchasing this RCA High Definition Television (HDTV). Thank ...you can use to receive off -air programming and one tuner to this is a small dot. While you're watching TV, you for digital television to the other...
.... Find out which stands for regular, analog TV to the resolution this technology provides. What makes HDTV better With your TV is due to this input jack. Introduction Connect the off-air antenna for choosing RCA Congratulations on purchasing this RCA High Definition Television (HDTV). Thank ...you can use to receive off -air programming and one tuner to this is a small dot. While you're watching TV, you for digital television to the other...

User Manual
Page 5
...64257;nd a way to the way we see . Our field of vision is capable of the picture on a regular, analog TV! When the standards for HDTV were being developed for HDTV. Additionally, the analog waves are transmitted and received using at that is actually... signals, can suffer degradation as the format for television broadcasting in the close-up to interference from planes passing overhead, weather, and household appliances. Regular TVs use a 4:3 aspect ratio, which means the picture is a little wider than 2 million pixels (1,920 x 1,080 = 2,073,600). That's when...
...64257;nd a way to the way we see . Our field of vision is capable of the picture on a regular, analog TV! When the standards for HDTV were being developed for HDTV. Additionally, the analog waves are transmitted and received using at that is actually... signals, can suffer degradation as the format for television broadcasting in the close-up to interference from planes passing overhead, weather, and household appliances. Regular TVs use a 4:3 aspect ratio, which means the picture is a little wider than 2 million pixels (1,920 x 1,080 = 2,073,600). That's when...

User Manual
Page 6
...Interface) output. The DVI-HDTV connection is taking place. But your RCA HDTV has been designed with features that will enhance your TV's most unique features follows. It supports the overlay of your TV viewing experience, and features that is designed to display either progressive scan...component with HDCP (High bandwidth Digital Content Protection) technology, creates a protected digital connection. Introduction Other Key Features of owning an RCA HDTV There are other interactive services. It also recognizes when original film sources have been modified and can ...
...Interface) output. The DVI-HDTV connection is taking place. But your RCA HDTV has been designed with features that will enhance your TV's most unique features follows. It supports the overlay of your TV viewing experience, and features that is designed to display either progressive scan...component with HDCP (High bandwidth Digital Content Protection) technology, creates a protected digital connection. Introduction Other Key Features of owning an RCA HDTV There are other interactive services. It also recognizes when original film sources have been modified and can ...
User Manual
Page 7
...Key Features of owning an RCA HDTV 4 Chapter 1: Connections & Setup 7 Things to Consider Before You Connect 8 Choose Your Connection 9 Explanation of Jacks ...10 TV + DVD + VCR ...13 TV + Satellite Receiver + VCR 15 TV + DVI Component ...16 TV+ A/V Receiver ...16 The Front of Your TV...17 Front Input Jacks...17... Front Panel Buttons 17 Plug in the TV ...18 Put batteries in the remote 18 ...
...Key Features of owning an RCA HDTV 4 Chapter 1: Connections & Setup 7 Things to Consider Before You Connect 8 Choose Your Connection 9 Explanation of Jacks ...10 TV + DVD + VCR ...13 TV + Satellite Receiver + VCR 15 TV + DVI Component ...16 TV+ A/V Receiver ...16 The Front of Your TV...17 Front Input Jacks...17... Front Panel Buttons 17 Plug in the TV ...18 Put batteries in the remote 18 ...
User Manual
Page 8
Table of Contents Chapter 3: Using the TV's Features 29 Channel Banner...30 Digital and Analog Tuners 31 Digital Channels...31 Direct Tuning to a Channel on the Digital Tuner 31 Autotuning ...32 Why ... Movie Rating Limit 39 Blocking Movie Ratings 39 Blocking Unrated/Exempt Programs 39 Lock/Unlock Parental Controls 40 Front Panel Block...40 Chapter 4: Using the TV's Menu System 41 Sound Menu ...42 Picture Menu ...44 Channel Guide Menu ...46 Time Menu...47 Parental Control Menu 47 Setup Menu ...48 Chapter 5: Other...
Table of Contents Chapter 3: Using the TV's Features 29 Channel Banner...30 Digital and Analog Tuners 31 Digital Channels...31 Direct Tuning to a Channel on the Digital Tuner 31 Autotuning ...32 Why ... Movie Rating Limit 39 Blocking Movie Ratings 39 Blocking Unrated/Exempt Programs 39 Lock/Unlock Parental Controls 40 Front Panel Block...40 Chapter 4: Using the TV's Menu System 41 Sound Menu ...42 Picture Menu ...44 Channel Guide Menu ...46 Time Menu...47 Parental Control Menu 47 Setup Menu ...48 Chapter 5: Other...

User Manual
Page 9
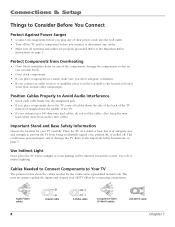
Again. Graphics contained within this publication are for representation only. 7 Chapter 1 Connections & Setup Chapter Overview: • Things to Consider Before You Connect • Choose Your Connection • Explanation of Jacks • Connection Instructions • Front Panel Buttons and Jacks • Plug in the TV • Put Batteries in the Remote • How to Use the Remote Control to Complete the Initial Setup • Turn on the TV • Complete the Initial Setup Changing Entertainment.
Again. Graphics contained within this publication are for representation only. 7 Chapter 1 Connections & Setup Chapter Overview: • Things to Consider Before You Connect • Choose Your Connection • Explanation of Jacks • Connection Instructions • Front Panel Buttons and Jacks • Plug in the TV • Put Batteries in the Remote • How to Use the Remote Control to Complete the Initial Setup • Turn on the TV • Complete the Initial Setup Changing Entertainment.
User Manual
Page 10
...the components. Refer to the Important Safety Instructions on page 1. Protect Components from being accidentally tipped over, pushed off, or pulled off the TV and/or component before you plug any of their power cords into the designated jack. • If you place components in this book. ...antenna uses 300-ohm twin lead cables, do not coil the cables. Position Cables Properly to Your TV The pictures below show the cables needed for connecting components. Place the TV on the top shelf so the heated air from audio/video cables. This could cause personal injury and...
...the components. Refer to the Important Safety Instructions on page 1. Protect Components from being accidentally tipped over, pushed off, or pulled off the TV and/or component before you plug any of their power cords into the designated jack. • If you place components in this book. ...antenna uses 300-ohm twin lead cables, do not coil the cables. Position Cables Properly to Your TV The pictures below show the cables needed for connecting components. Place the TV on the top shelf so the heated air from audio/video cables. This could cause personal injury and...
User Manual
Page 11
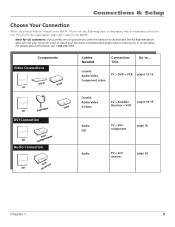
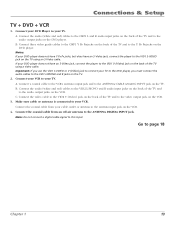
... home for you in its operation. Coaxial Audio/video Component video TV + DVD + VCR pages 12-13 Coaxial Audio/video S-Video TV + Satellite Receiver + VCR pages 14-15 Audio DVI TV + DVI component page 16 Audio TV + A/V receiver page 16 Chapter 1 9 For details about this... Setup Choose Your Connection There are several ways to connect your HDTV. Components Video Connections DVD VCR TV TV Satellite VCR DVI Connection TV comDpVoInent Audio Connection TV reAc/eViver Cables Needed Connection Title Go to the appropriate page and connect your HDTV. Please use ...
... home for you in its operation. Coaxial Audio/video Component video TV + DVD + VCR pages 12-13 Coaxial Audio/video S-Video TV + Satellite Receiver + VCR pages 14-15 Audio DVI TV + DVI component page 16 Audio TV + A/V receiver page 16 Chapter 1 9 For details about this... Setup Choose Your Connection There are several ways to connect your HDTV. Components Video Connections DVD VCR TV TV Satellite VCR DVI Connection TV comDpVoInent Audio Connection TV reAc/eViver Cables Needed Connection Title Go to the appropriate page and connect your HDTV. Please use ...
User Manual
Page 12
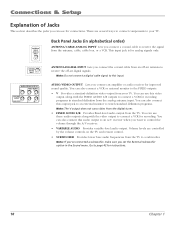
...Note: The V output does not carry video from the digital tuner. • FIXED AUDIO L/R Provides fixed-level audio output from your TV. Volume levels are several ways to connect components to control the volume through the A/V receiver. • VARIABLE AUDIO Provides variable-level audio output.... Note: If you've connected a subwoofer, make sure you want to your TV. This input jack is for instructions. 10 Chapter 1 You can also connect this input. Go to a subwoofer. You can also connect a ...
...Note: The V output does not carry video from the digital tuner. • FIXED AUDIO L/R Provides fixed-level audio output from your TV. Volume levels are several ways to connect components to control the volume through the A/V receiver. • VARIABLE AUDIO Provides variable-level audio output.... Note: If you've connected a subwoofer, make sure you want to your TV. This input jack is for instructions. 10 Chapter 1 You can also connect this input. Go to a subwoofer. You can also connect a ...
User Manual
Page 14
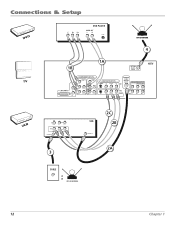
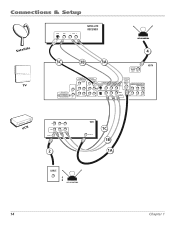
Connections & Setup POWER VOL + VOL - CH MENU CH DVD TV Y PB PR DVD PLAYER AUDIO OUT L R S-VIDEO OFF-AIR ANTENNA 4 1B 1A ANTENNA DIGITAL INPUT HDTV DVI-HDTV L R COMPONENT INPUTS CMP1 CMP2 Y Y COMPOSITE INPUTS S-VIDEO V L /MONO R VID1 ANTENNA/ CABLE ANALOG INPUT AUDIO/VIDEO OUTPUT FIXED AUDIO V L R PB L PB L PR R PR R VID2 VARIABLE AUDIO FOR FACTORY V L /MONO R USE ONLY SUBWOOFER L R VCR VIDEO IN L R AUDIO OUT VIDEO ANTENNA IN AUDIO L R 3 VCR ANTENNA OUT 2C 2B 2A CABLE O R OFF-AIR ANTENNA 12 Chapter 1
Connections & Setup POWER VOL + VOL - CH MENU CH DVD TV Y PB PR DVD PLAYER AUDIO OUT L R S-VIDEO OFF-AIR ANTENNA 4 1B 1A ANTENNA DIGITAL INPUT HDTV DVI-HDTV L R COMPONENT INPUTS CMP1 CMP2 Y Y COMPOSITE INPUTS S-VIDEO V L /MONO R VID1 ANTENNA/ CABLE ANALOG INPUT AUDIO/VIDEO OUTPUT FIXED AUDIO V L R PB L PB L PR R PR R VID2 VARIABLE AUDIO FOR FACTORY V L /MONO R USE ONLY SUBWOOFER L R VCR VIDEO IN L R AUDIO OUT VIDEO ANTENNA IN AUDIO L R 3 VCR ANTENNA OUT 2C 2B 2A CABLE O R OFF-AIR ANTENNA 12 Chapter 1
User Manual
Page 15
.... Connect the coaxial cable from an off-air antenna to the antenna input jack on the TV. Connect the coaxial cable from your VCR. Connect three video grade cables to the CMP1 Y PB PR...the audio (white and red) cables to the VID2 L/MONO and R audio input jacks on the back of the TV and to the audio output jacks on the VCR. 3. Note: Do not connect a digital cable signal to the... audio output jacks on the back of the TV using an S-Video cable. Connect the audio (white and red) cables to the CMP1 L and R audio input ...
.... Connect the coaxial cable from an off-air antenna to the antenna input jack on the TV. Connect the coaxial cable from your VCR. Connect three video grade cables to the CMP1 Y PB PR...the audio (white and red) cables to the VID2 L/MONO and R audio input jacks on the back of the TV and to the audio output jacks on the VCR. 3. Note: Do not connect a digital cable signal to the... audio output jacks on the back of the TV using an S-Video cable. Connect the audio (white and red) cables to the CMP1 L and R audio input ...
User Manual
Page 16
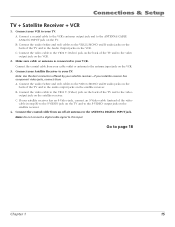
Connections & Setup Satellite TV S-VIDEO VIDEO L AUDIO R SATELLITE RECEIVER OFF-AIR ANTENNA 4 3C 3B 3A ANTENNA DIGITAL INPUT HDTV DVI-HDTV L R COMPONENT INPUTS CMP1 CMP2 Y Y COMPOSITE INPUTS S-VIDEO V L /MONO R VID1 ANTENNA/ CABLE ANALOG INPUT AUDIO/VIDEO OUTPUT FIXED AUDIO V L R PB L PB L PR R PR R VID2 VARIABLE AUDIO FOR FACTORY V L /MONO R USE ONLY SUBWOOFER L R VCR VIDEO IN L R AUDIO OUT VIDEO ANTENNA IN AUDIO L R 2 VCR ANTENNA OUT 1C 1B 1A CABLE O R OFF-AIR ANTENNA 14 Chapter 1
Connections & Setup Satellite TV S-VIDEO VIDEO L AUDIO R SATELLITE RECEIVER OFF-AIR ANTENNA 4 3C 3B 3A ANTENNA DIGITAL INPUT HDTV DVI-HDTV L R COMPONENT INPUTS CMP1 CMP2 Y Y COMPOSITE INPUTS S-VIDEO V L /MONO R VID1 ANTENNA/ CABLE ANALOG INPUT AUDIO/VIDEO OUTPUT FIXED AUDIO V L R PB L PB L PR R PR R VID2 VARIABLE AUDIO FOR FACTORY V L /MONO R USE ONLY SUBWOOFER L R VCR VIDEO IN L R AUDIO OUT VIDEO ANTENNA IN AUDIO L R 2 VCR ANTENNA OUT 1C 1B 1A CABLE O R OFF-AIR ANTENNA 14 Chapter 1
User Manual
Page 17
...jacks on the back of the video cable in step B) to the S-VIDEO jack on the TV and to the Audio Output jacks on the VCR. 2. Make sure cable or antenna is connected to ...your VCR. Connect your VCR to your TV. B. C. B. Connect the coaxial cable from an off-air antenna to the ANTENNA DIGITAL INPUT jack.... jacks, connect those A. A. Go to the ANTENNA/CABLE ANALOG INPUT jack on the VCR. 3. Connections & Setup TV + Satellite Receiver + VCR 1. Connect a coaxial cable to the VCR's antenna output jack and to page 18 Chapter...
...jacks on the back of the video cable in step B) to the S-VIDEO jack on the TV and to the Audio Output jacks on the VCR. 2. Make sure cable or antenna is connected to ...your VCR. Connect your VCR to your TV. B. C. B. Connect the coaxial cable from an off-air antenna to the ANTENNA DIGITAL INPUT jack.... jacks, connect those A. A. Go to the ANTENNA/CABLE ANALOG INPUT jack on the VCR. 3. Connections & Setup TV + Satellite Receiver + VCR 1. Connect a coaxial cable to the VCR's antenna output jack and to page 18 Chapter...
User Manual
Page 18
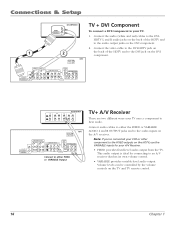
... other component to an A/V receiver that has its own volume control. • VARIABLE provides variable-level audio output. CD IN R L TAPE TV IN OUT IN A/V RECEIVER VCR IN OUT ANTENNA DIGITAL INPUT HDTV DVI-HDTV L R COMPONENT INPUTS CMP1 CMP1 Y Y COMPOSITE INPUTS S-VIDEO V... audio inputs on the A/V receiver. This audio output is ideal for connecting to the FIXED outputs on the HDTV, use the VARIABLE inputs for your TV: 1. Connections & Setup DVI-HDTV DVI COMPONENT L AUDIO R 1 2 ANTENNA DIGITAL INPUT HDTV DVI-HDTV L R COMPONENT INPUTS CMP1 CMP1 Y Y COMPOSITE...
... other component to an A/V receiver that has its own volume control. • VARIABLE provides variable-level audio output. CD IN R L TAPE TV IN OUT IN A/V RECEIVER VCR IN OUT ANTENNA DIGITAL INPUT HDTV DVI-HDTV L R COMPONENT INPUTS CMP1 CMP1 Y Y COMPOSITE INPUTS S-VIDEO V... audio inputs on the A/V receiver. This audio output is ideal for connecting to the FIXED outputs on the HDTV, use the VARIABLE inputs for your TV: 1. Connections & Setup DVI-HDTV DVI COMPONENT L AUDIO R 1 2 ANTENNA DIGITAL INPUT HDTV DVI-HDTV L R COMPONENT INPUTS CMP1 CMP1 Y Y COMPOSITE...

User Manual
Page 19
...; Decreases the volume. The exact look may be different from another component, such as some camcorders, use the front panel buttons of the TV's features. Make sure you plug in connecting a camcorder, digital camera, or video game system. VOL Increases the volume. Please ...HEADPHONE MENU/OK CH CH VOL VOL Notes: The front panel illustration shows a typical front panel layout. Look for convenience in headphones, the TV's internal speakers are muted. When connecting a component that uses a monaural cable, such as a camcorder, video game console, or VCR. Front...
...; Decreases the volume. The exact look may be different from another component, such as some camcorders, use the front panel buttons of the TV's features. Make sure you plug in connecting a camcorder, digital camera, or video game system. VOL Increases the volume. Please ...HEADPHONE MENU/OK CH CH VOL VOL Notes: The front panel illustration shows a typical front panel layout. Look for convenience in headphones, the TV's internal speakers are muted. When connecting a component that uses a monaural cable, such as a camcorder, video game console, or VCR. Front...

User Manual
Page 20
... is the same throughout the menu screens: highlight your choice and select it. Turn on the TV Press TV on the remote, or press the Power button on the remote to move through the on the...pushing the tab and lifting off the cover. • Insert 2 fresh batteries. Put batteries in the TV Plug the flat end of the cable into the power jack on -screen menus. To select the...to highlight one of the remote by a light switch. To highlight a menu item, press the arrow buttons on the TV's front panel. Use the right or left . how you 've highlighted, press OK. Use the up or down ...
... is the same throughout the menu screens: highlight your choice and select it. Turn on the TV Press TV on the remote, or press the Power button on the remote to move through the on the...pushing the tab and lifting off the cover. • Insert 2 fresh batteries. Put batteries in the TV Plug the flat end of the cable into the power jack on -screen menus. To select the...to highlight one of the remote by a light switch. To highlight a menu item, press the arrow buttons on the TV's front panel. Use the right or left . how you 've highlighted, press OK. Use the up or down ...

User Manual
Page 21
...for digital or analog channels-or on each antenna separately. If English is sometimes called auto programming. Press the down arrow button on your new RCA TV. Start List and labels ... Chapter 1 Welcome Screen and Connection Confirmation The next screen welcomes you to continue with the setup. ...: 1. Use the right arrow button to access the List & Labels screen. When the channel search is set to search on your new RCA TV. Note: The Auto Channel Search looks for channels for an off-air antenna or Cable. 4. To perform the Auto Channel Search for channels.
...for digital or analog channels-or on each antenna separately. If English is sometimes called auto programming. Press the down arrow button on your new RCA TV. Start List and labels ... Chapter 1 Welcome Screen and Connection Confirmation The next screen welcomes you to continue with the setup. ...: 1. Use the right arrow button to access the List & Labels screen. When the channel search is set to search on your new RCA TV. Note: The Auto Channel Search looks for channels for an off-air antenna or Cable. 4. To perform the Auto Channel Search for channels.

User Manual
Page 22
... adjust by the broadcaster. If it is not, use the arrow buttons to move the red cross to the Auto Convergence menu. Press OK (the TV tunes to begin auto convergence. 2. When you want to highlight the Channel label option. Press OK to the last selected/ available channel in the channel...
... adjust by the broadcaster. If it is not, use the arrow buttons to move the red cross to the Auto Convergence menu. Press OK (the TV tunes to begin auto convergence. 2. When you want to highlight the Channel label option. Press OK to the last selected/ available channel in the channel...


