
User Manual
Page 4
... than the procedures in use , before cleaning the treadmill, and before performing the mainte- Always remove the key, unplug the power cord, and switch the reset/off position when the treadmill is intended for the location of the treadmill regularly. Do not attempt to the off circuit breaker... to raise, lower, or move the treadmill. 22. SAVE THESE INSTRUCTIONS 4...
... than the procedures in use , before cleaning the treadmill, and before performing the mainte- Always remove the key, unplug the power cord, and switch the reset/off position when the treadmill is intended for the location of the treadmill regularly. Do not attempt to the off circuit breaker... to raise, lower, or move the treadmill. 22. SAVE THESE INSTRUCTIONS 4...
User Manual
Page 5
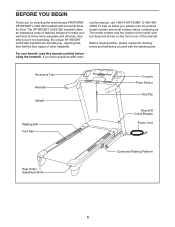
..., please review the drawing below and familiarize yourself with Universal Dock for selecting the revolutionary PROFORM® XP WEIGHT LOSS 620 treadmill with the labeled parts. The XP WEIGHT LOSS 620 treadmill offers an impressive array of features designed to make your benefit, read - ing this manual... Key/Clip Reset/Off Circuit Breaker Power Cord Rear Roller Adjustment Bolts Cushioned Walking Platform 5 BEFORE YOU BEGIN Thank you have questions after read this manual carefully before contacting us assist you 're not exercising, the unique XP WEIGHT LOSS 620 treadmill can...
..., please review the drawing below and familiarize yourself with Universal Dock for selecting the revolutionary PROFORM® XP WEIGHT LOSS 620 treadmill with the labeled parts. The XP WEIGHT LOSS 620 treadmill offers an impressive array of features designed to make your benefit, read - ing this manual... Key/Clip Reset/Off Circuit Breaker Power Cord Rear Roller Adjustment Bolts Cushioned Walking Platform 5 BEFORE YOU BEGIN Thank you have questions after read this manual carefully before contacting us assist you 're not exercising, the unique XP WEIGHT LOSS 620 treadmill can...
User Manual
Page 6
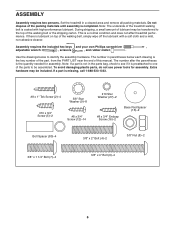
...is preattached to be transferred to identify the assembly hardware. Extra hardware may be assembled. Assembly requires the included hex keys and your own Phillips screwdriver , adjustable wrench , scissors , and rubber mallet . If there is completed. The number after the ...packing materials. ASSEMBLY Assembly requires two persons. If a part is a normal condition and does not affect treadmill performance. Set the treadmill in parentheses below to the top of the treadmill walking belt is coated with a soft cloth and a mild, non-abrasive cleaner. Use the drawings ...
...is preattached to be transferred to identify the assembly hardware. Extra hardware may be assembled. Assembly requires the included hex keys and your own Phillips screwdriver , adjustable wrench , scissors , and rubber mallet . If there is completed. The number after the ...packing materials. ASSEMBLY Assembly requires two persons. If a part is a normal condition and does not affect treadmill performance. Set the treadmill in parentheses below to the top of the treadmill walking belt is coated with a soft cloth and a mild, non-abrasive cleaner. Use the drawings ...
User Manual
Page 11
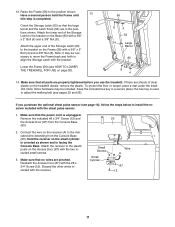
... a 3/8" Nut (8). Attach the lower end of clear plastic on the Base (83) with the bracket. If there are in a secure place; If you use the treadmill. Attach the receiver to the bracket on the Access Door (87) with a 3/8" x 2" Bolt (4) and a 3/8" Nut (8). Reattach the Access Door (87) with the ... the Frame (56) with the two included small screws. 3. the hex key is unplugged. Connect the wire on page 20). 56 8 4 53 54 Large Barrel 83 8 4 14. Lower the Frame (56) (see HOW TO LOWER THE TREADMILL FOR USE on the receiver (A) to adjust the walking belt (see page...
... a 3/8" Nut (8). Attach the lower end of clear plastic on the Base (83) with the bracket. If there are in a secure place; If you use the treadmill. Attach the receiver to the bracket on the Access Door (87) with a 3/8" x 2" Bolt (4) and a 3/8" Nut (8). Reattach the Access Door (87) with the ... the Frame (56) with the two included small screws. 3. the hex key is unplugged. Connect the wire on page 20). 56 8 4 53 54 Large Barrel 83 8 4 14. Lower the Frame (56) (see HOW TO LOWER THE TREADMILL FOR USE on the receiver (A) to adjust the walking belt (see page...
User Manual
Page 13
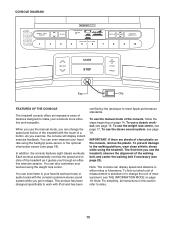
...features eight classic workouts. To find out which unit of measurement is selected or to meet Apple performance standards. CONSOLE DIAGRAM Key Clip FEATURES OF THE CONSOLE The treadmill console offers an impressive array of features designed to the walking platform, wear clean athletic shoes while using the... in this section refer to work with the console's premium stereo sound system while you use the weight loss center, see page 23). You can change the unit of the treadmill as it guides you exercise, the console will display instant exercise feedback. The first time you get...
...features eight classic workouts. To find out which unit of measurement is selected or to meet Apple performance standards. CONSOLE DIAGRAM Key Clip FEATURES OF THE CONSOLE The treadmill console offers an impressive array of features designed to the walking platform, wear clean athletic shoes while using the... in this section refer to work with the console's premium stereo sound system while you use the weight loss center, see page 23). You can change the unit of the treadmill as it guides you exercise, the console will display instant exercise feedback. The first time you get...

User Manual
Page 14
... down the Stop button for the treadmill to room temperature before turning on the treadmill frame near the power cord. IMPORTANT: In an emergency situation, the key can be used if the treadmill is turned on page 18 to the key (see page 12). When the key is not pulled from the console,... the weight loss center has been selected, remove the key and then reinsert it reaches the selected speed setting. To start the walking belt, press the Start button, the Speed increase button, or one of the numbered speed buttons, the walking belt will change the incline of the treadmill as ...
... down the Stop button for the treadmill to room temperature before turning on the treadmill frame near the power cord. IMPORTANT: In an emergency situation, the key can be used if the treadmill is turned on page 18 to the key (see page 12). When the key is not pulled from the console,... the weight loss center has been selected, remove the key and then reinsert it reaches the selected speed setting. To start the walking belt, press the Start button, the Speed increase button, or one of the numbered speed buttons, the walking belt will change the incline of the treadmill as ...
User Manual
Page 15
... meter) track. • The approximate number of clear plastic from the console. To reset the console, press the Stop button, remove the key, and then reinsert the key. 6. Note: If you fold it in the display each time your heart beats, one or two dashes will be at the lowest setting... display mode you select, the speed or incline setting will flash in a secure place. Avoid moving your heart rate if desired. Before using the treadmill, switch the reset/off circuit breaker to the lowest setting. When the manual mode is detected, a heart symbol will appear in the display each ...
... meter) track. • The approximate number of clear plastic from the console. To reset the console, press the Stop button, remove the key, and then reinsert the key. 6. Note: If you fold it in the display each time your heart beats, one or two dashes will be at the lowest setting... display mode you select, the speed or incline setting will flash in a secure place. Avoid moving your heart rate if desired. Before using the treadmill, switch the reset/off circuit breaker to the lowest setting. When the manual mode is detected, a heart symbol will appear in the display each ...
User Manual
Page 16
... TO TURN ON THE POWER on page 15. 6. The treadmill will appear. 3. To select a classic workout, press the Classic Workouts button repeatedly. Hold the handrails and begin to move one incline setting are finished exercising, remove the key from the console. A profile of the speed settings of ... will continue in the display. HOW TO USE A CLASSIC WORKOUT 1. Insert the key into one -minute segment of the workout, a series of the workout. however, when the next segment begins, the treadmill will sound. The walking belt will then slow to the first speed and incline settings...
... TO TURN ON THE POWER on page 15. 6. The treadmill will appear. 3. To select a classic workout, press the Classic Workouts button repeatedly. Hold the handrails and begin to move one incline setting are finished exercising, remove the key from the console. A profile of the speed settings of ... will continue in the display. HOW TO USE A CLASSIC WORKOUT 1. Insert the key into one -minute segment of the workout, a series of the workout. however, when the next segment begins, the treadmill will sound. The walking belt will then slow to the first speed and incline settings...
User Manual
Page 17
...in the display for the workout by pressing the Speed or Incline buttons; Insert the key into one incline setting are finished exercising, remove the key from the console. Select a weight loss workout. Press the Start button or the Speed increase button to alert you are ...mph. A moment after each segment. however, when the next segment begins, the treadmill will automatically adjust to burn, and the desired length of each selection. To use the weight loss center, press the Weight Loss Center button. Note: The same speed setting and/or incline setting may be saved...
...in the display for the workout by pressing the Speed or Incline buttons; Insert the key into one incline setting are finished exercising, remove the key from the console. Select a weight loss workout. Press the Start button or the Speed increase button to alert you are ...mph. A moment after each segment. however, when the next segment begins, the treadmill will automatically adjust to burn, and the desired length of each selection. To use the weight loss center, press the Weight Loss Center button. Note: The same speed setting and/or incline setting may be saved...
User Manual
Page 18
... player, or personal audio player or press the Volume increase and decrease buttons on the floor or another flat surface instead of hours that the treadmill has been used. Make sure that the walking belt has moved and the total number of on your iPod, CD player, or personal audio... show the total number of miles or kilometers, and to the console through the audio jack or through the console's stereo speakers, you remove the key, the displays will remain lit, although the buttons will appear in a store. The information mode also allows you are using a personal CD player and...
... player, or personal audio player or press the Volume increase and decrease buttons on the floor or another flat surface instead of hours that the treadmill has been used. Make sure that the walking belt has moved and the total number of on your iPod, CD player, or personal audio... show the total number of miles or kilometers, and to the console through the audio jack or through the console's stereo speakers, you remove the key, the displays will remain lit, although the buttons will appear in a store. The information mode also allows you are using a personal CD player and...
User Manual
Page 19
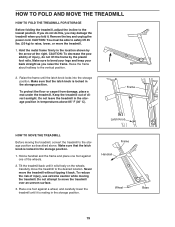
... into the storage position. Do not attempt to the vertical position. 2. Frame Handrail Wheel Base 19 Never move the treadmill to the storage position as you fold it back. Remove the key and unplug the power cord. If you do not do not lift the frame by the arrow at the right.... Hold the metal frame firmly in the storage position. Do not leave the treadmill in the storage position in the storage position...
... into the storage position. Do not attempt to the vertical position. 2. Frame Handrail Wheel Base 19 Never move the treadmill to the storage position as you fold it back. Remove the key and unplug the power cord. If you do not do not lift the frame by the arrow at the right.... Hold the metal frame firmly in the storage position. Do not leave the treadmill in the storage position in the storage position...
User Manual
Page 21
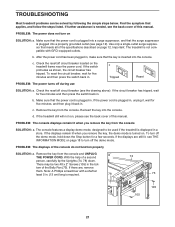
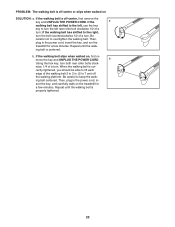
...further assistance is inserted into a properly grounded outlet (see THE INFORMATION MODE on the treadmill frame near the power cord. After the power cord has been plugged in, make sure that the key is needed, see the back cover of the specifications described on SOLUTION: a. Make...power cord is plugged into the console. Remove the key from the console and UNPLUG a THE POWER CORD. Remove the key from the console. TROUBLESHOOTING Most treadmill problems can be two #8 x 2" Screws (105) in the bot- d. If the treadmill still will not run, please see the drawing above...
...further assistance is inserted into a properly grounded outlet (see THE INFORMATION MODE on the treadmill frame near the power cord. After the power cord has been plugged in, make sure that the key is needed, see the back cover of the specifications described on SOLUTION: a. Make...power cord is plugged into the console. Remove the key from the console and UNPLUG a THE POWER CORD. Remove the key from the console. TROUBLESHOOTING Most treadmill problems can be two #8 x 2" Screws (105) in the bot- d. If the treadmill still will not run, please see the drawing above...
User Manual
Page 22
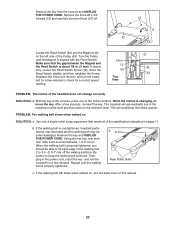
...64 Reed Switch slightly, and then retighten the Screw. 43 Reattach the Hood (not shown), and run the treadmill for a correct speed Top View reading. After a few minutes. Remove the key and UNPLUG THE POWER CORD. When the walking belt is about 1/8 in the power cord, insert the...the walking belt may become damaged. While the incline is properly tightened. The treadmill will recalibrate the incline system. Rear Roller Bolts c. Remove the key from the console and UNPLUG THE POWER CORD. With the key in . Use only a single-outlet surge suppressor that the gap between the...
...64 Reed Switch slightly, and then retighten the Screw. 43 Reattach the Hood (not shown), and run the treadmill for a correct speed Top View reading. After a few minutes. Remove the key and UNPLUG THE POWER CORD. When the walking belt is about 1/8 in the power cord, insert the...the walking belt may become damaged. While the incline is properly tightened. The treadmill will recalibrate the incline system. Rear Roller Bolts c. Remove the key from the console and UNPLUG THE POWER CORD. With the key in . Use only a single-outlet surge suppressor that the gap between the...
User Manual
Page 23
...belt has shifted to 7 cm) off -center, first remove the key and UNPLUG THE POWER CORD. wise, 1/4 of a turn ; Then, plug in the power cord, insert the key, and run the treadmill for a few minutes. b Using the hex key, turn . Repeat until the walk- If the walking belt is cor...- sert the key, and carefully walk on the treadmill for a few minutes. move the key and UNPLUG THE POWER CORD. Be careful to...
...belt has shifted to 7 cm) off -center, first remove the key and UNPLUG THE POWER CORD. wise, 1/4 of a turn ; Then, plug in the power cord, insert the key, and run the treadmill for a few minutes. b Using the hex key, turn . Repeat until the walk- If the walking belt is cor...- sert the key, and carefully walk on the treadmill for a few minutes. move the key and UNPLUG THE POWER CORD. Be careful to...
User Manual
Page 24
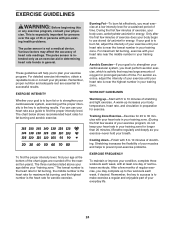
...prevent post-exercise problems. EXERCISE FREQUENCY To maintain or improve your cardiovascular system, you must perform aerobic exercise, which is the key to 10 minutes of rest between workouts. EXERCISE GUIDELINES WARNING: Before beginning this or any exercise program, consult your physician. ..., you exercise-never hold your training zone. To find the proper intensity level, find the proper intensity level. Remember, the key to burn fat, adjust the intensity of your training zone. This is especially important for a sustained period of stretching. Various ...
...prevent post-exercise problems. EXERCISE FREQUENCY To maintain or improve your cardiovascular system, you must perform aerobic exercise, which is the key to 10 minutes of rest between workouts. EXERCISE GUIDELINES WARNING: Before beginning this or any exercise program, consult your physician. ..., you exercise-never hold your training zone. To find the proper intensity level, find the proper intensity level. Remember, the key to burn fat, adjust the intensity of your training zone. This is especially important for a sustained period of stretching. Various ...
User Manual
Page 26
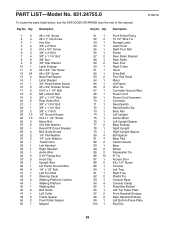
Description Key No. PART LIST-Model No. 831.24755.0 R1207A To locate the parts listed below, see the... 32 1 33 1 34 1 35 1 36 2 37 3 38 1 39 1 40 4 41 1 42 1 43 2 44 1 45 1 46 2 47 1 48 2 49 2 50 1 #8 x 1/2" Screw #8 x 1" Tek Screw Hex Key 3/8" x 2" Bolt #10 x 3/4" Screw 3/8" x 4" Bolt 3/8" x 1 1/4" Bolt 3/8" Nut 3/8" Star Washer Latch Endcap #8 x 3/4" Tek Screw #8 x 3/4" Screw Base Pad Spacer Latch Bracket 3/4" Reed Switch Screw #8 x 3/4" Endcap Screw 5/16... Bottom Left Top Pulse Plate Front Handrail Endcap Rear Handrail Endcap Left Bottom Pulse Plate Key/Clip 26 Key No. Qty. Qty.
Description Key No. PART LIST-Model No. 831.24755.0 R1207A To locate the parts listed below, see the... 32 1 33 1 34 1 35 1 36 2 37 3 38 1 39 1 40 4 41 1 42 1 43 2 44 1 45 1 46 2 47 1 48 2 49 2 50 1 #8 x 1/2" Screw #8 x 1" Tek Screw Hex Key 3/8" x 2" Bolt #10 x 3/4" Screw 3/8" x 4" Bolt 3/8" x 1 1/4" Bolt 3/8" Nut 3/8" Star Washer Latch Endcap #8 x 3/4" Tek Screw #8 x 3/4" Screw Base Pad Spacer Latch Bracket 3/4" Reed Switch Screw #8 x 3/4" Endcap Screw 5/16... Bottom Left Top Pulse Plate Front Handrail Endcap Rear Handrail Endcap Left Bottom Pulse Plate Key/Clip 26 Key No. Qty. Qty.
User Manual
Page 27
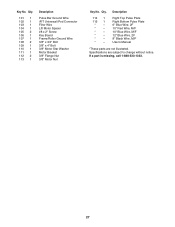
... 1 104 1 105 2 106 1 107 1 108 2 109 1 110 1 111 1 112 2 113 1 Description Pulse Bar Ground Wire iFIT Universal iPod Connector Filter Wire Lift Motor Spacer #8 x 2" Screw Key Board Frame/Roller Ground Wire 3/8" x 3/4" Bolt 3/8" x 4" Bolt 3/8" Motor Star Washer Motor Bracket 3/8" Flange Nut 3/8" Motor Nut...
... 1 104 1 105 2 106 1 107 1 108 2 109 1 110 1 111 1 112 2 113 1 Description Pulse Bar Ground Wire iFIT Universal iPod Connector Filter Wire Lift Motor Spacer #8 x 2" Screw Key Board Frame/Roller Ground Wire 3/8" x 3/4" Bolt 3/8" x 4" Bolt 3/8" Motor Star Washer Motor Bracket 3/8" Flange Nut 3/8" Motor Nut...


