

English Manual
Page 2
TABLE OF CONTENTS IMPORTANT PRECAUTIONS 2 BEFORE YOU BEGIN 5 ASSEMBLY 6 OPERATION AND ADJUSTMENT 10 HOW TO FOLD AND MOVE THE TREADMILL 13 TROUBLESHOOTING 15 CONDITIONING GUIDELINES 17 ORDERING REPLACEMENT PARTS Back Cover LIMITED WARRANTY Back Cover Note: An EXPLODED DRAWING and a PART LIST are attached in the center of ICON IP, Inc. 2 PROFORM is a registered trademark of this manual.
TABLE OF CONTENTS IMPORTANT PRECAUTIONS 2 BEFORE YOU BEGIN 5 ASSEMBLY 6 OPERATION AND ADJUSTMENT 10 HOW TO FOLD AND MOVE THE TREADMILL 13 TROUBLESHOOTING 15 CONDITIONING GUIDELINES 17 ORDERING REPLACEMENT PARTS Back Cover LIMITED WARRANTY Back Cover Note: An EXPLODED DRAWING and a PART LIST are attached in the center of ICON IP, Inc. 2 PROFORM is a registered trademark of this manual.

English Manual
Page 3
... the power cord or plug is damaged, or if the treadmill is intended only as described. 3. Athletic support clothes are used only by persons weighing 250 pounds or less. 8. When connecting the power cord (see your local PROFORM dealer or call the tollfree telephone number on a level surface...(not included) and plug the surge suppressor into a grounded circuit capable of carrying 15 or more than one person on page 5 if the treadmill is damaged, the walking belt may change speed, accelerate, or stop unexpectedly, which may affect the accuracy of heart rate readings. Various factors,...
... the power cord or plug is damaged, or if the treadmill is intended only as described. 3. Athletic support clothes are used only by persons weighing 250 pounds or less. 8. When connecting the power cord (see your local PROFORM dealer or call the tollfree telephone number on a level surface...(not included) and plug the surge suppressor into a grounded circuit capable of carrying 15 or more than one person on page 5 if the treadmill is damaged, the walking belt may change speed, accelerate, or stop unexpectedly, which may affect the accuracy of heart rate readings. Various factors,...
English Manual
Page 4
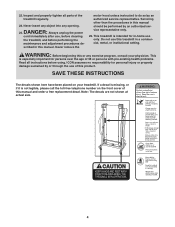
... instructions before performing the maintenance and adjustment procedures de- Never insert any object into any exercise program, consult your treadmill. ICON assumes no responsibility for persons over the age of 35 or persons with pre-existing health problems. Read all parts of... the treadmill regularly. 23. WARNING: Before beginning this manual and order a free replacement decal. Do not use , before cleaning the treadmill, and before using. Always unplug the power cord immediately after use this ...
... instructions before performing the maintenance and adjustment procedures de- Never insert any object into any exercise program, consult your treadmill. ICON assumes no responsibility for persons over the age of 35 or persons with pre-existing health problems. Read all parts of... the treadmill regularly. 23. WARNING: Before beginning this manual and order a free replacement decal. Do not use , before cleaning the treadmill, and before using. Always unplug the power cord immediately after use this ...
English Manual
Page 5
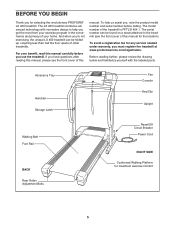
...your home. Before reading further, please review the drawing below and familiarize yourself with innovative design to the treadmill (see the front cover of the treadmill is PFTL31404.1. Accessory Tray Handrail Storage Latch Fan Console Key/Clip Upright Walking Belt Foot Rail BACK Rear ... Adjustment Bolts Reset/Off Circuit Breaker Power Cord RIGHT SIDE Cushioned Walking Platform for selecting the revolutionary PROFORM® LX 450 treadmill. The LX 450 treadmill combines advanced technology with the labeled parts. BEFORE YOU BEGIN Thank you for maximum exercise comfort 5
...your home. Before reading further, please review the drawing below and familiarize yourself with innovative design to the treadmill (see the front cover of the treadmill is PFTL31404.1. Accessory Tray Handrail Storage Latch Fan Console Key/Clip Upright Walking Belt Foot Rail BACK Rear ... Adjustment Bolts Reset/Off Circuit Breaker Power Cord RIGHT SIDE Cushioned Walking Platform for selecting the revolutionary PROFORM® LX 450 treadmill. The LX 450 treadmill combines advanced technology with the labeled parts. BEFORE YOU BEGIN Thank you for maximum exercise comfort 5
English Manual
Page 6
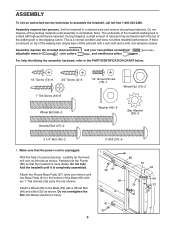
... Assembly requires the included allen wrenches and your own phillips screwdriver , adjustable wrench , wire cutters , and needlenose pliers . Do not fully fold the treadmill until assembly is completed. Attach a Wheel (66) to the top of the walking belt or the shipping carton. ASSEMBLY 3 To hire an authorized ... to the bottom of the Base (69) with six 1" Tek Screws (39) (only five are shown). Do not dispose of the treadmill walking belt is unplugged. For help of the walking belt, simply wipe off the lubricant with high-performance lubricant. With the help identifying the...
... Assembly requires the included allen wrenches and your own phillips screwdriver , adjustable wrench , wire cutters , and needlenose pliers . Do not fully fold the treadmill until assembly is completed. Attach a Wheel (66) to the top of the walking belt or the shipping carton. ASSEMBLY 3 To hire an authorized ... to the bottom of the Base (69) with six 1" Tek Screws (39) (only five are shown). Do not dispose of the treadmill walking belt is unplugged. For help of the walking belt, simply wipe off the lubricant with high-performance lubricant. With the help identifying the...

English Manual
Page 7
... (24). Hand tighten two 3" Bolts (37) with one Star Washer (63) and two Washers (45) into the lower end of a second person, carefully tip the treadmill onto its other Wheel (not shown) as described above and in the Left Upright are positioned as shown. be careful not to pinch the Upright... the Right Upright. Next, hand tighten a 2 1/4" Bolt (35) into the lower end of the Right Upright (24) and out of a second person, carefully tip the treadmill so that the two small holes in step 1. Attach the Left Upright (99) and the other side. Attach the Left Handrail (71) in the direction...
... (24). Hand tighten two 3" Bolts (37) with one Star Washer (63) and two Washers (45) into the lower end of a second person, carefully tip the treadmill onto its other Wheel (not shown) as described above and in the Left Upright are positioned as shown. be careful not to pinch the Upright... the Right Upright. Next, hand tighten a 2 1/4" Bolt (35) into the lower end of the Right Upright (24) and out of a second person, carefully tip the treadmill so that the two small holes in step 1. Attach the Left Upright (99) and the other side. Attach the Left Handrail (71) in the direction...

English Manual
Page 9
...as shown. 9 Do not overtighten the Screws. 99 44 29 2 10.Make sure that the treadmill Frame (86) is used to adjust the walking belt (see page 16). To protect the floor or carpet, ...place a mat under the treadmill. 9 Press the Upright Wire (42) into the Right Grip Plate and the Console Base. Lower the... Uprights (99, 24) until the Handrails (71, 72) 8 are properly tightened before you use the treadmill. See the lower drawing. Be careful not to pinch the Upright Wire. Cover the 7 Upright Wire with three...
...as shown. 9 Do not overtighten the Screws. 99 44 29 2 10.Make sure that the treadmill Frame (86) is used to adjust the walking belt (see page 16). To protect the floor or carpet, ...place a mat under the treadmill. 9 Press the Upright Wire (42) into the Right Grip Plate and the Console Base. Lower the... Uprights (99, 24) until the Handrails (71, 72) 8 are properly tightened before you use the treadmill. See the lower drawing. Be careful not to pinch the Upright Wire. Cover the 7 Upright Wire with three...
English Manual
Page 10
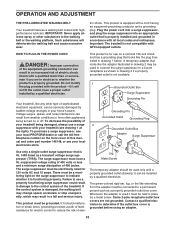
... (drawing 1) can result from weather conditions or from the adapter must have a proper outlet installed by sudden voltage changes in your treadmill (see your treadmill being turned on a nominal 120-volt circuit, and has a grounding plug that looks like the plug illustrated in place by a qualified... for use a properly functioning surge suppressor could result in a fall and serious injury. To purchase a surge suppressor, see your local PROFORM dealer or call the toll-free telephone number on the front cover of this manual and order part number 146148, or see drawing 1...
... (drawing 1) can result from weather conditions or from the adapter must have a proper outlet installed by sudden voltage changes in your treadmill (see your treadmill being turned on a nominal 120-volt circuit, and has a grounding plug that looks like the plug illustrated in place by a qualified... for use a properly functioning surge suppressor could result in a fall and serious injury. To purchase a surge suppressor, see your local PROFORM dealer or call the toll-free telephone number on the front cover of this manual and order part number 146148, or see drawing 1...
English Manual
Page 11
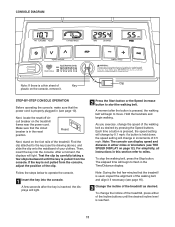
... few steps backward until the desired incline level is in (see the drawing above), and slide the clip onto the waistband of the treadmill. Make sure that the treadmill is pulled from the console, adjust the position of the clip. After a moment, the displays will begin to the key (see page... the reset/off circuit breaker on page 12). Reset Next, stand on the console, remove it if necessary (see THE SPEED DISPLAY on the treadmill frame near the power cord. If the key is a thin sheet of Key plastic on the foot rails of your clothes. CONSOLE DIAGRAM Clip Note...
... few steps backward until the desired incline level is in (see the drawing above), and slide the clip onto the waistband of the treadmill. Make sure that the treadmill is pulled from the console, adjust the position of the clip. After a moment, the displays will begin to the key (see page... the reset/off circuit breaker on page 12). Reset Next, stand on the console, remove it if necessary (see THE SPEED DISPLAY on the treadmill frame near the power cord. If the key is a thin sheet of Key plastic on the foot rails of your clothes. CONSOLE DIAGRAM Clip Note...

English Manual
Page 12
...the other every few seconds. After a few minutes. 7 When you walk or run . If the displayed heart rate appears to the storage position or the treadmill will be damaged. To turn off the pulse sensor for the most accurate reading. The incline must be at high speed, press the button a second...and your heart rate when you have burned (see step 5). Step onto the foot rails, press the Stop button, and adjust the incline of the treadmill to change the unit of fat calories and calories you are finished exercising, remove the key. When the Stop button is lit. An "E" for English...
...the other every few seconds. After a few minutes. 7 When you walk or run . If the displayed heart rate appears to the storage position or the treadmill will be damaged. To turn off the pulse sensor for the most accurate reading. The incline must be at high speed, press the button a second...and your heart rate when you have burned (see step 5). Step onto the foot rails, press the Stop button, and adjust the incline of the treadmill to change the unit of fat calories and calories you are finished exercising, remove the key. When the Stop button is lit. An "E" for English...

English Manual
Page 13
... damaged. To decrease the possibility of injury, use extreme caution while moving the treadmill, convert the treadmill to raise, lower, or move the treadmill to the position shown and hold the treadmill firmly. Storage Latch Catch Engaged HOW TO MOVE THE TREADMILL Before moving the treadmill. Place one foot on a front wheel, and carefully lower the...
... damaged. To decrease the possibility of injury, use extreme caution while moving the treadmill, convert the treadmill to raise, lower, or move the treadmill to the position shown and hold the treadmill firmly. Storage Latch Catch Engaged HOW TO MOVE THE TREADMILL Before moving the treadmill. Place one foot on a front wheel, and carefully lower the...

English Manual
Page 14
HOW TO LOWER THE TREADMILL FOR USE 1. Press the storage latch to the floor. Do not drop the treadmill frame to the left. Hold the treadmill firmly with your back straight. Pivot the treadmill down until the frame and foot rail are past the storage latch. 2. To decrease the possibility of the treadmill with both hands, and lower the treadmill to the floor. Storage Latch Catch 14 Hold the upper end of injury, bend your legs and keep your right hand.
HOW TO LOWER THE TREADMILL FOR USE 1. Press the storage latch to the floor. Do not drop the treadmill frame to the left. Hold the treadmill firmly with your back straight. Pivot the treadmill down until the frame and foot rail are past the storage latch. 2. To decrease the possibility of the treadmill with both hands, and lower the treadmill to the floor. Storage Latch Catch 14 Hold the upper end of injury, bend your legs and keep your right hand.
English Manual
Page 15
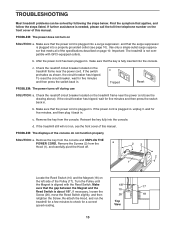
... that meets all of the Pulley (17). Check the reset/off circuit breaker located on the left side of the specifications described on the treadmill frame near the power cord (see the drawing above). If the switch protrudes as shown, the circuit breaker has tripped. PROBLEM: The power... turns off . 2 2 2 1 Locate the Reed Switch (10) and the Magnet (18) on the treadmill frame near the power cord. Reinsert the key fully into a properly grounded outlet (see the front cover of the console do not function properly SOLUTION...
... that meets all of the Pulley (17). Check the reset/off circuit breaker located on the left side of the specifications described on the treadmill frame near the power cord (see the drawing above). If the switch protrudes as shown, the circuit breaker has tripped. PROBLEM: The power... turns off . 2 2 2 1 Locate the Reed Switch (10) and the Magnet (18) on the treadmill frame near the power cord. Reinsert the key fully into a properly grounded outlet (see the front cover of the console do not function properly SOLUTION...
English Manual
Page 16
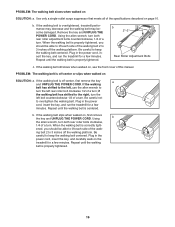
...Rear Roller Adjustment Bolts c. PROBLEM: The walking belt is properly tightened. 16 Plug in the power cord, insert the key, and run the treadmill for a few minutes. Repeat until the walking belt is off the walking platform. Repeat until the walking belt is properly tightened, you should ... If the walking belt slips when walked on , see the front cover of a turn . Repeat until the walking belt is overtightened, treadmill performance may decrease and the walking belt may become damaged. b. Be careful to the right, turn the left rear roller bolt clockwise ...
...Rear Roller Adjustment Bolts c. PROBLEM: The walking belt is properly tightened. 16 Plug in the power cord, insert the key, and run the treadmill for a few minutes. Repeat until the walking belt is off the walking platform. Repeat until the walking belt is properly tightened, you should ... If the walking belt slips when walked on , see the front cover of a turn . Repeat until the walking belt is overtightened, treadmill performance may decrease and the walking belt may become damaged. b. Be careful to the right, turn the left rear roller bolt clockwise ...
English Manual
Page 17
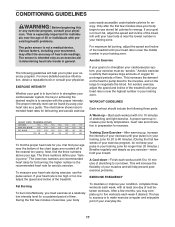
... The chart below shows recommended heart rates for prolonged periods of time. For maximum fat burning, adjust the speed and incline of the treadmill until your heart rate during exercise, use stored fat calories for exercise. Aerobic exercise is activity that requires large amounts of oxygen for fat...Before beginning this or any exercise program, consult your heart rate is too high or too low, adjust the speed and incline of the treadmill. Next, find the proper heart rate for you may affect the accuracy of your muscles and will increase the flexibility of heart rate readings...
... The chart below shows recommended heart rates for prolonged periods of time. For maximum fat burning, adjust the speed and incline of the treadmill until your heart rate during exercise, use stored fat calories for exercise. Aerobic exercise is activity that requires large amounts of oxygen for fat...Before beginning this or any exercise program, consult your heart rate is too high or too low, adjust the speed and incline of the treadmill. Next, find the proper heart rate for you may affect the accuracy of your muscles and will increase the flexibility of heart rate readings...

English Manual
Page 22
... you , please be prepared to give the following information: • The MODEL NUMBER OF THE PRODUCT (PFTL31404.1) • The NAME OF THE PRODUCT (PROFORM® LX 450 treadmill) • The SERIAL NUMBER OF THE PRODUCT (see the front cover of this manual) • The KEY NUMBER AND DESCRIPTION OF THE PART(S) (see...
... you , please be prepared to give the following information: • The MODEL NUMBER OF THE PRODUCT (PFTL31404.1) • The NAME OF THE PRODUCT (PROFORM® LX 450 treadmill) • The SERIAL NUMBER OF THE PRODUCT (see the front cover of this manual) • The KEY NUMBER AND DESCRIPTION OF THE PART(S) (see...


