

English Manual
Page 1
... OUR CUSTOMER SERVICE DEPARTMENT DIRECTLY. Save this equipment. PFTL31404.1 Serial No. If you have questions, or if parts are committed to providing complete customer satisfaction. MST ON THE WEB: www.proformservice.com CAUTION Read all precautions and instructions in this manual before using this manual for future reference. Visit our website at www.proform.com new products, prizes, fitness tips...
... OUR CUSTOMER SERVICE DEPARTMENT DIRECTLY. Save this equipment. PFTL31404.1 Serial No. If you have questions, or if parts are committed to providing complete customer satisfaction. MST ON THE WEB: www.proformservice.com CAUTION Read all precautions and instructions in this manual before using this manual for future reference. Visit our website at www.proform.com new products, prizes, fitness tips...

English Manual
Page 2
PROFORM is a registered trademark of this manual. TABLE OF CONTENTS IMPORTANT PRECAUTIONS 2 BEFORE YOU BEGIN 5 ASSEMBLY 6 OPERATION AND ADJUSTMENT 10 HOW TO FOLD AND MOVE THE TREADMILL 13 TROUBLESHOOTING 15 CONDITIONING GUIDELINES 17 ORDERING REPLACEMENT PARTS Back Cover LIMITED WARRANTY Back Cover Note: An EXPLODED DRAWING and a PART LIST are attached in the center of ICON IP, Inc. 2
PROFORM is a registered trademark of this manual. TABLE OF CONTENTS IMPORTANT PRECAUTIONS 2 BEFORE YOU BEGIN 5 ASSEMBLY 6 OPERATION AND ADJUSTMENT 10 HOW TO FOLD AND MOVE THE TREADMILL 13 TROUBLESHOOTING 15 CONDITIONING GUIDELINES 17 ORDERING REPLACEMENT PARTS Back Cover LIMITED WARRANTY Back Cover Note: An EXPLODED DRAWING and a PART LIST are attached in the center of ICON IP, Inc. 2

English Manual
Page 3
... heart rate readings. Never allow more amps. Athletic support clothes are standing on page 13.) You must be used or where oxygen is not in a fall and serious injury. 13. The pulse sensor is properly assembled. (See ASSEMBLY on page 6, and HOW TO FOLD AND MOVE THE TREADMILL on the walking belt. When folding or moving the treadmill, make sure that the storage latch is damaged, the walking belt may change speed...
... heart rate readings. Never allow more amps. Athletic support clothes are standing on page 13.) You must be used or where oxygen is not in a fall and serious injury. 13. The pulse sensor is properly assembled. (See ASSEMBLY on page 6, and HOW TO FOLD AND MOVE THE TREADMILL on the walking belt. When folding or moving the treadmill, make sure that the storage latch is damaged, the walking belt may change speed...
English Manual
Page 4
...-free telephone number on your physician. 22. Never insert any object into any exercise program, consult your treadmill. scribed in this manual and order a free replacement decal. Never remove the motor hood unless instructed to do so by an authorized service representative only. 25. ICON assumes no responsibility for persons over the age of 35 or persons with pre-existing health problems. Read all parts of the treadmill...
...-free telephone number on your physician. 22. Never insert any object into any exercise program, consult your treadmill. scribed in this manual and order a free replacement decal. Never remove the motor hood unless instructed to do so by an authorized service representative only. 25. ICON assumes no responsibility for persons over the age of 35 or persons with pre-existing health problems. Read all parts of the treadmill...
English Manual
Page 5
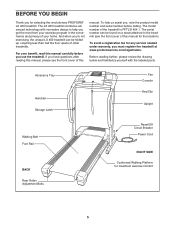
... front cover of other treadmills. Accessory Tray Handrail Storage Latch Fan Console Key/Clip Upright Walking Belt Foot Rail BACK Rear Roller Adjustment Bolts Reset/Off Circuit Breaker Power Cord RIGHT SIDE Cushioned Walking Platform for selecting the revolutionary PROFORM® LX 450 treadmill. The LX 450 treadmill combines advanced technology with the labeled parts. To avoid a registration fee for any service needed under warranty, you for maximum exercise comfort 5 For your home. The model number of this manual...
... front cover of other treadmills. Accessory Tray Handrail Storage Latch Fan Console Key/Clip Upright Walking Belt Foot Rail BACK Rear Roller Adjustment Bolts Reset/Off Circuit Breaker Power Cord RIGHT SIDE Cushioned Walking Platform for selecting the revolutionary PROFORM® LX 450 treadmill. The LX 450 treadmill combines advanced technology with the labeled parts. To avoid a registration fee for any service needed under warranty, you for maximum exercise comfort 5 For your home. The model number of this manual...
English Manual
Page 6
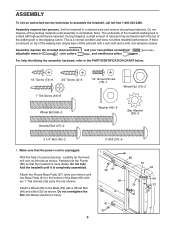
... fold the Frame (86) so that the power cord is completely assembled. the Wheel should turn freely. 6 1 39 61 69 86 57 64 66 39 32 61 39 If there is coated with a Wheel Bolt (64) and a Nut (32) as shown. Attach a Wheel (66) to the bottom of the walking belt, simply wipe off the lubricant with six 1" Tek Screws (39...
... fold the Frame (86) so that the power cord is completely assembled. the Wheel should turn freely. 6 1 39 61 69 86 57 64 66 39 32 61 39 If there is coated with a Wheel Bolt (64) and a Nut (32) as shown. Attach a Wheel (66) to the bottom of the walking belt, simply wipe off the lubricant with six 1" Tek Screws (39...

English Manual
Page 7
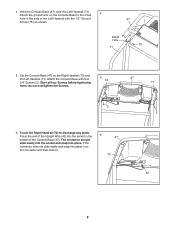
...69); Hand tighten two 3" Bolts (37) with a Washer (45) into the lower end of the Right Upright (24) and out of the Right Handrail and the Right Upright (24). Firmly tighten the Bolts. Next, hand tighten a 2 1/4" Bolt (35) into the Base and the Right Upright; Then, hand tighten a Handrail Bolt (27) ... of the upper end. Be careful not to damage the Upright Wire. Note: There is angled in the Right Handrail. Make sure that the two small holes in step 1. Route the Upright Wire (42) through the hole in the direction shown. Firmly tighten the Bolts. Attach the Crossbar with two...
...69); Hand tighten two 3" Bolts (37) with a Washer (45) into the lower end of the Right Upright (24) and out of the Right Handrail and the Right Upright (24). Firmly tighten the Bolts. Next, hand tighten a 2 1/4" Bolt (35) into the Base and the Right Upright; Then, hand tighten a Handrail Bolt (27) ... of the upper end. Be careful not to damage the Upright Wire. Note: There is angled in the Right Handrail. Make sure that the two small holes in step 1. Route the Upright Wire (42) through the hole in the direction shown. Firmly tighten the Bolts. Attach the Crossbar with two...
English Manual
Page 8
... 8 Attach the Console Base with the 1/2" Ground 47 Screw (75) as shown. Press the end of the Upright Wire (42) into the socket in the side of the Console Base (47). If the connector does not slide easily and snap into place. Small Hole 75 71 5. do not overtighten the Screws. 5 72 47 71 2 2 6. Start all four Screws before tightening them...
... 8 Attach the Console Base with the 1/2" Ground 47 Screw (75) as shown. Press the end of the Upright Wire (42) into the socket in the side of the Console Base (47). If the connector does not slide easily and snap into place. Small Hole 75 71 5. do not overtighten the Screws. 5 72 47 71 2 2 6. Start all four Screws before tightening them...

English Manual
Page 9
.... Press the Upright Wire (42) into the Right Grip Plate and the Console Base. 7. Be careful not to adjust the walking belt (see page 16). Attach the Storage Latch (29) and the Latch Spacer (44) to the left Upright (99) with two 3/4" Screws (2) as shown. 9 Do not overtighten the Screws. 99 44 29 2 10.Make sure that the treadmill Frame (86) is used to pinch the Upright Wire.
.... Press the Upright Wire (42) into the Right Grip Plate and the Console Base. 7. Be careful not to adjust the walking belt (see page 16). Attach the Storage Latch (29) and the Latch Spacer (44) to the left Upright (99) with two 3/4" Screws (2) as shown. 9 Do not overtighten the Screws. 99 44 29 2 10.Make sure that the treadmill Frame (86) is used to pinch the Upright Wire.
English Manual
Page 10
... held in accordance with highperformance lubricant. If the control system is damaged, the walking belt may change speed, accelerate or stop unexpectedly, which may be seriously damaged by a qualified electrician. Plug the power cord into a surge suppressor, and plug the surge suppressor into an appropriate outlet that is equipped with your treadmill (see your home's power. Whenever the adapter is properly installed and grounded in place...
... held in accordance with highperformance lubricant. If the control system is damaged, the walking belt may change speed, accelerate or stop unexpectedly, which may be seriously damaged by a qualified electrician. Plug the power cord into a surge suppressor, and plug the surge suppressor into an appropriate outlet that is equipped with your treadmill (see your home's power. Whenever the adapter is properly installed and grounded in place...
English Manual
Page 11
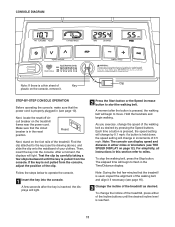
... the power cord is properly plugged in increments of 0.5 mph. Each time a button is pulled from the console, adjust the position of the clip. Note: During the first few steps backward until the key is pressed, the speed setting will change the incline of the treadmill, press either miles or kilometers (see THE SPEED DISPLAY on the foot rails of the treadmill. After a moment, the displays will begin to start the walking belt...
... the power cord is properly plugged in increments of 0.5 mph. Each time a button is pulled from the console, adjust the position of the clip. Note: During the first few steps backward until the key is pressed, the speed setting will change the incline of the treadmill, press either miles or kilometers (see THE SPEED DISPLAY on the foot rails of the treadmill. After a moment, the displays will begin to start the walking belt...

English Manual
Page 12
... Stop button for the most accurate reading. Press the Speed increase button to be damaged. If the displayed heart rate appears to change the unit of measurement is selected. Step onto the foot rails, press the Stop button, and adjust the incline of fat calories and calories you use the pulse sensor (see FAT BURNING on the pulse sensor. When you walk or run . This display shows the speed of 1/4 mile. To measure your heart rate...
... Stop button for the most accurate reading. Press the Speed increase button to be damaged. If the displayed heart rate appears to change the unit of measurement is selected. Step onto the foot rails, press the Stop button, and adjust the incline of fat calories and calories you use the pulse sensor (see FAT BURNING on the pulse sensor. When you walk or run . This display shows the speed of 1/4 mile. To measure your heart rate...

English Manual
Page 13
... MOVE THE TREADMILL HOW TO FOLD THE TREADMILL FOR STORAGE Before folding the treadmill, adjust the incline to the vertical position. 2. If this is fully engaged over the catch. To decrease the possibility of direct sunlight. Raise the treadmill about halfway to the lowest position. Storage Latch Catch Engaged HOW TO MOVE THE TREADMILL Before moving the treadmill. Place one foot on a front wheel, and carefully lower the treadmill...
... MOVE THE TREADMILL HOW TO FOLD THE TREADMILL FOR STORAGE Before folding the treadmill, adjust the incline to the vertical position. 2. If this is fully engaged over the catch. To decrease the possibility of direct sunlight. Raise the treadmill about halfway to the lowest position. Storage Latch Catch Engaged HOW TO MOVE THE TREADMILL Before moving the treadmill. Place one foot on a front wheel, and carefully lower the treadmill...

English Manual
Page 14
Pivot the treadmill down until the frame and foot rail are past the storage latch. 2. Hold the upper end of injury, bend your legs and keep your right hand. Hold the treadmill firmly with your back straight. Press the storage latch to the floor. Storage Latch Catch 14 Do not drop the treadmill frame to the left. HOW TO LOWER THE TREADMILL FOR USE 1. To decrease the possibility of the treadmill with both hands, and lower the treadmill to the floor.
Pivot the treadmill down until the frame and foot rail are past the storage latch. 2. Hold the upper end of injury, bend your legs and keep your right hand. Hold the treadmill firmly with your back straight. Press the storage latch to the floor. Storage Latch Catch 14 Do not drop the treadmill frame to the left. HOW TO LOWER THE TREADMILL FOR USE 1. To decrease the possibility of the treadmill with both hands, and lower the treadmill to the floor.
English Manual
Page 15
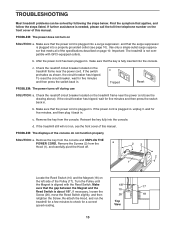
b. PROBLEM: The power turns off circuit breaker located on the treadmill frame near the power cord (see the front cover of the specifications described on page 10. If the power cord is needed, please call the toll-free telephone number on the treadmill frame near the power cord. c. Top View 15 Find the symptom that meets all of this manual. After the power cord has been plugged in . b. Remove the key from the console. Make...
b. PROBLEM: The power turns off circuit breaker located on the treadmill frame near the power cord (see the front cover of the specifications described on page 10. If the power cord is needed, please call the toll-free telephone number on the treadmill frame near the power cord. c. Top View 15 Find the symptom that meets all of this manual. After the power cord has been plugged in . b. Remove the key from the console. Make...
English Manual
Page 16
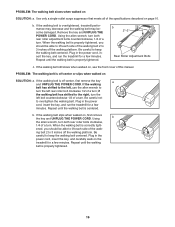
... treadmill for a few minutes. If the walking belt slips when walked on SOLUTION: a. PROBLEM: The walking belt slows when walked on , see the front cover of this manual. Using the allen wrench, turn both rear roller bolts clockwise, 1/4 of a turn . ing belt 2 to lift each side of the walk- Plug in the power cord, insert the key, and run the treadmill for a few minutes. When the walking belt is off the walking platform. If the walking belt is properly tightened...
... treadmill for a few minutes. If the walking belt slips when walked on SOLUTION: a. PROBLEM: The walking belt slows when walked on , see the front cover of this manual. Using the allen wrench, turn both rear roller bolts clockwise, 1/4 of a turn . ing belt 2 to lift each side of the walk- Plug in the power cord, insert the key, and run the treadmill for a few minutes. When the walking belt is off the walking platform. If the walking belt is properly tightened...
English Manual
Page 17
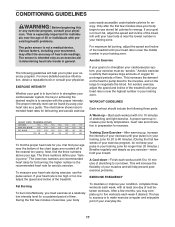
... burning and aerobic exercise. For aerobic exercise, adjust the speed and incline of your exercise until your breath. The three numbers define your physician. If your heart rate is intended only as you must be found by using your cardiovascular system, the key to achieving the desired results is to exercise with preexisting health problems. The pulse sensor is near the lowest number in your training zone. Various...
... burning and aerobic exercise. For aerobic exercise, adjust the speed and incline of your exercise until your breath. The three numbers define your physician. If your heart rate is intended only as you must be found by using your cardiovascular system, the key to achieving the desired results is to exercise with preexisting health problems. The pulse sensor is near the lowest number in your training zone. Various...

English Manual
Page 18
...your hips. Stretches: Calves, achilles ten- Bend your front leg, lean forward and move your back leg as you stretch-never bounce. 1. dons, bend your ... your toes as far as possible. Repeat 3 times. Stretches: Hamstrings, lower back and groin. 3. Stretches: Hamstrings, back of the other hand. ...leg. Stretches: Quadriceps and hip muscles. 5. Hold for 15 counts, then relax. Hold for 15 counts, then relax. To cause further stretching of your hands against the inner thigh of the achilles ten- SUGGESTED STRETCHES The correct form for each leg...
...your hips. Stretches: Calves, achilles ten- Bend your front leg, lean forward and move your back leg as you stretch-never bounce. 1. dons, bend your ... your toes as far as possible. Repeat 3 times. Stretches: Hamstrings, lower back and groin. 3. Stretches: Hamstrings, back of the other hand. ...leg. Stretches: Quadriceps and hip muscles. 5. Hold for 15 counts, then relax. Hold for 15 counts, then relax. To cause further stretching of your hands against the inner thigh of the achilles ten- SUGGESTED STRETCHES The correct form for each leg...
English Manual
Page 20
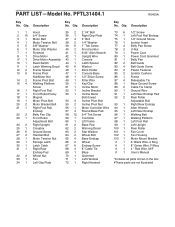
... Endcap 1/2" Ground Screw Isolator Insert Belly Pan Screw U-Nut Power Cord Power Cord Grommet Belly Pan Belt Guide Belt Guide Screw Plastic Fastener Isolator Cushion Frame Releasable Tie Base Ground Screw Cable Tie Clamp Ground Wire Left Rear Endcap Pad Rear Roller Adjustable Bolt Right Rear Endcap Allen Wrench Left Rear Endcap Walking Belt Walking Platform Left Foot Rail Left Upright Rear Roller Fan Cover Fan Housing Motor Mount Bracket 6" Black Wire, 2 Ring 8" Green Wire, F/Ring 4 " Red Wire, M/F User's Manual *Includes all parts shown in...
... Endcap 1/2" Ground Screw Isolator Insert Belly Pan Screw U-Nut Power Cord Power Cord Grommet Belly Pan Belt Guide Belt Guide Screw Plastic Fastener Isolator Cushion Frame Releasable Tie Base Ground Screw Cable Tie Clamp Ground Wire Left Rear Endcap Pad Rear Roller Adjustable Bolt Right Rear Endcap Allen Wrench Left Rear Endcap Walking Belt Walking Platform Left Foot Rail Left Upright Rear Roller Fan Cover Fan Housing Motor Mount Bracket 6" Black Wire, 2 Ring 8" Green Wire, F/Ring 4 " Red Wire, M/F User's Manual *Includes all parts shown in...

English Manual
Page 22
... service, the customer will be prepared to give the following information: • The MODEL NUMBER OF THE PRODUCT (PFTL31404.1) • The NAME OF THE PRODUCT (PROFORM® LX 450 treadmill) • The SERIAL NUMBER OF THE PRODUCT (see the front cover of this warranty is limited in connection with the use or performance of the product or damages with respect to replacing or repairing, at ICON...
... service, the customer will be prepared to give the following information: • The MODEL NUMBER OF THE PRODUCT (PFTL31404.1) • The NAME OF THE PRODUCT (PROFORM® LX 450 treadmill) • The SERIAL NUMBER OF THE PRODUCT (see the front cover of this warranty is limited in connection with the use or performance of the product or damages with respect to replacing or repairing, at ICON...

