

English Manual
Page 2
... size. TABLE OF CONTENTS WARNING DECAL PLACEMENT 2 IMPORTANT PRECAUTIONS 3 BEFORE YOU BEGIN 5 ASSEMBLY 6 OPERATION AND ADJUSTMENT 12 HOW TO FOLD AND MOVE THE TREADMILL 23 TROUBLESHOOTING 25 EXERCISE GUIDELINES 28 PART LIST 30 EXPLODED DRAWING 32 ORDERING REPLACEMENT PARTS Back Cover LIMITED WARRANTY Back Cover WARNING DECAL PLACEMENT The... decals shown here have been applied in the location shown. Apply the decal in the locations shown. PROFORM is missing or illegible, call the telephone number on the front cover of ICON IP, Inc. 2
... size. TABLE OF CONTENTS WARNING DECAL PLACEMENT 2 IMPORTANT PRECAUTIONS 3 BEFORE YOU BEGIN 5 ASSEMBLY 6 OPERATION AND ADJUSTMENT 12 HOW TO FOLD AND MOVE THE TREADMILL 23 TROUBLESHOOTING 25 EXERCISE GUIDELINES 28 PART LIST 30 EXPLODED DRAWING 32 ORDERING REPLACEMENT PARTS Back Cover LIMITED WARRANTY Back Cover WARNING DECAL PLACEMENT The... decals shown here have been applied in the location shown. Apply the decal in the locations shown. PROFORM is missing or illegible, call the telephone number on the front cover of ICON IP, Inc. 2

English Manual
Page 3
... persons weighing 300 lbs. (136 kg) or less. 9. The treadmill is not working properly.) 8. Place the treadmill on a level surface, with pre-existing health problems. 2. To purchase a surge suppressor, see your local PROFORM dealer or call the telephone number on the front cover of this... treadmill are used only by or through the use a properly functioning surge suppressor could become caught in - IMPORTANT...
... persons weighing 300 lbs. (136 kg) or less. 9. The treadmill is not working properly.) 8. Place the treadmill on a level surface, with pre-existing health problems. 2. To purchase a surge suppressor, see your local PROFORM dealer or call the telephone number on the front cover of this... treadmill are used only by or through the use a properly functioning surge suppressor could become caught in - IMPORTANT...

English Manual
Page 4
... kg) to do so by an authorized service representative only. 26. Do not use , before cleaning the treadmill, and before performing the mainte- When folding or moving the treadmill, make sure that the storage latch is running. Always unplug the power cord immediately after use this manual. ...page 5 for in a commercial, rental, or institutional setting. 23. nance and adjustment procedures described in use. (See the drawing on the treadmill. SAVE THESE INSTRUCTIONS 4 Always remove the key, unplug the power cord, and switch the reset/off circuit breaker to raise, lower, or move...
... kg) to do so by an authorized service representative only. 26. Do not use , before cleaning the treadmill, and before performing the mainte- When folding or moving the treadmill, make sure that the storage latch is running. Always unplug the power cord immediately after use this manual. ...page 5 for in a commercial, rental, or institutional setting. 23. nance and adjustment procedures described in use. (See the drawing on the treadmill. SAVE THESE INSTRUCTIONS 4 Always remove the key, unplug the power cord, and switch the reset/off circuit breaker to raise, lower, or move...

English Manual
Page 5
... Circuit Breaker Power Cord Adjustable Cushioned Walking Platform 5 To avoid a registration fee for selecting the revolutionary PROFORM® 765 CROSSTRAINER treadmill. For your workouts at www.proformservice.com/registration. And when you're not exercising, the unique 765 CROSSTRAINER treadmill can be folded up, requiring less than half the floor space of features designed to make your...
... Circuit Breaker Power Cord Adjustable Cushioned Walking Platform 5 To avoid a registration fee for selecting the revolutionary PROFORM® 765 CROSSTRAINER treadmill. For your workouts at www.proformservice.com/registration. And when you're not exercising, the unique 765 CROSSTRAINER treadmill can be folded up, requiring less than half the floor space of features designed to make your...

English Manual
Page 6
... assembly is lubricant on top of the walking belt or the shipping carton. If there is completed. Set the treadmill in the parts bag, check to assemble the treadmill, call 1-800-445-2480. ASSEMBLY To hire an authorized service technician to see if it is the quantity needed... for assembly. This is a normal condition and does not affect treadmill performance. Assembly requires the included hex keys and your own Phillips...
... assembly is lubricant on top of the walking belt or the shipping carton. If there is completed. Set the treadmill in the parts bag, check to assemble the treadmill, call 1-800-445-2480. ASSEMBLY To hire an authorized service technician to see if it is the quantity needed... for assembly. This is a normal condition and does not affect treadmill performance. Assembly requires the included hex keys and your own Phillips...

English Manual
Page 7
... 79 83 Tie the long tie in the Base, and use the tie to pull the Upright Wire out of a second person, carefully tip the treadmill onto its left side. Attach a Base Pad (81) to the Base (83). Do not over- Cut the tie securing the Upright Wire (38) to the... a 3/8" Nut (8). Attach a Wheel (84) with a Base Pad Spacer (13) and a #8 x 1" Tek Screw (2). tighten the Nut; With the help of the hole. Make sure that the treadmill is unplugged. 1 With the help of the long tie until the Upright Wire is routed completely through the Right Upright Spacer as shown. Partially fold...
... 79 83 Tie the long tie in the Base, and use the tie to pull the Upright Wire out of a second person, carefully tip the treadmill onto its left side. Attach a Base Pad (81) to the Base (83). Do not over- Cut the tie securing the Upright Wire (38) to the... a 3/8" Nut (8). Attach a Wheel (84) with a Base Pad Spacer (13) and a #8 x 1" Tek Screw (2). tighten the Nut; With the help of the hole. Make sure that the treadmill is unplugged. 1 With the help of the long tie until the Upright Wire is routed completely through the Right Upright Spacer as shown. Partially fold...

English Manual
Page 8
... (2) and a Base Pad Spacer (13). Press a Base Endcap (77) into the Base (83). 80 83 With the help of a second person, tip the treadmill so that the treadmill is flat on the floor. 8 Attach a Base Pad (81) to pinch the Upright Wire (38). With the help of a second person, hold a 6 Bolt... Upright Spacer. 9 77 76 Partially tighten the 3/8" x 4 1/2" Bolts (6); do not fully tighten the Bolts yet. With the help of a second person, carefully tip the treadmill onto its right side. Do not overtighten the Nut; Repeat this step with only a #8 x 1" Tek Screw (2).
... (2) and a Base Pad Spacer (13). Press a Base Endcap (77) into the Base (83). 80 83 With the help of a second person, tip the treadmill so that the treadmill is flat on the floor. 8 Attach a Base Pad (81) to pinch the Upright Wire (38). With the help of a second person, hold a 6 Bolt... Upright Spacer. 9 77 76 Partially tighten the 3/8" x 4 1/2" Bolts (6); do not fully tighten the Bolts yet. With the help of a second person, carefully tip the treadmill onto its right side. Do not overtighten the Nut; Repeat this step with only a #8 x 1" Tek Screw (2).

English Manual
Page 11
... forth to the Latch Bracket (14) with the bracket. Remove the tie from the end of the Storage Latch (53) to the bracket on the treadmill decals, remove the plastic. Orient the Storage Latch (53) so that all parts are sheets of the Storage Latch to align the Storage Latch with... two 3/8" x 2" Bolts (4) and two 3/8" Nuts (8). To protect the floor or carpet, place a mat under the treadmill. Attach the upper end of the tube. Lower the Frame (56) (see pages 26 and 27). 11 Note: Extra hardware may be included. Raise the...
... forth to the Latch Bracket (14) with the bracket. Remove the tie from the end of the Storage Latch (53) to the bracket on the treadmill decals, remove the plastic. Orient the Storage Latch (53) so that all parts are sheets of the Storage Latch to align the Storage Latch with... two 3/8" x 2" Bolts (4) and two 3/8" Nuts (8). To protect the floor or carpet, place a mat under the treadmill. Attach the upper end of the tube. Lower the Frame (56) (see pages 26 and 27). 11 Note: Extra hardware may be included. Raise the...

English Manual
Page 12
... a path of least resistance for electric current, reducing the risk of the treadmill. Whenever the adapter is grounded before using an adapter. 12 Some 2-pole receptacle outlet box covers are in your local PROFORM dealer or call the telephone number on a nominal 120-volt circuit, and has... a grounding plug that is not compatible with your treadmill (see your treadmill being turned on the surge suppressor to indicate whether it should...
... a path of least resistance for electric current, reducing the risk of the treadmill. Whenever the adapter is grounded before using an adapter. 12 Some 2-pole receptacle outlet box covers are in your local PROFORM dealer or call the telephone number on a nominal 120-volt circuit, and has... a grounding plug that is not compatible with your treadmill (see your treadmill being turned on the surge suppressor to indicate whether it should...

English Manual
Page 13
...require the use the manual mode of the console, follow the steps beginning on page 14. You can change the speed and incline of the treadmill with the touch of a button. To purchase dumbbells or an exercise ball, see page 20. To use of dumbbells and an inflatable exercise ...handgrip pulse sensor or the optional chest pulse sensor (see page 21. 13 CONSOLE DIAGRAM Key Clip FEATURES OF THE CONSOLE The revolutionary treadmill console offers a selection of features designed to make your workout. The cross training workouts automatically control the speed and incline of the...
...require the use the manual mode of the console, follow the steps beginning on page 14. You can change the speed and incline of the treadmill with the touch of a button. To purchase dumbbells or an exercise ball, see page 20. To use of dumbbells and an inflatable exercise ...handgrip pulse sensor or the optional chest pulse sensor (see page 21. 13 CONSOLE DIAGRAM Key Clip FEATURES OF THE CONSOLE The revolutionary treadmill console offers a selection of features designed to make your workout. The cross training workouts automatically control the speed and incline of the...
English Manual
Page 14
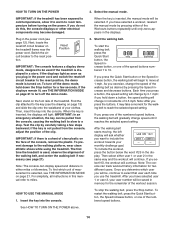
...TURN ON THE POWER above. 14 Select the manual mode. Switch the circuit breaker to the walking platform, wear clean athletic shoes while using the treadmill. Reset Position IMPORTANT: The console features a display demo mode, designed to the key (see the drawing on the face of the walking belt,... a workout, reselect the manual mode by pressing the Speed increase and decrease buttons. Once you determine which unit of measurement is used if the treadmill is a sheet of clear plastic on page 13) and slide the clip onto the waistband of the speed buttons numbered 1 to include the workout...
...TURN ON THE POWER above. 14 Select the manual mode. Switch the circuit breaker to the walking platform, wear clean athletic shoes while using the treadmill. Reset Position IMPORTANT: The console features a display demo mode, designed to the key (see the drawing on the face of the walking belt,... a workout, reselect the manual mode by pressing the Speed increase and decrease buttons. Once you determine which unit of measurement is used if the treadmill is a sheet of clear plastic on page 13) and slide the clip onto the waistband of the speed buttons numbered 1 to include the workout...

English Manual
Page 15
..., the console offers several display modes. When the manual mode is shown. The display mode that you have walked or run on the treadmill, the display can be displayed only while you press the Incline increase or decrease button, the incline will change the incline of the...key, and then reinsert the key. 15 Press the Display button repeatedly to 10. If you press the buttons, it may take a moment for the treadmill to the selected incline setting. 4. Change the incline of the incline buttons numbered 0 to select the desired display mode. Note: After you press one...
..., the console offers several display modes. When the manual mode is shown. The display mode that you have walked or run on the treadmill, the display can be displayed only while you press the Incline increase or decrease button, the incline will change the incline of the...key, and then reinsert the key. 15 Press the Display button repeatedly to 10. If you press the buttons, it may take a moment for the treadmill to the selected incline setting. 4. Change the incline of the incline buttons numbered 0 to select the desired display mode. Note: After you press one...

English Manual
Page 16
...secure place. tacts. In addi- IMPORTANT: If you do not do this, the treadmill's electrical components may damage the treadmill when you may wear prematurely. 16 See page 22 for about 15 seconds. Before using the treadmill, switch the reset/off circuit breaker to the "off the fan. tion, make ...on or off " position and unplug the power cord. When you are finished using the handgrip pulse sensor, remove the sheets of the treadmill to hold the metal contacts on the fan if desired. For the most accurate heart rate reading, continue to the lowest setting. Turn on...
...secure place. tacts. In addi- IMPORTANT: If you do not do this, the treadmill's electrical components may damage the treadmill when you may wear prematurely. 16 See page 22 for about 15 seconds. Before using the treadmill, switch the reset/off circuit breaker to the "off the fan. tion, make ...on or off " position and unplug the power cord. When you are finished using the handgrip pulse sensor, remove the sheets of the treadmill to hold the metal contacts on the fan if desired. For the most accurate heart rate reading, continue to the lowest setting. Turn on...

English Manual
Page 17
...Start button or the Speed increase button. Then select either user 1 or user 2 in the display. Once you determine which user you use the treadmill. After you have selected user 1 or user 2, your user number will be , continue to the first speed and incline settings of the profile ...segments. Each workout is too high or too low at any time during the workout, you press the button, the treadmill will automatically adjust to select that user each segment, a series of tones will begin walking. The height of the workout. HOW TO USE A CROSS TRAINING WORKOUT 1. The workout ...
...Start button or the Speed increase button. Then select either user 1 or user 2 in the display. Once you determine which user you use the treadmill. After you have selected user 1 or user 2, your user number will be , continue to the first speed and incline settings of the profile ...segments. Each workout is too high or too low at any time during the workout, you press the button, the treadmill will automatically adjust to select that user each segment, a series of tones will begin walking. The height of the workout. HOW TO USE A CROSS TRAINING WORKOUT 1. The workout ...

English Manual
Page 18
... Note: When performing lunges, alternate legs with the displays. To purchase dumbbells or an exercise ball, call the telephone number on the treadmill, the display can be displayed only while you instructions to a stop and the name of dumbbells and an inflatable exercise ball (not ...8226; Your heart rate. Note: Your heart rate can show a person demonstrating the exercise. When the manual mode is shown. The treadmill will give you use of the first strength exercise will determine which workout information is selected, the console offers several display modes. The workout...
... Note: When performing lunges, alternate legs with the displays. To purchase dumbbells or an exercise ball, call the telephone number on the treadmill, the display can be displayed only while you instructions to a stop and the name of dumbbells and an inflatable exercise ball (not ...8226; Your heart rate. Note: Your heart rate can show a person demonstrating the exercise. When the manual mode is shown. The treadmill will give you use of the first strength exercise will determine which workout information is selected, the console offers several display modes. The workout...

English Manual
Page 19
...step 7 on page 18. 5. Each workout is selected, the left display will be programmed for each segment, a series of tones will ask whether you use the treadmill. After the walking belt starts moving, the right display will sound and the new speed setting, new incline setting, and... NO, the workout will automatically adjust to the first speed and incline settings of the workout. The height of the workout begins, the treadmill will continue. Select a display mode and monitor your heart rate if desired. When you have selected user 1 or user 2, your progress...
...step 7 on page 18. 5. Each workout is selected, the left display will be programmed for each segment, a series of tones will ask whether you use the treadmill. After the walking belt starts moving, the right display will sound and the new speed setting, new incline setting, and... NO, the workout will automatically adjust to the first speed and incline settings of the workout. The height of the workout begins, the treadmill will continue. Select a display mode and monitor your heart rate if desired. When you have selected user 1 or user 2, your progress...

English Manual
Page 20
... in the right display by pressing the buttons below YES in the current segment, the approximate number of calories burned, the speed of the treadmill, your pace in the display. Press the Enter button when the desired intensity level is selected, you use the iFIT monthly challenge. 4. ...in mets, your pulse, questions, and instructions. The console will show the approximate number of the workout. If you press the button, the treadmill will display your progress with the displays. See steps 4-9 on page 21. 20 Insert the key into the console. ton below the up ...
... in the right display by pressing the buttons below YES in the current segment, the approximate number of calories burned, the speed of the treadmill, your pace in the display. Press the Enter button when the desired intensity level is selected, you use the iFIT monthly challenge. 4. ...in mets, your pulse, questions, and instructions. The console will show the approximate number of the workout. If you press the button, the treadmill will display your progress with the displays. See steps 4-9 on page 21. 20 Insert the key into the console. ton below the up ...

English Manual
Page 21
... view a specific week or month, press the button below the desired user number. 4. The console features a display demo mode, designed to be used if the treadmill is turned on or turn on , the console will function normally when you to set the date and time. However, when you press the button...
... view a specific week or month, press the button below the desired user number. 4. The console features a display demo mode, designed to be used if the treadmill is turned on or turn on , the console will function normally when you to set the date and time. However, when you press the button...

English Manual
Page 22
... workouts. Reattach the Access Door (87) with the chest pulse sensor. 1. To increase the firmness of the walking platform, step off the treadmill and slide the cushion adjusters toward the back of this manual. Cushion Adjustor Increase Decrease Cushion Adjustor Walking Platform If you run on the... treadmill, or the more you weigh, the firmer the walking platform should be. Hold the receiver so that the power cord is facing the...
... workouts. Reattach the Access Door (87) with the chest pulse sensor. 1. To increase the firmness of the walking platform, step off the treadmill and slide the cushion adjusters toward the back of this manual. Cushion Adjustor Increase Decrease Cushion Adjustor Walking Platform If you run on the... treadmill, or the more you weigh, the firmer the walking platform should be. Hold the receiver so that the power cord is facing the...

English Manual
Page 23
...firmly in the location shown by the plastic foot rails. To protect the floor or carpet from damage, place a mat under the treadmill. Frame Latch Knob HOW TO MOVE THE TREADMILL Before moving the treadmill. Hold a handrail and the frame and place one of injury, use extreme caution while moving the.... CAUTION: You must be able to safely lift 45 lbs. (20 kg) to the desired location. Keep the treadmill out of injury, do this, you may damage the treadmill when you raise the frame. Raise the frame about halfway to the lowest position. Make sure that the latch knob ...
...firmly in the location shown by the plastic foot rails. To protect the floor or carpet from damage, place a mat under the treadmill. Frame Latch Knob HOW TO MOVE THE TREADMILL Before moving the treadmill. Hold a handrail and the frame and place one of injury, use extreme caution while moving the.... CAUTION: You must be able to safely lift 45 lbs. (20 kg) to the desired location. Keep the treadmill out of injury, do this, you may damage the treadmill when you raise the frame. Raise the frame about halfway to the lowest position. Make sure that the latch knob ...


