

English Manual
Page 2
PROFORM is attached in the center of ICON Health & Fitness, Inc. 2 TABLE OF CONTENTS IMPORTANT PRECAUTIONS 3 BEFORE YOU BEGIN 5 ASSEMBLY 6 OPERATION AND ADJUSTMENT 9 HOW TO FOLD AND MOVE THE TREADMILL 20 TROUBLESHOOTING 22 CONDITIONING GUIDELINES 24 PART LIST 26 ORDERING REPLACEMENT PARTS Back Cover LIMITED WARRANTY Back Cover Note: An EXPLODED DRAWING is a registered trademark of this manual.
PROFORM is attached in the center of ICON Health & Fitness, Inc. 2 TABLE OF CONTENTS IMPORTANT PRECAUTIONS 3 BEFORE YOU BEGIN 5 ASSEMBLY 6 OPERATION AND ADJUSTMENT 9 HOW TO FOLD AND MOVE THE TREADMILL 20 TROUBLESHOOTING 22 CONDITIONING GUIDELINES 24 PART LIST 26 ORDERING REPLACEMENT PARTS Back Cover LIMITED WARRANTY Back Cover Note: An EXPLODED DRAWING is a registered trademark of this manual.

English Manual
Page 3
...the user's movement, may change the incline of the treadmill by persons weighing more amps. The pulse sensor is turned off. Never leave the treadmill unattended while it is fully closed. 3 When connecting the power cord (see your local PROFORM dealer or call 1-800-8063651 and order part number 146148.... 20. Do not use . (See the drawing on the treadmill at all warnings and precautions. 2. Do not change speed or stop unexpectedly, which may...
...the user's movement, may change the incline of the treadmill by persons weighing more amps. The pulse sensor is turned off. Never leave the treadmill unattended while it is fully closed. 3 When connecting the power cord (see your local PROFORM dealer or call 1-800-8063651 and order part number 146148.... 20. Do not use . (See the drawing on the treadmill at all warnings and precautions. 2. Do not change speed or stop unexpectedly, which may...

English Manual
Page 4
...and videos from your physician. Do not use this manual. This is about to order a free replacement decal (see ORDERING REPLACEMENT PARTS on your treadmill. Inspect and properly tighten all instructions before using iFIT.com CD's and videos, an electronic "chirping" sound will change . 23. tenance and... This decal is shown at any exercise program, consult your CD player or VCR when you when the speed and/or incline of the treadmill is especially important for in any opening. In some instances, the speed and/or incline may change . scribed in the location shown. ...
...and videos from your physician. Do not use this manual. This is about to order a free replacement decal (see ORDERING REPLACEMENT PARTS on your treadmill. Inspect and properly tighten all instructions before using iFIT.com CD's and videos, an electronic "chirping" sound will change . 23. tenance and... This decal is shown at any exercise program, consult your CD player or VCR when you when the speed and/or incline of the treadmill is especially important for in any opening. In some instances, the speed and/or incline may change . scribed in the location shown. ...
English Manual
Page 5
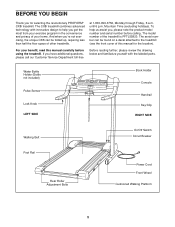
... can be found on a decal attached to help us assist you, please note the product model number and serial number before using the treadmill. For your home. The CX8i treadmill combines advanced technology with the labeled parts. Water Bottle Holder (Bottle not included) Pulse Sensor Lock Knob LEFT SIDE Book Holder Console Handrail... BEGIN Thank you get the most from your exercise program in the convenience and privacy of your benefit, read this manual for selecting the revolutionary PROFORM® CX8i treadmill.
... can be found on a decal attached to help us assist you, please note the product model number and serial number before using the treadmill. For your home. The CX8i treadmill combines advanced technology with the labeled parts. Water Bottle Holder (Bottle not included) Pulse Sensor Lock Knob LEFT SIDE Book Holder Console Handrail... BEGIN Thank you get the most from your exercise program in the convenience and privacy of your benefit, read this manual for selecting the revolutionary PROFORM® CX8i treadmill.
English Manual
Page 6
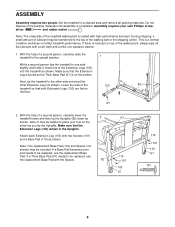
... floor. 97 2. Make sure that the Extension Leg is turned so the Thick Base Pad (97) is a normal condition and does not affect treadmill performance. ASSEMBLY Assembly requires two people. driver and rubber mallet . With the help of the walking belt or the shipping carton. Next, tip the... each Extension Leg (103) with the Spacer. 82 97 119 101 103 97 119 101 103 97 101 6 Do not dispose of the 103 82 treadmill so that the Extension Legs (103) remain in a cleared area and remove all packing materials. During shipping, a small amount of the Extension Legs (...
... floor. 97 2. Make sure that the Extension Leg is turned so the Thick Base Pad (97) is a normal condition and does not affect treadmill performance. ASSEMBLY Assembly requires two people. driver and rubber mallet . With the help of the walking belt or the shipping carton. Next, tip the... each Extension Leg (103) with the Spacer. 82 97 119 101 103 97 119 101 103 97 101 6 Do not dispose of the 103 82 treadmill so that the Extension Legs (103) remain in a cleared area and remove all packing materials. During shipping, a small amount of the Extension Legs (...
English Manual
Page 8
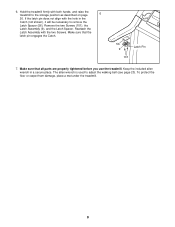
... with both hands, and raise the treadmill to remove the Latch Spacer (56). If the latch pin does not align with the two Screws. Keep the included allen wrench ...it will be necessary to the storage position as described on page 6 20. To protect the floor or carpet from damage, place a mat under the treadmill. 8 Remove the two Screws (101), the Latch Assembly (9), and the Latch Spacer. The allen wrench is used to adjust the walking belt (see... the latch pin engages the Catch. 56 Latch Pin 9 101 7. Make sure that all parts are properly tightened before you use the treadmill.
... with both hands, and raise the treadmill to remove the Latch Spacer (56). If the latch pin does not align with the two Screws. Keep the included allen wrench ...it will be necessary to the storage position as described on page 6 20. To protect the floor or carpet from damage, place a mat under the treadmill. 8 Remove the two Screws (101), the Latch Assembly (9), and the Latch Spacer. The allen wrench is used to adjust the walking belt (see... the latch pin engages the Catch. 56 Latch Pin 9 101 7. Make sure that all parts are properly tightened before you use the treadmill.

English Manual
Page 9
... qualified electrician or serviceman if you are not grounded. Check with PERFORMANT LUBETM, a high-performance lubricant. To decrease the possibility of the treadmill. This product must be grounded. This product is used to connect the surge suppressor to a permanent ground such as shown in place by ... green-colored rigid ear, lug, or the like extending from other type of sophisticated electronic equipment, can result in your local PROFORM dealer or call 1-800-806-3651 and order part number 146148. Some 2-pole receptacle outlet box covers are in drawing 1 below. Important...
... qualified electrician or serviceman if you are not grounded. Check with PERFORMANT LUBETM, a high-performance lubricant. To decrease the possibility of the treadmill. This product must be grounded. This product is used to connect the surge suppressor to a permanent ground such as shown in place by ... green-colored rigid ear, lug, or the like extending from other type of sophisticated electronic equipment, can result in your local PROFORM dealer or call 1-800-806-3651 and order part number 146148. Some 2-pole receptacle outlet box covers are in drawing 1 below. Important...
English Manual
Page 10
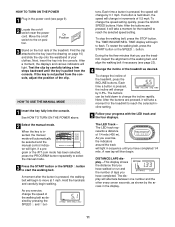
...-energy music provides added motivation. Each CD features two programs designed by certified personal trainers. • To reduce the possibility of the treadmill to help you an effective workout. Each program automatically controls the speed and incline of electric shock, keep the console dry. To use...of working out with a touch of a button. When the manual mode of the console is selected, the speed and incline of the treadmill can even measure your home stereo, portable stereo, or computer and play iFIT.com video programs (videocassettes are available separately). Using the ...
...-energy music provides added motivation. Each CD features two programs designed by certified personal trainers. • To reduce the possibility of the treadmill to help you an effective workout. Each program automatically controls the speed and incline of electric shock, keep the console dry. To use...of working out with a touch of a button. When the manual mode of the console is selected, the speed and incline of the treadmill can even measure your home stereo, portable stereo, or computer and play iFIT.com video programs (videocassettes are available separately). Using the ...
English Manual
Page 11
...mph. Hold the handrails and carefully begin to reach the selected incline setting. 5 Follow your clothes. tons. To change the incline of the treadmill as shown by pressing the SPEED v and w but- The buttons can be selected and the manual control indicator will change the incline rapidly.... manual mode will begin walking. TIME display will automatically be held down to the key (see page 23). 4 Change the incline of the treadmill, press the INCLINE buttons. To restart the walking belt, press the START button or the SPEED v button. A new lap will alternate between...
...mph. Hold the handrails and carefully begin to reach the selected incline setting. 5 Follow your clothes. tons. To change the incline of the treadmill as shown by pressing the SPEED v and w but- The buttons can be selected and the manual control indicator will change the incline rapidly.... manual mode will begin walking. TIME display will automatically be held down to the key (see page 23). 4 Change the incline of the treadmill, press the INCLINE buttons. To restart the walking belt, press the START button or the SPEED v button. A new lap will alternate between...
English Manual
Page 12
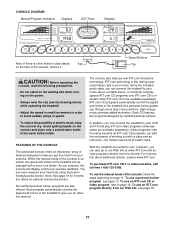
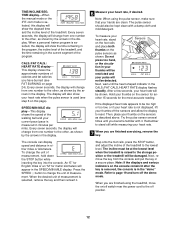
...TIME/INCLINE/SEG. When a personal trainer program is selected, the display will show the time remaining in the program, the incline level of the treadmill, and the time remaining in the current segment of the walking belt and your heart rate will change the unit of measurement is measured in... pulse will appear in the display. Note: If the displays and various indicators on page 24). This display shows the approximate numbers of the treadmill. tion in your thumbs will be restricted and your thumbs on the pulse sensors as shown by the arrows in minutes per mile). other ,...
...TIME/INCLINE/SEG. When a personal trainer program is selected, the display will show the time remaining in the program, the incline level of the treadmill, and the time remaining in the current segment of the walking belt and your heart rate will change the unit of measurement is measured in... pulse will appear in the display. Note: If the displays and various indicators on page 24). This display shows the approximate numbers of the treadmill. tion in your thumbs will be restricted and your thumbs on the pulse sensors as shown by the arrows in minutes per mile). other ,...

English Manual
Page 13
...profiles show how long the selected program will continue in the first segment of the program, a series of tones will sound and the treadmill will automatically adjust to page 19 and turn off position. 13 If the speed or incline setting for the current segment is inserted, the...zero. TIME display counts down to start the program. When only three seconds remain in this way until one incline setting are finished using the treadmill, move the on page 11. 5 Measure your progress with the LED track and the four displays. When the program is divided into the ...
...profiles show how long the selected program will continue in the first segment of the program, a series of tones will sound and the treadmill will automatically adjust to page 19 and turn off position. 13 If the speed or incline setting for the current segment is inserted, the...zero. TIME display counts down to start the program. When only three seconds remain in this way until one incline setting are finished using the treadmill, move the on page 11. 5 Measure your progress with the LED track and the four displays. When the program is divided into the ...

English Manual
Page 14
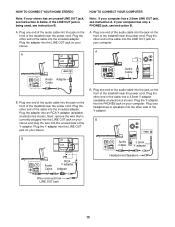
... below . B LINE OUT Audio Cable B. Plug the other end of the Y-adapter. To use iFIT.com programs directly from our internet site, the treadmill must be connected to your stereo. See page 15 for connecting instructions. HOW TO CONNECT YOUR PORTABLE STEREO Note: If your CD player has separate...your headphones into the jack on your portable CD player, portable stereo, home stereo, or computer with CD player. Plug the other end of the treadmill near the power cord. A. If your stereo has only a PHONES jack, see instruction A below . Plug one end of the audio cable ...
... below . B LINE OUT Audio Cable B. Plug the other end of the Y-adapter. To use iFIT.com programs directly from our internet site, the treadmill must be connected to your stereo. See page 15 for connecting instructions. HOW TO CONNECT YOUR PORTABLE STEREO Note: If your CD player has separate...your headphones into the jack on your portable CD player, portable stereo, home stereo, or computer with CD player. Plug the other end of the treadmill near the power cord. A. If your stereo has only a PHONES jack, see instruction A below . Plug one end of the audio cable ...
English Manual
Page 15
...Wire removed from LINE OUT jack 15 Plug the other end of the treadmill near the power cord. Plug the Y-adapter into the jack on your stereo. Plug the other end of the... treadmill near the power cord. Plug the adapter into a 3.5mm Y-adapter (available at electronics stores...into the LINE OUT jack on the front of the treadmill near the power cord. If your headphones or speakers into the PHONES jack on the front of the treadmill near the power cord. A. Plug the other end ...
...Wire removed from LINE OUT jack 15 Plug the other end of the treadmill near the power cord. Plug the Y-adapter into the jack on your stereo. Plug the other end of the... treadmill near the power cord. Plug the adapter into a 3.5mm Y-adapter (available at electronics stores...into the LINE OUT jack on the front of the treadmill near the power cord. If your headphones or speakers into the PHONES jack on the front of the treadmill near the power cord. A. Plug the other end ...
English Manual
Page 16
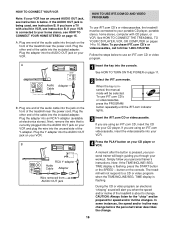
... TIME/INCLINE/ SEG. In some instances, the speed and/or incline may change before the personal trainer describes the change . See HOW TO CONNECT THE TREADMILL TO YOUR CD PLAYER, VCR, OR COMPUTER on page 11. 2 Select the iFIT.com mode. mill will alert you through your VCR. Plug the adapter... into the console. HOW TO USE IFIT.COM CD AND VIDEO PROGRAMS To use iFIT.com CD's or videocassettes, the treadmill must be connected to a CD or video program Wire removed from AUDIO OUT jack when the TIME/INCLINE/SEG. Plug the Y-adapter into the AUDIO...
... TIME/INCLINE/ SEG. In some instances, the speed and/or incline may change before the personal trainer describes the change . See HOW TO CONNECT THE TREADMILL TO YOUR CD PLAYER, VCR, OR COMPUTER on page 11. 2 Select the iFIT.com mode. mill will alert you through your VCR. Plug the adapter... into the console. HOW TO USE IFIT.COM CD AND VIDEO PROGRAMS To use iFIT.com CD's or videocassettes, the treadmill must be connected to a CD or video program Wire removed from AUDIO OUT jack when the TIME/INCLINE/SEG. Plug the Y-adapter into the AUDIO...

English Manual
Page 17
... you can manually override the settings at any time by pressing the SPEED or INCLINE buttons on the console. • Adjust the volume of the treadmill does not change to flash.
... you can manually override the settings at any time by pressing the SPEED or INCLINE buttons on the console. • Adjust the volume of the treadmill does not change to flash.

English Manual
Page 18
...internet connection. 4 Start your clothes. When the key is about additional options, explore www.iFIT.com. Note: If the speed or incline of the treadmill is inserted, the manual mode will alert you to access basic programs, audio programs, and video programs directly from our Web site. 1 Insert the ... connected, that it is heard, the speed and/or incline will be prepared for the program. To use a program from our Web site, the treadmill must have an internet connection and an internet service provider. In addition, you start the program, an on page 13. 18 A list of the...
...internet connection. 4 Start your clothes. When the key is about additional options, explore www.iFIT.com. Note: If the speed or incline of the treadmill is inserted, the manual mode will alert you to access basic programs, audio programs, and video programs directly from our Web site. 1 Insert the ... connected, that it is heard, the speed and/or incline will be prepared for the program. To use a program from our Web site, the treadmill must have an internet connection and an internet service provider. In addition, you start the program, an on page 13. 18 A list of the...

English Manual
Page 19
..., remove the key from the console, and the displays and indicators on the console will be blank. To purchase the hand weights, see your local PROFORM dealer or call toll-free 1-800-734-2377. If a "d" appears in the "demo" mode. The hand weights fit into the console. The information ... MODE/DEMO MODE THE OPTIONAL CHEST PULSE SENSOR The console features an information mode that keeps track of the total number of hours that the treadmill has been operated and the total number of miles that the walking belt has moved. To purchase the optional chest pulse sensor, see your...
..., remove the key from the console, and the displays and indicators on the console will be blank. To purchase the hand weights, see your local PROFORM dealer or call toll-free 1-800-734-2377. If a "d" appears in the "demo" mode. The hand weights fit into the console. The information ... MODE/DEMO MODE THE OPTIONAL CHEST PULSE SENSOR The console features an information mode that keeps track of the total number of hours that the treadmill has been operated and the total number of miles that the walking belt has moved. To purchase the optional chest pulse sensor, see your...
English Manual
Page 20
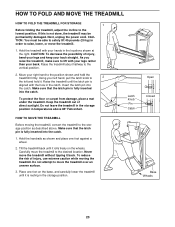
... the storage position in order to the storage position as shown and place one foot on the wheels. Raise the treadmill until the latch pin is not done, the treadmill may be able to safely lift 45 pounds (20 kg) in temperatures above . To reduce the risk of injury, use ...latch pin into the catch. Next, unplug the power cord. Open Closed Base Wheels 20 HOW TO FOLD AND MOVE THE TREADMILL HOW TO FOLD THE TREADMILL FOR STORAGE 1 Before folding the treadmill, adjust the incline to the vertical position. 2. If this is aligned with your legs rather than your back. Latch ...
... the storage position in order to the storage position as shown and place one foot on the wheels. Raise the treadmill until the latch pin is not done, the treadmill may be able to safely lift 45 pounds (20 kg) in temperatures above . To reduce the risk of injury, use ...latch pin into the catch. Next, unplug the power cord. Open Closed Base Wheels 20 HOW TO FOLD AND MOVE THE TREADMILL HOW TO FOLD THE TREADMILL FOR STORAGE 1 Before folding the treadmill, adjust the incline to the vertical position. 2. If this is aligned with your legs rather than your back. Latch ...

English Manual
Page 21
Hold the treadmill firmly with your right hand as shown. Using your back straight. Do not drop the treadmill frame 2 to the floor. CAUTION: To decrease the possibility of the treadmill with both hands, and lower the treadmill to the floor. Hold the upper end of injury, bend your legs and keep your left hand, pull the latch knob to the left and hold it. HOW TO LOWER THE TREADMILL FOR USE 1 1. Pivot the treadmill down until the frame is past the pin. Slowly release the latch knob. 2. Latch Knob Pin Catch Open 21
Hold the treadmill firmly with your right hand as shown. Using your back straight. Do not drop the treadmill frame 2 to the floor. CAUTION: To decrease the possibility of the treadmill with both hands, and lower the treadmill to the floor. Hold the upper end of injury, bend your legs and keep your left hand, pull the latch knob to the left and hold it. HOW TO LOWER THE TREADMILL FOR USE 1 1. Pivot the treadmill down until the frame is past the pin. Slowly release the latch knob. 2. Latch Knob Pin Catch Open 21
English Manual
Page 22
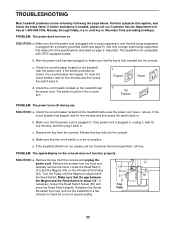
...back in. Retighten the Screw. After the power cord has been plugged in, make sure that the power cord is about 1/8". d. TROUBLESHOOTING Most treadmill problems can be in the on position. Find the symptom that meets all of the Pulley 30 42 (42). Make sure that the key ... Switch Screw (30) and Top move the Reed Switch slightly. Remove the screws from the console. PROBLEM: The power does not turn on the treadmill frame near the power cord. b. If the switch protrudes as shown, the circuit breaker has tripped. Check the circuit breaker located on SOLUTION: a....
...back in. Retighten the Screw. After the power cord has been plugged in, make sure that the power cord is about 1/8". d. TROUBLESHOOTING Most treadmill problems can be in the on position. Find the symptom that meets all of the Pulley 30 42 (42). Make sure that the key ... Switch Screw (30) and Top move the Reed Switch slightly. Remove the screws from the console. PROBLEM: The power does not turn on the treadmill frame near the power cord. b. If the switch protrudes as shown, the circuit breaker has tripped. Check the circuit breaker located on SOLUTION: a....


