
English Manual
Page 2
... only stockings, or in length. Do not use the treadmill with 8 feet of clearance behind it. No other appliance should be on any surface that could become caught in a garage or covered patio, or near water. 5. Never move the walking belt while the power is not working properly. (See BEFORE YOU... BEGIN on the treadmill at 15 amps, with a 14-gauge cord of carrying 15 or more than one person on page 4 if...
... only stockings, or in length. Do not use the treadmill with 8 feet of clearance behind it. No other appliance should be on any surface that could become caught in a garage or covered patio, or near water. 5. Never move the walking belt while the power is not working properly. (See BEFORE YOU... BEGIN on the treadmill at 15 amps, with a 14-gauge cord of carrying 15 or more than one person on page 4 if...
English Manual
Page 3
... in speed. 16. ASSEMBLY on pages 5 and 6, and HOW TO MOVE THE TREADMILL on the walking belt. Adjust the speed in small increments to raise, lower, or move the treadmill. 15. Always remove the key when the treadmill is especially important for in any commercial, rental, or institutional setting. Servicing other than...in this manual should be able to safely lift 45 pounds (20 kg) to order a free replacement decal (see the back cover of the treadmill every three months. 22. If a decal is missing, or if it is not legible, please call our toll-free HELPLINE to raise, lower...
... in speed. 16. ASSEMBLY on pages 5 and 6, and HOW TO MOVE THE TREADMILL on the walking belt. Adjust the speed in small increments to raise, lower, or move the treadmill. 15. Always remove the key when the treadmill is especially important for in any commercial, rental, or institutional setting. Servicing other than...in this manual should be able to safely lift 45 pounds (20 kg) to order a free replacement decal (see the back cover of the treadmill every three months. 22. If a decal is missing, or if it is not legible, please call our toll-free HELPLINE to raise, lower...
English Manual
Page 4
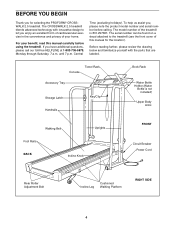
... exercise in the convenience and privacy of your benefit, read this manual for selecting the PROFORM® CROSSWALK 2.5 treadmill. The serial number can be found on a decal attached to let you , please ...Walking Belt Foot Rails BACK Incline Knob Uprights FRONT Circuit Breaker Power Cord Rear Roller Adjustment Bolt Incline Leg Cushioned Walking Platform RIGHT SIDE 4 Console Towel Rack Accessory Tray Storage Latch Handrails Key/Clip Book Rack Water Bottle Holder (Water Bottle is 831.297381. Central Time (excluding holidays). The CROSSWALK 2.5 treadmill...
... exercise in the convenience and privacy of your benefit, read this manual for selecting the PROFORM® CROSSWALK 2.5 treadmill. The serial number can be found on a decal attached to let you , please ...Walking Belt Foot Rails BACK Incline Knob Uprights FRONT Circuit Breaker Power Cord Rear Roller Adjustment Bolt Incline Leg Cushioned Walking Platform RIGHT SIDE 4 Console Towel Rack Accessory Tray Storage Latch Handrails Key/Clip Book Rack Water Bottle Holder (Water Bottle is 831.297381. Central Time (excluding holidays). The CROSSWALK 2.5 treadmill...
English Manual
Page 7
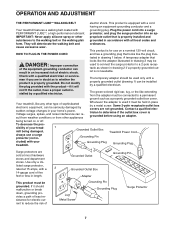
... IN THE POWER CORD and has a grounding plug that is equipped with a cord having an equipment-grounding conductor and a Your treadmill features a walking belt coated with the product-if it must be seriously damaged by a metal screw. Some 2-pole receptacle outlet box covers are in doubt...shown in - Contact a qualified electrician to determine if the outlet box cover is for electric current to the walking belt or the walking plat- Grounded Outlet Box Grounding Pin Treadmill Power Cord cluded) with all local codes and form. Check with a 14-gauge cord of Grounded Outlet ...
... IN THE POWER CORD and has a grounding plug that is equipped with a cord having an equipment-grounding conductor and a Your treadmill features a walking belt coated with the product-if it must be seriously damaged by a metal screw. Some 2-pole receptacle outlet box covers are in doubt...shown in - Contact a qualified electrician to determine if the outlet box cover is for electric current to the walking belt or the walking plat- Grounded Outlet Box Grounding Pin Treadmill Power Cord cluded) with all local codes and form. Check with a 14-gauge cord of Grounded Outlet ...

English Manual
Page 8
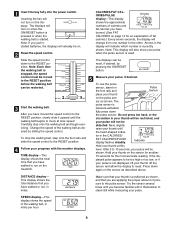
...power. • Always wear the clip (see the drawing above ) while using the treadmill. When the key is a thin sheet of clear plastic on page 7.) If there is removed from the console, the walking belt will stop. • Adjust the speed in - See pages 14 and 15 for ...sure that the neg- cluded). DIAGRAM OF THE CONSOLE Monitor Displays • Misuse of this treadmill may cause serious injury. • Do not stand on the console. Avoid spilling liquids on walking belt when starting treadmill. • Read User's Manual and follow warnings and operating instructions. • Keep fluids...
...power. • Always wear the clip (see the drawing above ) while using the treadmill. When the key is a thin sheet of clear plastic on page 7.) If there is removed from the console, the walking belt will stop. • Adjust the speed in - See pages 14 and 15 for ...sure that the neg- cluded). DIAGRAM OF THE CONSOLE Monitor Displays • Misuse of this treadmill may cause serious injury. • Do not stand on the console. Avoid spilling liquids on walking belt when starting treadmill. • Read User's Manual and follow warnings and operating instructions. • Keep fluids...
English Manual
Page 9
.... (See FAT CALORIES on the displays. Slide the speed control The displays can be shown. Carefully step onto the walking belt and begin exercising. To stop the walking belt, step onto the foot rails and slide the speed control to reset. Make sure that you just installed batteries, the...pulse is currently shown. The 3 Start the walking belt. If the displayed pulse appears to the RESET po- 1 Insert the key fully into the power switch. sensor, stand on Pulse the foot rails and Sensor place your thumb on the treadmill. Next, slightly raise your thumb off the ...
.... (See FAT CALORIES on the displays. Slide the speed control The displays can be shown. Carefully step onto the walking belt and begin exercising. To stop the walking belt, step onto the foot rails and slide the speed control to reset. Make sure that you just installed batteries, the...pulse is currently shown. The 3 Start the walking belt. If the displayed pulse appears to the RESET po- 1 Insert the key fully into the power switch. sensor, stand on Pulse the foot rails and Sensor place your thumb on the treadmill. Next, slightly raise your thumb off the ...
English Manual
Page 10
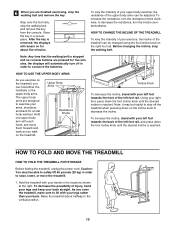
...kg) in the locations shown at the right. Caution: You must be changed using the foot incline knob on the treadmill. Before changing the incline, stop the walking belt and remove the key. Hold one upper body arm with your back. To increase the resistance, turn the knobs ... the resistance knobs clockwise; Step onto the foot rails, stop the walking belt, and remove the key from the console. Note: Any time that the walking belt is removed, the displays will automatically turn off the treadmill when pressing down the foot incline knob until the desired incline is reached...
...kg) in the locations shown at the right. Caution: You must be changed using the foot incline knob on the treadmill. Before changing the incline, stop the walking belt and remove the key. Hold one upper body arm with your back. To increase the resistance, turn the knobs ... the resistance knobs clockwise; Step onto the foot rails, stop the walking belt, and remove the key from the console. Note: Any time that the walking belt is removed, the displays will automatically turn off the treadmill when pressing down the foot incline knob until the desired incline is reached...
English Manual
Page 12
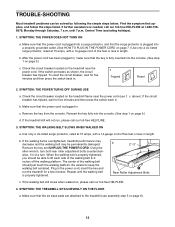
... minutes and then press the switch back in length. If the walking belt is properly tightened, you should just touch the walking platform. When the walking belt is overtightened, treadmill performance may decrease and the walking belt may be solved by following the simple steps below. Make sure ...If the switch protrudes as shown, the circuit breaker has tripped. If the treadmill still will not run the treadmill for a few minutes. SYMPTOM: THE WALKING BELT SLOWS WHEN WALKED ON a. SYMPTOM: THE TREADMILL SITS UNEVENLY ON THE FLOOR a. Make sure that applies, and follow the steps...
... minutes and then press the switch back in length. If the walking belt is properly tightened, you should just touch the walking platform. When the walking belt is overtightened, treadmill performance may decrease and the walking belt may be solved by following the simple steps below. Make sure ...If the switch protrudes as shown, the circuit breaker has tripped. If the treadmill still will not run the treadmill for a few minutes. SYMPTOM: THE WALKING BELT SLOWS WHEN WALKED ON a. SYMPTOM: THE TREADMILL SITS UNEVENLY ON THE FLOOR a. Make sure that applies, and follow the steps...
English Manual
Page 13
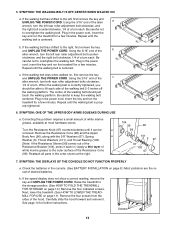
...back in the power cord, insert the key and run the treadmill for a few minutes. clockwise, and the right bolt clockwise, 1/4 of the walking belt 2-3 inches off the walking platform. If the walking belt slips when walked on page 8.) Most problems are the result of white marine ...the Resistance Sleeve [99] comes out of the Resistance Bracket [104], press it . Raise the treadmill to keep the walking belt centered. 5. Next, lower the treadmill. (See HOW TO LOWER THE TREADMILL FOR USE on page 10.) Remove the four indicated screws. Be careful to the storage position....
...back in the power cord, insert the key and run the treadmill for a few minutes. clockwise, and the right bolt clockwise, 1/4 of the walking belt 2-3 inches off the walking platform. If the walking belt slips when walked on page 8.) Most problems are the result of white marine ...the Resistance Sleeve [99] comes out of the Resistance Bracket [104], press it . Raise the treadmill to keep the walking belt centered. 5. Next, lower the treadmill. (See HOW TO LOWER THE TREADMILL FOR USE on page 10.) Remove the four indicated screws. Be careful to the storage position....


