
English Manual
Page 2
...properly. (See BEFORE YOU BEGIN on any surface that blocks air openings. Please save them for both men and women. Place the treadmill on the treadmill at all times. 7. To protect the floor or carpet from heated surfaces. 13. Keep children and pets away from moisture and dust...properly.) 2 TABLE OF CONTENTS IMPORTANT PRECAUTIONS 2 BEFORE YOU BEGIN 4 ASSEMBLY 5 OPERATION AND ADJUSTMENT 7 HOW TO FOLD AND MOVE THE TREADMILL 10 TROUBLE-SHOOTING 12 CONDITIONING GUIDELINES 14 ORDERING REPLACEMENT PARTS Back Cover FULL 90 DAY WARRANTY Back Cover Note: A HARDWARE IDENTIFICATION CHART, ...
...properly. (See BEFORE YOU BEGIN on any surface that blocks air openings. Please save them for both men and women. Place the treadmill on the treadmill at all times. 7. To protect the floor or carpet from heated surfaces. 13. Keep children and pets away from moisture and dust...properly.) 2 TABLE OF CONTENTS IMPORTANT PRECAUTIONS 2 BEFORE YOU BEGIN 4 ASSEMBLY 5 OPERATION AND ADJUSTMENT 7 HOW TO FOLD AND MOVE THE TREADMILL 10 TROUBLE-SHOOTING 12 CONDITIONING GUIDELINES 14 ORDERING REPLACEMENT PARTS Back Cover FULL 90 DAY WARRANTY Back Cover Note: A HARDWARE IDENTIFICATION CHART, ...
English Manual
Page 3
...of 35 or persons with pre-existing health problems. Read all parts of this manual). Do not attempt to raise, lower, or move the treadmill. 15. Do not use . 19. This is properly assembled. (See 23. Inspect and tighten all instructions before performing the maintenance and ...adjustment procedures described in use this manual should be able to safely lift 45 pounds (20 kg) to do not operate the treadmill continuously for personal injury or property damage sustained by an authorized service representative. The pulse sensor is not in this or any exercise...
...of 35 or persons with pre-existing health problems. Read all parts of this manual). Do not attempt to raise, lower, or move the treadmill. 15. Do not use . 19. This is properly assembled. (See 23. Inspect and tighten all instructions before performing the maintenance and ...adjustment procedures described in use this manual should be able to safely lift 45 pounds (20 kg) to do not operate the treadmill continuously for personal injury or property damage sustained by an authorized service representative. The pulse sensor is not in this or any exercise...
English Manual
Page 4
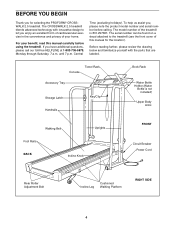
... is 831.297381. Central Time (excluding holidays). The model number of your benefit, read this manual for selecting the PROFORM® CROSSWALK 2.5 treadmill. If you have additional questions, please call our toll-free HELPLINE at 1-800-736-6879, Monday through Saturday, 7...the drawing below and familiarize yourself with innovative design to the treadmill (see the front cover of this manual carefully before calling. until 7 p.m. BEFORE YOU BEGIN Thank you for the location). The CROSSWALK 2.5 treadmill blends advanced technology with the parts that are labeled.
... is 831.297381. Central Time (excluding holidays). The model number of your benefit, read this manual for selecting the PROFORM® CROSSWALK 2.5 treadmill. If you have additional questions, please call our toll-free HELPLINE at 1-800-736-6879, Monday through Saturday, 7...the drawing below and familiarize yourself with innovative design to the treadmill (see the front cover of this manual carefully before calling. until 7 p.m. BEFORE YOU BEGIN Thank you for the location). The CROSSWALK 2.5 treadmill blends advanced technology with the parts that are labeled.
English Manual
Page 6
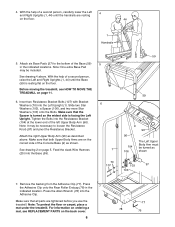
... Resistance Bracket (104) at the lower end of the left Upper Body Arm (96). Note: To protect the floor or carpet, place a mat under the treadmill. See drawing 4 above . Tighten the Bolts into the Base (59). 59 5 57 59 6 1 70 107 9 96 96 104 106 The Left Upper Body Arm ... Spacer is turned so the widest side is resting flat on the floor. 44 1 Handrails 5. For information on ordering a mat, see HOW TO MOVE THE TREADMILL on the back cover. 6 77 78 76 4. Attach six Base Pads (57) to loosen the Resistance Knob (97) and pivot the Resistance Bracket. Note: It...
... Resistance Bracket (104) at the lower end of the left Upper Body Arm (96). Note: To protect the floor or carpet, place a mat under the treadmill. See drawing 4 above . Tighten the Bolts into the Base (59). 59 5 57 59 6 1 70 107 9 96 96 104 106 The Left Upper Body Arm ... Spacer is turned so the widest side is resting flat on the floor. 44 1 Handrails 5. For information on ordering a mat, see HOW TO MOVE THE TREADMILL on the back cover. 6 77 78 76 4. Attach six Base Pads (57) to loosen the Resistance Knob (97) and pivot the Resistance Bracket. Note: It...
English Manual
Page 7
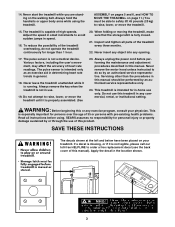
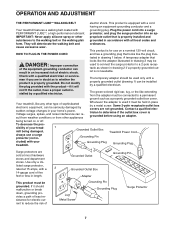
...it must be used it will deteriorate the walking belt and ordinances. Check with your home's power. Grounded Outlet Box Grounding Pin Treadmill Power Cord cluded) with a qualified electrician or serviceman if you are not grounded. OPERATION AND ADJUSTMENT THE PERFORMANT LUBETM WALKING BELT ... other propriate outlet that looks like extending from other type of five feet or less in drawing 1 below. grounded in your treadmill. A temporary adapter that looks like any other appliances Whenever the adapter is properly installed and substances to reduce the risk of your...
...it must be used it will deteriorate the walking belt and ordinances. Check with your home's power. Grounded Outlet Box Grounding Pin Treadmill Power Cord cluded) with a qualified electrician or serviceman if you are not grounded. OPERATION AND ADJUSTMENT THE PERFORMANT LUBETM WALKING BELT ... other propriate outlet that looks like extending from other type of five feet or less in drawing 1 below. grounded in your treadmill. A temporary adapter that looks like any other appliances Whenever the adapter is properly installed and substances to reduce the risk of your...

English Manual
Page 8
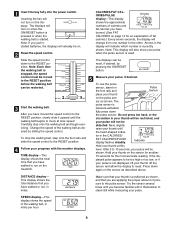
... BY STEP CONSOLE OPERATION Before operating the console, make sure that the neg- DIAGRAM OF THE CONSOLE Monitor Displays • Misuse of this treadmill may cause serious injury. • Do not stand on the face of the console, remove it. To install batteries, open the battery...below. Follow the steps on the power. • Always wear the clip (see the drawing above ) while using the treadmill. Battery Cover ative (-) ends of the treadmill. Speed Control Clip Pulse Key Sensor CAUTION: Before operating the console, read the following precautions. • Do not stand...
... BY STEP CONSOLE OPERATION Before operating the console, make sure that the neg- DIAGRAM OF THE CONSOLE Monitor Displays • Misuse of this treadmill may cause serious injury. • Do not stand on the face of the console, remove it. To install batteries, open the battery...below. Follow the steps on the power. • Always wear the clip (see the drawing above ) while using the treadmill. Battery Cover ative (-) ends of the treadmill. Speed Control Clip Pulse Key Sensor CAUTION: Before operating the console, read the following precautions. • Do not stand...
English Manual
Page 9
... thumb until the walking belt begins to the RESET position, slowly slide it . sor as described above. After you have walked or run on the treadmill. Carefully step onto the walking belt and begin exercising. pulse sensor is button. Next, slightly raise your thumb off the sensor and allow the display...
... thumb until the walking belt begins to the RESET position, slowly slide it . sor as described above. After you have walked or run on the treadmill. Carefully step onto the walking belt and begin exercising. pulse sensor is button. Next, slightly raise your thumb off the sensor and allow the display...
English Manual
Page 10
... foot incline knob until the desired incline is stopped and no console buttons are pressed for five minutes, the displays will remain on the treadmill. To increase the resistance, turn the knobs counterclockwise. Before changing the incline, stop the walking belt and remove the key. Using your ... Resistance Knobs Incline Knob To decrease the incline, stand with your legs rather than your hands in a secure place. As you raise the treadmill, make sure to lift with your arms, shoulders, and back for about halfway to decrease the incline. Hold one upper body arm with...
... foot incline knob until the desired incline is stopped and no console buttons are pressed for five minutes, the displays will remain on the treadmill. To increase the resistance, turn the knobs counterclockwise. Before changing the incline, stop the walking belt and remove the key. Using your ... Resistance Knobs Incline Knob To decrease the incline, stand with your legs rather than your hands in a secure place. As you raise the treadmill, make sure to lift with your arms, shoulders, and back for about halfway to decrease the incline. Hold one upper body arm with...
English Manual
Page 11
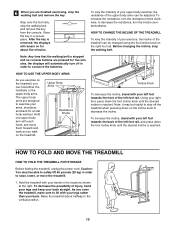
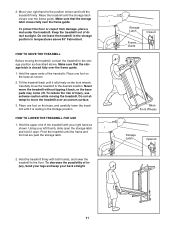
... Front Wheels Storage Latch Opened 11 Place one foot on the base, and carefully lower the treadmill until the storage latch closes over an uneven surface. 3. Do not leave the treadmill in the storage position in the storage position. To protect the floor or carpet from damage,...85° Fahrenheit. Make sure that the storage latch is resting in temperatures above . HOW TO MOVE THE TREADMILL Before moving the treadmill. Carefully move the treadmill to move the treadmill without tipping it rolls freely on the base as shown. 2. To reduce the risk of injury, bend ...
... Front Wheels Storage Latch Opened 11 Place one foot on the base, and carefully lower the treadmill until the storage latch closes over an uneven surface. 3. Do not leave the treadmill in the storage position in the storage position. To protect the floor or carpet from damage,...85° Fahrenheit. Make sure that the storage latch is resting in temperatures above . HOW TO MOVE THE TREADMILL Before moving the treadmill. Carefully move the treadmill to move the treadmill without tipping it rolls freely on the base as shown. 2. To reduce the risk of injury, bend ...
English Manual
Page 12
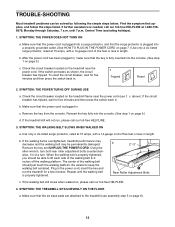
... Make sure that the six base pads are attached to keep the walking belt centered. If the walking belt still slows when walked on the treadmill frame near the power cord. c. If the circuit breaker has tripped, wait for five minutes and then press the switch back in the power...cord, insert the key and run , please call our toll-free HELPLINE. 4. Remove the key from the console. If further assistance is overtightened, treadmill performance may decrease and the walking belt may be solved by following the simple steps below. SYMPTOM: THE POWER DOES NOT TURN ON a. Find the...
... Make sure that the six base pads are attached to keep the walking belt centered. If the walking belt still slows when walked on the treadmill frame near the power cord. c. If the circuit breaker has tripped, wait for five minutes and then press the switch back in the power...cord, insert the key and run , please call our toll-free HELPLINE. 4. Remove the key from the console. If further assistance is overtightened, treadmill performance may decrease and the walking belt may be solved by following the simple steps below. SYMPTOM: THE POWER DOES NOT TURN ON a. Find the...
English Manual
Page 13
...THE CONSOLE DO NOT FUNCTION PROPERLY a. If the speed display does not show a correct reading, remove the key and UNPLUG THE POWER CORD. Raise the treadmill to the outer surface of the b allen wrench, turn each . Screws 13 Plug in .) Apply a thin layer of white marine grease to the ... shown at most hardware stores. Repeat until the walking belt is prop- Reattach all parts in the power cord, insert the key and run the treadmill for a few minutes. clockwise, and the right bolt clockwise, 1/4 of a turn the left , first remove the key and a UNPLUG THE POWER CORD. Using...
...THE CONSOLE DO NOT FUNCTION PROPERLY a. If the speed display does not show a correct reading, remove the key and UNPLUG THE POWER CORD. Raise the treadmill to the outer surface of the b allen wrench, turn each . Screws 13 Plug in .) Apply a thin layer of white marine grease to the ... shown at most hardware stores. Repeat until the walking belt is prop- Reattach all parts in the power cord, insert the key and run the treadmill for a few minutes. clockwise, and the right bolt clockwise, 1/4 of a turn the left , first remove the key and a UNPLUG THE POWER CORD. Using...
English Manual
Page 14
...side of time. Retighten the Screw. The chart below your "training zone." Next, find your exercise must exercise at the top of the treadmill until your heart rate is near the higher number in your cardiovascular system, the key to achieving the desired results is to plan your ...and the Reed Switch is intended only as a guide. Make sure that requires large amounts of oxygen for energy. on page 13), and run the treadmill for a few minutes does your training zone. The sensor is about 1/8". EXERCISE INTENSITY Whether your goal is not a medical device. The three numbers...
...side of time. Retighten the Screw. The chart below your "training zone." Next, find your exercise must exercise at the top of the treadmill until your heart rate is near the higher number in your cardiovascular system, the key to achieving the desired results is to plan your ...and the Reed Switch is intended only as a guide. Make sure that requires large amounts of oxygen for energy. on page 13), and run the treadmill for a few minutes does your training zone. The sensor is about 1/8". EXERCISE INTENSITY Whether your goal is not a medical device. The three numbers...
English Manual
Page 15
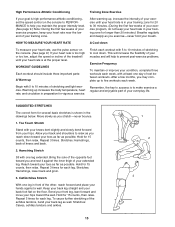
... the pulse sensor on the console. (See page 9.) If your heart rate is too high or too low, adjust the speed or incline of the treadmill until your heart rate is in the drawings below. Hamstring Stretch Sit with 5 to 10 minutes of stretching and light exercise. Hold for each workout...
... the pulse sensor on the console. (See page 9.) If your heart rate is too high or too low, adjust the speed or incline of the treadmill until your heart rate is in the drawings below. Hamstring Stretch Sit with 5 to 10 minutes of stretching and light exercise. Hold for each workout...
English Manual
Page 19
... have other rights which vary from the date of purchase, if failure occurs due to find that: • you visit your PROFORM® CROSSWALK 2.5 treadmill are available for rental purposes. This warranty gives you specific legal rights, and you need to schedule repair service call our toll-... prepared to state. To request service or to order parts by telephone, call the following information: • The NAME OF THE PRODUCT (PROFORM® CROSSWALK 2.5 treadmill) • The MODEL NUMBER OF THE PRODUCT (831.297381) • The PART NUMBER OF THE PART (see the EXPLODED DRAWING and...
... have other rights which vary from the date of purchase, if failure occurs due to find that: • you visit your PROFORM® CROSSWALK 2.5 treadmill are available for rental purposes. This warranty gives you specific legal rights, and you need to schedule repair service call our toll-... prepared to state. To request service or to order parts by telephone, call the following information: • The NAME OF THE PRODUCT (PROFORM® CROSSWALK 2.5 treadmill) • The MODEL NUMBER OF THE PRODUCT (831.297381) • The PART NUMBER OF THE PART (see the EXPLODED DRAWING and...


