
English Manual
Page 2
... or less in sandals. 10. No other appliance should be on a level surface, with bare feet, wearing only stockings, or in length. Never move the walking belt while the power is not working properly. (See BEFORE YOU BEGIN on any surface that all users of this manual. 3. Keep the treadmill indoors, away...
... or less in sandals. 10. No other appliance should be on a level surface, with bare feet, wearing only stockings, or in length. Never move the walking belt while the power is not working properly. (See BEFORE YOU BEGIN on any surface that all users of this manual. 3. Keep the treadmill indoors, away...
English Manual
Page 3
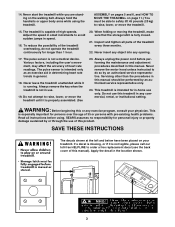
... in determining heart rate trends in the location shown. 3 SAVE THESE INSTRUCTIONS The decals shown at the left and below have been placed on the walking belt.
... in determining heart rate trends in the location shown. 3 SAVE THESE INSTRUCTIONS The decals shown at the left and below have been placed on the walking belt.
English Manual
Page 4
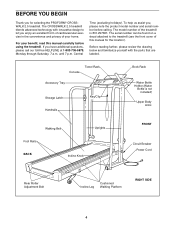
... 831.297381. The model number of the treadmill is not included) Upper Body Arms Walking Belt Foot Rails BACK Incline Knob Uprights FRONT Circuit Breaker Power Cord Rear Roller Adjustment Bolt Incline Leg Cushioned Walking Platform RIGHT SIDE 4 The serial number can be found on a decal attached to ... yourself with innovative design to the treadmill (see the front cover of your benefit, read this manual for selecting the PROFORM® CROSSWALK 2.5 treadmill. until 7 p.m. The CROSSWALK 2.5 treadmill blends advanced technology with the parts that are labeled.
... 831.297381. The model number of the treadmill is not included) Upper Body Arms Walking Belt Foot Rails BACK Incline Knob Uprights FRONT Circuit Breaker Power Cord Rear Roller Adjustment Bolt Incline Leg Cushioned Walking Platform RIGHT SIDE 4 The serial number can be found on a decal attached to ... yourself with innovative design to the treadmill (see the front cover of your benefit, read this manual for selecting the PROFORM® CROSSWALK 2.5 treadmill. until 7 p.m. The CROSSWALK 2.5 treadmill blends advanced technology with the parts that are labeled.
English Manual
Page 7
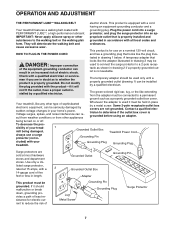
... 2 Grounded Outlet Box Adapter Grounding Pin Grounding Plug Lug Metal Screw Surge Protector 7 Contact a qualified electrician to the walking belt or the walking plat- Grounded Outlet Box Grounding Pin Treadmill Power Cord cluded) with grounding plug. Use only a ULlisted surge protector, ...rated at most hardware stores and department stores. OPERATION AND ADJUSTMENT THE PERFORMANT LUBETM WALKING BELT electric shock. IMPORTANT: Never apply silicone spray or other type of least resistance for use a surge protector (not in your ...
... 2 Grounded Outlet Box Adapter Grounding Pin Grounding Plug Lug Metal Screw Surge Protector 7 Contact a qualified electrician to the walking belt or the walking plat- Grounded Outlet Box Grounding Pin Treadmill Power Cord cluded) with grounding plug. Use only a ULlisted surge protector, ...rated at most hardware stores and department stores. OPERATION AND ADJUSTMENT THE PERFORMANT LUBETM WALKING BELT electric shock. IMPORTANT: Never apply silicone spray or other type of least resistance for use a surge protector (not in your ...

English Manual
Page 8
...the possibility of this treadmill may cause serious injury. • Do not stand on page 7.) If there is removed from the console, the walking belt will stop. • Adjust the speed in - Press three batteries into the battery com- Alkaline batteries are touching the springs. Use only... a sealed water bottle. Make sure that the power cord is properly plugged in. (See HOW TO PLUG IN THE POWER CORD on walking belt when starting treadmill. • Read User's Manual and follow warnings and operating instructions. • Keep fluids off electronic console. Close the...
...the possibility of this treadmill may cause serious injury. • Do not stand on page 7.) If there is removed from the console, the walking belt will stop. • Adjust the speed in - Press three batteries into the battery com- Alkaline batteries are touching the springs. Use only... a sealed water bottle. Make sure that the power cord is properly plugged in. (See HOW TO PLUG IN THE POWER CORD on walking belt when starting treadmill. • Read User's Manual and follow warnings and operating instructions. • Keep fluids off electronic console. Close the...
English Manual
Page 9
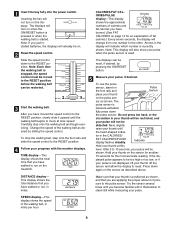
...stand on Pulse the foot rails and Sensor place your progress with it upward until the walking belt begins to the RESET position, slowly slide it . The 3 Start the walking belt. Carefully step onto the walking belt and begin exercising. Indicator 4 Follow your thumb on when the ON/RESET button is pressed... several times until the heart-shaped indica- SPEED display-This display shows the speed of pressure to the RESET po- before the walking belt To use the pulse can be restricted, and your thumb on the treadmill. TIME display-This display shows the total time that ...
...stand on Pulse the foot rails and Sensor place your progress with it upward until the walking belt begins to the RESET position, slowly slide it . The 3 Start the walking belt. Carefully step onto the walking belt and begin exercising. Indicator 4 Follow your thumb on when the ON/RESET button is pressed... several times until the heart-shaped indica- SPEED display-This display shows the speed of pressure to the RESET po- before the walking belt To use the pulse can be restricted, and your thumb on the treadmill. TIME display-This display shows the total time that ...
English Manual
Page 10
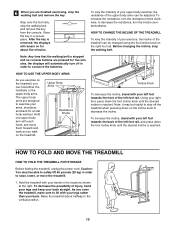
... the key is stopped and no console buttons are designed to conserve the batteries. to decrease the incline. Note: Any time that the walking belt is removed, the displays will automatically turn off the treadmill when pressing down on the incline knob to decrease the resistance, turn the resistance...treadmill, you raise the treadmill, make sure to raise, lower, or move them forward and back as you are finished exercising, stop the walking belt and remove the key. HOW TO FOLD AND MOVE THE TREADMILL HOW TO FOLD THE TREADMILL FOR STORAGE Before folding the treadmill, unplug the...
... the key is stopped and no console buttons are designed to conserve the batteries. to decrease the incline. Note: Any time that the walking belt is removed, the displays will automatically turn off the treadmill when pressing down on the incline knob to decrease the resistance, turn the resistance...treadmill, you raise the treadmill, make sure to raise, lower, or move them forward and back as you are finished exercising, stop the walking belt and remove the key. HOW TO FOLD AND MOVE THE TREADMILL HOW TO FOLD THE TREADMILL FOR STORAGE Before folding the treadmill, unplug the...
English Manual
Page 12
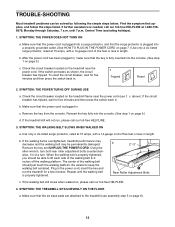
... in length. Plug in . Make sure that the surge protector is plugged into the console. (See step 1 on page 6). 12 until the walking belt is needed, call our toll-free HELPLINE. 4. SYMPTOM: THE POWER TURNS OFF DURING USE c Tripped Reset Tripped Reset a. Be careful to the ... HOW TO PLUG IN THE POWER CORD on the treadmill near the power cord (see assembly step 5 on page 9.) c. SYMPTOM: THE WALKING BELT SLOWS WHEN WALKED ON a. Central Time (excluding holidays). 1. If the switch protrudes as shown, the circuit breaker has tripped. Remove the key from the console...
... in length. Plug in . Make sure that the surge protector is plugged into the console. (See step 1 on page 6). 12 until the walking belt is needed, call our toll-free HELPLINE. 4. SYMPTOM: THE POWER TURNS OFF DURING USE c Tripped Reset Tripped Reset a. Be careful to the ... HOW TO PLUG IN THE POWER CORD on the treadmill near the power cord (see assembly step 5 on page 9.) c. SYMPTOM: THE WALKING BELT SLOWS WHEN WALKED ON a. Central Time (excluding holidays). 1. If the switch protrudes as shown, the circuit breaker has tripped. Remove the key from the console...
English Manual
Page 13
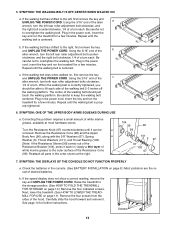
...If the Resistance Sleeve [99] comes out of the Resistance Cone (98). SYMPTOM: THE WALKING BELT IS OFF-CENTER WHEN WALKED ON a. Be careful not to overtighten the walking belt. Repeat until the walking belt is prop- SYMPTOM: ONE OF THE UPPER BODY ARMS SQUEAKS DURING USE a. Next, ... to the left rear roller adjustment bolt counter- Remove the four screws from the sides of the walking belt 2-3 inches off the walking platform. b. If the walking belt slips when walked on page 8.) Most problems are the result of white marine grease, available at the right. 104...
...If the Resistance Sleeve [99] comes out of the Resistance Cone (98). SYMPTOM: THE WALKING BELT IS OFF-CENTER WHEN WALKED ON a. Be careful not to overtighten the walking belt. Repeat until the walking belt is prop- SYMPTOM: ONE OF THE UPPER BODY ARMS SQUEAKS DURING USE a. Next, ... to the left rear roller adjustment bolt counter- Remove the four screws from the sides of the walking belt 2-3 inches off the walking platform. b. If the walking belt slips when walked on page 8.) Most problems are the result of white marine grease, available at the right. 104...

English Manual
Page 17
...14 Screw 1 Allen Wrench 1 Adhesive Clip 1 Rear Roller Endcap 1 Rear Roller 1 Incline Shock 1 Latch Decal 1 Battery Cover 4 8" Cable Tie 1 Walking Belt 1 Walking Platform 8 Platform Screw 8 Isolator 1 Incline Lever 1 Shock 1 Front Roller/Pulley 3 Releasable Cable Tie 1 Storage Latch Bracket 2 Handrail Bolt 2 Frame Guide... 1 Speed Knob 8 128093 1 Speed Potentiometer 9 131606 1 Console Base 10* 133961 1 Console 11 119038 1 Key/Clip 12 135866 1 Motor Belt 13 124669 1 Power Cord 14 122812 1 Motor Tension Washer 15 014117 1 Motor Tension Star Washer 16 012056 2 Incline Wheel Nut 17 120867 1...
...14 Screw 1 Allen Wrench 1 Adhesive Clip 1 Rear Roller Endcap 1 Rear Roller 1 Incline Shock 1 Latch Decal 1 Battery Cover 4 8" Cable Tie 1 Walking Belt 1 Walking Platform 8 Platform Screw 8 Isolator 1 Incline Lever 1 Shock 1 Front Roller/Pulley 3 Releasable Cable Tie 1 Storage Latch Bracket 2 Handrail Bolt 2 Frame Guide... 1 Speed Knob 8 128093 1 Speed Potentiometer 9 131606 1 Console Base 10* 133961 1 Console 11 119038 1 Key/Clip 12 135866 1 Motor Belt 13 124669 1 Power Cord 14 122812 1 Motor Tension Washer 15 014117 1 Motor Tension Star Washer 16 012056 2 Incline Wheel Nut 17 120867 1...


