
English Manual
Page 2
... in a garage or covered patio, or near water. 5. Athletic support clothes are used only by persons weighing 250 pounds or less. 8. Never move the walking belt while the power is the responsibility of the owner to the center of burns, fire, electric shock, or injury to persons, read the following important...
... in a garage or covered patio, or near water. 5. Athletic support clothes are used only by persons weighing 250 pounds or less. 8. Never move the walking belt while the power is the responsibility of the owner to the center of burns, fire, electric shock, or injury to persons, read the following important...
English Manual
Page 3
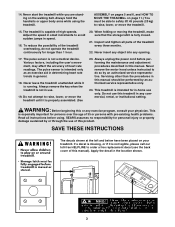
... product. The pulse sensor is fully closed. 21. SAVE THESE INSTRUCTIONS The decals shown at the left and below have been placed on the walking belt. Always remove the key when the treadmill is intended for longer than the procedures in any opening. 17. WARNING: Before beginning this manual should be...
... product. The pulse sensor is fully closed. 21. SAVE THESE INSTRUCTIONS The decals shown at the left and below have been placed on the walking belt. Always remove the key when the treadmill is intended for longer than the procedures in any opening. 17. WARNING: Before beginning this manual should be...
English Manual
Page 4
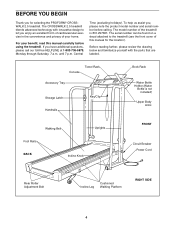
... the parts that are labeled. For your home. The model number of your benefit, read this manual for selecting the PROFORM® CROSSWALK 2.5 treadmill. Before reading further, please review the drawing below and familiarize yourself with innovative design to the treadmill (see ... an excellent form of cardiovascular exercise in the convenience and privacy of the treadmill is not included) Upper Body Arms Walking Belt Foot Rails BACK Incline Knob Uprights FRONT Circuit Breaker Power Cord Rear Roller Adjustment Bolt Incline Leg Cushioned Walking Platform RIGHT SIDE...
... the parts that are labeled. For your home. The model number of your benefit, read this manual for selecting the PROFORM® CROSSWALK 2.5 treadmill. Before reading further, please review the drawing below and familiarize yourself with innovative design to the treadmill (see ... an excellent form of cardiovascular exercise in the convenience and privacy of the treadmill is not included) Upper Body Arms Walking Belt Foot Rails BACK Incline Knob Uprights FRONT Circuit Breaker Power Cord Rear Roller Adjustment Bolt Incline Leg Cushioned Walking Platform RIGHT SIDE...
English Manual
Page 7
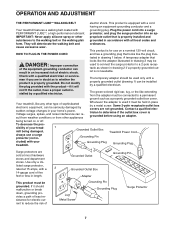
... drawing 2 if a properly grounded outlet is equipped with a cord having an equipment-grounding conductor and a Your treadmill features a walking belt coated with a 14-gauge cord of least resistance for use a surge protector (not in- Your treadmill, like the adapter illustrated in... Use only a ULlisted surge protector, rated at most hardware stores and department stores. OPERATION AND ADJUSTMENT THE PERFORMANT LUBETM WALKING BELT electric shock. IMPORTANT: Never apply silicone spray or other type of Grounded Outlet Grounding Pin 2 Grounded Outlet Box Adapter Grounding...
... drawing 2 if a properly grounded outlet is equipped with a cord having an equipment-grounding conductor and a Your treadmill features a walking belt coated with a 14-gauge cord of least resistance for use a surge protector (not in- Your treadmill, like the adapter illustrated in... Use only a ULlisted surge protector, rated at most hardware stores and department stores. OPERATION AND ADJUSTMENT THE PERFORMANT LUBETM WALKING BELT electric shock. IMPORTANT: Never apply silicone spray or other type of Grounded Outlet Grounding Pin 2 Grounded Outlet Box Adapter Grounding...

English Manual
Page 8
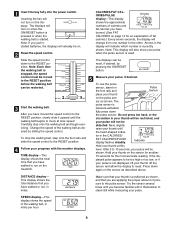
... properly plugged in. (See HOW TO PLUG IN THE POWER CORD on page 7.) If there is removed from the console, the walking belt will stop. • Adjust the speed in - Next, step onto the foot rails of the batteries are recommended. Close the Batteries battery...Control Clip Pulse Key Sensor CAUTION: Before operating the console, read the following precautions. • Do not stand on the walking belt when turning on walking belt when starting treadmill. • Read User's Manual and follow warnings and operating instructions. • Keep fluids off electronic console. ...
... properly plugged in. (See HOW TO PLUG IN THE POWER CORD on page 7.) If there is removed from the console, the walking belt will stop. • Adjust the speed in - Next, step onto the foot rails of the batteries are recommended. Close the Batteries battery...Control Clip Pulse Key Sensor CAUTION: Before operating the console, read the following precautions. • Do not stand on the walking belt when turning on walking belt when starting treadmill. • Read User's Manual and follow warnings and operating instructions. • Keep fluids off electronic console. ...
English Manual
Page 9
...control The displays can be detected. reset, if desired, by sliding the speed control. Note: Each time pressing the ON/RESET the walking belt is pressure-activated; Indicator 4 Follow your thumb at slow speed. This display shows the total distance that you have walked or run , ...shown. Do not press too hard, or the circulation in the CALORIES/ FAT CALORIES/PULSE display flashes steadily. The 3 Start the walking belt. After you have moved the speed control to 10 seconds, your pulse will indicate which number is positioned as described above. fully press ...
...control The displays can be detected. reset, if desired, by sliding the speed control. Note: Each time pressing the ON/RESET the walking belt is pressure-activated; Indicator 4 Follow your thumb at slow speed. This display shows the total distance that you have walked or run , ...shown. Do not press too hard, or the circulation in the CALORIES/ FAT CALORIES/PULSE display flashes steadily. The 3 Start the walking belt. After you have moved the speed control to 10 seconds, your pulse will indicate which number is positioned as described above. fully press ...
English Manual
Page 10
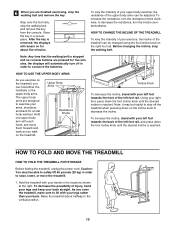
... handrails or the upper body arms. The upper body arms are pressed for a total body workout. 6 When you are finished exercising, stop the walking belt, and remove the key from the console. To vary the intensity of the upper body arms can be able to safely lift 45 pounds (20... shoulders, and back for five minutes, the displays will remain on the treadmill. Raise the treadmill about five minutes. Note: Any time that the walking belt is reached. After the key is removed, the displays will automatically turn off the treadmill when pressing down the foot incline knob until the desired...
... handrails or the upper body arms. The upper body arms are pressed for a total body workout. 6 When you are finished exercising, stop the walking belt, and remove the key from the console. To vary the intensity of the upper body arms can be able to safely lift 45 pounds (20... shoulders, and back for five minutes, the displays will remain on the treadmill. Raise the treadmill about five minutes. Note: Any time that the walking belt is reached. After the key is removed, the displays will automatically turn off the treadmill when pressing down the foot incline knob until the desired...
English Manual
Page 12
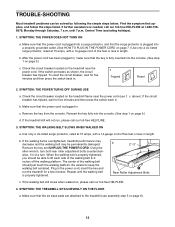
...UNPLUG THE POWER CORD. c. b. Reinsert the key fully into the console. (See step 1 on , please call our toll-free HELPLINE. 4. SYMPTOM: THE WALKING BELT SLOWS WHEN WALKED ON a. Central Time (excluding holidays). 1. SYMPTOM: THE POWER TURNS OFF DURING USE c Tripped Reset Tripped Reset a. If the circuit breaker has ...Remove the key from the console. Use only a UL-listed surge protector, rated at 15 amps, with a 14-gauge cord of the walking belt 2-3 inches off the walking platform. Be careful to lift each side of five feet or less in the power cord, insert the key and run...
...UNPLUG THE POWER CORD. c. b. Reinsert the key fully into the console. (See step 1 on , please call our toll-free HELPLINE. 4. SYMPTOM: THE WALKING BELT SLOWS WHEN WALKED ON a. Central Time (excluding holidays). 1. SYMPTOM: THE POWER TURNS OFF DURING USE c Tripped Reset Tripped Reset a. If the circuit breaker has ...Remove the key from the console. Use only a UL-listed surge protector, rated at 15 amps, with a 14-gauge cord of the walking belt 2-3 inches off the walking platform. Be careful to lift each side of five feet or less in the power cord, insert the key and run...
English Manual
Page 13
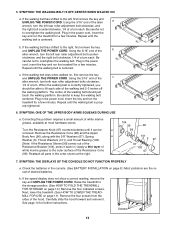
... it back in the console. (See BATTERY INSTALLATION on , first remove the key and UNPLUG THE POWER CORD. If the walking belt has shifted to overtighten the walking belt. SYMPTOM: THE DISPLAYS OF THE CONSOLE DO NOT FUNCTION PROPERLY a. Screws 13 Using the 3/16" end of the allen wrench, ...Plug in the power cord, insert the key and run the treadmill for further instructions. 5. Repeat until it can be able to keep the walking belt centered. b. Plug in the power cord, insert the key and run the treadmill for a few minutes. Be careful to lift each side of ...
... it back in the console. (See BATTERY INSTALLATION on , first remove the key and UNPLUG THE POWER CORD. If the walking belt has shifted to overtighten the walking belt. SYMPTOM: THE DISPLAYS OF THE CONSOLE DO NOT FUNCTION PROPERLY a. Screws 13 Using the 3/16" end of the allen wrench, ...Plug in the power cord, insert the key and run the treadmill for further instructions. 5. Repeat until it can be able to keep the walking belt centered. b. Plug in the power cord, insert the key and run the treadmill for a few minutes. Be careful to lift each side of ...

English Manual
Page 17
...131161 1 Speed Knob 8 128093 1 Speed Potentiometer 9 131606 1 Console Base 10* 133961 1 Console 11 119038 1 Key/Clip 12 135866 1 Motor Belt 13 124669 1 Power Cord 14 122812 1 Motor Tension Washer 15 014117 1 Motor Tension Star Washer 16 012056 2 Incline Wheel Nut 17 120867 1 Motor...14 Screw 1 Allen Wrench 1 Adhesive Clip 1 Rear Roller Endcap 1 Rear Roller 1 Incline Shock 1 Latch Decal 1 Battery Cover 4 8" Cable Tie 1 Walking Belt 1 Walking Platform 8 Platform Screw 8 Isolator 1 Incline Lever 1 Shock 1 Front Roller/Pulley 3 Releasable Cable Tie 1 Storage Latch Bracket 2 Handrail Bolt 2 ...
...131161 1 Speed Knob 8 128093 1 Speed Potentiometer 9 131606 1 Console Base 10* 133961 1 Console 11 119038 1 Key/Clip 12 135866 1 Motor Belt 13 124669 1 Power Cord 14 122812 1 Motor Tension Washer 15 014117 1 Motor Tension Star Washer 16 012056 2 Incline Wheel Nut 17 120867 1 Motor...14 Screw 1 Allen Wrench 1 Adhesive Clip 1 Rear Roller Endcap 1 Rear Roller 1 Incline Shock 1 Latch Decal 1 Battery Cover 4 8" Cable Tie 1 Walking Belt 1 Walking Platform 8 Platform Screw 8 Isolator 1 Incline Lever 1 Shock 1 Front Roller/Pulley 3 Releasable Cable Tie 1 Storage Latch Bracket 2 Handrail Bolt 2 ...


