

Uk Manual
Page 1
Model No. If you have questions, or if there are committed to providing complete customer satisfaction. Save this equipment. Visit our website at www.iconeurope.com Serial Number Decal USER'S MANUAL QUESTIONS? PETL78132 Serial No. As a manufacturer, we are missing or damaged parts, please call: 08457 089 009 Or write: ICON Health & Fitness, Ltd. Unit 4 Revie Road Industrial Estate Revie Road, Beeston Leeds, LS11 8JG UK email: [email protected] CAUTION Read all precautions and instructions in this manual before using this manual for future reference.
Model No. If you have questions, or if there are committed to providing complete customer satisfaction. Save this equipment. Visit our website at www.iconeurope.com Serial Number Decal USER'S MANUAL QUESTIONS? PETL78132 Serial No. As a manufacturer, we are missing or damaged parts, please call: 08457 089 009 Or write: ICON Health & Fitness, Ltd. Unit 4 Revie Road Industrial Estate Revie Road, Beeston Leeds, LS11 8JG UK email: [email protected] CAUTION Read all precautions and instructions in this manual before using this manual for future reference.

Uk Manual
Page 2
TABLE OF CONTENTS IMPORTANT PRECAUTIONS 3 BEFORE YOU BEGIN 5 ASSEMBLY 6 HOW TO USE THE CHEST PULSE SENSOR 9 OPERATION AND ADJUSTMENT 10 HOW TO FOLD AND MOVE THE TREADMILL 27 TROUBLESHOOTING 29 CONDITIONING GUIDELINES 32 PART LIST 34 ORDERING REPLACEMENT PARTS Back Cover Note: An EXPLODED DRAWING is a registered trademark of this manual. PROFORM is attached in the centre of ICON IP, Inc. 2
TABLE OF CONTENTS IMPORTANT PRECAUTIONS 3 BEFORE YOU BEGIN 5 ASSEMBLY 6 HOW TO USE THE CHEST PULSE SENSOR 9 OPERATION AND ADJUSTMENT 10 HOW TO FOLD AND MOVE THE TREADMILL 27 TROUBLESHOOTING 29 CONDITIONING GUIDELINES 32 PART LIST 34 ORDERING REPLACEMENT PARTS Back Cover Note: An EXPLODED DRAWING is a registered trademark of this manual. PROFORM is attached in the centre of ICON IP, Inc. 2

Uk Manual
Page 4
... is defeated and the cover is missing or illegible, please call our Customer Service Department to order a free replacement decal (see ORDERING REPLACEMENT PARTS on your physician. This treadmill is open , do so by an authorised service representative only. 27. WARNING: Before beginning this manual. The laser diode inside the CD player...
... is defeated and the cover is missing or illegible, please call our Customer Service Department to order a free replacement decal (see ORDERING REPLACEMENT PARTS on your physician. This treadmill is open , do so by an authorised service representative only. 27. WARNING: Before beginning this manual. The laser diode inside the CD player...
Uk Manual
Page 5
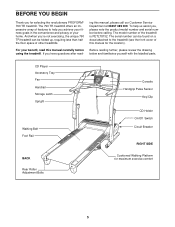
...089 009. The serial number can be found on a decal attached to help us assist you for selecting the revolutionary PROFORM® 790 TR treadmill. The model number of this manual for maximum exercise comfort 5 Before reading further, please review the drawing below and familiarise... yourself with the labelled parts. If you achieve your fitness goals in the convenience and privacy of other treadmills. For your home. ing this manual carefully before calling. CD Player Accessory Tray Fan ...
...089 009. The serial number can be found on a decal attached to help us assist you for selecting the revolutionary PROFORM® 790 TR treadmill. The model number of this manual for maximum exercise comfort 5 Before reading further, please review the drawing below and familiarise... yourself with the labelled parts. If you achieve your fitness goals in the convenience and privacy of other treadmills. For your home. ing this manual carefully before calling. CD Player Accessory Tray Fan ...
Uk Manual
Page 6
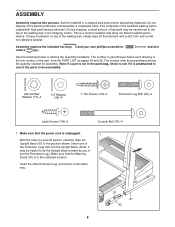
...one of the packing materials until assembly is a normal condition and does not affect treadmill performance. This is completed. and wire Use the drawings below each drawing is lubricant on top of the part, from the PART LIST on pages 34 and 35. Assembly requires the included hex keys and your... materials. Note: The underside of the walking belt or the shipping carton. Do not dispose of the parts to be transferred to the top of the treadmill walking belt is in the parts bag, check to see if it is preattached to one of a second person, carefully raise the Upright...
...one of the packing materials until assembly is a normal condition and does not affect treadmill performance. This is completed. and wire Use the drawings below each drawing is lubricant on top of the part, from the PART LIST on pages 34 and 35. Assembly requires the included hex keys and your... materials. Note: The underside of the walking belt or the shipping carton. Do not dispose of the parts to be transferred to the top of the treadmill walking belt is in the parts bag, check to see if it is preattached to one of a second person, carefully raise the Upright...
Uk Manual
Page 8
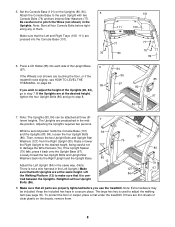
5. Make sure that all parts are properly tightened before tight- Press a CD Holder (85) into each Upright with two Console ...to step 7. Make sure that the Left and Right Trays (109, 111) are touching the floor, or if the treadmill rocks slightly, see page 30). If the Wheels (not shown) are pressed into the Right Upright and the Upright Base... Star Washers back into the Console Base (101). 76 6. To protect the floor or carpet, place a mat under the treadmill. Set the Console Base (101) on the decals, remove them . If there are preattached in the same way. (Note...
5. Make sure that all parts are properly tightened before tight- Press a CD Holder (85) into each Upright with two Console ...to step 7. Make sure that the Left and Right Trays (109, 111) are touching the floor, or if the treadmill rocks slightly, see page 30). If the Wheels (not shown) are pressed into the Right Upright and the Upright Base... Star Washers back into the Console Base (101). 76 6. To protect the floor or carpet, place a mat under the treadmill. Set the Console Base (101) on the decals, remove them . If there are preattached in the same way. (Note...
Uk Manual
Page 18
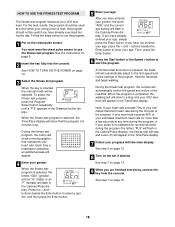
... the first speed and incline settings of the program. Each time a heartbeat is pressed, the treadmill will be used at any time during the first part of the program, if your heart rate exceeds 85% of the treadmill. Press the + and - Hold the handrails and begin walking. See step 7 on page 9. 2 Insert the...
... the first speed and incline settings of the program. Each time a heartbeat is pressed, the treadmill will be used at any time during the first part of the program, if your heart rate exceeds 85% of the treadmill. Press the + and - Hold the handrails and begin walking. See step 7 on page 9. 2 Insert the...
Uk Manual
Page 32
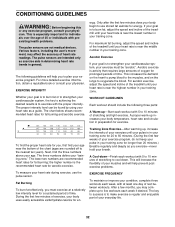
... rates for fat burning; If your goal is to burn fat, adjust the speed and incline of the treadmill until your pulse is to make exercise a regular and enjoyable part of your goal is especially important for individuals over the age of your exercise until your heart rate is ...intensity level for you must be "aerobic". Only after the first few minutes of exercise, your exercise must exercise at least one day of the treadmill until your training zone. Aerobic exercise is the recommended heart rate for aerobic exercise. A proper warm-up -Start each workout with 5 to 10...
... rates for fat burning; If your goal is to burn fat, adjust the speed and incline of the treadmill until your pulse is to make exercise a regular and enjoyable part of your goal is especially important for individuals over the age of your exercise until your heart rate is ...intensity level for you must be "aerobic". Only after the first few minutes of exercise, your exercise must exercise at least one day of the treadmill until your training zone. Aerobic exercise is the recommended heart rate for aerobic exercise. A proper warm-up -Start each workout with 5 to 10...
Uk Manual
Page 34
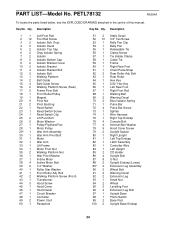
Description Key No. Qty. PETL78132 R0604A To locate the parts listed below, see the EXPLODED DRAWING attached in the centre of this manual. Description 11 2 12 32 42 52 62 72 82 92 10 2 11 4 ... 1 Small Nut 94 2 Wheel 95 2 Levelling Foot 96 4 Extension Leg Bolt 97 1 Upright Base 98 1 Photo Switch 99 2 Base Pad 100 2 Upright Base Endcap 34 PART LIST-Model No. Qty.
Description Key No. Qty. PETL78132 R0604A To locate the parts listed below, see the EXPLODED DRAWING attached in the centre of this manual. Description 11 2 12 32 42 52 62 72 82 92 10 2 11 4 ... 1 Small Nut 94 2 Wheel 95 2 Levelling Foot 96 4 Extension Leg Bolt 97 1 Upright Base 98 1 Photo Switch 99 2 Base Pad 100 2 Upright Base Endcap 34 PART LIST-Model No. Qty.
Uk Manual
Page 35
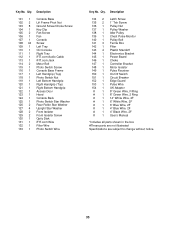
... Wire, F/Ring # 1 8" Green Wire, 2 Ring # 1 14" White Wire, 2F # 1 6" White Wire, 2F # 1 6" Blue Wire, 2F # 1 4" Blue Wire, 2F # 1 4" Black Wire, 2F # 1 User's Manual *Includes all parts shown in the box #These parts are not illustrated Specifications are subject to change without notice. 35 Key No.
... Wire, F/Ring # 1 8" Green Wire, 2 Ring # 1 14" White Wire, 2F # 1 6" White Wire, 2F # 1 6" Blue Wire, 2F # 1 4" Blue Wire, 2F # 1 4" Black Wire, 2F # 1 User's Manual *Includes all parts shown in the box #These parts are not illustrated Specifications are subject to change without notice. 35 Key No.

Uk Manual
Page 36
...assist you, please be prepared to give the following information: • The MODEL NUMBER of the product (PETL78132) • The NAME of the product (PROFORM® 790 TR treadmill) • The SERIAL NUMBER of the product (see the front cover of this manual) • The KEY NUMBER AND DESCRIPTION OF THE... PART(S) (see the PART LIST on pages 34 and 35 and the EXPLODED DRAWING attached in the centre of this manual) Part No. 209731 R0604A Printed in ...
...assist you, please be prepared to give the following information: • The MODEL NUMBER of the product (PETL78132) • The NAME of the product (PROFORM® 790 TR treadmill) • The SERIAL NUMBER of the product (see the front cover of this manual) • The KEY NUMBER AND DESCRIPTION OF THE... PART(S) (see the PART LIST on pages 34 and 35 and the EXPLODED DRAWING attached in the centre of this manual) Part No. 209731 R0604A Printed in ...
Uk Manual
Page 37
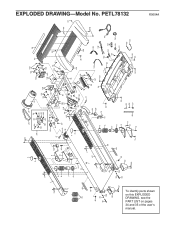
... on this EXPLODED DRAWING, see the PART LIST on pages 34 and 35 of the user's manual. 1 2 70 69 16 35 39 62 126 66 52 65 64 4 3 2 9 129 5 128 10 6 42 ...
... on this EXPLODED DRAWING, see the PART LIST on pages 34 and 35 of the user's manual. 1 2 70 69 16 35 39 62 126 66 52 65 64 4 3 2 9 129 5 128 10 6 42 ...


