
Uk Manual
Page 3
... treadmill. 15. Do not wear loose clothes that the storage latch is capable of high speeds. Athletic support clothes are standing on /off switch to avoid sudden jumps in a garage or covered patio, or near water. 5. If an extension cord is needed, use only a 3conductor, 1mm2 (14-gauge) cord that blocks air openings. The pulse sensors are used . 11. Always remove the key, unplug the power cord and move the walking belt...
... treadmill. 15. Do not wear loose clothes that the storage latch is capable of high speeds. Athletic support clothes are standing on /off switch to avoid sudden jumps in a garage or covered patio, or near water. 5. If an extension cord is needed, use only a 3conductor, 1mm2 (14-gauge) cord that blocks air openings. The pulse sensors are used . 11. Always remove the key, unplug the power cord and move the walking belt...

Uk Manual
Page 4
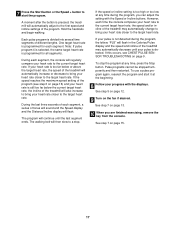
... exercise program, consult your treadmill. If the interlock switch is defeated and the cover is missing or illegible, please call our Customer Service Department to do not view the laser diode with pre-existing health problems. Read all parts of the CD or video program. 21. If a decal is open . IEC60825-1:1993+A1+A2 788nM, 148mW 24. Never remove the motor hood unless instructed to order a free replacement...
... exercise program, consult your treadmill. If the interlock switch is defeated and the cover is missing or illegible, please call our Customer Service Department to do not view the laser diode with pre-existing health problems. Read all parts of the CD or video program. 21. If a decal is open . IEC60825-1:1993+A1+A2 788nM, 148mW 24. Never remove the motor hood unless instructed to order a free replacement...
Uk Manual
Page 5
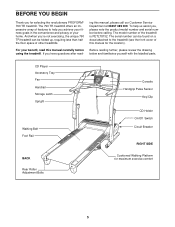
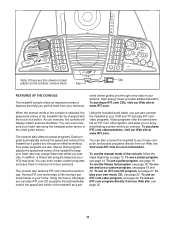
... review the drawing below and familiarise yourself with the labelled parts. ing this manual for the location). The serial number can be found on a decal attached to help us assist you, please note the product model number and serial number before using the treadmill. BEFORE YOU BEGIN Thank you for maximum exercise comfort 5 CD Player Accessory Tray Fan Handrail Storage Latch Upright Walking Belt Foot Rail BACK Rear Roller Adjustment Bolts Console Handgrip Pulse Sensor Key/Clip...
... review the drawing below and familiarise yourself with the labelled parts. ing this manual for the location). The serial number can be found on a decal attached to help us assist you, please note the product model number and serial number before using the treadmill. BEFORE YOU BEGIN Thank you for maximum exercise comfort 5 CD Player Accessory Tray Fan Handrail Storage Latch Upright Walking Belt Foot Rail BACK Rear Roller Adjustment Bolts Console Handgrip Pulse Sensor Key/Clip...
Uk Manual
Page 7
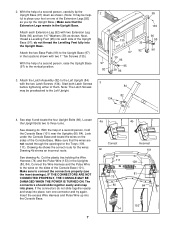
... CONSOLE MAY BE DAMAGED WHEN THE POWER IS TURNED ON. Insert the excess Wire Harness and Pulse Wire up into the Upright Base. Note: The Latch Screws may be preattached to the Left Upright (84) with two Extension Leg Bolts (96) and two 1/4" Washers (39) as you tip the Upright Base.) Make sure that the wires are not routed through the openings for the wires. See step 6 and locate...
... CONSOLE MAY BE DAMAGED WHEN THE POWER IS TURNED ON. Insert the excess Wire Harness and Pulse Wire up into the Upright Base. Note: The Latch Screws may be preattached to the Left Upright (84) with two Extension Leg Bolts (96) and two 1/4" Washers (39) as you tip the Upright Base.) Make sure that the wires are not routed through the openings for the wires. See step 6 and locate...
Uk Manual
Page 8
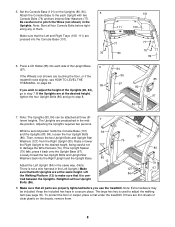
..., remove the two Upright Bolts and Upright Star Washers (127) from the Right Upright (80). Lift the Walking Platform (13) to step 7. Keep the included hex keys in the Uprights. Note: Extra hardware may be attached at the desired height, tighten the four Upright Bolts (86) and go to make sure that all parts are properly tightened before tight- 5. Whilst a second person holds the Console Base...
..., remove the two Upright Bolts and Upright Star Washers (127) from the Right Upright (80). Lift the Walking Platform (13) to step 7. Keep the included hex keys in the Uprights. Note: Extra hardware may be attached at the desired height, tighten the four Upright Bolts (86) and go to make sure that all parts are properly tightened before tight- 5. Whilst a second person holds the Console Base...
Uk Manual
Page 9
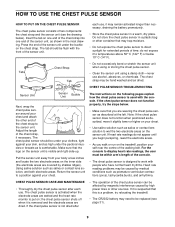
... chest strap may need to display heart rate readings, the user must be replaced (see the drawing below). Using saline solution such as high under the buckle on the chest strap. The instructions on the inner side (the electrode areas are wetted and the heart rate monitor is a problem, try the steps below 10° C (14° F). For the console to be within arm's length of the walking belt. If the chest pulse sensor...
... chest strap may need to display heart rate readings, the user must be replaced (see the drawing below). Using saline solution such as high under the buckle on the chest strap. The instructions on the inner side (the electrode areas are wetted and the heart rate monitor is a problem, try the steps below 10° C (14° F). For the console to be within arm's length of the walking belt. If the chest pulse sensor...
Uk Manual
Page 10
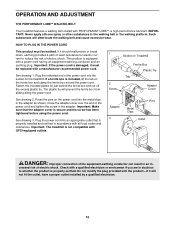
... codes and ordinances. Fasten the included plastic tie just behind the ferrite box and cut off the excess plastic tie. Check with GFCI-equipped outlets. Important: Make sure that is secure and the screw has been tightened before using the power cord. Adapter 3 Pins Metal Clips Outlet DANGER: Improper connection of least resistance for electric current to the walking belt or the walking...
... codes and ordinances. Fasten the included plastic tie just behind the ferrite box and cut off the excess plastic tie. Check with GFCI-equipped outlets. Important: Make sure that is secure and the screw has been tightened before using the power cord. Adapter 3 Pins Metal Clips Outlet DANGER: Improper connection of least resistance for electric current to the walking belt or the walking...
Uk Manual
Page 11
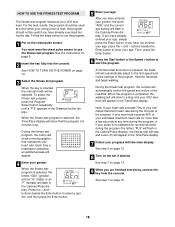
... manual mode of the treadmill as a per- sonal trainer guides you get the most from our Web site, see page 24. In addition, a fitness test program measures your heart rate near a target heart rate whilst you through every step of the treadmill to your heart rate using the handgrip pulse sensor or the chest pulse sensor. Using the included audio cable, you can play your workouts. Using the built-in your workout. Each program adjusts the speed and incline of your home...
... manual mode of the treadmill as a per- sonal trainer guides you get the most from our Web site, see page 24. In addition, a fitness test program measures your heart rate near a target heart rate whilst you through every step of the treadmill to your heart rate using the handgrip pulse sensor or the chest pulse sensor. Using the included audio cable, you can play your workouts. Using the built-in your workout. Each program adjusts the speed and incline of your home...
Uk Manual
Page 12
... handgrip pulse sensor, and insert the key into the console. For simplicity, all instructions in this section refer to light in the power cord (see page 10). 2 Locate the on/off switch to start the walking belt. The track will then darken and the indicators will change in succession until the entire track is not lit. 3 Press the Start button or the Speed + button to the on the treadmill near the power cord...
... handgrip pulse sensor, and insert the key into the console. For simplicity, all instructions in this section refer to light in the power cord (see page 10). 2 Locate the on/off switch to start the walking belt. The track will then darken and the indicators will change in succession until the entire track is not lit. 3 Press the Start button or the Speed + button to the on the treadmill near the power cord...

Uk Manual
Page 13
... the demo mode. To turn off position and unplug the power cord. 13 To change the unit of measurement is selected, remove the key. The display will be at high speed, press the button a second time. The display will change from the console. Distance/Incline display-This display shows the distance that your heart rate using the treadmill, move the on/off the fan, press the button a third time. The display will also show the incline setting for pulse program 4), the display will...
... the demo mode. To turn off position and unplug the power cord. 13 To change the unit of measurement is selected, remove the key. The display will be at high speed, press the button a second time. The display will change from the console. Distance/Incline display-This display shows the distance that your heart rate using the treadmill, move the on/off the fan, press the button a third time. The display will also show the incline setting for pulse program 4), the display will...
Uk Manual
Page 17
... target heart rate. If the speed or incline setting is still too far below or above the target heart rate, the speed of the treadmill will automatically adjust to the first speed and incline settings of tones will sound and the Speed display and the Distance/Incline display will regularly compare your pulse is not detected during the program, you are finished exercising, remove the key from the console. 7 Press the Start button or the Speed + button to start it...
... target heart rate. If the speed or incline setting is still too far below or above the target heart rate, the speed of the treadmill will automatically adjust to the first speed and incline settings of tones will sound and the Speed display and the Distance/Incline display will regularly compare your pulse is not detected during the program, you are finished exercising, remove the key from the console. 7 Press the Start button or the Speed + button to start it...
Uk Manual
Page 18
... heart rate. Hold the handrails and begin walking. You must wear the chest pulse sensor to a stop and a zero (0) will show a moving graphic that the program is 9 minutes long. After you have already exercised during the program, or if your pulse is selected, the Time/Pace display will appear in the Distance/Incline display. buttons beside the Enter button to enter your VO2 max level will slow to use the program...
... heart rate. Hold the handrails and begin walking. You must wear the chest pulse sensor to a stop and a zero (0) will show a moving graphic that the program is 9 minutes long. After you have already exercised during the program, or if your pulse is selected, the Time/Pace display will appear in the Distance/Incline display. buttons beside the Enter button to enter your VO2 max level will slow to use the program...
Uk Manual
Page 24
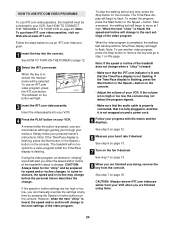
.../Pace display is flashing, press the Start button or the Speed + button on page 12. 6 Measure your personal trainer will change . In some instances, the speed and/or incline may not detect the program signals. • Make sure that the audio cable is properly connected, that it is heard, the speed and incline will begin to use an iFIT.com video program. 1 Insert the key into your VCR. If the speed or incline settings...
.../Pace display is flashing, press the Start button or the Speed + button on page 12. 6 Measure your personal trainer will change . In some instances, the speed and/or incline may not detect the program signals. • Make sure that the audio cable is properly connected, that it is heard, the speed and incline will begin to use an iFIT.com video program. 1 Insert the key into your VCR. If the speed or incline settings...
Uk Manual
Page 25
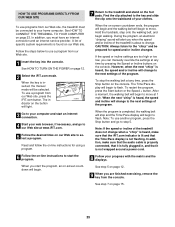
... manual mode will begin to select a program. To stop and the Time/Pace display will be prepared for using a program. When the on the console. Note: To use a program from the console. When you can manually override the settings at 1 mph. After a moment, the walking belt will begin to start the program, an on -line instructions for speed and/or incline changes. Find the clip attached to move at any time, press the Stop button on...
... manual mode will begin to select a program. To stop and the Time/Pace display will be prepared for using a program. When the on the console. Note: To use a program from the console. When you can manually override the settings at 1 mph. After a moment, the walking belt will begin to start the program, an on -line instructions for speed and/or incline changes. Find the clip attached to move at any time, press the Stop button on...
Uk Manual
Page 29
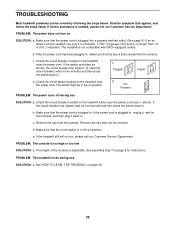
... assembly step 7 on position. Important: The treadmill is needed , use only a 3-conductor, 1 mm2 (14-gauge) cord that the key is plugged in, unplug it back in . above). If the power cord is fully inserted into the console. d. PROBLEM: The console is in the on page 8 for five minutes and then press the switch back in. d On Position PROBLEM: The power turns off switch located on position. Remove the key from the console. PROBLEM: The treadmill...
... assembly step 7 on position. Important: The treadmill is needed , use only a 3-conductor, 1 mm2 (14-gauge) cord that the key is plugged in, unplug it back in . above). If the power cord is fully inserted into the console. d. PROBLEM: The console is in the on page 8 for five minutes and then press the switch back in. d On Position PROBLEM: The power turns off switch located on position. Remove the key from the console. PROBLEM: The treadmill...
Uk Manual
Page 30
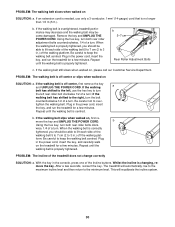
... walking belt is properly tightened. b. Repeat until the walking belt is properly tightened. Repeat until the walking belt is off -centre or slips when walked on , first re- wise, 1/4 of a turn . form. PROBLEM: The incline of the Incline buttons. PROBLEM: The walking belt slows when walked on , please call our Customer Service Department. Be careful not to turn both rear roller bolts clock- If the walking belt slips when walked on SOLUTION: a. move the key and UNPLUG THE POWER CORD. When the walking belt is needed, use...
... walking belt is properly tightened. b. Repeat until the walking belt is properly tightened. Repeat until the walking belt is off -centre or slips when walked on , first re- wise, 1/4 of a turn . form. PROBLEM: The incline of the Incline buttons. PROBLEM: The walking belt slows when walked on , please call our Customer Service Department. Be careful not to turn both rear roller bolts clock- If the walking belt slips when walked on SOLUTION: a. move the key and UNPLUG THE POWER CORD. When the walking belt is needed, use...
Uk Manual
Page 32
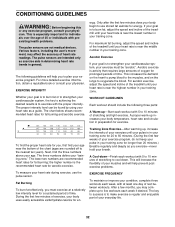
... Exercise If your breath. For aerobic exercise, adjust the speed and incline of the treadmill until your exercise program. Next, find your age near the middle number in your body begin to success is near the lowest number in your everyday life. 32 The key to use the pulse sensor. CONDITIONING GUIDELINES WARNING: Before beginning this or any exercise program, consult your age. The chart below shows recommended heart rates...
... Exercise If your breath. For aerobic exercise, adjust the speed and incline of the treadmill until your exercise program. Next, find your age near the middle number in your body begin to success is near the lowest number in your everyday life. 32 The key to use the pulse sensor. CONDITIONING GUIDELINES WARNING: Before beginning this or any exercise program, consult your age. The chart below shows recommended heart rates...
Uk Manual
Page 34
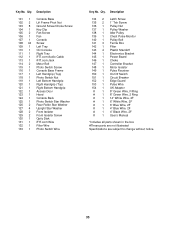
... 1 Chest Pulse Strap 62 2 Rear Roller Adj, Bolt 63 1 Rear Roller 64 1 Hex Key 65 1 5/32" Hex Key 66 1 Left Rear Foot 67 1 Right Foot Rail 68 1 Walking Belt 69 2 Warning Decal 70 2 Blue Isolator Spring 71 1 Pulse Bar 72 4 Pulse Bar Screw 73 1 Splitter 74 1 Wire Harness 75 1 Right Top Endcap 76 4 Console Bolt 77 4 Internal Star Washer 78 5 Hood Cover Screw 79 2 Upright Spacer 80 1 Right Upright 81 1 Left Top Endcap 82 1 Latch Assembly 83 1 Controller Wire 84...
... 1 Chest Pulse Strap 62 2 Rear Roller Adj, Bolt 63 1 Rear Roller 64 1 Hex Key 65 1 5/32" Hex Key 66 1 Left Rear Foot 67 1 Right Foot Rail 68 1 Walking Belt 69 2 Warning Decal 70 2 Blue Isolator Spring 71 1 Pulse Bar 72 4 Pulse Bar Screw 73 1 Splitter 74 1 Wire Harness 75 1 Right Top Endcap 76 4 Console Bolt 77 4 Internal Star Washer 78 5 Hood Cover Screw 79 2 Upright Spacer 80 1 Right Upright 81 1 Left Top Endcap 82 1 Latch Assembly 83 1 Controller Wire 84...
Uk Manual
Page 35
... 2 Rear Roller Star Washer 127 4 Upright Star Washer 128 2 Front Isolator 129 2 Front Isolator Screw 130 1 Optic Disk 131 1 iFIT.com Wire 132 1 Filter Wire 133 1 Photo Switch Wire Key No. Qty. Description 134 2 Latch Screw 135 2 1" Tek Screw 136 1 Pulley Nut 137 1 Pulley Washer 138 1 Idler Pulley 139 1 Chest Pulse Monitor 140 1 Pulley Bolt 141 3 Ferrite Box 142 1 Filter 143 4 Plastic Standoff 144 1 Electronics Bracket 145 1 Power Board 146 1 Choke 147 1 Controller...
... 2 Rear Roller Star Washer 127 4 Upright Star Washer 128 2 Front Isolator 129 2 Front Isolator Screw 130 1 Optic Disk 131 1 iFIT.com Wire 132 1 Filter Wire 133 1 Photo Switch Wire Key No. Qty. Description 134 2 Latch Screw 135 2 1" Tek Screw 136 1 Pulley Nut 137 1 Pulley Washer 138 1 Idler Pulley 139 1 Chest Pulse Monitor 140 1 Pulley Bolt 141 3 Ferrite Box 142 1 Filter 143 4 Plastic Standoff 144 1 Electronics Bracket 145 1 Power Board 146 1 Choke 147 1 Controller...
Uk Manual
Page 36
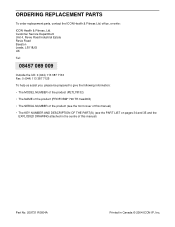
... you, please be prepared to give the following information: • The MODEL NUMBER of the product (PETL78132) • The NAME of the product (PROFORM® 790 TR treadmill) • The SERIAL NUMBER of the product (see the front cover of this manual) • The KEY NUMBER AND DESCRIPTION OF THE PART(S) (see the PART LIST on pages 34 and 35 and the EXPLODED DRAWING...
... you, please be prepared to give the following information: • The MODEL NUMBER of the product (PETL78132) • The NAME of the product (PROFORM® 790 TR treadmill) • The SERIAL NUMBER of the product (see the front cover of this manual) • The KEY NUMBER AND DESCRIPTION OF THE PART(S) (see the PART LIST on pages 34 and 35 and the EXPLODED DRAWING...


