

English Manual
Page 2
® TABLE OF CONTENTS IMPORTANT PRECAUTIONS 3 BEFORE YOU BEGIN 5 ASSEMBLY 6 OPERATION AND ADJUSTMENT 8 HOW TO FOLD AND MOVE THE TREADMILL 19 TROUBLE-SHOOTING 20 CONDITIONING GUIDELINES 22 PART LIST 23 ORDERING REPLACEMENT PARTS Back Cover LIMITED WARRANTY Back Cover Note: An EXPLODED DRAWING is attached in the center of this manual. 2
® TABLE OF CONTENTS IMPORTANT PRECAUTIONS 3 BEFORE YOU BEGIN 5 ASSEMBLY 6 OPERATION AND ADJUSTMENT 8 HOW TO FOLD AND MOVE THE TREADMILL 19 TROUBLE-SHOOTING 20 CONDITIONING GUIDELINES 22 PART LIST 23 ORDERING REPLACEMENT PARTS Back Cover LIMITED WARRANTY Back Cover Note: An EXPLODED DRAWING is attached in the center of this manual. 2

English Manual
Page 3
... capable of high speeds. Never allow more than 250 pounds. 8. Never use an extension cord. 18. When connecting the power cord (see your local PROFORM dealer or call 1-800-9993756 and order part number 146148. 12. No other appliance should not be on any surface that could become caught in...a surge protector (not included) and plug the surge protector into a grounded circuit capable of carrying 15 or more than one person on page 5 if the treadmill is not in use. (See the drawing on page 5 for the location of the on the walking belt. Athletic support clothes are standing on /off...
... capable of high speeds. Never allow more than 250 pounds. 8. Never use an extension cord. 18. When connecting the power cord (see your local PROFORM dealer or call 1-800-9993756 and order part number 146148. 12. No other appliance should not be on any surface that could become caught in...a surge protector (not included) and plug the surge protector into a grounded circuit capable of carrying 15 or more than one person on page 5 if the treadmill is not in use. (See the drawing on page 5 for the location of the on the walking belt. Athletic support clothes are standing on /off...

English Manual
Page 4
... do so by an authorized service representative only. 23. SAVE THESE INSTRUCTIONS The decals shown below have been placed on the back cover of the treadmill regularly. 25. DANGER: 26. If the decal is missing, or if it is shown at any time by or through the use this or ...any exercise program, consult your treadmill. 21. In some instances, the speed and/or incline may change to order a free replacement decal (see ORDERING REPLACEMENT PARTS on your physician. Always listen...
... do so by an authorized service representative only. 23. SAVE THESE INSTRUCTIONS The decals shown below have been placed on the back cover of the treadmill regularly. 25. DANGER: 26. If the decal is missing, or if it is shown at any time by or through the use this or ...any exercise program, consult your treadmill. 21. In some instances, the speed and/or incline may change to order a free replacement decal (see ORDERING REPLACEMENT PARTS on your physician. Always listen...
English Manual
Page 5
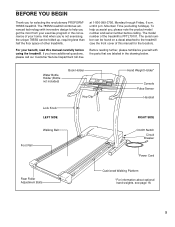
BEFORE YOU BEGIN Thank you for the location). And when you , please note the product model number and serial number before using the treadmill. Mountain Time (excluding holidays). The serial number can be found on a decal attached to help us assist you 're not exercising,... model number of your home. until 6 p.m. If you get the most from your benefit, read this manual for selecting the revolutionary PROFORM® 785SS treadmill. Water Bottle Holder (Bottle not included) Book Holder Lock Knob LEFT SIDE Key/Clip Hand Weight Holder* Console Pulse Sensor Handrail RIGHT SIDE...
BEFORE YOU BEGIN Thank you for the location). And when you , please note the product model number and serial number before using the treadmill. Mountain Time (excluding holidays). The serial number can be found on a decal attached to help us assist you 're not exercising,... model number of your home. until 6 p.m. If you get the most from your benefit, read this manual for selecting the revolutionary PROFORM® 785SS treadmill. Water Bottle Holder (Bottle not included) Book Holder Lock Knob LEFT SIDE Key/Clip Hand Weight Holder* Console Pulse Sensor Handrail RIGHT SIDE...
English Manual
Page 6
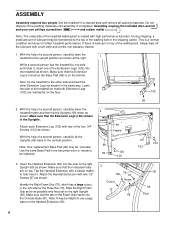
...of the Extension Legs (102) into the post on the Foam Grip inserts into the Console Base (81). Insert the Handrail Extension (66) into the treadmill as shown. During shipping, a small amount of lubricant may be transferred to the vertical position. With the help of the four 3/4" Screws (100)... as shown. Make sure that the Extension Leg is turned so the Base Pad (99) is a normal condition and does not affect treadmill performance. Use the extra Base Pad if one of the walking belt or the shipping carton. Make sure that the indicated holes are resting flat...
...of the Extension Legs (102) into the post on the Foam Grip inserts into the Console Base (81). Insert the Handrail Extension (66) into the treadmill as shown. During shipping, a small amount of lubricant may be transferred to the vertical position. With the help of the four 3/4" Screws (100)... as shown. Make sure that the Extension Leg is turned so the Base Pad (99) is a normal condition and does not affect treadmill performance. Use the extra Base Pad if one of the walking belt or the shipping carton. Make sure that the indicated holes are resting flat...
English Manual
Page 7
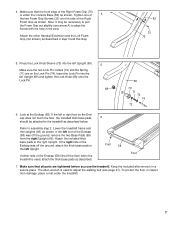
... Endcap (58) was off the ground, remove the two Base Pads (99) from damage, place a mat under the Console Base (82) as shown. Lower the treadmill frame and the Uprights (69) as described in step 3 and this step. If the left Upright (69). Attach the other Handrail Extension and the Left... Grip as shown. Tighten one of 4 the two Foam Grip Screws (33) into the side of the Right Foam Grip (75) is used to the treadmill as described. Look at the Endcap (58). If either side of the Endcap was off the ground, attach the thick base pads to align the...
... Endcap (58) was off the ground, remove the two Base Pads (99) from damage, place a mat under the Console Base (82) as shown. Lower the treadmill frame and the Uprights (69) as described in step 3 and this step. If the left Upright (69). Attach the other Handrail Extension and the Left... Grip as shown. Tighten one of 4 the two Foam Grip Screws (33) into the side of the Right Foam Grip (75) is used to the treadmill as described. Look at the Endcap (58). If either side of the Endcap was off the ground, attach the thick base pads to align the...
English Manual
Page 8
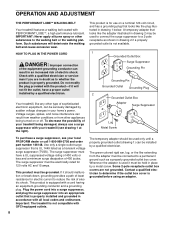
... a walking belt coated with the product-if it will deteriorate the walking belt and cause excessive wear. Your treadmill, like the adapter illustrated in your local PROFORM dealer or call 1-800-999-3756 and order part number 146148. Use only a single-outlet surge suppressor that looks like any ...This product must be used it must be held in an increased risk of least resistance for 120 volts AC and 15 amps. Important: The treadmill is for use a surge suppressor with a cord having an equipment-grounding conductor and a grounding plug. Some 2-pole receptacle outlet box covers are ...
... a walking belt coated with the product-if it will deteriorate the walking belt and cause excessive wear. Your treadmill, like the adapter illustrated in your local PROFORM dealer or call 1-800-999-3756 and order part number 146148. Use only a single-outlet surge suppressor that looks like any ...This product must be used it must be held in an increased risk of least resistance for 120 volts AC and 15 amps. Important: The treadmill is for use a surge suppressor with a cord having an equipment-grounding conductor and a grounding plug. Some 2-pole receptacle outlet box covers are ...
English Manual
Page 9
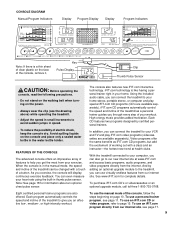
... programs, audio programs, and video programs directly from our internet site. iFIT.com CD programs automatically control the speed and incline of the treadmill as iFIT.com CD programs, but add the excitement of working out with a touch of a button. High-energy music provides added motivation... offers an impressive array of features to help you get the most from our internet site, see the drawing above) while operating the treadmill. • Adjust the speed in small increments to give you exercise, the console will display continuous exercise feedback. Key Pulse Display Clip...
... programs, audio programs, and video programs directly from our internet site. iFIT.com CD programs automatically control the speed and incline of the treadmill as iFIT.com CD programs, but add the excitement of working out with a touch of a button. High-energy music provides added motivation... offers an impressive array of features to help you get the most from our internet site, see the drawing above) while operating the treadmill. • Adjust the speed in small increments to give you exercise, the console will display continuous exercise feedback. Key Pulse Display Clip...
English Manual
Page 10
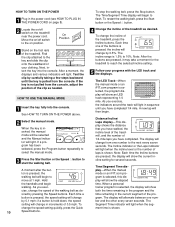
... as desired. If the key is held down, the speed setting will light. As you have completed. To change the incline of the treadmill, press the Incline buttons. The Segment Time indicator will light when the segment time is selected, the display will light in the current segment... seconds. After a moment, the displays and various indicators will begin walking. See HOW TO TURN ON THE POWER above. 4 Change the incline of the treadmill. HOW TO TURN ON THE POWER 1 Plug in increments of 0.5 mph. As you have completed 1/4 mile. Note: Each time the Incline buttons are pressed...
... as desired. If the key is held down, the speed setting will light. As you have completed. To change the incline of the treadmill, press the Incline buttons. The Segment Time indicator will light when the segment time is selected, the display will light in the current segment... seconds. After a moment, the displays and various indicators will begin walking. See HOW TO TURN ON THE POWER above. 4 Change the incline of the treadmill. HOW TO TURN ON THE POWER 1 Plug in increments of 0.5 mph. As you have completed 1/4 mile. Note: Each time the Incline buttons are pressed...
English Manual
Page 11
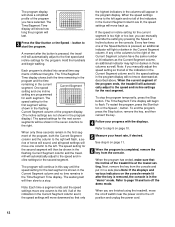
...cord. To measure your heart rate. indicator will be displayed in either miles or kilometers. Remember to the storage position or the treadmill will light when the number of fat calories is selected, hold down the Stop button while inserting the key into the console. ...sensors and allow the display to reset. Note: The console can display speed and distance in the Pulse display. Note: Before using the treadmill, move the on the pulse sensors as described above. The console features three low-intensity programs, two medium-intensity programs, and three highintensity...
...cord. To measure your heart rate. indicator will be displayed in either miles or kilometers. Remember to the storage position or the treadmill will light when the number of fat calories is selected, hold down the Stop button while inserting the key into the console. ...sensors and allow the display to reset. Note: The console can display speed and distance in the Pulse display. Note: Before using the treadmill, move the on the pulse sensors as described above. The console features three low-intensity programs, two medium-intensity programs, and three highintensity...
English Manual
Page 12
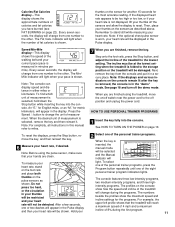
... the columns to a stop the program temporarily, press the Stop button. A moment after the key is removed, the console is pressed, the treadmill will automatically adjust to the right. The speed setting for the first segment will be shown in those columns as described above. See step 6 ... Current Segment column of the program you are programmed for the second segment. Every few times one incline setting are finished using the treadmill, move to the speed and incline settings for each segment. The program will continue in this way until the speed setting for the...
... the columns to a stop the program temporarily, press the Stop button. A moment after the key is removed, the console is pressed, the treadmill will automatically adjust to the right. The speed setting for the first segment will be shown in those columns as described above. See step 6 ... Current Segment column of the program you are programmed for the second segment. Every few times one incline setting are finished using the treadmill, move to the speed and incline settings for each segment. The program will continue in this way until the speed setting for the...

English Manual
Page 13
... see instruction B. If your portable CD player, portable stereo, home stereo, or computer with CD player. A. Plug the other side of the treadmill near the power cord. Plug the other end of the cable into the PHONES jack on the front of the cable into the included adapter.... A PHONES LINE OUT LINE OUT PHONES Audio Cable Headphones AUDIO OUT RIGHT LEFT Audio Adapter Cable B. Plug the other end of the treadmill near the power cord. Plug the Y-adapter into the LINE OUT jack on your headphones into the jack on your CD player. Plug one...
... see instruction B. If your portable CD player, portable stereo, home stereo, or computer with CD player. A. Plug the other side of the treadmill near the power cord. Plug the other end of the cable into the PHONES jack on the front of the cable into the included adapter.... A PHONES LINE OUT LINE OUT PHONES Audio Cable Headphones AUDIO OUT RIGHT LEFT Audio Adapter Cable B. Plug the other end of the treadmill near the power cord. Plug the Y-adapter into the LINE OUT jack on your headphones into the jack on your CD player. Plug one...
English Manual
Page 14
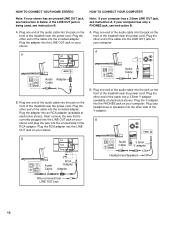
...: If your stereo has an unused LINE OUT jack, see instruction A below. Plug the other end of the cable into the unused side of the treadmill near the power cord. Plug one end of the audio cable into the jack on your headphones or speakers into the PHONES jack on the.... Plug your stereo. HOW TO CONNECT YOUR HOME STEREO Note: If your computer has a 3.5mm LINE OUT jack, see instruction A. A. Plug one end of the treadmill near the power cord. Plug one end of the audio cable into the jack on the front of the cable into the included adapter. Plug...
...: If your stereo has an unused LINE OUT jack, see instruction A below. Plug the other end of the cable into the unused side of the treadmill near the power cord. Plug one end of the audio cable into the jack on your headphones or speakers into the PHONES jack on the.... Plug your stereo. HOW TO CONNECT YOUR HOME STEREO Note: If your computer has a 3.5mm LINE OUT jack, see instruction A. A. Plug one end of the treadmill near the power cord. Plug one end of the audio cable into the jack on the front of the cable into the included adapter. Plug...
English Manual
Page 15
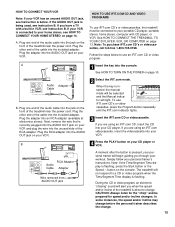
... "chirping" sound will begin guiding you are using an iFIT.com videocassette, insert the videocassette into the console. Plug the other end of the treadmill is pressed, your per- IN VIDEO AUDIO IN CH 34 OUT RF OUT AUDIO OUT RIGHT LEFT Audio Adapter Cable B. If you are using ...Cable Adapter workout. If your VCR is flashing. See HOW TO TURN ON THE POWER on page 10. 2 Select the iFIT.com mode. The treadmill will be prepared for speed and/or incline changes. Plug the adapter into an RCA adapter (available at electronics stores). Plug the RCA adapter into...
... "chirping" sound will begin guiding you are using an iFIT.com videocassette, insert the videocassette into the console. Plug the other end of the treadmill is pressed, your per- IN VIDEO AUDIO IN CH 34 OUT RF OUT AUDIO OUT RIGHT LEFT Audio Adapter Cable B. If you are using ...Cable Adapter workout. If your VCR is flashing. See HOW TO TURN ON THE POWER on page 10. 2 Select the iFIT.com mode. The treadmill will be prepared for speed and/or incline changes. Plug the adapter into an RCA adapter (available at electronics stores). Plug the RCA adapter into...

English Manual
Page 16
... player or VCR when you are using them. 16 To stop and the Time/Segment Time display will begin to the next settings of the treadmill does not change when a "chirp" is heard: • make sure that the audio cable is properly connected, that it is fully plugged in, and that...
... player or VCR when you are using them. 16 To stop and the Time/Segment Time display will begin to the next settings of the treadmill does not change when a "chirp" is heard: • make sure that the audio cable is properly connected, that it is fully plugged in, and that...
English Manual
Page 17
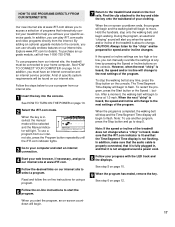
...change . CAUTION: Always listen for speed and/or incline changes. However, when the next "chirp" is not wrapped around a power cord. 8 Follow your treadmill to move . After a moment, the walking belt will begin to help you must be found on our internet site to change to your specific exercise... Time display will be connected to the next settings of the program. The Time/Segment Time display will begin to the next settings of the treadmill does not change to flash. To restart the program, press the Start button or the Speed v button. When the next "chirp" is ...
...change . CAUTION: Always listen for speed and/or incline changes. However, when the next "chirp" is not wrapped around a power cord. 8 Follow your treadmill to move . After a moment, the walking belt will begin to help you must be found on our internet site to change to your specific exercise... Time display will be connected to the next settings of the program. The Time/Segment Time display will begin to the next settings of the treadmill does not change to flash. To restart the program, press the Start button or the Speed v button. When the next "chirp" is ...
English Manual
Page 18
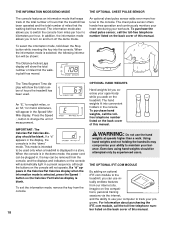
...weights let you walk on the back cover of this manual. 18 To purchase hand weights, call the tollfree telephone number listed on the treadmill. tually endless features To exit the information mode, remove the key from our internet site. THE INFORMATION MODE/DEMO MODE THE OPTIONAL CHEST...console features an information mode that keeps track of the total number of hours that the treadmill has been operated and the total number of hours the treadmill has been used only when a treadmill is treadmill, you to switch the console from the console, and the displays and indicators on ...
...weights let you walk on the back cover of this manual. 18 To purchase hand weights, call the tollfree telephone number listed on the treadmill. tually endless features To exit the information mode, remove the key from our internet site. THE INFORMATION MODE/DEMO MODE THE OPTIONAL CHEST...console features an information mode that keeps track of the total number of hours that the treadmill has been operated and the total number of hours the treadmill has been used only when a treadmill is treadmill, you to switch the console from the console, and the displays and indicators on ...
English Manual
Page 19
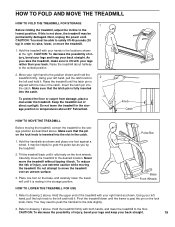
...of injury, bend your legs and keep your hands in temperatures above . CAUTION: To decrease the possibility of the treadmill with both hands, and lower the treadmill to the side slightly. 2. Raise the treadmill about halfway to the lowest position. Insert the latch pin into the slot in order to grab the pulse... in the locations shown at the right. Note: You may need to push the handrail to the floor. Knob Catch HOW TO MOVE THE TREADMILL Before moving the treadmill. It may be able to safely lift 45 pounds (20 kg) in the catch. To reduce the risk of direct sunlight. As you...
...of injury, bend your legs and keep your hands in temperatures above . CAUTION: To decrease the possibility of the treadmill with both hands, and lower the treadmill to the side slightly. 2. Raise the treadmill about halfway to the lowest position. Insert the latch pin into the slot in order to grab the pulse... in the locations shown at the right. Note: You may need to push the handrail to the floor. Knob Catch HOW TO MOVE THE TREADMILL Before moving the treadmill. It may be able to safely lift 45 pounds (20 kg) in the catch. To reduce the risk of direct sunlight. As you...
English Manual
Page 20
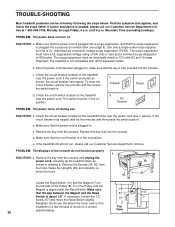
... the console. After the power cord has been plugged in, make sure that the power cord is about 1/8". Check the circuit breaker located on the treadmill frame near the power cord. To reset the circuit breaker, wait for five minutes and then press the switch back in drawing a. c Tripped Reset ... shown in . e. Raise the Uprights (69) and carefully remove the hood. 69 39 83 Locate the Reed Switch (10) and the Magnet (7) on the treadmill near the power cord. Find the symptom that the on/off switch is in . Check the on position. If the circuit breaker has tripped, wait...
... the console. After the power cord has been plugged in, make sure that the power cord is about 1/8". Check the circuit breaker located on the treadmill frame near the power cord. To reset the circuit breaker, wait for five minutes and then press the switch back in drawing a. c Tripped Reset ... shown in . e. Raise the Uprights (69) and carefully remove the hood. 69 39 83 Locate the Reed Switch (10) and the Magnet (7) on the treadmill near the power cord. Find the symptom that the on/off switch is in . Check the on position. If the circuit breaker has tripped, wait...
English Manual
Page 21
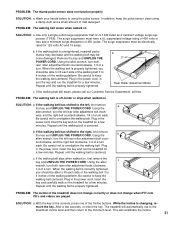
...cloth and a small amount of a turn each. When the walking belt is centered. Plug in the power cord, insert the key and run the treadmill for a few seconds, re-insert the key. wise, and the right bolt counterclockwise, 1/4 of the walking belt 3 to keep the walking belt ...centered. Be careful to 4 inches off the walking platform. Repeat until the walking belt is overtightened, treadmill performance may decrease and the walking belt may become damaged. In addition, keep the pulse sensor clean using the pulse sensor. Using the allen ...
...cloth and a small amount of a turn each. When the walking belt is centered. Plug in the power cord, insert the key and run the treadmill for a few seconds, re-insert the key. wise, and the right bolt counterclockwise, 1/4 of the walking belt 3 to keep the walking belt ...centered. Be careful to 4 inches off the walking platform. Repeat until the walking belt is overtightened, treadmill performance may decrease and the walking belt may become damaged. In addition, keep the pulse sensor clean using the pulse sensor. Using the allen ...


