

English Manual
Page 3
... in use. (See the drawing on page 5 for both men and women. The surge suppressor must be able to raise, lower, or move the walking belt while the power is not a medical device. The pulse sensor is the responsibility of the owner to persons, read the following important precautions and information... burns, fire, electric shock, or injury to ensure that the storage latch is capable of carrying 15 or more than one person on the walking belt. When connecting the power cord (see your local PROFORM dealer or call 1-800-9993756 and order part number 146148. 12.
... in use. (See the drawing on page 5 for both men and women. The surge suppressor must be able to raise, lower, or move the walking belt while the power is not a medical device. The pulse sensor is the responsibility of the owner to persons, read the following important precautions and information... burns, fire, electric shock, or injury to ensure that the storage latch is capable of carrying 15 or more than one person on the walking belt. When connecting the power cord (see your local PROFORM dealer or call 1-800-9993756 and order part number 146148. 12.
English Manual
Page 5
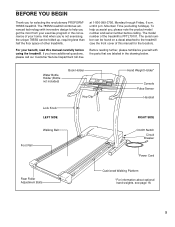
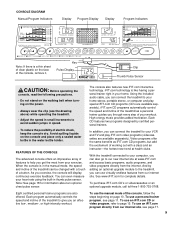
...Holder (Bottle not included) Book Holder Lock Knob LEFT SIDE Key/Clip Hand Weight Holder* Console Pulse Sensor Handrail RIGHT SIDE Walking Belt Foot Rail On/Off Switch Circuit Breaker Power Cord Rear Roller Adjustment Bolts Cushioned Walking Platform *For information about optional hand weights, see...the unique 785SS can be folded up, requiring less than half the floor space of your benefit, read this manual for selecting the revolutionary PROFORM® 785SS treadmill. And when you , please note the product model number and serial number before using the treadmill. at 1-800-...
...Holder (Bottle not included) Book Holder Lock Knob LEFT SIDE Key/Clip Hand Weight Holder* Console Pulse Sensor Handrail RIGHT SIDE Walking Belt Foot Rail On/Off Switch Circuit Breaker Power Cord Rear Roller Adjustment Bolts Cushioned Walking Platform *For information about optional hand weights, see...the unique 785SS can be folded up, requiring less than half the floor space of your benefit, read this manual for selecting the revolutionary PROFORM® 785SS treadmill. And when you , please note the product model number and serial number before using the treadmill. at 1-800-...
English Manual
Page 6
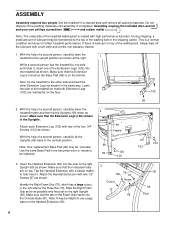
... becomes worn or needs to the vertical position. Make sure that both Extension Legs (102) are on the bottom. Note: The underside of the walking belt, simply wipe off the lubricant with a soft cloth and a mild, non-abrasive cleaner. 1. Attach each Extension Leg (102) with high-performance lubricant... tip the Uprights (69) back to be included. With the help of the packing materials until assembly is coated with two of the walking belt or the shipping carton. Tap the Handrail Extension with two 1/2" Screws (67) as shown at the right. 1 While a second person tips...
... becomes worn or needs to the vertical position. Make sure that both Extension Legs (102) are on the bottom. Note: The underside of the walking belt, simply wipe off the lubricant with a soft cloth and a mild, non-abrasive cleaner. 1. Attach each Extension Leg (102) with high-performance lubricant... tip the Uprights (69) back to be included. With the help of the packing materials until assembly is coated with two of the walking belt or the shipping carton. Tap the Handrail Extension with two 1/2" Screws (67) as shown at the right. 1 While a second person tips...
English Manual
Page 7
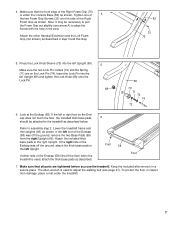
... the End- Make sure that the front edge of the Endcap (58) lifts off the ground, attach the thick base pads to adjust the walking belt (see arrow A) to the treadmill as described. A 82 33 75 5. If either side of the Right Foam Grip (75) is used , attach the thick base...
... the End- Make sure that the front edge of the Endcap (58) lifts off the ground, attach the thick base pads to adjust the walking belt (see arrow A) to the treadmill as described. A 82 33 75 5. If either side of the Right Foam Grip (75) is used , attach the thick base...
English Manual
Page 8
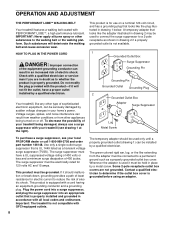
... be seriously damaged by a metal screw. A temporary adapter that looks like the adapter illustrated in an increased risk of your local PROFORM dealer or call 1-800-999-3756 and order part number 146148. The surge suppressor must be electrically rated for 120 volts AC and.... Voltage surges, spikes, and noise interference can be connected to determine if the outlet box cover is for electric current to the walking belt or the walking platform. This product is grounded before using an adapter. 8 The surge suppressor must be installed by a qualified electrician. ...
... be seriously damaged by a metal screw. A temporary adapter that looks like the adapter illustrated in an increased risk of your local PROFORM dealer or call 1-800-999-3756 and order part number 146148. The surge suppressor must be electrically rated for 120 volts AC and.... Voltage surges, spikes, and noise interference can be connected to determine if the outlet box cover is for electric current to the walking belt or the walking platform. This product is grounded before using an adapter. 8 The surge suppressor must be installed by a qualified electrician. ...
English Manual
Page 9
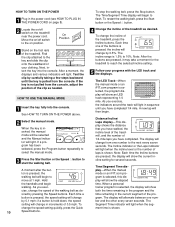
... console dry. Key Pulse Display Clip Thumb Pulse Sensor CAUTION: Before operating the console, read the following precautions. • Do not stand on the walking belt when turning on the console and place only a sealed water bottle in thumb pulse sensor. Video programs offer the same benefits as a personal trainer guides...
... console dry. Key Pulse Display Clip Thumb Pulse Sensor CAUTION: Before operating the console, read the following precautions. • Do not stand on the walking belt when turning on the console and place only a sealed water bottle in thumb pulse sensor. Video programs offer the same benefits as a personal trainer guides...
English Manual
Page 10
... . 2 Select the manual mode. The Incline indicator or the Laps indicator will show the current incline setting for the treadmill to start the walking belt. The Segment Time indicator will show an LED track representing 1/4 mile. Next, insert the key into the console. Note: After the buttons are pressed... time one number and the other every seven seconds. As you exercise, the indicators around the track will change the speed of the walking belt as desired. A new lap will begin to the next every seven seconds. Time/Segment Time display-When the manual mode or an iFIT....
... . 2 Select the manual mode. The Incline indicator or the Laps indicator will show the current incline setting for the treadmill to start the walking belt. The Segment Time indicator will show an LED track representing 1/4 mile. Next, insert the key into the console. Note: After the buttons are pressed... time one number and the other every seven seconds. As you exercise, the indicators around the track will change the speed of the walking belt as desired. A new lap will begin to the next every seven seconds. Time/Segment Time display-When the manual mode or an iFIT....
English Manual
Page 11
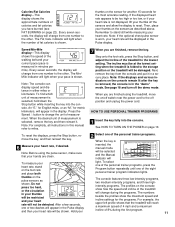
.... 7 When you are finished using the pulse sensor, make sure that the treadmill will reach a maximum speed of 4 mph and a maximum incline of the walking belt and your heart rate will not be at the lowest setting when the treadmill is in the Pulse display. Every seven seconds, the display will...
.... 7 When you are finished using the pulse sensor, make sure that the treadmill will reach a maximum speed of 4 mph and a maximum incline of the walking belt and your heart rate will not be at the lowest setting when the treadmill is in the Pulse display. Every seven seconds, the display will...
English Manual
Page 12
... flashing Current Segment column and the treadmill will be shown in the program display. If the speed or incline setting for the program. The walking belt will light or darken in the Current Segment column. When the speed settings move one column to the left again and not all of lit...
... flashing Current Segment column and the treadmill will be shown in the program display. If the speed or incline setting for the program. The walking belt will light or darken in the Current Segment column. When the speed settings move one column to the left again and not all of lit...

English Manual
Page 16
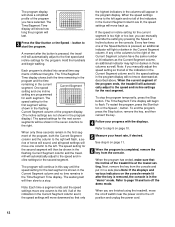
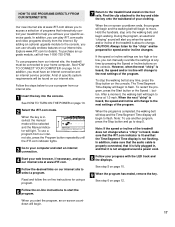
... program, press the Stop button or remove the key and go to flash. After a moment, the walking belt will begin to move at 1.0 mph. Note: To use another flat surface instead of the CD or video...page 12. When the CD or video program is heard, the speed and incline will stop the walking belt at any time, press the Stop button on the console. If the Time/Segment Time display is completed..., press the Start button or the Speed v button. When the next "chirp" is completed, the walking belt will change to the next settings of on the console. 5 Follow your CD player or VCR. The program...
... program, press the Stop button or remove the key and go to flash. After a moment, the walking belt will begin to move at 1.0 mph. Note: To use another flat surface instead of the CD or video...page 12. When the CD or video program is heard, the speed and incline will stop the walking belt at any time, press the Stop button on the console. If the Time/Segment Time display is completed..., press the Start button or the Speed v button. When the next "chirp" is completed, the walking belt will change to the next settings of on the console. 5 Follow your CD player or VCR. The program...
English Manual
Page 17
... and an internet service provider. Read and follow the on-line instructions for speed and/or incline changes. Hold the handrails, step onto the walking belt, and begin to flash. The Time/Segment Time display will light. To restart the program, press the Start button or the Speed v button. When you... the on -screen countdown will begin to your computer and start the program, an on -screen countdown ends, the program will begin and the walking belt will change to the next settings of your web browser, if necessary, and go to step 5. When the next "chirp" is not wrapped around a ...
... and an internet service provider. Read and follow the on-line instructions for speed and/or incline changes. Hold the handrails, step onto the walking belt, and begin to flash. The Time/Segment Time display will light. To restart the program, press the Start button or the Speed v button. When you... the on -screen countdown will begin to your computer and start the program, an on -screen countdown ends, the program will begin and the walking belt will change to the next settings of your web browser, if necessary, and go to step 5. When the next "chirp" is not wrapped around a ...
English Manual
Page 18
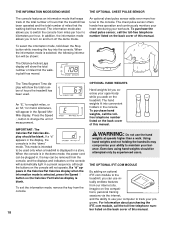
...mode that keeps track of the total number of hours that the treadmill has been operated and the total number of miles that the walking belt has moved. grams. For information about purchasing the iFIT.com module, call the tollfree telephone number listed on the back cover of this manual.... In addition, the information mode allows you walk on the console will show the total number of miles that the walking belt has moved. OPTIONAL HAND WEIGHTS Hand weights let you exercise your upper-body while you to turn on -line competitions, personal training sessions via...
...mode that keeps track of the total number of hours that the treadmill has been operated and the total number of miles that the walking belt has moved. grams. For information about purchasing the iFIT.com module, call the tollfree telephone number listed on the back cover of this manual.... In addition, the information mode allows you walk on the console will show the total number of miles that the walking belt has moved. OPTIONAL HAND WEIGHTS Hand weights let you exercise your upper-body while you to turn on -line competitions, personal training sessions via...
English Manual
Page 21
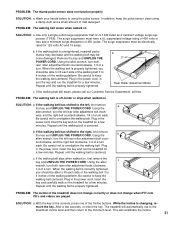
... a few minutes. Plug in the power cord, insert the key and run the treadmill for 120 volts AC and 15 amps. Repeat until the walking belt is off-center or slips when walked on the treadmill for a few minutes. b 3"-4" Rear Roller Adjustment Bolts c. terclockwise, and the right bolt clockwise... tightened, you should be able to the minimum level. Using the allen wrench, turn both rear roller adjustment bolts clockwise, 1/4 of the walking belt 3 to lift each side of a turn . Using the allen wrench, turn the left rear roller adjustment bolt coun- Plug in the power ...
... a few minutes. Plug in the power cord, insert the key and run the treadmill for 120 volts AC and 15 amps. Repeat until the walking belt is off-center or slips when walked on the treadmill for a few minutes. b 3"-4" Rear Roller Adjustment Bolts c. terclockwise, and the right bolt clockwise... tightened, you should be able to the minimum level. Using the allen wrench, turn both rear roller adjustment bolts clockwise, 1/4 of the walking belt 3 to lift each side of a turn . Using the allen wrench, turn the left rear roller adjustment bolt coun- Plug in the power ...

English Manual
Page 23
...Roller/Pulley Frame Pivot Nut Reed Switch/Sensor Wire Latch Assembly Reed Switch Clip Lift Frame Star Washer Motor Assembly Motor Pulley/Flywheel/Fan Motor Belt Motor Pivot Nut Motor Tension Nut Motor Tension Bolt Motor Pivot Bolt Hood Incline Motor Bolt Plastic Stand-off Power Board Screw Choke Controller ... Nut Incline Motor Incline Motor Stop Belly Pan Belly Pan Screw (Long) Static Decal Circuit Breaker Power Cord On/Off Switch Left Endcap Insert Belt Guide Screw Belt Guide 47 4 48 4 49 16 50 1 51 1 52 1 53 6 54 4 55 2 56 5 57 1 58 1 59 2 60 1 61 1 62 1 63** 1 64** 1 65 1 66 2 67 8 ...
...Roller/Pulley Frame Pivot Nut Reed Switch/Sensor Wire Latch Assembly Reed Switch Clip Lift Frame Star Washer Motor Assembly Motor Pulley/Flywheel/Fan Motor Belt Motor Pivot Nut Motor Tension Nut Motor Tension Bolt Motor Pivot Bolt Hood Incline Motor Bolt Plastic Stand-off Power Board Screw Choke Controller ... Nut Incline Motor Incline Motor Stop Belly Pan Belly Pan Screw (Long) Static Decal Circuit Breaker Power Cord On/Off Switch Left Endcap Insert Belt Guide Screw Belt Guide 47 4 48 4 49 16 50 1 51 1 52 1 53 6 54 4 55 2 56 5 57 1 58 1 59 2 60 1 61 1 62 1 63** 1 64** 1 65 1 66 2 67 8 ...


