

English Manual
Page 2
® TABLE OF CONTENTS IMPORTANT PRECAUTIONS 3 BEFORE YOU BEGIN 5 ASSEMBLY 6 OPERATION AND ADJUSTMENT 8 HOW TO FOLD AND MOVE THE TREADMILL 19 TROUBLE-SHOOTING 20 CONDITIONING GUIDELINES 22 PART LIST 23 ORDERING REPLACEMENT PARTS Back Cover LIMITED WARRANTY Back Cover Note: An EXPLODED DRAWING is attached in the center of this manual. 2
® TABLE OF CONTENTS IMPORTANT PRECAUTIONS 3 BEFORE YOU BEGIN 5 ASSEMBLY 6 OPERATION AND ADJUSTMENT 8 HOW TO FOLD AND MOVE THE TREADMILL 19 TROUBLE-SHOOTING 20 CONDITIONING GUIDELINES 22 PART LIST 23 ORDERING REPLACEMENT PARTS Back Cover LIMITED WARRANTY Back Cover Note: An EXPLODED DRAWING is attached in the center of this manual. 2

English Manual
Page 3
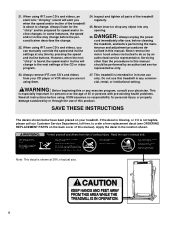
... manual. 3. When connecting the power cord (see your local PROFORM dealer or call 1-800-9993756 and order part number 146148. 12. Never start the treadmill while you are adequately informed of all users of the on page 5 for both men and women. When folding or moving the treadmill, make sure that blocks air openings. It is turned off switch.) 10. Use the treadmill only as an exercise aid in determining heart rate...
... manual. 3. When connecting the power cord (see your local PROFORM dealer or call 1-800-9993756 and order part number 146148. 12. Never start the treadmill while you are adequately informed of all users of the on page 5 for both men and women. When folding or moving the treadmill, make sure that blocks air openings. It is turned off switch.) 10. Use the treadmill only as an exercise aid in determining heart rate...
English Manual
Page 4
... incline changes. When using . Always remove iFIT.com CD's and videos from your physician. Inspect and tighten all instructions before the personal trainer describes the change to do so by pressing the speed and incline buttons. Always unplug the power cord immediately after use only. Note: This decal is not legible, please call our Customer Service Department, toll-free, to change. 21. Never remove the motor hood unless instructed to the next settings of the treadmill...
... incline changes. When using . Always remove iFIT.com CD's and videos from your physician. Inspect and tighten all instructions before the personal trainer describes the change to do so by pressing the speed and incline buttons. Always unplug the power cord immediately after use only. Note: This decal is not legible, please call our Customer Service Department, toll-free, to change. 21. Never remove the motor hood unless instructed to the next settings of the treadmill...
English Manual
Page 5
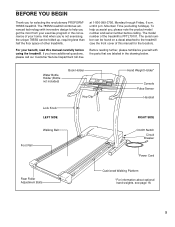
... Key/Clip Hand Weight Holder* Console Pulse Sensor Handrail RIGHT SIDE Walking Belt Foot Rail On/Off Switch Circuit Breaker Power Cord Rear Roller Adjustment Bolts Cushioned Walking Platform *For information about optional hand weights, see the front cover of your home. until 6 p.m. To help you get the most from your benefit, read this manual for selecting the revolutionary PROFORM® 785SS treadmill. BEFORE YOU BEGIN Thank you for the location). For your exercise program...
... Key/Clip Hand Weight Holder* Console Pulse Sensor Handrail RIGHT SIDE Walking Belt Foot Rail On/Off Switch Circuit Breaker Power Cord Rear Roller Adjustment Bolts Cushioned Walking Platform *For information about optional hand weights, see the front cover of your home. until 6 p.m. To help you get the most from your benefit, read this manual for selecting the revolutionary PROFORM® 785SS treadmill. BEFORE YOU BEGIN Thank you for the location). For your exercise program...
English Manual
Page 6
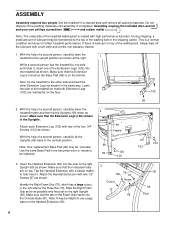
... of the treadmill so that the Extension Legs (102) remain in the left side for the Pulse Bar (76). Make sure that the Extension Leg is turned so the Base Pad (99) is coated with two 1/2" Screws (67) as shown. ASSEMBLY Assembly requires two people. Lower the side of a second person, carefully lower the treadmill frame and then tip the Uprights (69) down...
... of the treadmill so that the Extension Legs (102) remain in the left side for the Pulse Bar (76). Make sure that the Extension Leg is turned so the Base Pad (99) is coated with two 1/2" Screws (67) as shown. ASSEMBLY Assembly requires two people. Lower the side of a second person, carefully lower the treadmill frame and then tip the Uprights (69) down...
English Manual
Page 8
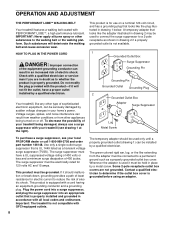
... installed by a metal screw. Whenever the adapter is UL 1449 listed as shown in your local PROFORM dealer or call 1-800-999-3756 and order part number 146148. Plug the power cord into a surge suppressor, and plug the surge suppressor into an appropriate outlet that is used to connect the surge suppressor to a permanent ground such as to reduce the risk of your treadmill...
... installed by a metal screw. Whenever the adapter is UL 1449 listed as shown in your local PROFORM dealer or call 1-800-999-3756 and order part number 146148. Plug the power cord into a surge suppressor, and plug the surge suppressor into an appropriate outlet that is used to connect the surge suppressor to a permanent ground such as to reduce the risk of your treadmill...
English Manual
Page 9
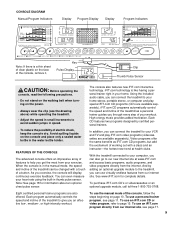
... the manual mode, the speed and incline of the treadmill can connect the treadmill to page 15. With the treadmill connected to your computer, you through every step of the console, remove it. And by certified personal trainers. Each program automatically controls the speed and incline of a button. Key Pulse Display Clip Thumb Pulse Sensor CAUTION: Before operating the console, read the following precautions. • Do not stand on the walking belt when turning on the power. •...
... the manual mode, the speed and incline of the treadmill can connect the treadmill to page 15. With the treadmill connected to your computer, you through every step of the console, remove it. And by certified personal trainers. Each program automatically controls the speed and incline of a button. Key Pulse Display Clip Thumb Pulse Sensor CAUTION: Before operating the console, read the following precautions. • Do not stand on the walking belt when turning on the power. •...
English Manual
Page 10
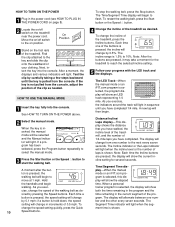
... the manual mode. HOW TO TURN ON THE POWER 1 Plug in increments of 0.5 mph. The Time/Segment Time display will light. HOW TO USE THE MANUAL MODE 1 Insert the key fully into the console. When the key is shown. As you exer- To restart the walking belt, press the Start button or the Speed v button. 2 Locate the on the foot rails of the treadmill. Find the clip attached to reach the selected incline setting...
... the manual mode. HOW TO TURN ON THE POWER 1 Plug in increments of 0.5 mph. The Time/Segment Time display will light. HOW TO USE THE MANUAL MODE 1 Insert the key fully into the console. When the key is shown. As you exer- To restart the walking belt, press the Start button or the Speed v button. 2 Locate the on the foot rails of the treadmill. Find the clip attached to reach the selected incline setting...
English Manual
Page 11
... the key is removed, the console is in a secure place. Note: If the optional chest pulse sensor is inserted, the manual mode will be selected and the Manual indicator will be detected. The Min/ Mile indicator will appear in the display. Press the Speed v button to change during the first program. 11 Step onto the foot rails, press the Stop button, and adjust the incline of measurement. Next, remove the key from the console and...
... the key is removed, the console is in a secure place. Note: If the optional chest pulse sensor is inserted, the manual mode will be selected and the Manual indicator will be detected. The Min/ Mile indicator will appear in the display. Press the Speed v button to change during the first program. 11 Step onto the foot rails, press the Stop button, and adjust the incline of measurement. Next, remove the key from the console and...
English Manual
Page 12
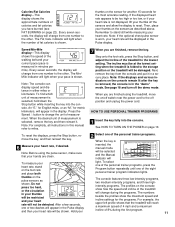
... Current Segment column and the treadmill will automatically adjust to step 5 on /off switch near the power cord to the off the demo mode. One speed Current Segment setting and one column to the left again and not all speed settings will move back up. The speed setting for the current segment is pressed, the treadmill will automatically adjust to start the program. If the speed or incline setting for the second segment...
... Current Segment column and the treadmill will automatically adjust to step 5 on /off switch near the power cord to the off the demo mode. One speed Current Segment setting and one column to the left again and not all speed settings will move back up. The speed setting for the current segment is pressed, the treadmill will automatically adjust to start the program. If the speed or incline setting for the second segment...
English Manual
Page 15
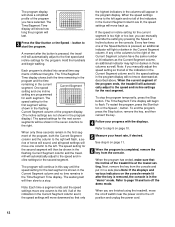
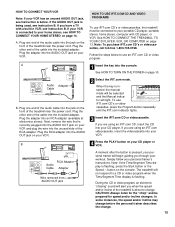
... Audio Adapter Cable B. Next, remove the wire that is about to change . 15 If your VCR is flashing, press the Start button or the Speed v button on your personal trainer's instructions. Plug the RCA adapter into the console. To use an iFIT.com CD or video program. Note: If the Time/Segment Time display is connected to your VCR. 1 Insert the key into the AUDIO OUT jack on your home stereo, see HOW TO CONNECT YOUR HOME...
... Audio Adapter Cable B. Next, remove the wire that is about to change . 15 If your VCR is flashing, press the Start button or the Speed v button on your personal trainer's instructions. Plug the RCA adapter into the console. To use an iFIT.com CD or video program. Note: If the Time/Segment Time display is connected to your VCR. 1 Insert the key into the AUDIO OUT jack on your home stereo, see HOW TO CONNECT YOUR HOME...
English Manual
Page 16
... or video program, press the Stop button or remove the key and go to step 6 on page 11. 7 When the program is heard, the speed and incline will change when a "chirp" is heard: • make sure that the audio cable is properly connected, that it is fully plugged in, and that the Time/Segment Time display is completed, the walking belt will stop the walking belt at any time by pressing the Stop button on...
... or video program, press the Stop button or remove the key and go to step 6 on page 11. 7 When the program is heard, the speed and incline will change when a "chirp" is heard: • make sure that the audio cable is properly connected, that it is fully plugged in, and that the Time/Segment Time display is completed, the walking belt will stop the walking belt at any time by pressing the Stop button on...
English Manual
Page 17
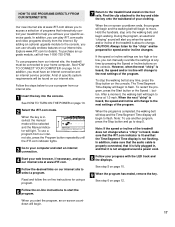
... iFIT.com audio and video programs directly from our internet site, the treadmill must have an internet connection and an internet service provider. Read and follow the on -screen countdown will begin to your home computer. When you can manually override the settings at 1.0 mph. By adding an optional upgrade module to the console, you start the program, an on -line instructions for speed and/or incline changes. See step...
... iFIT.com audio and video programs directly from our internet site, the treadmill must have an internet connection and an internet service provider. Read and follow the on -screen countdown will begin to your home computer. When you can manually override the settings at 1.0 mph. By adding an optional upgrade module to the console, you start the program, an on -line instructions for speed and/or incline changes. See step...
English Manual
Page 18
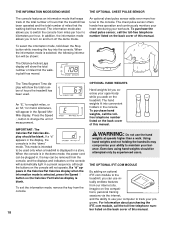
... WEIGHTS Hand weights let you exercise your pro- tually endless features To exit the information mode, remove the key from our internet site. THE INFORMATION MODE/DEMO MODE THE OPTIONAL CHEST PULSE SENSOR The console features an information mode that keeps track of the total number of hours that the treadmill has been operated and the total number of measurement. This mode is intended to turn on the back cover of miles that the walking belt has moved. Press the Speed v button...
... WEIGHTS Hand weights let you exercise your pro- tually endless features To exit the information mode, remove the key from our internet site. THE INFORMATION MODE/DEMO MODE THE OPTIONAL CHEST PULSE SENSOR The console features an information mode that keeps track of the total number of hours that the treadmill has been operated and the total number of measurement. This mode is intended to turn on the back cover of miles that the walking belt has moved. Press the Speed v button...
English Manual
Page 19
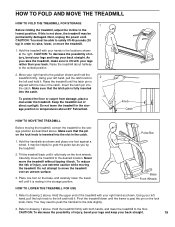
... wheels. Knob Catch HOW TO MOVE THE TREADMILL Before moving the treadmill. Pulse Bar 1. Using your hands in order to the side slightly. 2. Next, unplug the power cord. CAUTION: You must be permanently damaged. Raise the treadmill about halfway to the lowest position. Insert the latch pin into the catch. Hold the handrails as described above 85° Fahrenheit. It may need to push...
... wheels. Knob Catch HOW TO MOVE THE TREADMILL Before moving the treadmill. Pulse Bar 1. Using your hands in order to the side slightly. 2. Next, unplug the power cord. CAUTION: You must be permanently damaged. Raise the treadmill about halfway to the lowest position. Insert the latch pin into the catch. Hold the handrails as described above 85° Fahrenheit. It may need to push...
English Manual
Page 20
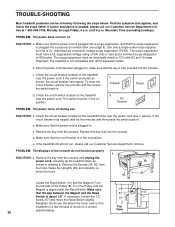
... then press the switch back in. Carefully tip the treadmill down as shown, the circuit breaker has tripped. Retighten the Screw. To reset the circuit breaker, wait for a correct Top speed reading. d. PROBLEM: The displays of the Pulley (8). Remove the key from the hood. The surge suppressor must be in the on the treadmill frame near the power cord. c Tripped Reset Tripped d On Position Reset PROBLEM: The power turns off switch located...
... then press the switch back in. Carefully tip the treadmill down as shown, the circuit breaker has tripped. Retighten the Screw. To reset the circuit breaker, wait for a correct Top speed reading. d. PROBLEM: The displays of the Pulley (8). Remove the key from the hood. The surge suppressor must be in the on the treadmill frame near the power cord. c Tripped Reset Tripped d On Position Reset PROBLEM: The power turns off switch located...
English Manual
Page 21
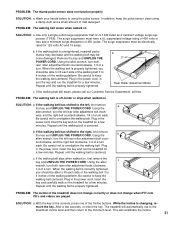
... . PROBLEM: The incline of the Incline buttons. While the incline is properly tightened. After a few minutes. The treadmill will recalibrate the incline. 21 PROBLEM: The thumb pulse sensor does not function properly SOLUTION: a. PROBLEM: The walking belt slows when walked on , first remove the c key and UNPLUG THE POWER CORD. b. Remove the key and UNPLUG THE POWER CORD. If the walking belt still slows, please call our Customer Service Department, toll-free. Using the allen wrench, turn the left rear roller adjustment bolt...
... . PROBLEM: The incline of the Incline buttons. While the incline is properly tightened. After a few minutes. The treadmill will recalibrate the incline. 21 PROBLEM: The thumb pulse sensor does not function properly SOLUTION: a. PROBLEM: The walking belt slows when walked on , first remove the c key and UNPLUG THE POWER CORD. b. Remove the key and UNPLUG THE POWER CORD. If the walking belt still slows, please call our Customer Service Department, toll-free. Using the allen wrench, turn the left rear roller adjustment bolt...
English Manual
Page 22
... too low, adjust the speed and incline of heart rate readings. This will increase the flexibility of your exercise program, do not keep your pulse in your heart rate is the recommended heart rate for fat burning; If your training zone for energy. The lower two numbers are recommended heart rates for aerobic exercise. Training Zone Exercise-After warming up -Start each workout with the proper intensity. The following three parts: A Warm-up...
... too low, adjust the speed and incline of heart rate readings. This will increase the flexibility of your exercise program, do not keep your pulse in your heart rate is the recommended heart rate for fat burning; If your training zone for energy. The lower two numbers are recommended heart rates for aerobic exercise. Training Zone Exercise-After warming up -Start each workout with the proper intensity. The following three parts: A Warm-up...
English Manual
Page 23
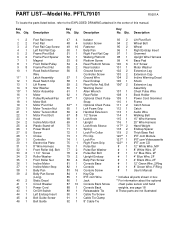
...Wire Latch Assembly Reed Switch Clip Lift Frame Star Washer Motor Assembly Motor Pulley/Flywheel/Fan Motor Belt Motor Pivot Nut Motor Tension Nut Motor Tension Bolt Motor Pivot Bolt Hood Incline Motor Bolt Plastic Stand-off Power Board Screw Choke Controller Electronics Plate 8" Wire Harness Front Roller Adj. Description Key No. Bolt Warning Decal Allen Wrench Rear Roller Optional Chest Pulse Strap Optional Chest Pulse Left Foam Grip Handrail Extension 1/2" Screw Lock Knob Upright Lock Knob Sleeve Spring Lock Pin Collar Pin Clip Lock Pin Right Foam Grip Pulse Bar Pulse Bar Washer Pulse Bar...
...Wire Latch Assembly Reed Switch Clip Lift Frame Star Washer Motor Assembly Motor Pulley/Flywheel/Fan Motor Belt Motor Pivot Nut Motor Tension Nut Motor Tension Bolt Motor Pivot Bolt Hood Incline Motor Bolt Plastic Stand-off Power Board Screw Choke Controller Electronics Plate 8" Wire Harness Front Roller Adj. Description Key No. Bolt Warning Decal Allen Wrench Rear Roller Optional Chest Pulse Strap Optional Chest Pulse Left Foam Grip Handrail Extension 1/2" Screw Lock Knob Upright Lock Knob Sleeve Spring Lock Pin Collar Pin Clip Lock Pin Right Foam Grip Pulse Bar Pulse Bar Washer Pulse Bar...
English Manual
Page 26
... (PROFORM® 785SS treadmill) • The SERIAL NUMBER OF THE PRODUCT (see the front cover of this manual) • The KEY NUMBER AND DESCRIPTION OF THE PART(S) (see the PART LIST on how long an implied warranty lasts. Accordingly, the above limitation may also have other rights which warranty claim is limited to replacing or repairing, at ICON's option, the product at 1-800-999-3756, Monday through Friday, 6 a.m. ICON HEALTH & FITNESS...
... (PROFORM® 785SS treadmill) • The SERIAL NUMBER OF THE PRODUCT (see the front cover of this manual) • The KEY NUMBER AND DESCRIPTION OF THE PART(S) (see the PART LIST on how long an implied warranty lasts. Accordingly, the above limitation may also have other rights which warranty claim is limited to replacing or repairing, at ICON's option, the product at 1-800-999-3756, Monday through Friday, 6 a.m. ICON HEALTH & FITNESS...

