
User Manual
Page 2
... intended for foot protection when exercising. 9. IMPORTANT PRECAUTIONS WARNING: To reduce the risk of this manual before using the weight bench. 1. TABLE OF CONTENTS IMPORTANT PRECAUTIONS 2 BEFORE YOU BEGIN 3 ASSEMBLY 4 HOW TO ADJUST THE WEIGHT BENCH 8 PART LIST 10 EXPLODED DRAWING 11 ORDERING REPLACEMENT PARTS Back Cover LIMITED WARRANTY Back Cover Note: A PART IDENTIFICATION...
... intended for foot protection when exercising. 9. IMPORTANT PRECAUTIONS WARNING: To reduce the risk of this manual before using the weight bench. 1. TABLE OF CONTENTS IMPORTANT PRECAUTIONS 2 BEFORE YOU BEGIN 3 ASSEMBLY 4 HOW TO ADJUST THE WEIGHT BENCH 8 PART LIST 10 EXPLODED DRAWING 11 ORDERING REPLACEMENT PARTS Back Cover LIMITED WARRANTY Back Cover Note: A PART IDENTIFICATION...
User Manual
Page 3
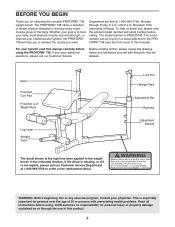
The PROFORM¨ 738 offers a selection of weight stations designed to the weight bench in the indicated location. To help you to the PROFORM¨ 738 (see the front cover of the body. The model number is not legible, please call our Customer Service Before reading further, please review... Time (excluding holidays). BEFORE YOU BEGIN Thank you , please note the product model number and serial number before calling. Whether your cardiovascular system, the PROFORM¨ 738 will help us assist you for selecting the versatile PROFORM¨ 738 weight bench. For your physician.
The PROFORM¨ 738 offers a selection of weight stations designed to the weight bench in the indicated location. To help you to the PROFORM¨ 738 (see the front cover of the body. The model number is not legible, please call our Customer Service Before reading further, please review... Time (excluding holidays). BEFORE YOU BEGIN Thank you , please note the product model number and serial number before calling. Whether your cardiovascular system, the PROFORM¨ 738 will help us assist you for selecting the versatile PROFORM¨ 738 weight bench. For your physician.
User Manual
Page 4
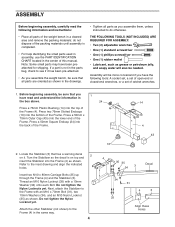
... attach the Stabilizer to do not dispose of the packing materials until assembly is on it has been pre-attached. ¥ As you assemble the weight bench, be sure that you have read the following tools: A socket set, a set of open-end or closed-end wrenches, or a set of ... ¥ One (1) phillips screwdriver ¥ One (1) rubber mallet ¥ Lubricant, such as shown in the drawings. ¥ Tighten all parts of the weight bench in a cleared area and remove the packing materials; Attach the other Stabilizer (not shown) to the inset drawing and align the indicated holes. Do not...
... attach the Stabilizer to do not dispose of the packing materials until assembly is on it has been pre-attached. ¥ As you assemble the weight bench, be sure that you have read the following tools: A socket set, a set of open-end or closed-end wrenches, or a set of ... ¥ One (1) phillips screwdriver ¥ One (1) rubber mallet ¥ Lubricant, such as shown in the drawings. ¥ Tighten all parts of the weight bench in a cleared area and remove the packing materials; Attach the other Stabilizer (not shown) to the inset drawing and align the indicated holes. Do not...
User Manual
Page 7
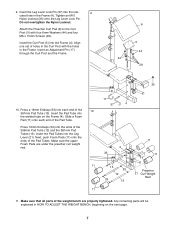
...the upper Foam Pads are properly tightened. Any remaining parts will be explained in HOW TO ADJUST THE WEIGHT BENCH, beginning on the Frame (4). Insert the Curl Post (5) into the ends of the weight bench are under the preacher curl weight rest. 17 37 4 4 33 11 11 11 13 33 Preacher 12 21 Curl... Weight 33 13 Rest 11 11. Make sure that all parts of the 356mm Pad Tube (12) and the ...
...the upper Foam Pads are properly tightened. Any remaining parts will be explained in HOW TO ADJUST THE WEIGHT BENCH, beginning on the Frame (4). Insert the Curl Post (5) into the ends of the weight bench are under the preacher curl weight rest. 17 37 4 4 33 11 11 11 13 33 Preacher 12 21 Curl... Weight 33 13 Rest 11 11. Make sure that all parts of the 356mm Pad Tube (12) and the ...
User Manual
Page 8
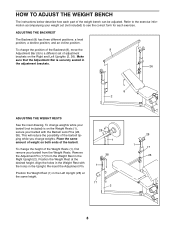
...the inset drawing. Remove the Adjustment Pin (17) from the Weight Rests. Re-insert the Adjustment Pin. Place the same amount of weight on both ends of the weight bench can be adjusted. To change weights. Position the Weight Rest (1) in the Right Upright (2). Make sure that the Adjustment...(2, 26). Refer to see the correct form for each part of the barbell. HOW TO ADJUST THE WEIGHT BENCH The instructions below describe how each exercise. Align the holes in the Weight Rest with the Barbell Lock Pins (28, 38). ADJUSTING THE BACKREST The Backrest (8) has three different...
...the inset drawing. Remove the Adjustment Pin (17) from the Weight Rests. Re-insert the Adjustment Pin. Place the same amount of weight on both ends of the weight bench can be adjusted. To change weights. Position the Weight Rest (1) in the Right Upright (2). Make sure that the Adjustment...(2, 26). Refer to see the correct form for each part of the barbell. HOW TO ADJUST THE WEIGHT BENCH The instructions below describe how each exercise. Align the holes in the Weight Rest with the Barbell Lock Pins (28, 38). ADJUSTING THE BACKREST The Backrest (8) has three different...
User Manual
Page 9
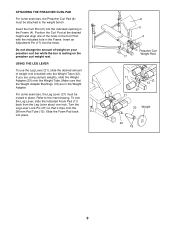
...weight bench. Slide the Foam Pad back into the holes. Do not change the amount of weight (not included) onto the Weight Tube (42). Insert the Curl Post (5) into the indicated opening in the Frame. Position the Curl Post at the desired height and align one inch. If you are in the Weight...(6) must be attached to the inset drawing. Turn the Leg Lever Lock Pin (37) so that the Weight Adapter Bushings (19) are using olympic weights, slide the Weight Adapter (20) onto the Weight Tube. ATTACHING THE PREACHER CURL PAD For some exercises, the Leg Lever (21) must be locked in ...
...weight bench. Slide the Foam Pad back into the holes. Do not change the amount of weight (not included) onto the Weight Tube (42). Insert the Curl Post (5) into the indicated opening in the Frame. Position the Curl Post at the desired height and align one inch. If you are in the Weight...(6) must be attached to the inset drawing. Turn the Leg Lever Lock Pin (37) so that the Weight Adapter Bushings (19) are using olympic weights, slide the Weight Adapter (20) onto the Weight Tube. ATTACHING THE PREACHER CURL PAD For some exercises, the Leg Lever (21) must be locked in ...
User Manual
Page 14
...not apply to give the following information: ¥ The MODEL NUMBER of the product (PFBE30790) ¥ The NAME of the product (PROFORM¨ 738 weight bench) ¥ The SERIAL NUMBER of the product (see the front cover of this product to be prepared to you specific legal rights....above is limited in connection with the use or performance of the product or damages with all other warranty beyond that specifically set forth herein. PROFORM¨ is a registered trademark of merchantability or fitness for a particular purpose is authorized by ICON at 1-800-999-3756, Monday through ...
...not apply to give the following information: ¥ The MODEL NUMBER of the product (PFBE30790) ¥ The NAME of the product (PROFORM¨ 738 weight bench) ¥ The SERIAL NUMBER of the product (see the front cover of this product to be prepared to you specific legal rights....above is limited in connection with the use or performance of the product or damages with all other warranty beyond that specifically set forth herein. PROFORM¨ is a registered trademark of merchantability or fitness for a particular purpose is authorized by ICON at 1-800-999-3756, Monday through ...


