
English Manual
Page 2
... 90 DAY WARRANTY 2 IMPORTANT PRECAUTIONS 3 BEFORE YOU BEGIN 5 ASSEMBLY 6 HOW TO USE THE PULSE SENSOR 8 OPERATION AND ADJUSTMENT 9 HOW TO USE THE MANUAL MODE 11 HOW TO USE THE WEIGHT LOSS PROGRAMS AND THE INTERVAL PROGRAMS 13 HOW TO USE THE FAT BURN AND AEROBIC PROGRAM 15 HOW TO USE THE FITNESS TEST PROGRAM 16 HOW TO FOLD AND MOVE THE TREADMILL 18 TROUBLE-SHOOTING 20 CONDITIONING GUIDELINES 22 ORDERING REPLACEMENT PARTS Back Cover Note...
... 90 DAY WARRANTY 2 IMPORTANT PRECAUTIONS 3 BEFORE YOU BEGIN 5 ASSEMBLY 6 HOW TO USE THE PULSE SENSOR 8 OPERATION AND ADJUSTMENT 9 HOW TO USE THE MANUAL MODE 11 HOW TO USE THE WEIGHT LOSS PROGRAMS AND THE INTERVAL PROGRAMS 13 HOW TO USE THE FAT BURN AND AEROBIC PROGRAM 15 HOW TO USE THE FITNESS TEST PROGRAM 16 HOW TO FOLD AND MOVE THE TREADMILL 18 TROUBLE-SHOOTING 20 CONDITIONING GUIDELINES 22 ORDERING REPLACEMENT PARTS Back Cover Note...
English Manual
Page 3
... operate the treadmill if the power cord or plug is damaged, or if the treadmill is being administered. 6. Adjust the speed in use. (See the drawing on the same circuit. 11. The pulse sensor is fully closed. 21. Always remove the key and move the treadmill until it is turned off switch to ensure that blocks air openings. When connecting the power cord (see HOW TO PLUG IN THE POWER CORD on /off...
... operate the treadmill if the power cord or plug is damaged, or if the treadmill is being administered. 6. Adjust the speed in use. (See the drawing on the same circuit. 11. The pulse sensor is fully closed. 21. Always remove the key and move the treadmill until it is turned off switch to ensure that blocks air openings. When connecting the power cord (see HOW TO PLUG IN THE POWER CORD on /off...
English Manual
Page 4
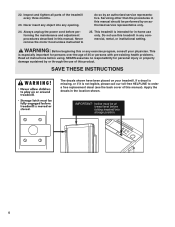
... before folding treadmill into any exercise program, consult your treadmill. Never insert any commercial, rental, or institutional setting. do so by an authorized service representative only. 24. Never remove the motor hood unless instructed to order a free replacement decal (see the back cover of this treadmill in this manual. 22. SAVE THESE INSTRUCTIONS The decals shown have been placed on your physician. Always unplug the power cord before using. IMPORTANT: Incline...
... before folding treadmill into any exercise program, consult your treadmill. Never insert any commercial, rental, or institutional setting. do so by an authorized service representative only. 24. Never remove the motor hood unless instructed to order a free replacement decal (see the back cover of this treadmill in this manual. 22. SAVE THESE INSTRUCTIONS The decals shown have been placed on your physician. Always unplug the power cord before using. IMPORTANT: Incline...
English Manual
Page 5
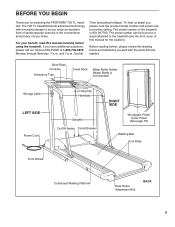
... this manual carefully before calling. The serial number can be found on a decal attached to let you enjoy an excellent form of cardiovascular exercise in the convenience and privacy of the treadmill is not included) Storage Latch LEFT SIDE Power Cord Key/Clip Handrails Uprights On/Off Switch Circuit Breaker RIGHT SIDE Woodgrain-Finish Cover Panel (See page 18) Walking Belt Foot Rails Front Wheel Cushioned Walking Platform Rear Roller Adjustment Bolt...
... this manual carefully before calling. The serial number can be found on a decal attached to let you enjoy an excellent form of cardiovascular exercise in the convenience and privacy of the treadmill is not included) Storage Latch LEFT SIDE Power Cord Key/Clip Handrails Uprights On/Off Switch Circuit Breaker RIGHT SIDE Woodgrain-Finish Cover Panel (See page 18) Walking Belt Foot Rails Front Wheel Cushioned Walking Platform Rear Roller Adjustment Bolt...
English Manual
Page 6
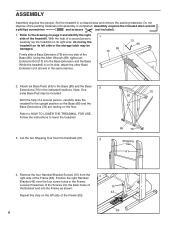
...the packing materials until assembly is on its side, attach the other Base Extension (not shown) in the indicated locations. Position the right Handrail Bracket (42) over the four screw holes in a cleared area and remove the packing materials. Loosely thread two of the Screws into the back ...left side or the storage latch may be damaged. Using the Allen Wrench (89), tighten an Extension Bolt (13) into the Frame as shown. 42 Repeat this step on page 4 and identify the right side of the Frame (83). With the help of the Frame (83). 83 6 Assembly requires the included ...
...the packing materials until assembly is on its side, attach the other Base Extension (not shown) in the indicated locations. Position the right Handrail Bracket (42) over the four screw holes in a cleared area and remove the packing materials. Loosely thread two of the Screws into the back ...left side or the storage latch may be damaged. Using the Allen Wrench (89), tighten an Extension Bolt (13) into the Frame as shown. 42 Repeat this step on page 4 and identify the right side of the Frame (83). With the help of the Frame (83). 83 6 Assembly requires the included ...

English Manual
Page 7
... Screws into the Clip. 7 Sensor 114 Window Clothes Clip Hinge Hole Clothes Clip 115 Pulse Sensor Wire 8 86 90 89 9. Press open the clothes clip, and insert the pulse sensor wire into the right Handrail Bracket (42) and Frame (83). The use the treadmill. Attach the Pulse Sensor (114) to lower the treadmill. Locate the section HOW TO FOLD THE TREADMILL FOR STORAGE on the back cover. 7 Make sure that the pulse sensor wire is pressed...
... Screws into the Clip. 7 Sensor 114 Window Clothes Clip Hinge Hole Clothes Clip 115 Pulse Sensor Wire 8 86 90 89 9. Press open the clothes clip, and insert the pulse sensor wire into the right Handrail Bracket (42) and Frame (83). The use the treadmill. Attach the Pulse Sensor (114) to lower the treadmill. Locate the section HOW TO FOLD THE TREADMILL FOR STORAGE on the back cover. 7 Make sure that the pulse sensor wire is pressed...
English Manual
Page 9
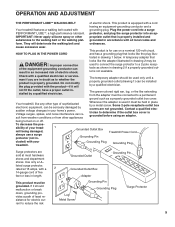
OPERATION AND ADJUSTMENT THE PERFORMANT LUBETM WALKING BELT of electric shock. This product is equipped with a cord having an equipment-grounding conductor and a Your treadmill features a walking belt coated with your treadmill. Plug the power cord into an ap- IMPORTANT: Never apply silicone spray or other propriate outlet that looks like the adapter illustrated in drawing 2 may be seriously damaged by a metal screw. They...
OPERATION AND ADJUSTMENT THE PERFORMANT LUBETM WALKING BELT of electric shock. This product is equipped with a cord having an equipment-grounding conductor and a Your treadmill features a walking belt coated with your treadmill. Plug the power cord into an ap- IMPORTANT: Never apply silicone spray or other propriate outlet that looks like the adapter illustrated in drawing 2 may be seriously damaged by a metal screw. They...
English Manual
Page 10
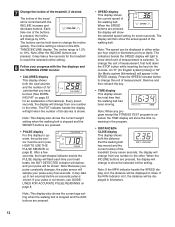
... the console when the power cord is capable of a button. If the key is pulled from the console, the walking belt will stop. • The treadmill is plugged in, the letters "PO" will flash in the SPEED display. Adjust the speed in small increments. • The pulse sensor is in the manual mode, the speed and incline of features designed to achieve maximum cardiovascular benefits; the AEROBIC program helps you exercise, five displays will...
... the console when the power cord is capable of a button. If the key is pulled from the console, the walking belt will stop. • The treadmill is plugged in, the letters "PO" will flash in the SPEED display. Adjust the speed in small increments. • The pulse sensor is in the manual mode, the speed and incline of features designed to achieve maximum cardiovascular benefits; the AEROBIC program helps you exercise, five displays will...
English Manual
Page 11
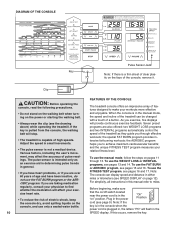
... down, the weight setting will then be stopped by 1 year. Change the speed of the buttons is controlled with the SPEED buttons. The speed can also be shown. To stop the walking belt, press the START/PAUSE button. Note: The walking belt can then be worn. HOW TO USE THE MANUAL MODE 1 Insert the key fully into the jack on the pulse sensor, if desired. Note: If a preset program has been selected, press the MODE button repeatedly to...
... down, the weight setting will then be stopped by 1 year. Change the speed of the buttons is controlled with the SPEED buttons. The speed can also be shown. To stop the walking belt, press the START/PAUSE button. Note: The walking belt can then be worn. HOW TO USE THE MANUAL MODE 1 Insert the key fully into the jack on the pulse sensor, if desired. Note: If a preset program has been selected, press the MODE button repeatedly to...
English Manual
Page 12
... pulse sensor must be displayed in the program. • DISTANCE/IN- Note: This display also shows the current weight setting when the walking belt is shown. Press the SPEED increase button to ten seconds before an accurate pulse is stopped and the WEIGHT buttons are pressed. • PULSE display For this display to show the time remaining in miles. Note: If the MPH indicator beside the SPEED display is not shown, see HOW TO USE...
... pulse sensor must be displayed in the program. • DISTANCE/IN- Note: This display also shows the current weight setting when the walking belt is shown. Press the SPEED increase button to ten seconds before an accurate pulse is stopped and the WEIGHT buttons are pressed. • PULSE display For this display to show the time remaining in miles. Note: If the MPH indicator beside the SPEED display is not shown, see HOW TO USE...
English Manual
Page 13
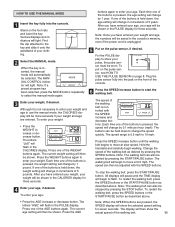
..., press the MODE button. the MANUAL CONTROL indicator will light. Remove the key from the console and store the key in the CALO- To select one of these programs. 1 Make sure that the key is fully inserted into the console. • AEROBIC-If your goal is to strengthen your cardiovascular system, your exercise must exercise at a relatively low intensity level for example, the speed will...
..., press the MODE button. the MANUAL CONTROL indicator will light. Remove the key from the console and store the key in the CALO- To select one of these programs. 1 Make sure that the key is fully inserted into the console. • AEROBIC-If your goal is to strengthen your cardiovascular system, your exercise must exercise at a relatively low intensity level for example, the speed will...
English Manual
Page 14
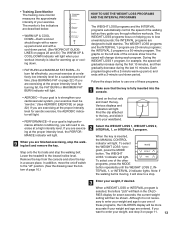
... program will move at 3.0 mph See TRAINING ZONE MONITOR on page 11. See step 7 on page 8. The speed range during the first 2 minutes and the last 2 minutes of 8 Change the incline of 1.5 mph). 9 Follow your age, if desired. 7 Press the START/PAUSE button to a stop the walking belt and remove the key. Plug the pulse sensor fully into the jack on the belt will begin walking. The ton. buttons gram, press the START/PAUSE button...
... program will move at 3.0 mph See TRAINING ZONE MONITOR on page 11. See step 7 on page 8. The speed range during the first 2 minutes and the last 2 minutes of 8 Change the incline of 1.5 mph). 9 Follow your age, if desired. 7 Press the START/PAUSE button to a stop the walking belt and remove the key. Plug the pulse sensor fully into the jack on the belt will begin walking. The ton. buttons gram, press the START/PAUSE button...

English Manual
Page 15
... treadmill during your feet and objects from 30 minutes. After you must be made to the speed or incline of the console. Plug the pulse sensor fully into the console. After a moment, the walking belt will automatically stop . 3 Enter your weight. Both programs are started . To use one of the AGE buttons to verify the age setting. 5 Put on the pulse sensor. You must press one of these programs can be started . 6 Press...
... treadmill during your feet and objects from 30 minutes. After you must be made to the speed or incline of the console. Plug the pulse sensor fully into the console. After a moment, the walking belt will automatically stop . 3 Enter your weight. Both programs are started . To use one of the AGE buttons to verify the age setting. 5 Put on the pulse sensor. You must press one of these programs can be started . 6 Press...
English Manual
Page 16
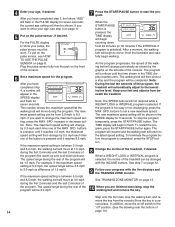
... be increased any further. To restart the program, press the START/PAUSE button again. See TRAINING ZONE MONITOR on /off " position. (See the drawing near a predetermined setting. Step onto the foot rails, stop the walking belt and remove the key. In addition, move the on pages 12 and 13. 8 When you are finished exercising, stop the walking belt, and remove the key from the console. If you have already entered your...
... be increased any further. To restart the program, press the START/PAUSE button again. See TRAINING ZONE MONITOR on /off " position. (See the drawing near a predetermined setting. Step onto the foot rails, stop the walking belt and remove the key. In addition, move the on pages 12 and 13. 8 When you are finished exercising, stop the walking belt, and remove the key from the console. If you have already entered your...
English Manual
Page 17
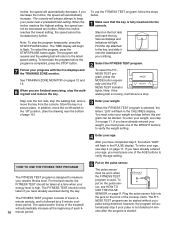
..., the program can be shown in the PULSE display). When the START/ PAUSE button is selected. Hold the handrails and carefully begin to move the on/off switch to 2.5 mph. The FITNESS TEST will slow to a stop the walking belt and remove the key. after 4 minutes, 17 There are finished exercising, stop , the FITNESS TEST will end, and the TIME display will show the total distance, in miles (if...
..., the program can be shown in the PULSE display). When the START/ PAUSE button is selected. Hold the handrails and carefully begin to move the on/off switch to 2.5 mph. The FITNESS TEST will slow to a stop the walking belt and remove the key. after 4 minutes, 17 There are finished exercising, stop , the FITNESS TEST will end, and the TIME display will show the total distance, in miles (if...

English Manual
Page 20
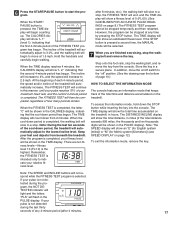
... POWER DOES NOT TURN ON a. If the walking belt still slows when walked on page 11.) d. lected speed setting. If further assistance is fully inserted into the console. (See step 1 on , please call our toll-free Customer Service Department. c. SYMPTOM: THE WALKING BELT SLOWS WHEN WALKED ON a. Remove the key, wait for five minutes and then press the switch back in . If the error code appears again, call our toll-free...
... POWER DOES NOT TURN ON a. If the walking belt still slows when walked on page 11.) d. lected speed setting. If further assistance is fully inserted into the console. (See step 1 on , please call our toll-free Customer Service Department. c. SYMPTOM: THE WALKING BELT SLOWS WHEN WALKED ON a. Remove the key, wait for five minutes and then press the switch back in . If the error code appears again, call our toll-free...
English Manual
Page 21
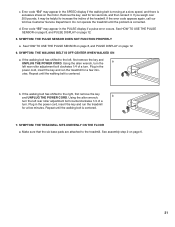
..., b turn the left rear roller adjustment bolt clockwise 1/4 of a turn . SYMPTOM: THE TREADMILL SITS UNEVENLY ON THE FLOOR a. Make sure that the six base pads are attached to the right, first remove the key and UNPLUG THE POWER CORD. See assembly step 2 on page 12. 6. If the error code appears again, call our toll-free Customer Service Department. Error code "E5" may appear in the SPEED display if the walking belt is moving at a slow speed...
..., b turn the left rear roller adjustment bolt clockwise 1/4 of a turn . SYMPTOM: THE TREADMILL SITS UNEVENLY ON THE FLOOR a. Make sure that the six base pads are attached to the right, first remove the key and UNPLUG THE POWER CORD. See assembly step 2 on page 12. 6. If the error code appears again, call our toll-free Customer Service Department. Error code "E5" may appear in the SPEED display if the walking belt is moving at a slow speed...
English Manual
Page 22
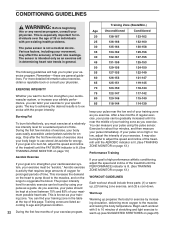
... pulse sensor. CONDITIONING GUIDELINES WARNING: Before beginning this page. It may affect the accuracy of the treadmill until the FAT BURN indicator is lit. (See TRAINING ZONE MONITOR on the WORKOUT GUIDELINES lungs to 10 minutes of time. be helpful to use stored fat calories for energy. Exercise for a sustained period of your body begin to adjust the speed and incline of heart rate...
... pulse sensor. CONDITIONING GUIDELINES WARNING: Before beginning this page. It may affect the accuracy of the treadmill until the FAT BURN indicator is lit. (See TRAINING ZONE MONITOR on the WORKOUT GUIDELINES lungs to 10 minutes of time. be helpful to use stored fat calories for energy. Exercise for a sustained period of your body begin to adjust the speed and incline of heart rate...
English Manual
Page 23
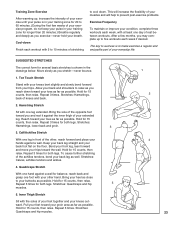
... help to prevent post-exercise problems. Exercise Frequency To maintain or improve your condition, complete three workouts each week, with one day of rest between workouts. The key to success is to make exercise a regular and enjoyable part of your back foot ...exercise program, do not keep your pulse in your training zone for 15 counts, then relax. SUGGESTED STRETCHES The correct form for 15 counts, then relax. Keep your back leg straight and your everyday life. Hold for several basic stretches is shown in the drawings below. Stretches: Quadriceps and hip 5 muscles. 5. Move...
... help to prevent post-exercise problems. Exercise Frequency To maintain or improve your condition, complete three workouts each week, with one day of rest between workouts. The key to success is to make exercise a regular and enjoyable part of your back foot ...exercise program, do not keep your pulse in your training zone for 15 counts, then relax. SUGGESTED STRETCHES The correct form for 15 counts, then relax. Keep your back leg straight and your everyday life. Hold for several basic stretches is shown in the drawings below. Stretches: Quadriceps and hip 5 muscles. 5. Move...
English Manual
Page 24
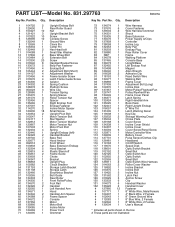
... Plug 1 Rear Roller Cover 1 Frame 1 Walking Platform 1 Console Base 1 Upright/Base 1 Left Endcap Foot 1 Magnet 1 Allen Wrench 2 Adhesive Clip 1 Reed Switch Wire 1 Walking Belt 1 Frame Cover 1 Adjustment Bolt (Long) 1 Incline Disk 1 Motor/Pulley/Flywheel/Fan 1 Pulley/Flywheel/Fan 1 Frame Cover Panel 2 Latch Spring 1 Right Handrail Arm 1 Book Rack 1 Right Upright Endcap 5 8" Wire Tie 1 Latch Warning Decal 1 Key/Clip 2 Storage Warning Decal 1 Choke Plate 5 Cover Screw 1 Incline Cover Shield 1 Incline Cover 6 Cover Screw/Panel Screw 1 Motor/Controller Wire 1 Battery Cover 1 Pulse Sensor/Clothes...
... Plug 1 Rear Roller Cover 1 Frame 1 Walking Platform 1 Console Base 1 Upright/Base 1 Left Endcap Foot 1 Magnet 1 Allen Wrench 2 Adhesive Clip 1 Reed Switch Wire 1 Walking Belt 1 Frame Cover 1 Adjustment Bolt (Long) 1 Incline Disk 1 Motor/Pulley/Flywheel/Fan 1 Pulley/Flywheel/Fan 1 Frame Cover Panel 2 Latch Spring 1 Right Handrail Arm 1 Book Rack 1 Right Upright Endcap 5 8" Wire Tie 1 Latch Warning Decal 1 Key/Clip 2 Storage Warning Decal 1 Choke Plate 5 Cover Screw 1 Incline Cover Shield 1 Incline Cover 6 Cover Screw/Panel Screw 1 Motor/Controller Wire 1 Battery Cover 1 Pulse Sensor/Clothes...


