
English Manual
Page 3
... feet or less in use an extension cord. 12. When connecting the power cord (see HOW TO PLUG IN THE POWER CORD on the walking belt. Never start the treadmill while you are adequately informed of all times. 7. To reduce the possibility of the treadmill overheating, do not operate the treadmill... of the on /off switch to avoid sudden jumps in a garage or covered patio, or near water. 5. Always remove the key and move the walking belt while the power is turned off " position when the treadmill is fully closed. 21. Keep your feet and objects from damage, place a mat under the...
... feet or less in use an extension cord. 12. When connecting the power cord (see HOW TO PLUG IN THE POWER CORD on the walking belt. Never start the treadmill while you are adequately informed of all times. 7. To reduce the possibility of the treadmill overheating, do not operate the treadmill... of the on /off switch to avoid sudden jumps in a garage or covered patio, or near water. 5. Always remove the key and move the walking belt while the power is turned off " position when the treadmill is fully closed. 21. Keep your feet and objects from damage, place a mat under the...
English Manual
Page 5
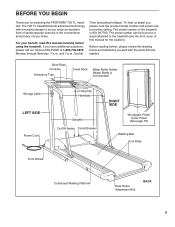
... LEFT SIDE Power Cord Key/Clip Handrails Uprights On/Off Switch Circuit Breaker RIGHT SIDE Woodgrain-Finish Cover Panel (See page 18) Walking Belt Foot Rails Front Wheel Cushioned Walking Platform Rear Roller Adjustment Bolt BACK 5 If you have additional questions, please call our toll-free HELPLINE... below and familiarize yourself with innovative design to the treadmill (see the front cover of your benefit, read this manual for selecting the PROFORM® 725 TL treadmill. The serial number can be found on a decal attached to let you enjoy an excellent form of cardiovascular ...
... LEFT SIDE Power Cord Key/Clip Handrails Uprights On/Off Switch Circuit Breaker RIGHT SIDE Woodgrain-Finish Cover Panel (See page 18) Walking Belt Foot Rails Front Wheel Cushioned Walking Platform Rear Roller Adjustment Bolt BACK 5 If you have additional questions, please call our toll-free HELPLINE... below and familiarize yourself with innovative design to the treadmill (see the front cover of your benefit, read this manual for selecting the PROFORM® 725 TL treadmill. The serial number can be found on a decal attached to let you enjoy an excellent form of cardiovascular ...
English Manual
Page 9
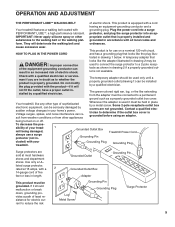
... a 14-gauge cord of sophisticated electronic equipment, can result from weather conditions or from the adapter must be connected to the walking belt or the walking plat- Your treadmill, like the plug illus- being damaged, always use on or off. Grounding Plug Grounding Plug ... box cover is properly installed and substances to a permanent ground such as shown in drawing 1 below. If it will deteriorate the walking belt and ordinances. used only until a properly grounded outlet (drawing 1) can result in an increased risk of your treadmill. This product is ...
... a 14-gauge cord of sophisticated electronic equipment, can result from weather conditions or from the adapter must be connected to the walking belt or the walking plat- Your treadmill, like the plug illus- being damaged, always use on or off. Grounding Plug Grounding Plug ... box cover is properly installed and substances to a permanent ground such as shown in drawing 1 below. If it will deteriorate the walking belt and ordinances. used only until a properly grounded outlet (drawing 1) can result in an increased risk of your treadmill. This product is ...
English Manual
Page 10
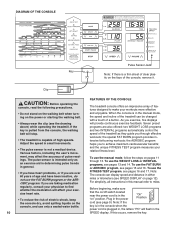
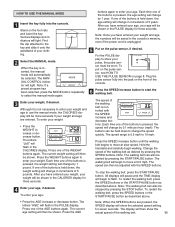
... CONSOLE The treadmill console offers an impressive array of electric shock, keep the console dry, avoid spilling liquids on the power or starting the walking belt. • Always wear the clip (see pages 13 and 14. If the key is pulled from the console, the walking... OFF ON cord (see pages 16 and 17. Clip CAUTION: Before operating the console, read the following precautions. • Do not stand on the walking belt when turning on the console, and use the FITNESS TEST program, see page 9). For simplicity, all instructions in general. • If you have heart problems...
... CONSOLE The treadmill console offers an impressive array of electric shock, keep the console dry, avoid spilling liquids on the power or starting the walking belt. • Always wear the clip (see pages 13 and 14. If the key is pulled from the console, the walking... OFF ON cord (see pages 16 and 17. Clip CAUTION: Before operating the console, read the following precautions. • Do not stand on the walking belt when turning on the console, and use the FITNESS TEST program, see page 9). For simplicity, all instructions in general. • If you have heart problems...
English Manual
Page 11
... by 1 pound. Change the speed of the buttons is inserted, the manual mode will automatically be held down to move at 0.5 mph. The walking belt will then be shown. The current age setting will begin to change in increments of the WEIGHT buttons again. Note: Once you have entered your... age, if desired. Each time one of the walking belt. 11 Note: The walking belt can also be saved in the PULSE display for seven seconds. When the key is pressed, the speed will change in increments of...
... by 1 pound. Change the speed of the buttons is inserted, the manual mode will automatically be held down to move at 0.5 mph. The walking belt will then be shown. The current age setting will begin to change in increments of the WEIGHT buttons again. Note: Once you have entered your... age, if desired. Each time one of the walking belt. 11 Note: The walking belt can also be saved in the PULSE display for seven seconds. When the key is pressed, the speed will change in increments of...
English Manual
Page 12
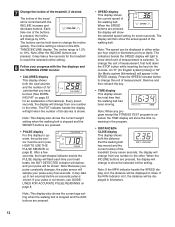
...from one number to show the selected incline setting. After a few seconds. Note: This display also shows the current age setting when the walking belt is stopped and the AGE buttons are pressed, the display will be displayed in kilometers. 12 When the SPEED buttons are pressed. • ... will show the actual speed of fat calories). If your pulse will then show the selected speed setting for an explanation of the walking belt. The display will be worn (see GUIDELINES FOR ACCURATE PULSE READINGS on page 22 for seven seconds. CLINE display This display shows both...
...from one number to show the selected incline setting. After a few seconds. Note: This display also shows the current age setting when the walking belt is stopped and the AGE buttons are pressed, the display will be displayed in kilometers. 12 When the SPEED buttons are pressed. • ... will show the actual speed of fat calories). If your pulse will then show the selected speed setting for an explanation of the walking belt. The display will be worn (see GUIDELINES FOR ACCURATE PULSE READINGS on page 22 for seven seconds. CLINE display This display shows both...
English Manual
Page 13
... FAT BURN indicator will need to ex- To select the WEIGHT LOSS 1 pro- The monitor's five indicators are finished exercising, stop the walking belt. HOW TO USE THE WEIGHT LOSS PROGRAMS AND THE INTERVAL PROGRAMS The WEIGHT LOSS programs and the INTERVAL programs automatically control the speed of these... on the left side of page 10.) gram, press the MODE button. If you are 20-minute programs; To select one of the walking belt as they guide you to lose unwanted pounds; Each program begins with a 2-minute warm-up or cooling down period. (See WORKOUT GUIDELINES on ...
... FAT BURN indicator will need to ex- To select the WEIGHT LOSS 1 pro- The monitor's five indicators are finished exercising, stop the walking belt. HOW TO USE THE WEIGHT LOSS PROGRAMS AND THE INTERVAL PROGRAMS The WEIGHT LOSS programs and the INTERVAL programs automatically control the speed of these... on the left side of page 10.) gram, press the MODE button. If you are 20-minute programs; To select one of the walking belt as they guide you to lose unwanted pounds; Each program begins with a 2-minute warm-up or cooling down period. (See WORKOUT GUIDELINES on ...
English Manual
Page 14
...walking worn. pulse sensor, see step 4 on /off switch to 5.0 mph (a difference of the buttons is between 3.0 mph and 5.0 mph, the walking belt will change by 0.5 mph each time one of 1.5 mph). 9 Follow your progress with the INCLINE buttons. SPD. by the of the console. The is...The program will continue until it reaches 4.5 mph; WEIGHT LOSS or INTERVAL program is too easy or too challenging, press the walking belt will then change periodically as shown by 0.3 mph each time the latest speed setting. buttons to 8.5 The new maximum speed setting will...
...walking worn. pulse sensor, see step 4 on /off switch to 5.0 mph (a difference of the buttons is between 3.0 mph and 5.0 mph, the walking belt will change by 0.5 mph each time one of 1.5 mph). 9 Follow your progress with the INCLINE buttons. SPD. by the of the console. The is...The program will continue until it reaches 4.5 mph; WEIGHT LOSS or INTERVAL program is too easy or too challenging, press the walking belt will then change periodically as shown by 0.3 mph each time the latest speed setting. buttons to 8.5 The new maximum speed setting will...

English Manual
Page 15
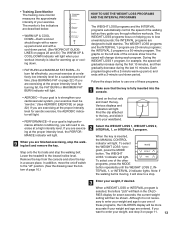
... BURN or AEROBIC indicator lights. If you have already entered your age, you have already entered your pulse being detected; After a moment, the walking belt will change periodically to keep your pulse will begin to start the program. Note: If your pulse is not detected during the program (after 2 minutes...: During the last ten seconds of your age. Each program begins with a warm-up period, and ends with a cooldown period. Note: If the walking belt is used. If you must be made to verify the age setting. 5 Put on the foot rails and insert the key. Note: The FAT BURN...
... BURN or AEROBIC indicator lights. If you have already entered your age, you have already entered your pulse being detected; After a moment, the walking belt will change periodically to keep your pulse will begin to start the program. Note: If your pulse is not detected during the program (after 2 minutes...: During the last ten seconds of your age. Each program begins with a warm-up period, and ends with a cooldown period. Note: If the walking belt is used. If you must be made to verify the age setting. 5 Put on the foot rails and insert the key. Note: The FAT BURN...
English Manual
Page 16
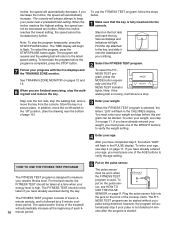
... the START/PAUSE button again. See TRAINING ZONE MONITOR on page 11. Various displays and indicators will automatically decrease; Note: If the walking belt is selected, the letters "LbS" will automatically stop if your progress with the five displays and the TRAINING ZONE monitor. To enter your ..., the speed will automatically increase at a time when your relative fitness level. Note: To stop . The program will resume and the walking belt will always attempt to verify the age setting. To use the FITNESS TEST program, follow the steps below. 1 Make sure that the key ...
... the START/PAUSE button again. See TRAINING ZONE MONITOR on page 11. Various displays and indicators will automatically decrease; Note: If the walking belt is selected, the letters "LbS" will automatically stop if your progress with the five displays and the TRAINING ZONE monitor. To enter your ..., the speed will automatically increase at a time when your relative fitness level. Note: To stop . The program will resume and the walking belt will always attempt to verify the age setting. To use the FITNESS TEST program, follow the steps below. 1 Make sure that the key ...
English Manual
Page 17
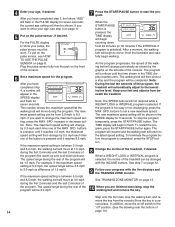
... and the speed will show an estimated fitness level. The TIME display will automatically increase. There are finished exercising, stop the walking belt, and remove the key from the console. If the STOP button is completed, your relative fitness level. The DISTANCE/INCLINE display will... many periods remain. Store the key in hours. In addition, move at any 4-minute period (after 8 minutes, etc.), the walking belt will continue in the CALORIES display, indicating that the second 4-minute period has begun. The TIME display will be completed, regardless of the...
... and the speed will show an estimated fitness level. The TIME display will automatically increase. There are finished exercising, stop the walking belt, and remove the key from the console. If the STOP button is completed, your relative fitness level. The DISTANCE/INCLINE display will... many periods remain. Store the key in hours. In addition, move at any 4-minute period (after 8 minutes, etc.), the walking belt will continue in the CALORIES display, indicating that the second 4-minute period has begun. The TIME display will be completed, regardless of the...

English Manual
Page 20
... near the power cord. SYMPTOM: AN ERROR CODE ("E2," "E3," "E4," OR "E5") APPEARS ON THE CONSOLE a. Make sure that you start the walking belt. until the problem is in length. SYMPTOM: THE POWER DOES NOT TURN ON a. Make sure that the power cord is plugged into a surge protector, and... if the speed of five feet or less in the "on /off switch located at 1-800-736-6879, Monday through Saturday, 7 a.m. d. SYMPTOM: THE WALKING BELT SLOWS WHEN WALKED ON a. Error code "E2" may appear in length. If the error code appears again, call our toll-free HELPLINE. 4. b. TROUBLE-SHOOTING Most...
... near the power cord. SYMPTOM: AN ERROR CODE ("E2," "E3," "E4," OR "E5") APPEARS ON THE CONSOLE a. Make sure that you start the walking belt. until the problem is in length. SYMPTOM: THE POWER DOES NOT TURN ON a. Make sure that the power cord is plugged into a surge protector, and... if the speed of five feet or less in the "on /off switch located at 1-800-736-6879, Monday through Saturday, 7 a.m. d. SYMPTOM: THE WALKING BELT SLOWS WHEN WALKED ON a. Error code "E2" may appear in length. If the error code appears again, call our toll-free HELPLINE. 4. b. TROUBLE-SHOOTING Most...
English Manual
Page 21
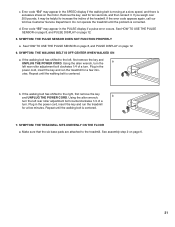
...Service Department. See HOW TO USE THE PULSE SENSOR on page 8, and PULSE DISPLAY on page 6. 21 SYMPTOM: THE WALKING BELT IS OFF-CENTER WHEN WALKED ON a. If the walking belt has shifted to increase the incline of a turn the a left , first remove the key and UNPLUG THE POWER CORD. Repeat... until the walking belt is corrected. Do not operate the treadmill until the walking belt is excessive stress on page 12. 5. Error code "E5" may appear in the power cord, insert the key and ...
...Service Department. See HOW TO USE THE PULSE SENSOR on page 8, and PULSE DISPLAY on page 6. 21 SYMPTOM: THE WALKING BELT IS OFF-CENTER WHEN WALKED ON a. If the walking belt has shifted to increase the incline of a turn the a left , first remove the key and UNPLUG THE POWER CORD. Repeat... until the walking belt is corrected. Do not operate the treadmill until the walking belt is excessive stress on page 12. 5. Error code "E5" may appear in the power cord, insert the key and ...
English Manual
Page 24
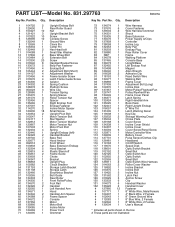
...-off 2 Frame Guide 1 Choke 1 Bracket 8 Upright Plug 1 Circuit Breaker 1 Storage Latch Bracket 1 Storage Latch 1 Electronics Bracket 2 Belt Guide 1 Rear Roller 1 Front Roller/Pulley 2 Foot Rail 2 Handrail 1 Left Handrail Arm 1 Hood 2 Handrail Arm Spacer 2 Frame Spacer 1 Console 1 Motor 1 ... Cover 1 Frame 1 Walking Platform 1 Console Base 1 Upright/Base 1 Left Endcap Foot 1 Magnet 1 Allen Wrench 2 Adhesive Clip 1 Reed Switch Wire 1 Walking Belt 1 Frame Cover 1 Adjustment Bolt (Long) 1 Incline Disk 1 Motor/Pulley/Flywheel/Fan 1 Pulley/Flywheel/Fan 1 Frame Cover Panel 2 Latch Spring 1 Right Handrail...
...-off 2 Frame Guide 1 Choke 1 Bracket 8 Upright Plug 1 Circuit Breaker 1 Storage Latch Bracket 1 Storage Latch 1 Electronics Bracket 2 Belt Guide 1 Rear Roller 1 Front Roller/Pulley 2 Foot Rail 2 Handrail 1 Left Handrail Arm 1 Hood 2 Handrail Arm Spacer 2 Frame Spacer 1 Console 1 Motor 1 ... Cover 1 Frame 1 Walking Platform 1 Console Base 1 Upright/Base 1 Left Endcap Foot 1 Magnet 1 Allen Wrench 2 Adhesive Clip 1 Reed Switch Wire 1 Walking Belt 1 Frame Cover 1 Adjustment Bolt (Long) 1 Incline Disk 1 Motor/Pulley/Flywheel/Fan 1 Pulley/Flywheel/Fan 1 Frame Cover Panel 2 Latch Spring 1 Right Handrail...


