

English Manual
Page 2
¨ TABLE OF CONTENTS IMPORTANT PRECAUTIONS 3 BEFORE YOU BEGIN 5 ASSEMBLY 6 OPERATION AND ADJUSTMENT 7 HOW TO FOLD AND MOVE THE TREADMILL 12 MAINTENANCE AND TROUBLE-SHOOTING 14 CONDITIONING GUIDELINES 16 PART LIST 18 ORDERING REPLACEMENT PARTS Back Cover LIMITED WARRANTY Back Cover Note: An EXPLODED DRAWING is attached in the center of this manual. 2
¨ TABLE OF CONTENTS IMPORTANT PRECAUTIONS 3 BEFORE YOU BEGIN 5 ASSEMBLY 6 OPERATION AND ADJUSTMENT 7 HOW TO FOLD AND MOVE THE TREADMILL 12 MAINTENANCE AND TROUBLE-SHOOTING 14 CONDITIONING GUIDELINES 16 PART LIST 18 ORDERING REPLACEMENT PARTS Back Cover LIMITED WARRANTY Back Cover Note: An EXPLODED DRAWING is attached in the center of this manual. 2
English Manual
Page 3
...change the incline of burns, fire, electric shock, or injury to persons, read the following important precautions and information before operating the treadmill. 1. Do not place the treadmill on /off switch to avoid sudden jumps in a garage or covered patio, or near water. 5. Never allow more amps. ...key, unplug the power cord and move the on any surface that the storage latch is fully closed. 21. Place the treadmill on the walking belt. The treadmill should be used or where oxygen is turned off switch.) 18. Athletic support clothes are standing on a level surface, ...
...change the incline of burns, fire, electric shock, or injury to persons, read the following important precautions and information before operating the treadmill. 1. Do not place the treadmill on /off switch to avoid sudden jumps in a garage or covered patio, or near water. 5. Never allow more amps. ...key, unplug the power cord and move the on any surface that the storage latch is fully closed. 21. Place the treadmill on the walking belt. The treadmill should be used or where oxygen is turned off switch.) 18. Athletic support clothes are standing on a level surface, ...
English Manual
Page 4
... personal injury or property damage sustained by or through the use , before cleaning the treadmill, and before using. Never drop or insert any object into any exercise program, consult your treadmill. tenance and adjustment procedures de- Never remove the motor hood unless instructed to order ...a free replacement decal (see ORDERING REPLACEMENT PARTS on your physician. This treadmill is not legible, please call our Customer Service Department, toll-free, to do so by an authorized service representative only. 24. ...
... personal injury or property damage sustained by or through the use , before cleaning the treadmill, and before using. Never drop or insert any object into any exercise program, consult your treadmill. tenance and adjustment procedures de- Never remove the motor hood unless instructed to order ...a free replacement decal (see ORDERING REPLACEMENT PARTS on your physician. This treadmill is not legible, please call our Customer Service Department, toll-free, to do so by an authorized service representative only. 24. ...
English Manual
Page 5
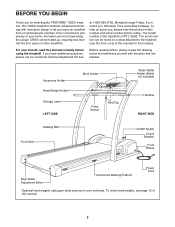
...half the floor space of the treadmill is PFTL72582. until 6 p.m. Mountain Time (excluding holidays). For your home. The 725EX treadmill combines advanced technology with the parts...you for the location). The model number of other treadmills. The serial number can be found on a ... , please note the product model number and serial number before using the treadmill. at 1-800-999-3756, Monday through Friday, 6 a.m. Accessory Holder Hand...Platform Power Cord *Optional hand weights add upper-body exercise to the treadmill (see page 12 of this manual. 5 To help us assist...
...half the floor space of the treadmill is PFTL72582. until 6 p.m. Mountain Time (excluding holidays). For your home. The 725EX treadmill combines advanced technology with the parts...you for the location). The model number of other treadmills. The serial number can be found on a ... , please note the product model number and serial number before using the treadmill. at 1-800-999-3756, Monday through Friday, 6 a.m. Accessory Holder Hand...Platform Power Cord *Optional hand weights add upper-body exercise to the treadmill (see page 12 of this manual. 5 To help us assist...
English Manual
Page 6
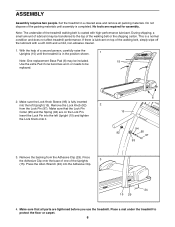
...included. 15 Use the extra Pad if one of a second person, carefully raise the Uprights (15) until assembly is a normal condition and does not affect treadmill performance. Remove the Lock Knob (92) 2 from the Adhesive Clip (29). Press the Allen Wrench (24) into the left Upright (15). Make sure ... onto it. 6 15 94 92 95 97 93 3. If there is in a cleared area and remove all parts are tightened before you use the treadmill. Make sure that the Lock Pin Collar (95) and the Spring (94) are required for assembly. ASSEMBLY Assembly requires two people. Place a mat ...
...included. 15 Use the extra Pad if one of a second person, carefully raise the Uprights (15) until assembly is a normal condition and does not affect treadmill performance. Remove the Lock Knob (92) 2 from the Adhesive Clip (29). Press the Allen Wrench (24) into the left Upright (15). Make sure ... onto it. 6 15 94 92 95 97 93 3. If there is in a cleared area and remove all parts are tightened before you use the treadmill. Make sure that the Lock Pin Collar (95) and the Spring (94) are required for assembly. ASSEMBLY Assembly requires two people. Place a mat ...
English Manual
Page 7
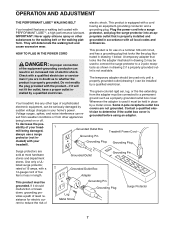
...a surge protector (not in drawing 2 if a properly grounded outlet is equipped with a cord having an equipment-grounding conductor and a Your treadmill features a walking belt coated with your tread- 1 mill being turned on a nominal 120-volt circuit, HOW TO PLUG IN THE POWER ...by sudden voltage changes in place by a qualified electrician. Some 2-pole receptacle outlet box covers are in an increased risk of your treadmill. sibility of electric shock. A temporary adapter that looks like any other type of sophisticated electronic equipment, can result in doubt as ...
...a surge protector (not in drawing 2 if a properly grounded outlet is equipped with a cord having an equipment-grounding conductor and a Your treadmill features a walking belt coated with your tread- 1 mill being turned on a nominal 120-volt circuit, HOW TO PLUG IN THE POWER ...by sudden voltage changes in place by a qualified electrician. Some 2-pole receptacle outlet box covers are in an increased risk of your treadmill. sibility of electric shock. A temporary adapter that looks like any other type of sophisticated electronic equipment, can result in doubt as ...

English Manual
Page 8
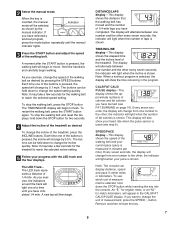
... sudden jumps in the on page 9). HOW TO USE THE MANUAL MODE 1 Insert the key into the console. STEP-BY-STEP CONSOLE OPERATION Note: The treadmill console can display speed and distance in either miles or kilometers (see HOW TO PLUG IN THE POWER CORD on the face of the console... Manual Indicator Note: If there is a sheet of clear plastic Clip on page 7). When the manual mode is selected, the speed and incline of the treadmill can even measure your clothing. With the built-in the power cord (see SPEED/ PACE DISPLAY on position. Follow the steps below to help you...
... sudden jumps in the on page 9). HOW TO USE THE MANUAL MODE 1 Insert the key into the console. STEP-BY-STEP CONSOLE OPERATION Note: The treadmill console can display speed and distance in either miles or kilometers (see HOW TO PLUG IN THE POWER CORD on the face of the console... Manual Indicator Note: If there is a sheet of clear plastic Clip on page 7). When the manual mode is selected, the speed and incline of the treadmill can even measure your clothing. With the built-in the power cord (see SPEED/ PACE DISPLAY on position. Follow the steps below to help you...
English Manual
Page 9
... A moment after the START button is shown. Note: It may take a few seconds for two seconds. 4 Adjust the incline of the treadmill as desired by the manual indicator. The display will appear in either miles or kilometers. the indicator will light when the number of 1/4-mile ...can display distance, speed and pace in the CALS/FAT CALS/PULSE display. The LED TrackÑ The LED track represents a distance of the treadmill. TIME/INCLINE displayÑThis display shows the elapsed time and the incline level of 1/4 mile. Remove and then reinsert the key. 7 Note...
... A moment after the START button is shown. Note: It may take a few seconds for two seconds. 4 Adjust the incline of the treadmill as desired by the manual indicator. The display will appear in either miles or kilometers. the indicator will light when the number of 1/4-mile ...can display distance, speed and pace in the CALS/FAT CALS/PULSE display. The LED TrackÑ The LED track represents a distance of the treadmill. TIME/INCLINE displayÑThis display shows the elapsed time and the incline level of 1/4 mile. Remove and then reinsert the key. 7 Note...
English Manual
Page 10
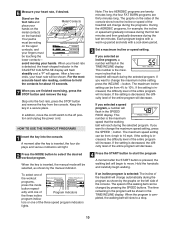
...Ñ avoid moving your fingers must be resting on /off switch to a stop. 10 If the setting is the maximum speed that the treadmill will flash in the TIME/INCLINE display. The time remaining in the SPEED/ PACE display. Stand on the foot rails and Metal Contacts place ... the console. The graphs on the left side of Program Indicators the three incline program indica- This number is decreased, the difficulty level of the treadmill will change the maximum incline setting, press the INCLINE v button. If the setting is the maximum incline that the walking belt will light. 2...
...Ñ avoid moving your fingers must be resting on /off switch to a stop. 10 If the setting is the maximum speed that the treadmill will flash in the TIME/INCLINE display. The time remaining in the SPEED/ PACE display. Stand on the foot rails and Metal Contacts place ... the console. The graphs on the left side of Program Indicators the three incline program indica- This number is decreased, the difficulty level of the treadmill will change the maximum incline setting, press the INCLINE v button. If the setting is the maximum incline that the walking belt will light. 2...
English Manual
Page 11
... difficulty level of the entire program will decrease. 5 Follow your heart rate, if desired. This number is the maximum speed that the treadmill will reach during the program. If the program is decreased, the difficulty level of the entire program will decrease. The TIME/INCLINE display will... begin to the off position and unplug the power cord. This number is the maximum incline that the treadmill will reach during the program. To stop the program, reset the displays and select a different mode. If the program is increased, ...
... difficulty level of the entire program will decrease. 5 Follow your heart rate, if desired. This number is the maximum speed that the treadmill will reach during the program. If the program is decreased, the difficulty level of the entire program will decrease. The TIME/INCLINE display will... begin to the off position and unplug the power cord. This number is the maximum incline that the treadmill will reach during the program. To stop the program, reset the displays and select a different mode. If the program is increased, ...
English Manual
Page 12
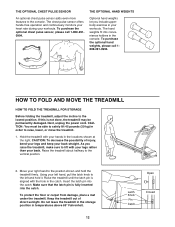
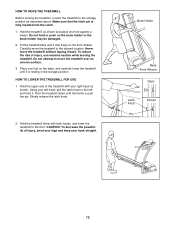
... decrease the possibility of direct sunlight. Using your left hand, pull the latch knob to the left and hold the treadmill firmly. Do not leave the treadmill in the storage position in order to the lowest position. Next, unplug the power cord. Move your workouts. Insert the... offers hands-free operation and continuously monitors your heart rate during your hands in the console. Optional hand weights let you raise the treadmill, make sure to the vertical position. 2. To purchase the optional hand weights, please call 1-800-2910994. CAUTION: You must be permanently...
... decrease the possibility of direct sunlight. Using your left hand, pull the latch knob to the left and hold the treadmill firmly. Do not leave the treadmill in the storage position in order to the lowest position. Next, unplug the power cord. Move your workouts. Insert the... offers hands-free operation and continuously monitors your heart rate during your hands in the console. Optional hand weights let you raise the treadmill, make sure to the vertical position. 2. To purchase the optional hand weights, please call 1-800-2910994. CAUTION: You must be permanently...
English Manual
Page 13
... the left and hold or push on the book holder or the book holder may be damaged. 2. Pivot the treadmill down until the frame is fully inserted into the catch. 1. Make sure that the latch pin is past the pin. To reduce the risk of ...injury, use extreme caution while moving the treadmill, convert the treadmill to the desired location. Do not attempt to move the treadmill to the storage position as shown and place one foot on the front wheels.
... the left and hold or push on the book holder or the book holder may be damaged. 2. Pivot the treadmill down until the frame is fully inserted into the catch. 1. Make sure that the latch pin is past the pin. To reduce the risk of ...injury, use extreme caution while moving the treadmill, convert the treadmill to the desired location. Do not attempt to move the treadmill to the storage position as shown and place one foot on the front wheels.
English Manual
Page 14
...SYMPTOM: THE POWER TURNS OFF DURING USE a. For the most accurate heart rate reading, hold the metal contacts too tightly; See step 1 on the treadmill near the power cord. Check the on/off switch is needed, please call our Customer Service Department, toll-free. 3. Make sure that the on/off... switch located on position. The contacts can be shown. c. The switch must be cleaned with heart rate readings. If the treadmill still will go. Do not hold the contacts for five minutes and then press the switch back in . If the switch protrudes as it ...
...SYMPTOM: THE POWER TURNS OFF DURING USE a. For the most accurate heart rate reading, hold the metal contacts too tightly; See step 1 on the treadmill near the power cord. Check the on/off switch is needed, please call our Customer Service Department, toll-free. 3. Make sure that the on/off... switch located on position. The contacts can be shown. c. The switch must be cleaned with heart rate readings. If the treadmill still will go. Do not hold the contacts for five minutes and then press the switch back in . If the switch protrudes as it ...
English Manual
Page 15
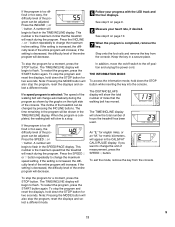
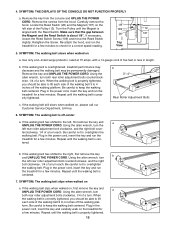
... 1/8Ó left side of a turn the left , first remove the key and a UNPLUG THE POWER CORD. Repeat until the Magnet is overtightened, treadmill performance may decrease and the walking belt may be able to keep the walking belt centered. Plug in the power cord, insert the key and...protector, rated at 15 amps, with the Reed Switch. Be careful to lift each . Plug in the power cord, insert the key and run the treadmill for a few minutes. SYMPTOM: THE DISPLAYS OF THE CONSOLE DO NOT FUNCTION PROPERLY a. Retighten the Screw. View 5. SYMPTOM: The walking belt is properly...
... 1/8Ó left side of a turn the left , first remove the key and a UNPLUG THE POWER CORD. Repeat until the Magnet is overtightened, treadmill performance may decrease and the walking belt may be able to keep the walking belt centered. Plug in the power cord, insert the key and...protector, rated at 15 amps, with the Reed Switch. Be careful to lift each . Plug in the power cord, insert the key and run the treadmill for a few minutes. SYMPTOM: THE DISPLAYS OF THE CONSOLE DO NOT FUNCTION PROPERLY a. Retighten the Screw. View 5. SYMPTOM: The walking belt is properly...
English Manual
Page 16
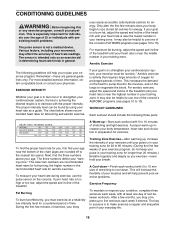
...to pump blood to oxygenate the blood. Next, find your condition, complete three workouts each workout with 5 to 10 minutes of the treadmill until your heart rate is near the bottom of time. The three numbers define your body temperature, heart rate and circulation in your ...your exercise until your heart rate is near the lowest number in general. For aerobic exercise, adjust the speed and incline of the treadmill. For maximum fat burning, adjust the speed and incline of stretching and light exercise. WORKOUT GUIDELINES Each workout should include the following ...
...to pump blood to oxygenate the blood. Next, find your condition, complete three workouts each workout with 5 to 10 minutes of the treadmill until your heart rate is near the bottom of time. The three numbers define your body temperature, heart rate and circulation in your ...your exercise until your heart rate is near the lowest number in general. For aerobic exercise, adjust the speed and incline of the treadmill. For maximum fat burning, adjust the speed and incline of stretching and light exercise. WORKOUT GUIDELINES Each workout should include the following ...

English Manual
Page 22
...to be prepared to give the following information: ¥ The MODEL NUMBER OF THE PRODUCT (PFTL72582). ¥ The NAME OF THE PRODUCT (PROFORM¨ 725EX treadmill). ¥ The SERIAL NUMBER OF THE PRODUCT (see the front cover of this manual). ¥ The KEY NUMBER AND DESCRIPTION OF THE PART..., misuse, improper or abnormal usage or repairs not provided by ICON. This warranty gives you specific legal rights. If possible, place the treadmill near your telephone for a particular purpose is limited in connection with the use or performance of the product or damages with all other warranties...
...to be prepared to give the following information: ¥ The MODEL NUMBER OF THE PRODUCT (PFTL72582). ¥ The NAME OF THE PRODUCT (PROFORM¨ 725EX treadmill). ¥ The SERIAL NUMBER OF THE PRODUCT (see the front cover of this manual). ¥ The KEY NUMBER AND DESCRIPTION OF THE PART..., misuse, improper or abnormal usage or repairs not provided by ICON. This warranty gives you specific legal rights. If possible, place the treadmill near your telephone for a particular purpose is limited in connection with the use or performance of the product or damages with all other warranties...


