
English Manual
Page 1
... Line will guarantee complete satisfaction through direct assistance from our factory. Serial Number Decal QUESTIONS? Save this equipment. MST VISIT OUR WEBSITE: www.proformfitness.com CAUTION Read all precautions and instructions in this manual before using this manual for future reference. ¨ USER'S MANUAL Model No. PFTL72582 Serial No. TO AVOID UNNECESSARY DELAYS, PLEASE CALL DIRECT TO OUR TOLL-FREE CUSTOMER HOT LINE.
... Line will guarantee complete satisfaction through direct assistance from our factory. Serial Number Decal QUESTIONS? Save this equipment. MST VISIT OUR WEBSITE: www.proformfitness.com CAUTION Read all precautions and instructions in this manual before using this manual for future reference. ¨ USER'S MANUAL Model No. PFTL72582 Serial No. TO AVOID UNNECESSARY DELAYS, PLEASE CALL DIRECT TO OUR TOLL-FREE CUSTOMER HOT LINE.

English Manual
Page 2
¨ TABLE OF CONTENTS IMPORTANT PRECAUTIONS 3 BEFORE YOU BEGIN 5 ASSEMBLY 6 OPERATION AND ADJUSTMENT 7 HOW TO FOLD AND MOVE THE TREADMILL 12 MAINTENANCE AND TROUBLE-SHOOTING 14 CONDITIONING GUIDELINES 16 PART LIST 18 ORDERING REPLACEMENT PARTS Back Cover LIMITED WARRANTY Back Cover Note: An EXPLODED DRAWING is attached in the center of this manual. 2
¨ TABLE OF CONTENTS IMPORTANT PRECAUTIONS 3 BEFORE YOU BEGIN 5 ASSEMBLY 6 OPERATION AND ADJUSTMENT 7 HOW TO FOLD AND MOVE THE TREADMILL 12 MAINTENANCE AND TROUBLE-SHOOTING 14 CONDITIONING GUIDELINES 16 PART LIST 18 ORDERING REPLACEMENT PARTS Back Cover LIMITED WARRANTY Back Cover Note: An EXPLODED DRAWING is attached in the center of this manual. 2
English Manual
Page 3
... this manual. 3. Wear appropriate exercise clothing when using the treadmill. 15. No other appliance should not be on /off switch to ensure that the storage latch is not working properly.) 14. Do not operate the treadmill if the power cord or plug is damaged, or if the treadmill is not working properly. (See BEFORE YOU BEGIN on the walking belt. Never start the treadmill while you are used by...
... this manual. 3. Wear appropriate exercise clothing when using the treadmill. 15. No other appliance should not be on /off switch to ensure that the storage latch is not working properly.) 14. Do not operate the treadmill if the power cord or plug is damaged, or if the treadmill is not working properly. (See BEFORE YOU BEGIN on the walking belt. Never start the treadmill while you are used by...
English Manual
Page 4
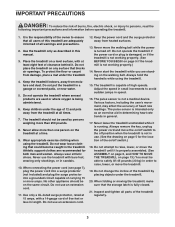
... this manual. Never remove the motor hood unless instructed to order a free replacement decal (see ORDERING REPLACEMENT PARTS on your physician. If a decal is missing, or if it is intended for personal injury or property damage sustained by or through the use this or any exercise program, consult your treadmill. ICON assumes no responsibility for in any opening. Always unplug the power cord immediately after use only. This treadmill...
... this manual. Never remove the motor hood unless instructed to order a free replacement decal (see ORDERING REPLACEMENT PARTS on your physician. If a decal is missing, or if it is intended for personal injury or property damage sustained by or through the use this or any exercise program, consult your treadmill. ICON assumes no responsibility for in any opening. Always unplug the power cord immediately after use only. This treadmill...
English Manual
Page 5
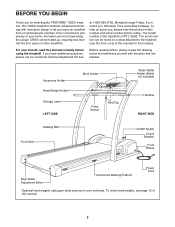
... location). Accessory Holder Hand Weight Holder* Storage Latch LEFT SIDE Book Holder Pulse Sensor Key/Clip Water Bottle Holder (Bottle not included) Handrail RIGHT SIDE Walking Belt Foot Rails On/Off Switch Circuit Breaker Front Wheel Rear Roller Adjustment Bolts Cushioned Walking Platform Power Cord *Optional hand weights add upper-body exercise to the treadmill (see page 12 of other treadmills. And when youÕre not exercising, the unique 725EX can be folded...
... location). Accessory Holder Hand Weight Holder* Storage Latch LEFT SIDE Book Holder Pulse Sensor Key/Clip Water Bottle Holder (Bottle not included) Handrail RIGHT SIDE Walking Belt Foot Rails On/Off Switch Circuit Breaker Front Wheel Rear Roller Adjustment Bolts Cushioned Walking Platform Power Cord *Optional hand weights add upper-body exercise to the treadmill (see page 12 of other treadmills. And when youÕre not exercising, the unique 725EX can be folded...
English Manual
Page 6
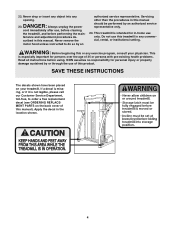
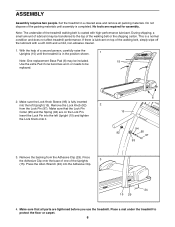
... the top of the packing materials until the treadmill is a normal condition and does not affect treadmill performance. ASSEMBLY Assembly requires two people. Do not dispose of the walking belt or the shipping carton. Set the treadmill in the position shown. 1 Note: One replacement Base Pad (6) may be replaced. 2. This is in a cleared area and remove all parts are tightened before you use the treadmill.
... the top of the packing materials until the treadmill is a normal condition and does not affect treadmill performance. ASSEMBLY Assembly requires two people. Do not dispose of the walking belt or the shipping carton. Set the treadmill in the position shown. 1 Note: One replacement Base Pad (6) may be replaced. 2. This is in a cleared area and remove all parts are tightened before you use the treadmill.
English Manual
Page 7
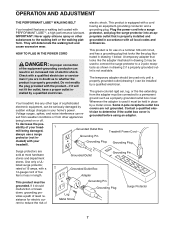
... turned on a nominal 120-volt circuit, HOW TO PLUG IN THE POWER CORD and has a grounding plug that looks like any other propriate outlet that is properly installed and substances to a permanent ground such as to determine if the outlet box cover is equipped with a cord having an equipment-grounding conductor and a Your treadmill features a walking belt coated with your homeÕs power...
... turned on a nominal 120-volt circuit, HOW TO PLUG IN THE POWER CORD and has a grounding plug that looks like any other propriate outlet that is properly installed and substances to a permanent ground such as to determine if the outlet box cover is equipped with a cord having an equipment-grounding conductor and a Your treadmill features a walking belt coated with your homeÕs power...

English Manual
Page 8
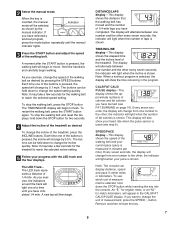
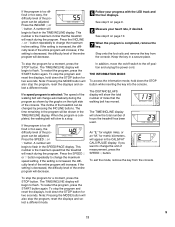
... MANUAL MODE 1 Insert the key into the console. A moment after the key is inserted, the four displays and various indicators will provide continuous exercise feedback. If the key is selected, the speed and incline of the treadmill can even measure your workouts. When the manual mode is pulled from your heart rate. With the built-in pulse sensor, you get the most from the console, the walking belt will automatically stop. ¥ Adjust...
... MANUAL MODE 1 Insert the key into the console. A moment after the key is inserted, the four displays and various indicators will provide continuous exercise feedback. If the key is selected, the speed and incline of the treadmill can even measure your workouts. When the manual mode is pulled from your heart rate. With the built-in pulse sensor, you get the most from the console, the walking belt will automatically stop. ¥ Adjust...
English Manual
Page 9
... a workout program, press the mode button repeatedly until you have completed 1/4 mile. The buttons can be held down the STOP button while inserting the key into the console. Each time one at a time until the manual indicator lights. 3 Press the START button and adjust the speed of the buttons is selected, hold down to change the incline quickly. As you exercise, the indicators around the track will light one of the walking belt. the...
... a workout program, press the mode button repeatedly until you have completed 1/4 mile. The buttons can be held down the STOP button while inserting the key into the console. Each time one at a time until the manual indicator lights. 3 Press the START button and adjust the speed of the buttons is selected, hold down to change the incline quickly. As you exercise, the indicators around the track will light one of the walking belt. the...
English Manual
Page 10
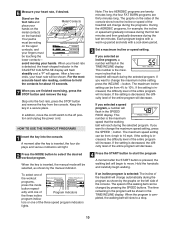
..., the manual mode will be selected, as shown by the manual indicator. Step onto the foot rails, press the STOP button and remove the key from 4 mph to hold the contacts for example, the incline or speed will change the maximum speed setting, press the SPEED v button. HOW TO USE THE WORKOUT PROGRAMS 1 Insert the key into the console. When the key is detected, the heart-shaped indicator in the CALS/FAT CALS/PULSE display will...
..., the manual mode will be selected, as shown by the manual indicator. Step onto the foot rails, press the STOP button and remove the key from 4 mph to hold the contacts for example, the incline or speed will change the maximum speed setting, press the SPEED v button. HOW TO USE THE WORKOUT PROGRAMS 1 Insert the key into the console. When the key is detected, the heart-shaped indicator in the CALS/FAT CALS/PULSE display will...
English Manual
Page 11
... change the maximum incline setting. Note: Pressing the MODE button will begin to change the unit of measurement, press the SPEED v button. This number is completed, remove the key. Press the INCLINE v or w button repeatedly to flash. See step 6 on the right side of the console. The TIME/INCLINE display will also stop the program, reset the displays and select a different mode. If the program is the maximum speed that the treadmill will reach during the program. The TIME/INCLINE display...
... change the maximum incline setting. Note: Pressing the MODE button will begin to change the unit of measurement, press the SPEED v button. This number is completed, remove the key. Press the INCLINE v or w button repeatedly to flash. See step 6 on the right side of the console. The TIME/INCLINE display will also stop the program, reset the displays and select a different mode. If the program is the maximum speed that the treadmill will reach during the program. The TIME/INCLINE display...
English Manual
Page 12
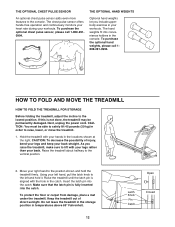
... treadmill. Raise the treadmill until the latch pin is fully inserted into convenience holders in the catch. The chest pulse sensor offers hands-free operation and continuously monitors your heart rate during your right hand to the console. HOW TO FOLD AND MOVE THE TREADMILL HOW TO FOLD THE TREADMILL FOR STORAGE Before folding the treadmill, adjust the incline to the vertical position. 2. CAUTION: To decrease the possibility of direct sunlight. Hold the treadmill...
... treadmill. Raise the treadmill until the latch pin is fully inserted into convenience holders in the catch. The chest pulse sensor offers hands-free operation and continuously monitors your heart rate during your right hand to the console. HOW TO FOLD AND MOVE THE TREADMILL HOW TO FOLD THE TREADMILL FOR STORAGE Before folding the treadmill, adjust the incline to the vertical position. 2. CAUTION: To decrease the possibility of direct sunlight. Hold the treadmill...
English Manual
Page 13
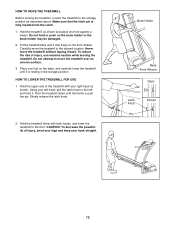
... is resting in the storage position. Never move the treadmill over an uneven surface. 3. Using your back straight. CAUTION: To decrease the possibility of injury, bend your legs and keep your left hand, pull the latch knob to the left and hold or push on the front wheels. Book Holder Base Front Wheels Open Latch Knob Pin Closed 13 Hold the...
... is resting in the storage position. Never move the treadmill over an uneven surface. 3. Using your back straight. CAUTION: To decrease the possibility of injury, bend your legs and keep your left hand, pull the latch knob to the left and hold or push on the front wheels. Book Holder Base Front Wheels Open Latch Knob Pin Closed 13 Hold the...
English Manual
Page 14
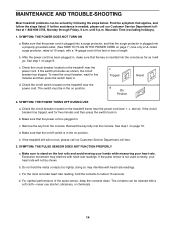
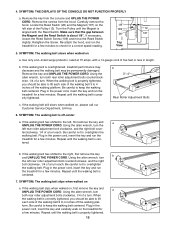
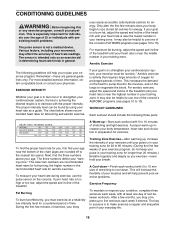
... power cord is in . To reset the circuit breaker, wait for five minutes and then press the switch back in . If the circuit breaker has tripped, wait for about 15 seconds. e. SYMPTOM: THE POWER TURNS OFF DURING USE a. If the pulse sensor is needed, please call our Customer Service Department, toll-free. 3. Mountain Time (excluding holidays). 1. MAINTENANCE AND TROUBLE-SHOOTING Most treadmill problems can be cleaned with heart rate...
... power cord is in . To reset the circuit breaker, wait for five minutes and then press the switch back in . If the circuit breaker has tripped, wait for about 15 seconds. e. SYMPTOM: THE POWER TURNS OFF DURING USE a. If the pulse sensor is needed, please call our Customer Service Department, toll-free. 3. Mountain Time (excluding holidays). 1. MAINTENANCE AND TROUBLE-SHOOTING Most treadmill problems can be cleaned with heart rate...
English Manual
Page 15
... remove the key b and UNPLUG THE POWER CORD. form. Plug in the power cord, insert the key and run the treadmill for a few minutes. b. Using the allen wrench, turn both rear roller adjustment bolts clockwise, 1/4 of the walking belt 3 to lift each side of a turn each . Using the allen wrench, turn . Repeat until the walking belt is off-center a. If necessary, 26 107 loosen the Reed Switch Screw (109) and move the Reed Switch slightly. SYMPTOM: The walking belt is properly tightened...
... remove the key b and UNPLUG THE POWER CORD. form. Plug in the power cord, insert the key and run the treadmill for a few minutes. b. Using the allen wrench, turn both rear roller adjustment bolts clockwise, 1/4 of the walking belt 3 to lift each side of a turn each . Using the allen wrench, turn . Repeat until the walking belt is off-center a. If necessary, 26 107 loosen the Reed Switch Screw (109) and move the Reed Switch slightly. SYMPTOM: The walking belt is properly tightened...
English Manual
Page 16
... console. For aerobic exercise, adjust the speed and incline of the treadmill until your age. To find the proper heart rate for you must be found by using your movement, may also be helpful to 13). The chart below shows recommended heart rates for energy. The three numbers define your training zone. The sensor is near the lowest number in your exercise must exercise at least one of heart rate...
... console. For aerobic exercise, adjust the speed and incline of the treadmill until your age. To find the proper heart rate for you must be found by using your movement, may also be helpful to 13). The chart below shows recommended heart rates for energy. The three numbers define your training zone. The sensor is near the lowest number in your exercise must exercise at least one of heart rate...
English Manual
Page 17
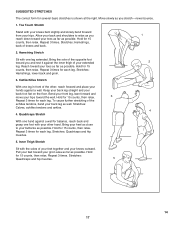
... as far as possible. Move slowly as possible. Allow your back and shoulders to your extended 2 leg. Stretches: Hamstrings, lower back and groin. 3. Hold for 15 counts, then relax. Repeat 3 times for each leg. Bend your front leg, lean forward and move your groin area as far... 3 times for 15 counts, then relax. Calf/Achilles Stretch With one leg in front of the other hand. Hold for several basic stretches is shown at the right. SUGGESTED STRETCHES The correct form for 15 counts, then relax. Bring your knees outward. Repeat 3 times...
... as far as possible. Move slowly as possible. Allow your back and shoulders to your extended 2 leg. Stretches: Hamstrings, lower back and groin. 3. Hold for 15 counts, then relax. Repeat 3 times for each leg. Bend your front leg, lean forward and move your groin area as far... 3 times for 15 counts, then relax. Calf/Achilles Stretch With one leg in front of the other hand. Hold for several basic stretches is shown at the right. SUGGESTED STRETCHES The correct form for 15 counts, then relax. Bring your knees outward. Repeat 3 times...
English Manual
Page 18
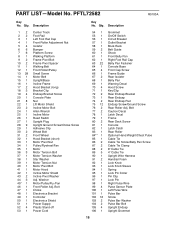
...Fan Motor Motor Tension Bolt Motor Tension Washer Star Washer Motor Tension Nut Motor Pivot Bolt Motor Hood Incline Motor Shield Incline Pivot Washer Adj. Bolt Caution Decal Latch Decal Frame Rear Deck Screw Console Latch Catch Rear Roller Optional Hand Weight/Chest Pulse Cable Tie Cable Tie Screw/Belly Pan Screw Cable Tie Clamp 8Ó Cable Tie 4Ó Cable Tie Upright Wire Harness Handrail Foam Lock Knob Lock Knob Sleeve Spring Lock Pin Collar Pin Clip Lock Pin Right Pulse Wire Pulse Sensor Plate Left Pulse Wire Pulse Bar Screw Pulse Bar Washer Pulse Bar Bolt Upright Endcap Upright Grommet...
...Fan Motor Motor Tension Bolt Motor Tension Washer Star Washer Motor Tension Nut Motor Pivot Bolt Motor Hood Incline Motor Shield Incline Pivot Washer Adj. Bolt Caution Decal Latch Decal Frame Rear Deck Screw Console Latch Catch Rear Roller Optional Hand Weight/Chest Pulse Cable Tie Cable Tie Screw/Belly Pan Screw Cable Tie Clamp 8Ó Cable Tie 4Ó Cable Tie Upright Wire Harness Handrail Foam Lock Knob Lock Knob Sleeve Spring Lock Pin Collar Pin Clip Lock Pin Right Pulse Wire Pulse Sensor Plate Left Pulse Wire Pulse Bar Screw Pulse Bar Washer Pulse Bar Bolt Upright Endcap Upright Grommet...
English Manual
Page 19
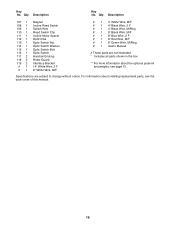
.... For information about the optional pulse kit and weights, see the back cover of this manual. 19 Key No. Description 107 1 108 1 109 1 110 1 111 1 112 1 113 1 114 1 115 1 116 1 117 2 118 2 119 2 #1 #1 Magnet Incline Reed Switch Switch Wire Reed Switch Clip Incline Motor Spacer Optic Disk Optic Switch Nut Optic Switch Washer Optic Switch Bolt Optic Switch Handrail Endcap Roller Guard Interface Bracket 14Ó White Wire, 2 F 8Ó White Wire, M/F # 1 4Ó White Wire...
.... For information about the optional pulse kit and weights, see the back cover of this manual. 19 Key No. Description 107 1 108 1 109 1 110 1 111 1 112 1 113 1 114 1 115 1 116 1 117 2 118 2 119 2 #1 #1 Magnet Incline Reed Switch Switch Wire Reed Switch Clip Incline Motor Spacer Optic Disk Optic Switch Nut Optic Switch Washer Optic Switch Bolt Optic Switch Handrail Endcap Roller Guard Interface Bracket 14Ó White Wire, 2 F 8Ó White Wire, M/F # 1 4Ó White Wire...

English Manual
Page 22
... (PROFORM¨ 725EX treadmill). ¥ The SERIAL NUMBER OF THE PRODUCT (see the front cover of this manual). Accordingly, the above limitation may not apply to the original purchaser. You may not apply to products used as store display models. When ordering parts, please be free from defects in USA © 2000 ICON Health & Fitness, Inc. ICON's obligation under normal use , costs of removal, installation or other rights which warranty...
... (PROFORM¨ 725EX treadmill). ¥ The SERIAL NUMBER OF THE PRODUCT (see the front cover of this manual). Accordingly, the above limitation may not apply to the original purchaser. You may not apply to products used as store display models. When ordering parts, please be free from defects in USA © 2000 ICON Health & Fitness, Inc. ICON's obligation under normal use , costs of removal, installation or other rights which warranty...


