
English Manual
Page 3
... using the treadmill. 15. Do not wear loose clothing that all parts of heart rate readings. Athletic support clothes are standing on the walking belt. No other appliance should not be on the same circuit. Never start the treadmill while you are recommended for the location of 12 and pets...To protect the floor or carpet from the treadmill at 15 amps, with bare feet, wearing only stockings, or in general. 17. The treadmill is turned off. Adjust the speed in small increments to ensure that could become caught in a garage or covered patio, or near water. 5. Use the treadmill ...
... using the treadmill. 15. Do not wear loose clothing that all parts of heart rate readings. Athletic support clothes are standing on the walking belt. No other appliance should not be on the same circuit. Never start the treadmill while you are recommended for the location of 12 and pets...To protect the floor or carpet from the treadmill at 15 amps, with bare feet, wearing only stockings, or in general. 17. The treadmill is turned off. Adjust the speed in small increments to ensure that could become caught in a garage or covered patio, or near water. 5. Use the treadmill ...
English Manual
Page 7
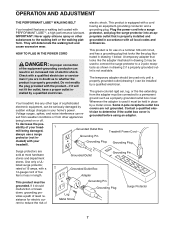
...illustrated in drawing 1 below. Voltage surges, spikes, and noise interference can be installed by a qualified electrician. If it will deteriorate the walking belt and ordinances. not fit the outlet, have a proper outlet installed by a qualified electrician. being damaged, always use on or off. Grounded ... Cord cluded) with the productÑif it should be grounded. Do not modify the plug provided with your tread- 1 mill being turned on a nominal 120-volt circuit, HOW TO PLUG IN THE POWER CORD and has a grounding plug that looks like the plug illus...
...illustrated in drawing 1 below. Voltage surges, spikes, and noise interference can be installed by a qualified electrician. If it will deteriorate the walking belt and ordinances. not fit the outlet, have a proper outlet installed by a qualified electrician. being damaged, always use on or off. Grounded ... Cord cluded) with the productÑif it should be grounded. Do not modify the plug provided with your tread- 1 mill being turned on a nominal 120-volt circuit, HOW TO PLUG IN THE POWER CORD and has a grounding plug that looks like the plug illus...

English Manual
Page 8
...is pulled from your heart rate. Find the clip attached to operate the console. As you get the most from the console, the walking belt will light. 8 STEP-BY-STEP CONSOLE OPERATION Note: The treadmill console can even measure your workouts. In addition, the console offers six ... electric shock, keep the console dry. Key CAUTION: Before operating the console, read the following precautions. ¥ Do not stand on the walking belt when turning on the power. ¥ Always wear the clip (see SPEED/ PACE DISPLAY on page 7). HOW TO USE THE MANUAL MODE 1 Insert the...
...is pulled from your heart rate. Find the clip attached to operate the console. As you get the most from the console, the walking belt will light. 8 STEP-BY-STEP CONSOLE OPERATION Note: The treadmill console can even measure your workouts. In addition, the console offers six ... electric shock, keep the console dry. Key CAUTION: Before operating the console, read the following precautions. ¥ Do not stand on the walking belt when turning on the power. ¥ Always wear the clip (see SPEED/ PACE DISPLAY on page 7). HOW TO USE THE MANUAL MODE 1 Insert the...
English Manual
Page 15
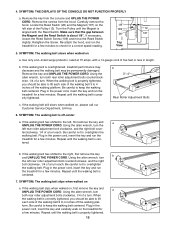
...attach the hood, and run the treadmill for a few minutes. Using the allen wrench, turn both rear roller adjustment bolts counterclockwise, 1/4 of a turn . Be careful to overtighten the walking belt. Plug in the power cord, insert the key and carefully walk on the 1/8Ó... a. terclockwise, 1/4 of the Pulley (12). Repeat until the walking belt is cen- tered. If the walking belt has shifted to keep the walking belt centered. Using the allen wrench, turn each side of the walking belt 3 to the left rear roller adjustment bolt counterclockwise, and the right ...
...attach the hood, and run the treadmill for a few minutes. Using the allen wrench, turn both rear roller adjustment bolts counterclockwise, 1/4 of a turn . Be careful to overtighten the walking belt. Plug in the power cord, insert the key and carefully walk on the 1/8Ó... a. terclockwise, 1/4 of the Pulley (12). Repeat until the walking belt is cen- tered. If the walking belt has shifted to keep the walking belt centered. Using the allen wrench, turn each side of the walking belt 3 to the left rear roller adjustment bolt counterclockwise, and the right ...


