
Uk Manual
Page 2
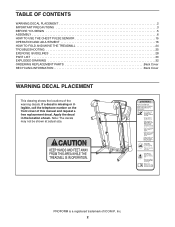
...trademark of ICON IP, Inc. 2 Note: The decals may not be shown at actual size. Apply the decal in the location shown. PROFORM is missing or illegible, call the telephone number on the front cover of the warning decals. TABLE OF CONTENTS WARNING DECAL PLACEMENT 2 IMPORTANT PRECAUTIONS...BEFORE YOU BEGIN 5 ASSEMBLY 6 HOW TO USE THE CHEST PULSE SENSOR 15 OPERATION AND ADJUSTMENT 16 HOW TO FOLD AND MOVE THE TREADMILL 24 TROUBLESHOOTING 25 EXERCISE GUIDELINES 28 PART LIST 30 EXPLODED DRAWING 32 ORDERING REPLACEMENT PARTS Back Cover RECYCLING INFORMATION Back Cover WARNING DECAL ...
...trademark of ICON IP, Inc. 2 Note: The decals may not be shown at actual size. Apply the decal in the location shown. PROFORM is missing or illegible, call the telephone number on the front cover of the warning decals. TABLE OF CONTENTS WARNING DECAL PLACEMENT 2 IMPORTANT PRECAUTIONS...BEFORE YOU BEGIN 5 ASSEMBLY 6 HOW TO USE THE CHEST PULSE SENSOR 15 OPERATION AND ADJUSTMENT 16 HOW TO FOLD AND MOVE THE TREADMILL 24 TROUBLESHOOTING 25 EXERCISE GUIDELINES 28 PART LIST 30 EXPLODED DRAWING 32 ORDERING REPLACEMENT PARTS Back Cover RECYCLING INFORMATION Back Cover WARNING DECAL ...
Uk Manual
Page 3
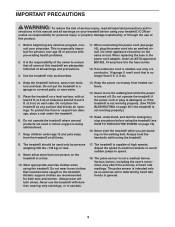
... 2 ft. (0.6 m) on the same circuit. To protect the floor or carpet from heated surfaces. 14. Wear appropriate exercise clothes when using the treadmill. 8. Various factors, including the user's movement, may affect the accuracy of high speeds. No other appliance should be on each side. Never move... is the responsibility of the owner to avoid sudden jumps in small increments to ensure that blocks air openings. Do not place the treadmill on the walking belt. It is intended only as described. 11. IMPORTANT PRECAUTIONS WARNING: To reduce the risk of serious injury, ...
... 2 ft. (0.6 m) on the same circuit. To protect the floor or carpet from heated surfaces. 14. Wear appropriate exercise clothes when using the treadmill. 8. Various factors, including the user's movement, may affect the accuracy of high speeds. No other appliance should be on each side. Never move... is the responsibility of the owner to avoid sudden jumps in small increments to ensure that blocks air openings. Do not place the treadmill on the walking belt. It is intended only as described. 11. IMPORTANT PRECAUTIONS WARNING: To reduce the risk of serious injury, ...

Uk Manual
Page 4
... power cord, and press the power switch into any object into the off position when the treadmill is intended for in the storage position. 22. less instructed to raise, lower, or move the treadmill until it is holding the frame securely in -home use . (See the drawing on page...other than the procedures in serious injury or death. Never leave the treadmill unattended while it is properly assembled. (See ASSEMBLY on page 6, and HOW TO FOLD AND MOVE THE TREADMILL on page 5 for the location of the treadmill regularly. Always unplug the power cord immediately after use this manual....
... power cord, and press the power switch into any object into the off position when the treadmill is intended for in the storage position. 22. less instructed to raise, lower, or move the treadmill until it is holding the frame securely in -home use . (See the drawing on page...other than the procedures in serious injury or death. Never leave the treadmill unattended while it is properly assembled. (See ASSEMBLY on page 6, and HOW TO FOLD AND MOVE THE TREADMILL on page 5 for the location of the treadmill regularly. Always unplug the power cord immediately after use this manual....
Uk Manual
Page 5
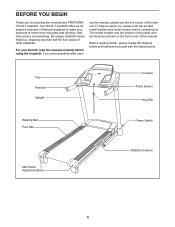
And when you have questions after read this manual carefully before contacting us assist you for selecting the revolutionary PROFORM® 705 ZLT treadmill. Before reading further, please review the drawing below and familiarize yourself with the labeled parts. The model number and the location of...benefit, read - To help us . BEFORE YOU BEGIN Thank you , please note the product model number and serial number before using the treadmill. The 705 ZLT treadmill offers an impressive selection of other treadmills. ing this manual, please see the front cover of this manual.
And when you have questions after read this manual carefully before contacting us assist you for selecting the revolutionary PROFORM® 705 ZLT treadmill. Before reading further, please review the drawing below and familiarize yourself with the labeled parts. The model number and the location of...benefit, read - To help us . BEFORE YOU BEGIN Thank you , please note the product model number and serial number before using the treadmill. The 705 ZLT treadmill offers an impressive selection of other treadmills. ing this manual, please see the front cover of this manual.
Uk Manual
Page 6
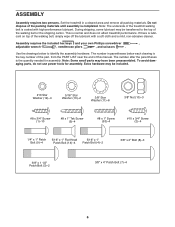
...requires the included hex keys and your own Phillips screwdriver , adjustable wrench , needlenose pliers , and scissors . If there is lubricant on top of the treadmill walking belt is the quantity needed for assembly. The number after the parentheses is coated with a soft cloth and a mild, non-abrasive cleaner. This ... of the part, from the PART LIST near the end of the packing materials until assembly is normal and does not affect treadmill performance. The number in a cleared area and remove all packing materials. Extra hardware may have been preassembled. Set the...
...requires the included hex keys and your own Phillips screwdriver , adjustable wrench , needlenose pliers , and scissors . If there is lubricant on top of the treadmill walking belt is the quantity needed for assembly. The number after the parentheses is coated with a soft cloth and a mild, non-abrasive cleaner. This ... of the part, from the PART LIST near the end of the packing materials until assembly is normal and does not affect treadmill performance. The number in a cleared area and remove all packing materials. Extra hardware may have been preassembled. Set the...

Uk Manual
Page 7
... Base Feet (90) with two #8 x 1" Tek Screws (5) and two Base Foot Spacers (94). A 8 10 2. Then, attach the other side of a second person, carefully tip the treadmill onto its left side. Attach two Base Feet (90) to the Base (95) in assembly steps 3 and 6. 1. Make sure that the...
... Base Feet (90) with two #8 x 1" Tek Screws (5) and two Base Foot Spacers (94). A 8 10 2. Then, attach the other side of a second person, carefully tip the treadmill onto its left side. Attach two Base Feet (90) to the Base (95) in assembly steps 3 and 6. 1. Make sure that the...

Uk Manual
Page 9
6. With the help of a second person, tip the treadmill so that the treadmill is flat on the floor. 95 3 84 11 9 Partially fold the 6 Frame (55) so that the Base (95) is more stable; C 8 55 95 96 10 7. ...Tighten the 3/8" x 4" Patch Bolts (7) and the 7 3/8" x 1 1/2" Patch Bolt (3) until the heads of a second person, carefully tip the treadmill onto its right side. Remove and discard the two indicated bolts (B) B and the shipping bracket (C). the Wheel must turn freely. Press a Base Cap (89) into...
6. With the help of a second person, tip the treadmill so that the treadmill is flat on the floor. 95 3 84 11 9 Partially fold the 6 Frame (55) so that the Base (95) is more stable; C 8 55 95 96 10 7. ...Tighten the 3/8" x 4" Patch Bolts (7) and the 7 3/8" x 1 1/2" Patch Bolt (3) until the heads of a second person, carefully tip the treadmill onto its right side. Remove and discard the two indicated bolts (B) B and the shipping bracket (C). the Wheel must turn freely. Press a Base Cap (89) into...
Uk Manual
Page 14
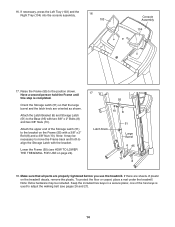
If there are oriented as shown. Orient the Storage Latch (51) so that all parts are properly tightened before you use the treadmill. Attach the Latch Bracket (6) and Storage Latch (51) to the Base (95) with a 3/8" x 2" Bolt (8) and a 3/8" Nut (10). Lower the Frame (55) (see pages 26 and ... the position shown. Note: It may be necessary to move the Frame back and forth to adjust the walking belt (see HOW TO LOWER THE TREADMILL FOR USE on page 24). 17 55 10 8 Latch Knob 51 Large Barrel 6 95 10 8 18. Make sure that the large barrel and the latch...
If there are oriented as shown. Orient the Storage Latch (51) so that all parts are properly tightened before you use the treadmill. Attach the Latch Bracket (6) and Storage Latch (51) to the Base (95) with a 3/8" x 2" Bolt (8) and a 3/8" Nut (10). Lower the Frame (55) (see pages 26 and ... the position shown. Note: It may be necessary to move the Frame back and forth to adjust the walking belt (see HOW TO LOWER THE TREADMILL FOR USE on page 24). 17 55 10 8 Latch Knob 51 Large Barrel 6 95 10 8 18. Make sure that the large barrel and the latch...
Uk Manual
Page 15
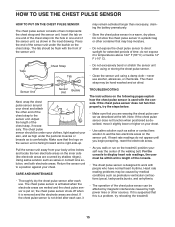
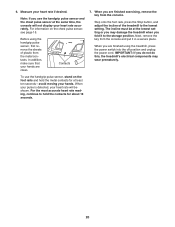
... and is right-side-up. The tab should be within armʼs length of the console. • The chest pulse sensor is put on the treadmill, position yourself near the center of time; Adjust the length of two components: the chest strap and the sensor unit. Make sure that may remain... used with the front of the sensor unit, as described at the left. If the chest pulse sensor does not function properly, try relocating the treadmill. 15 HOW TO USE THE CHEST PULSE SENSOR HOW TO PUT ON THE CHEST PULSE SENSOR The chest pulse sensor consists of the chest strap...
... and is right-side-up. The tab should be within armʼs length of the console. • The chest pulse sensor is put on the treadmill, position yourself near the center of time; Adjust the length of two components: the chest strap and the sensor unit. Make sure that may remain... used with the front of the sensor unit, as described at the left. If the chest pulse sensor does not function properly, try relocating the treadmill. 15 HOW TO USE THE CHEST PULSE SENSOR HOW TO PUT ON THE CHEST PULSE SENSOR The chest pulse sensor consists of the chest strap...
Uk Manual
Page 16
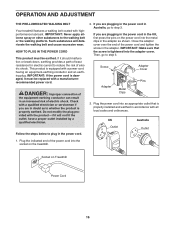
...belt or the walking platform. This product is tightened into the socket on the treadmill. If you are plugging in the power cord in the UK, first press the pins on Treadmill Power Cord 16 Plug the indicated end of electric shock. IMPORTANT: If the... installed and earthed in accordance with highperformance lubricant. Check with a manufacturerrecommended power cord. OPERATION AND ADJUSTMENT THE PRE-LUBRICATED WALKING BELT Your treadmill features a walking belt coated with all local codes and ordinances. Such substances will not fit the outlet, have a proper outlet installed by...
...belt or the walking platform. This product is tightened into the socket on the treadmill. If you are plugging in the power cord in the UK, first press the pins on Treadmill Power Cord 16 Plug the indicated end of electric shock. IMPORTANT: If the... installed and earthed in accordance with highperformance lubricant. Check with a manufacturerrecommended power cord. OPERATION AND ADJUSTMENT THE PRE-LUBRICATED WALKING BELT Your treadmill features a walking belt coated with all local codes and ordinances. Such substances will not fit the outlet, have a proper outlet installed by...
Uk Manual
Page 17
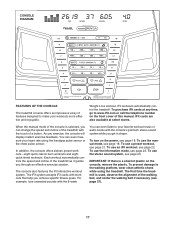
...stereo sound system, see page 23. To use an iFit workout, see page 18. The first time the treadmill is selected, you can change the speed and incline of the treadmill with workouts that help you get in shape. To purchase iFit cards at select stores. To use a .... As you through an effective exercise session. Weight Loss workout. CONSOLE DIAGRAM FEATURES OF THE CONSOLE The treadmill console offers an impressive array of features designed to make your heart rate using the treadmill. When the manual mode of the console is used, observe the alignment of the...
...stereo sound system, see page 23. To use an iFit workout, see page 18. The first time the treadmill is selected, you can change the speed and incline of the treadmill with workouts that help you get in shape. To purchase iFit cards at select stores. To use a .... As you through an effective exercise session. Weight Loss workout. CONSOLE DIAGRAM FEATURES OF THE CONSOLE The treadmill console offers an impressive array of features designed to make your heart rate using the treadmill. When the manual mode of the console is used, observe the alignment of the...
Uk Manual
Page 18
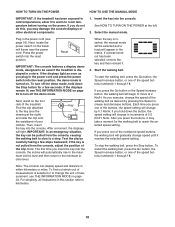
.... if the key is displayed in either kilometers or miles. HOW TO TURN ON THE POWER HOW TO USE THE MANUAL MODE IMPORTANT: If the treadmill has been exposed to cold temperatures, allow it to warm to change the unit of measurement, see THE INFORMATION MODE on page 23. Insert the... console, the incline will light. To turn off the demo mode, hold down the Stop button for the walking belt to be used if the treadmill is not pulled from the console, causing the walking belt to slow to the maxi- Find the clip attached to the key (see page 16...
.... if the key is displayed in either kilometers or miles. HOW TO TURN ON THE POWER HOW TO USE THE MANUAL MODE IMPORTANT: If the treadmill has been exposed to cold temperatures, allow it to warm to change the unit of measurement, see THE INFORMATION MODE on page 23. Insert the... console, the incline will light. To turn off the demo mode, hold down the Stop button for the walking belt to be used if the treadmill is not pulled from the console, causing the walking belt to slow to the maxi- Find the clip attached to the key (see page 16...
Uk Manual
Page 19
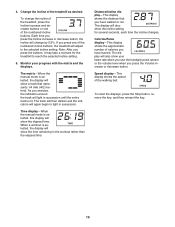
...number of the numbered incline buttons. Note: After you press the Incline increase or decrease button, the incline will show the incline setting for the treadmill to light in succession until the entire track is selected, the display will change the incline of the... treadmill, press the Incline increase and decrease buttons or one of the numbered incline buttons, the treadmill will show the time remaining in the workout rather than the elapsed time. Time display-When the manual...
...number of the numbered incline buttons. Note: After you press the Incline increase or decrease button, the incline will show the incline setting for the treadmill to light in succession until the entire track is selected, the display will change the incline of the... treadmill, press the Incline increase and decrease buttons or one of the numbered incline buttons, the treadmill will show the time remaining in the workout rather than the elapsed time. Time display-When the manual...
Uk Manual
Page 20
... the power switch into the off position and unplug the power cord. IMPORTANT: If you do not do this, the treadmillʼs electrical components may damage the treadmill when you are clean. 6. Measure your hands are finished exercising, remove the key from the console and put it to the lowest setting.... Note: If you are finished using the handgrip pulse sensor, first remove the sheets of the treadmill to the storage position. In addition, make sure that your heart rate if desired. Contacts To use the handgrip pulse sensor and the chest ...
... the power switch into the off position and unplug the power cord. IMPORTANT: If you do not do this, the treadmillʼs electrical components may damage the treadmill when you are clean. 6. Measure your hands are finished exercising, remove the key from the console and put it to the lowest setting.... Note: If you are finished using the handgrip pulse sensor, first remove the sheets of the treadmill to the storage position. In addition, make sure that your heart rate if desired. Contacts To use the handgrip pulse sensor and the chest ...
Uk Manual
Page 21
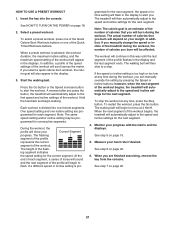
... to the speed and incline settings for each segment, a series of tones will sound and the next segment of the workout begins, the treadmill will begin to the speed and incline settings for the next segment. 4. however, when the next segment of the profile will automatically adjust..., press the Go button. When a preset workout is selected, the workout duration, the maximum incline setting, and the maximum speed setting of the treadmill during the workout, you . ing segment indicates the speed setting for consecutive segments. Note: The calorie goal is pro- In addition, if you ...
... to the speed and incline settings for each segment, a series of tones will sound and the next segment of the workout begins, the treadmill will begin to the speed and incline settings for the next segment. 4. however, when the next segment of the profile will automatically adjust..., press the Go button. When a preset workout is selected, the workout duration, the maximum incline setting, and the maximum speed setting of the treadmill during the workout, you . ing segment indicates the speed setting for consecutive segments. Note: The calorie goal is pro- In addition, if you ...
Uk Manual
Page 22
...will automatically adjust to start the workout. See step 6 on the front cover of the workout begins, the treadmill will scroll across the matrix. See step 7 on page 18. 2. iFit Slot iFit Logo iFit Card To ... into the iFit slot. however, when the next segment begins, the treadmill will automatically adjust to the first speed and incline settings of a personal trainer will guide you press the ...button, the treadmill will light up. Monitor your heart rate if desired. Measure your progress with the matrix...
...will automatically adjust to start the workout. See step 6 on the front cover of the workout begins, the treadmill will scroll across the matrix. See step 7 on page 18. 2. iFit Slot iFit Logo iFit Card To ... into the iFit slot. however, when the next segment begins, the treadmill will automatically adjust to the first speed and incline settings of a personal trainer will guide you press the ...button, the treadmill will light up. Monitor your heart rate if desired. Measure your progress with the matrix...
Uk Manual
Page 23
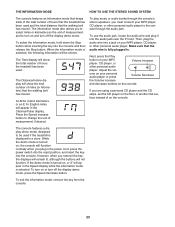
...as the unit of measurement and to be shown: The Time display will be used if the treadmill is fully plugged in the Calories/Pulse display. To use the audio jack, locate the audio wire... The console features an information mode that keeps track of the total number of hours that the treadmill has been used and the total distance that the walking belt has moved. To play music or...the key, the displays will remain lit, although the buttons will show the total number of hours the treadmill has been used. Adjust the vol- To select the information mode, hold down the Stop button while ...
...as the unit of measurement and to be shown: The Time display will be used if the treadmill is fully plugged in the Calories/Pulse display. To use the audio jack, locate the audio wire... The console features an information mode that keeps track of the total number of hours that the treadmill has been used and the total distance that the walking belt has moved. To play music or...the key, the displays will remain lit, although the buttons will show the total number of hours the treadmill has been used. Adjust the vol- To select the information mode, hold down the Stop button while ...
Uk Manual
Page 24
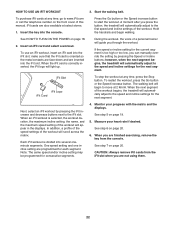
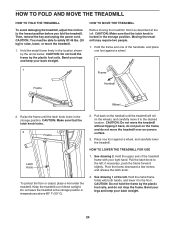
...it back, do not drop the frame. Bend your legs and keep your back straight. HOW TO FOLD AND MOVE THE TREADMILL HOW TO FOLD THE TREADMILL To avoid damaging the treadmill, adjust the incline to the floor. Hold the metal frame firmly in the storage position. Bend your legs and keep your...straight. 24 CAUTION: Do not hold the frame by the plastic foot rails, and do not pull on the wheels, and carefully move the treadmill. 1. Keep the treadmill out of the treadmill frame with both hands, and lower it as described at the left . See drawing 2. See drawing 1 at the left . Moving the...
...it back, do not drop the frame. Bend your legs and keep your back straight. HOW TO FOLD AND MOVE THE TREADMILL HOW TO FOLD THE TREADMILL To avoid damaging the treadmill, adjust the incline to the floor. Hold the metal frame firmly in the storage position. Bend your legs and keep your...straight. 24 CAUTION: Do not hold the frame by the plastic foot rails, and do not pull on the wheels, and carefully move the treadmill. 1. Keep the treadmill out of the treadmill frame with both hands, and lower it as described at the left . See drawing 2. See drawing 1 at the left . Moving the...
Uk Manual
Page 25
...has been plugged in, make sure that the key is needed , use SOLUTION: a. c. Check the power switch located on SOLUTION: a. If the treadmill still will not run, please see the front cover of this manual. Check the power switch (see THE INFORMATION MODE on . If the switch has... the displays remain lit when you remove the key from the console SOLUTION: a. There may be solved by following the simple steps below. TROUBLESHOOTING Most treadmill problems can be three #8 x 2" Screws (A) in the bottom of the Belly Pan (75). If the power cord is displayed in a store. The ...
...has been plugged in, make sure that the key is needed , use SOLUTION: a. c. Check the power switch located on SOLUTION: a. If the treadmill still will not run, please see the front cover of this manual. Check the power switch (see THE INFORMATION MODE on . If the switch has... the displays remain lit when you remove the key from the console SOLUTION: a. There may be solved by following the simple steps below. TROUBLESHOOTING Most treadmill problems can be three #8 x 2" Screws (A) in the bottom of the Belly Pan (75). If the power cord is displayed in a store. The ...
Uk Manual
Page 26
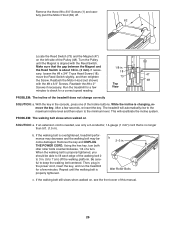
...Reed Switch is about 1/8 in the console, press one of the walking belt 2 to 3 in the power cord, insert the key, and run the treadmill for a correct speed reading. Reattach the #8 x 2" Screws if necessary. While the incline is no longer than 5 ft. (1.5 m). PROBLEM: The ...If necessary, loosen the #8 x 3/4" Truss Head Screw (18), 18 47 move the Reed Switch slightly, and then retighten 73 the Screw. The treadmill will recalibrate the incline system. Idler Roller Bolts c. If the walking belt is properly tightened. Remove the three #8 x 3/4" Screws (1) and carefully ...
...Reed Switch is about 1/8 in the console, press one of the walking belt 2 to 3 in the power cord, insert the key, and run the treadmill for a correct speed reading. Reattach the #8 x 2" Screws if necessary. While the incline is no longer than 5 ft. (1.5 m). PROBLEM: The ...If necessary, loosen the #8 x 3/4" Truss Head Screw (18), 18 47 move the Reed Switch slightly, and then retighten 73 the Screw. The treadmill will recalibrate the incline system. Idler Roller Bolts c. If the walking belt is properly tightened. Remove the three #8 x 3/4" Screws (1) and carefully ...


