
English Manual
Page 1
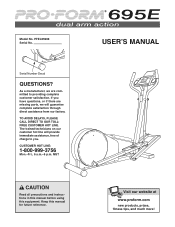
..., or if there are missing parts, we are committed to you. MST CAUTION Read all precautions and instructions in this manual before using this manual for future reference. TO AVOID DELAYS, PLEASE CALL DIRECT TO OUR TOLLFREE CUSTOMER HOT LINE. Model No. USERÕS MANUAL Visit our website at www.proform.com new products, prizes, fitness tips, and much more! CUSTOMER...
..., or if there are missing parts, we are committed to you. MST CAUTION Read all precautions and instructions in this manual before using this manual for future reference. TO AVOID DELAYS, PLEASE CALL DIRECT TO OUR TOLLFREE CUSTOMER HOT LINE. Model No. USERÕS MANUAL Visit our website at www.proform.com new products, prizes, fitness tips, and much more! CUSTOMER...
English Manual
Page 2
TABLE OF CONTENTS IMPORTANT PRECAUTIONS 3 BEFORE YOU BEGIN 4 ASSEMBLY 5 HOW TO USE THE ELLIPTICAL CROSSTRAINER 10 MAINTENANCE AND TROUBLE-SHOOTING 14 CONDITIONING GUIDELINES 15 PART LIST 18 EXPLODED DRAWING 19 HOW TO ORDER REPLACEMENT PARTS Back Cover LIMITED WARRANTY Back Cover 2
TABLE OF CONTENTS IMPORTANT PRECAUTIONS 3 BEFORE YOU BEGIN 4 ASSEMBLY 5 HOW TO USE THE ELLIPTICAL CROSSTRAINER 10 MAINTENANCE AND TROUBLE-SHOOTING 14 CONDITIONING GUIDELINES 15 PART LIST 18 EXPLODED DRAWING 19 HOW TO ORDER REPLACEMENT PARTS Back Cover LIMITED WARRANTY Back Cover 2
English Manual
Page 3
.... 7. When you feel pain or dizziness while exercising, stop before using . Read all instructions in general. 11. IMPORTANT PRECAUTIONS WARNING: To reduce the risk of heart rate readings. tions before using the elliptical crosstrainer. 2. Always hold the handlebar or the upper body arms when mounting, dismounting, or using the elliptical crosstrainer. 1. Inspect and tighten all instructions before using the elliptical crosstrainer. 9. Replace any commercial, rental, or institutional setting. lems. Read all...
.... 7. When you feel pain or dizziness while exercising, stop before using . Read all instructions in general. 11. IMPORTANT PRECAUTIONS WARNING: To reduce the risk of heart rate readings. tions before using the elliptical crosstrainer. 2. Always hold the handlebar or the upper body arms when mounting, dismounting, or using the elliptical crosstrainer. 1. Inspect and tighten all instructions before using the elliptical crosstrainer. 9. Replace any commercial, rental, or institutional setting. lems. Read all...
English Manual
Page 4
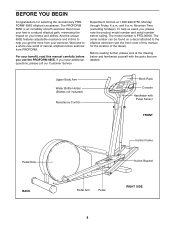
... Customer Service Department toll-free at the drawing below and familiarize yourself with Pulse Sensor FRONT Pedal Disk BACK Incline Frame Incline Bracket Pedal Arm Pedal RIGHT SIDE 4 And the unique 695E features adjustable resistance and incline to help us assist you, please note the product model number and serial number before you get the most from PROFORM. For your benefit, read this manual for selecting the revolutionary PROFORM¨ 695E elliptical crosstrainer. The serial number...
... Customer Service Department toll-free at the drawing below and familiarize yourself with Pulse Sensor FRONT Pedal Disk BACK Incline Frame Incline Bracket Pedal Arm Pedal RIGHT SIDE 4 And the unique 695E features adjustable resistance and incline to help us assist you, please note the product model number and serial number before you get the most from PROFORM. For your benefit, read this manual for selecting the revolutionary PROFORM¨ 695E elliptical crosstrainer. The serial number...
English Manual
Page 5
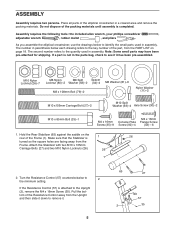
... below to the key number of the packing materials until assembly is attached to 2 the minimum setting. If a part is 1 26 turned so the square holes are facing away from the PART LIST on the rear of the Resistance Control away from the Upright and then slide it down to see if it . 5 65 27 Tab 57 2 35 As you assemble the elliptical crosstrainer, use the drawings...
... below to the key number of the packing materials until assembly is attached to 2 the minimum setting. If a part is 1 26 turned so the square holes are facing away from the PART LIST on the rear of the Resistance Control away from the Upright and then slide it down to see if it . 5 65 27 Tab 57 2 35 As you assemble the elliptical crosstrainer, use the drawings...

English Manual
Page 6
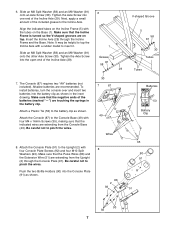
... the four welded bolts on the Extension Cable (84) as shown. ¥ Refer to protect it into the Upright (2). Refer to the Reed Switch Wire (50). Connect the Extension Wire (51) to assembly step 2. Once the top edge of the metal bracket is no slack. Lay a cloth over the front of the Resistance Cable (57) into the wire clip on the Resistance Control (57) into...
... the four welded bolts on the Extension Cable (84) as shown. ¥ Refer to protect it into the Upright (2). Refer to the Reed Switch Wire (50). Connect the Extension Wire (51) to assembly step 2. Once the top edge of the metal bracket is no slack. Lay a cloth over the front of the Resistance Cable (57) into the wire clip on the Resistance Control (57) into...
English Manual
Page 7
... Incline Axle (29). 7. To install batteries, turn the console over and insert two batteries into one end of the included grease to the Incline Axle. Slide an M8 Split Washer (58) and an M8 Washer (81) onto the other Axle Screw (30). The Console (87) requires two ÒAAÓ batteries (not included). Be careful not to pinch the wires. Tighten the Axle Screw...
... Incline Axle (29). 7. To install batteries, turn the console over and insert two batteries into one end of the included grease to the Incline Axle. Slide an M8 Split Washer (58) and an M8 Washer (81) onto the other Axle Screw (30). The Console (87) requires two ÒAAÓ batteries (not included). Be careful not to pinch the wires. Tighten the Axle Screw...
English Manual
Page 8
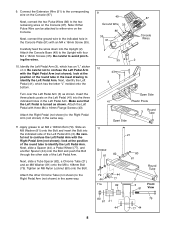
... Screws (35). Make sure that the Left Pedal is turned as shown. Be careful not to identify the Left Pedal Arm. look at the position of the Left Pedal Arm. Tighten an M8 Nylon Locknut (80) onto the Bolt. Note: Either Pulse Wire can be attached to confuse the Left Pedal Arm with the Right Pedal Arm (not shown); Be careful not to either wire on the Console...
... Screws (35). Make sure that the Left Pedal is turned as shown. Be careful not to identify the Left Pedal Arm. look at the position of the Left Pedal Arm. Tighten an M8 Nylon Locknut (80) onto the Bolt. Note: Either Pulse Wire can be attached to confuse the Left Pedal Arm with the Right Pedal Arm (not shown); Be careful not to either wire on the Console...
English Manual
Page 9
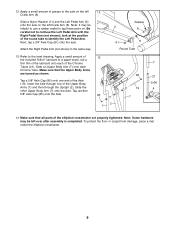
... on . Make sure that all parts of grease to tap these parts on the left Crank Arm (6). Note: Some hardware may be left 12 Crank Arm (6). Next, tap a 3/4Ó Axle Cap (61) onto the axle. Apply a small amount of the elliptical crosstrainer are turned as shown. Be careful not to the inset drawing. Attach the Right Pedal Arm (not shown) in the same...
... on . Make sure that all parts of grease to tap these parts on the left Crank Arm (6). Note: Some hardware may be left 12 Crank Arm (6). Next, tap a 3/4Ó Axle Cap (61) onto the axle. Apply a small amount of the elliptical crosstrainer are turned as shown. Be careful not to the inset drawing. Attach the Right Pedal Arm (not shown) in the same...
English Manual
Page 10
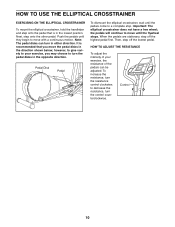
... the elliptical crosstrainer, wait until the pedals come to decrease the resistance, turn the control counterclockwise. HOW TO ADJUST THE RESISTANCE To adjust the intensity of the pedals can turn the resistance control clockwise; the pedals will continue to move with a continuous motion. When the pedals are stationary, step off the lowest pedal. To increase the resistance, turn in either direction. to a complete stop. HOW TO USE THE ELLIPTICAL CROSSTRAINER EXERCISING ON THE ELLIPTICAL CROSSTRAINER To mount the elliptical crosstrainer...
... the elliptical crosstrainer, wait until the pedals come to decrease the resistance, turn the control counterclockwise. HOW TO ADJUST THE RESISTANCE To adjust the intensity of the pedals can turn the resistance control clockwise; the pedals will continue to move with a continuous motion. When the pedals are stationary, step off the lowest pedal. To increase the resistance, turn in either direction. to a complete stop. HOW TO USE THE ELLIPTICAL CROSSTRAINER EXERCISING ON THE ELLIPTICAL CROSSTRAINER To mount the elliptical crosstrainer...
English Manual
Page 11
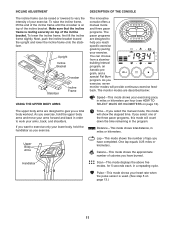
... UPPER BODY ARMS The innovative console offers a manual mode and three pacer programs. The pacer programs are designed to give you have completed. DistanceÑThis mode shows total distance, in a repeating cycle. If you exercise. As you exercise, hold the handlebar as you select one of calories you a total body workout. Next, push the incline bracket toward the upright and lower the incline frame onto the stabilizer. INCLINE ADJUSTMENT...
... UPPER BODY ARMS The innovative console offers a manual mode and three pacer programs. The pacer programs are designed to give you have completed. DistanceÑThis mode shows total distance, in a repeating cycle. If you exercise. As you exercise, hold the handlebar as you select one of calories you a total body workout. Next, push the incline bracket toward the upright and lower the incline frame onto the stabilizer. INCLINE ADJUSTMENT...

English Manual
Page 12
... the manual mode, press the program button until you have selected. Adjust your actual exercising pace. ing pace. As you pedal, the indicators around the track will Program Button show one bar, indicating a relatively slow pace. play. ing the program; The programs will appear for you. If you selected one bar appears in the display. Your actual pace may be installed. (See assembly step 7 on page 7.) Follow the steps below...
... the manual mode, press the program button until you have selected. Adjust your actual exercising pace. ing pace. As you pedal, the indicators around the track will Program Button show one bar, indicating a relatively slow pace. play. ing the program; The programs will appear for you. If you selected one bar appears in the display. Your actual pace may be installed. (See assembly step 7 on page 7.) Follow the steps below...

English Manual
Page 13
... before using the pulse sensor. HOW TO SELECT MILES OR KILOMETERS The console can display distance and speed in miles. Lift the console a few inches and turn off automatically. Switch Next, locate the small switch on the metal contacts. Your palms must be shown in kilometers; To reset the display, press the on/reset button. 5 Measure your hands excessively or squeezing the metal contacts too tightly. 6 Turn off the power To turn...
... before using the pulse sensor. HOW TO SELECT MILES OR KILOMETERS The console can display distance and speed in miles. Lift the console a few inches and turn off automatically. Switch Next, locate the small switch on the metal contacts. Your palms must be shown in kilometers; To reset the display, press the on/reset button. 5 Measure your hands excessively or squeezing the metal contacts too tightly. 6 Turn off the power To turn...
English Manual
Page 14
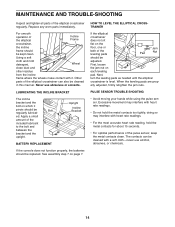
... kept clean. LUBRICATING THE INCLINE BRACKET The incline bracket and the bolt on page 7. Next, turn the leveling pads as needed until the elliptical crosstrainer is level. See assembly step 7 on which it . First, loosen the jam nut on the floor, one or both of the pulse sensor, keep the metal contacts clean. PULSE SENSOR TROUBLE-SHOOTING ¥ Avoid moving your hands while using the pulse sensor. doing so...
... kept clean. LUBRICATING THE INCLINE BRACKET The incline bracket and the bolt on page 7. Next, turn the leveling pads as needed until the elliptical crosstrainer is level. See assembly step 7 on which it . First, loosen the jam nut on the floor, one or both of the pulse sensor, keep the metal contacts clean. PULSE SENSOR TROUBLE-SHOOTING ¥ Avoid moving your hands while using the pulse sensor. doing so...
English Manual
Page 15
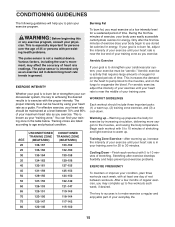
... minutes of your exercise until your condition, plan three workouts each workout with pre-existing health problems. The pulse sensor is in general. EXERCISE INTENSITY Whether your goal is to burn fat or strengthen your cardiovascular system, the key to achieving the desired results is to oxygenate the blood. The proper intensity level can find your heart rate as a guide. AGE 20...
... minutes of your exercise until your condition, plan three workouts each workout with pre-existing health problems. The pulse sensor is in general. EXERCISE INTENSITY Whether your goal is to burn fat or strengthen your cardiovascular system, the key to achieving the desired results is to oxygenate the blood. The proper intensity level can find your heart rate as a guide. AGE 20...
English Manual
Page 16
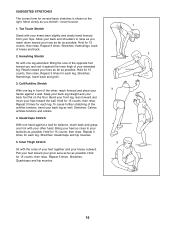
...one foot with your knees bent slightly and slowly bend forward from your buttocks as possible. Keep your back leg straight and your hips toward the wall. Stretches: Hamstrings, lower back and groin. 3. Pull your feet toward your heel as close to relax as possible. Hold for...Ñnever bounce. 1. SUGGESTED STRETCHES The correct form for 15 counts, then relax. Stretches: Hamstrings, back of the other hand. Calf/Achilles Stretch With one leg in front of knees and back. 2. Bend your front leg, lean forward and move your back foot flat on the floor. Hold for...
...one foot with your knees bent slightly and slowly bend forward from your buttocks as possible. Keep your back leg straight and your hips toward the wall. Stretches: Hamstrings, lower back and groin. 3. Pull your feet toward your heel as close to relax as possible. Hold for...Ñnever bounce. 1. SUGGESTED STRETCHES The correct form for 15 counts, then relax. Stretches: Hamstrings, back of the other hand. Calf/Achilles Stretch With one leg in front of knees and back. 2. Bend your front leg, lean forward and move your back foot flat on the floor. Hold for...
English Manual
Page 18
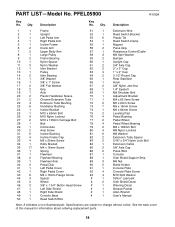
Qty. See the back cover of this manual for information about ordering replacement parts. 18 Description 1 1 Frame 51 1 Extension Wire 2 1 Upright 52 1 Reed Switch Bracket 3 1 Left Pedal Arm 53 6 Plastic Tie 4 1 Right Pedal Arm 54 1 Reed Switch Clamp 5 1 Incline Frame 55 1 Magnet 6 2 Crank Arm 56 2 Pulse Grip 7 2 Upper Body Arm 57 1 Resistance Control/Cable 8 1 Large Pulley 58 3 M8 Split Washer 9 2 Frame Bearing 59 2 Bumper 10 1 Nylon Spacer 60 1 Upright Cap 11 3 Nylon Washer 61 2 3/4Ó Axle Cap...
Qty. See the back cover of this manual for information about ordering replacement parts. 18 Description 1 1 Frame 51 1 Extension Wire 2 1 Upright 52 1 Reed Switch Bracket 3 1 Left Pedal Arm 53 6 Plastic Tie 4 1 Right Pedal Arm 54 1 Reed Switch Clamp 5 1 Incline Frame 55 1 Magnet 6 2 Crank Arm 56 2 Pulse Grip 7 2 Upper Body Arm 57 1 Resistance Control/Cable 8 1 Large Pulley 58 3 M8 Split Washer 9 2 Frame Bearing 59 2 Bumper 10 1 Nylon Spacer 60 1 Upright Cap 11 3 Nylon Washer 61 2 3/4Ó Axle Cap...
English Manual
Page 20
...; The MODEL NUMBER of the product (PFEL05900) ¥ The NAME of the product (PROFORM¨ 695E elliptical crosstrainer) ¥ The SERIAL NUMBER of the product (see the front cover of this manual) ¥ The KEY NUMBER and DESCRIPTION of the part(s) from page 18 of incidental or consequential damages. Accordingly, the above limitation may not apply to any and all other warranty beyond that specifically set forth...
...; The MODEL NUMBER of the product (PFEL05900) ¥ The NAME of the product (PROFORM¨ 695E elliptical crosstrainer) ¥ The SERIAL NUMBER of the product (see the front cover of this manual) ¥ The KEY NUMBER and DESCRIPTION of the part(s) from page 18 of incidental or consequential damages. Accordingly, the above limitation may not apply to any and all other warranty beyond that specifically set forth...

