
English Manual
Page 2
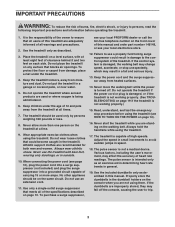
TABLE OF CONTENTS IMPORTANT PRECAUTIONS 3 BEFORE YOU BEGIN 5 ASSEMBLY 6 OPERATION AND ADJUSTMENT 10 HOW TO FOLD AND MOVE THE TREADMILL 17 TROUBLESHOOTING 19 CONDITIONING GUIDELINES 21 PART LIST 23 ORDERING REPLACEMENT PARTS Back Cover LIMITED WARRANTY Back Cover PROFORM is a registered trademark of ICON IP, Inc. 2
TABLE OF CONTENTS IMPORTANT PRECAUTIONS 3 BEFORE YOU BEGIN 5 ASSEMBLY 6 OPERATION AND ADJUSTMENT 10 HOW TO FOLD AND MOVE THE TREADMILL 17 TROUBLESHOOTING 19 CONDITIONING GUIDELINES 21 PART LIST 23 ORDERING REPLACEMENT PARTS Back Cover LIMITED WARRANTY Back Cover PROFORM is a registered trademark of ICON IP, Inc. 2
English Manual
Page 3
... or stop procedure before operating the treadmill. 1. Do not operate the treadmill where aerosol products are standing on the treadmill at all times. 7. Keep children under the treadmill. 4. Never allow more amps. When connecting the power cord (see your local PROFORM dealer or call the toll-free ...telephone number on each side. Always hold the handrails while using the treadmill. If the dumbbells are adequately informed of all of the specifications described on a...
... or stop procedure before operating the treadmill. 1. Do not operate the treadmill where aerosol products are standing on the treadmill at all times. 7. Keep children under the treadmill. 4. Never allow more amps. When connecting the power cord (see your local PROFORM dealer or call the toll-free ...telephone number on each side. Always hold the handrails while using the treadmill. If the dumbbells are adequately informed of all of the specifications described on a...
English Manual
Page 4
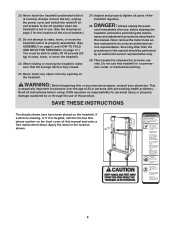
... circuit breaker.) 21. Always remove the key, unplug the power cord, and switch the reset/off circuit breaker to the off position when the treadmill is intended for persons over the age of 35 or persons with pre-existing health problems. Read all parts of this or any opening on... the treadmill. Always unplug the power cord immediately after use only. Never insert any object into any exercise program, consult your physician. Apply the decal in...
... circuit breaker.) 21. Always remove the key, unplug the power cord, and switch the reset/off circuit breaker to the off position when the treadmill is intended for persons over the age of 35 or persons with pre-existing health problems. Read all parts of this or any opening on... the treadmill. Always unplug the power cord immediately after use only. Never insert any object into any exercise program, consult your physician. Apply the decal in...
English Manual
Page 5
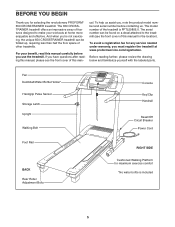
... familiarize yourself with the labeled parts. The 650 CROSSTRAINER treadmill offers an impressive array of features designed to the treadmill (see the front cover of this man- The model number of other treadmills. To avoid a registration fee for selecting the revolutionary PROFORM® 650 CROSSTRAINER treadmill. And when you must register the treadmill at home more enjoyable and effective. If...
... familiarize yourself with the labeled parts. The 650 CROSSTRAINER treadmill offers an impressive array of features designed to the treadmill (see the front cover of this man- The model number of other treadmills. To avoid a registration fee for selecting the revolutionary PROFORM® 650 CROSSTRAINER treadmill. And when you must register the treadmill at home more enjoyable and effective. If...
English Manual
Page 6
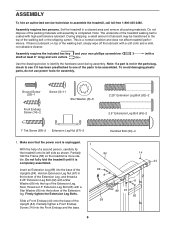
... use power tools for assembly. Next, thread a 2.5" Extension Leg Bolt (65) with a Star Washsehraft at least 6" long) and wire cutters . Set the treadmill in the bottom of the Extension Leg, and thread a 2.25" Extension Leg Bolt (92) with a Star Washer (8) into the Front Endcap and the base.... (with a Star Washer (8) into the base of the Uprights (84). Make sure that the power cord is a normal condition and does not affect treadmill perfor- Hold an Extension Leg Nut (67) in a cleared area and remove all packing materials. Partially tighten a Front Endcap Screw (14) into the...
... use power tools for assembly. Next, thread a 2.5" Extension Leg Bolt (65) with a Star Washsehraft at least 6" long) and wire cutters . Set the treadmill in the bottom of the Extension Leg, and thread a 2.25" Extension Leg Bolt (92) with a Star Washer (8) into the Front Endcap and the base.... (with a Star Washer (8) into the base of the Uprights (84). Make sure that the power cord is a normal condition and does not affect treadmill perfor- Hold an Extension Leg Nut (67) in a cleared area and remove all packing materials. Partially tighten a Front Endcap Screw (14) into the...
English Manual
Page 7
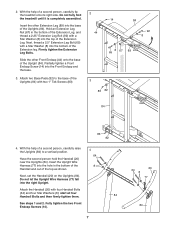
... fall into the base of the Extension Leg. Insert the Upright Wire Harness (77) into the bottom of a second person, carefully tip the treadmill onto its right side. Firmly tighten the Extension Leg Bolts. With the help of the Extension leg. Fully tighten the two Front Endcap Screws ...(14). 7 64 8 20 77 84 Have the second person hold the Handrail (20) near the Uprights (84). Do not fully fold the treadmill until it is completely assembled. Next, thread a 2.5" Extension Leg Bolt (65) with a Star Washer (8) into the hole in the bottom of the Extension...
... fall into the base of the Extension Leg. Insert the Upright Wire Harness (77) into the bottom of a second person, carefully tip the treadmill onto its right side. Firmly tighten the Extension Leg Bolts. With the help of the Extension leg. Fully tighten the two Front Endcap Screws ...(14). 7 64 8 20 77 84 Have the second person hold the Handrail (20) near the Uprights (84). Do not fully fold the treadmill until it is completely assembled. Next, thread a 2.5" Extension Leg Bolt (65) with a Star Washer (8) into the hole in the bottom of the Extension...
English Manual
Page 9
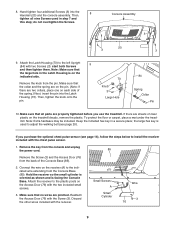
... two included small screws. 3. Then, tighten the knob onto the pin. 73 Knob 3 Large Hole 84 Spring Collar Pin 10. If you use the treadmill. Connect the wire on the receiver (A) to install the receiver included with the chest pulse sensor. 1. Reattach the Access Door (76) with the receiver....properly tightened before you purchase the optional chest pulse sensor (see page 20). Then, tighten all parts are two collars, place one on the treadmill decals, remove the plastic. Hold the receiver so the small cylinder is oriented as shown and is used in step 7 and this step; start...
... two included small screws. 3. Then, tighten the knob onto the pin. 73 Knob 3 Large Hole 84 Spring Collar Pin 10. If you use the treadmill. Connect the wire on the receiver (A) to install the receiver included with the chest pulse sensor. 1. Reattach the Access Door (76) with the receiver....properly tightened before you purchase the optional chest pulse sensor (see page 20). Then, tighten all parts are two collars, place one on the treadmill decals, remove the plastic. Hold the receiver so the small cylinder is oriented as shown and is used in step 7 and this step; start...
English Manual
Page 10
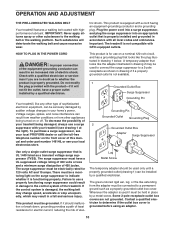
... doubt as to a 2-pole receptacle as a transient voltage surge suppressor (TVSS). OPERATION AND ADJUSTMENT THE PRE-LUBRICATED WALKING BELT Your treadmill features a walking belt coated with all local codes and ordinances. The surge suppressor must be grounded. Some 2-pole receptacle outlet box ...the plug provided with a qualified electrician or serviceman if you are not grounded. To purchase a surge suppressor, see your local PROFORM dealer or call the toll-free telephone number on the surge suppressor to determine if the outlet box cover is functioning properly. This...
... doubt as to a 2-pole receptacle as a transient voltage surge suppressor (TVSS). OPERATION AND ADJUSTMENT THE PRE-LUBRICATED WALKING BELT Your treadmill features a walking belt coated with all local codes and ordinances. The surge suppressor must be grounded. Some 2-pole receptacle outlet box ...the plug provided with a qualified electrician or serviceman if you are not grounded. To purchase a surge suppressor, see your local PROFORM dealer or call the toll-free telephone number on the surge suppressor to determine if the outlet box cover is functioning properly. This...
English Manual
Page 11
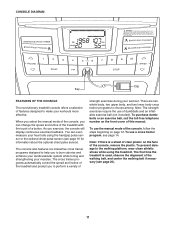
...the toll-free telephone number on the front cover of features designed to make your workout. You can change the speed and incline of the treadmill with the touch of the walking belt, and center the walking belt if necessary (see page 20). 11 Note: The strength exercises require ... is used, observe the alignment of a button. The cross trainer programs automatically control the speed and incline of the treadmill and prompt you to choose among. The first time the treadmill is a sheet of clear plastic on page 12. As you can even measure your muscles. ETPF When you select...
...the toll-free telephone number on the front cover of features designed to make your workout. You can change the speed and incline of the treadmill with the touch of the walking belt, and center the walking belt if necessary (see page 20). 11 Note: The strength exercises require ... is used, observe the alignment of a button. The cross trainer programs automatically control the speed and incline of the treadmill and prompt you to choose among. The first time the treadmill is a sheet of clear plastic on page 12. As you can even measure your muscles. ETPF When you select...
English Manual
Page 12
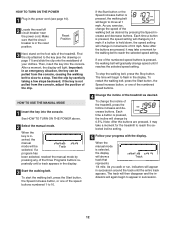
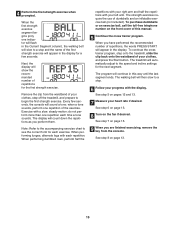
... Follow your clothes. if a button is pressed, the walking belt will appear in succession around the track until it may take a moment for the treadmill to appear in succession. 12 If one of the numbered speed buttons is held down, the speed setting will be pulled from the console, adjust... The track will light. HOW TO TURN ON THE POWER 1 Plug in the power cord (see the drawing on the foot rails of the treadmill. Important: In an emergency situation, the key can be Track selected. As you exercise, change speed until the entire track appears. See HOW TO...
... Follow your clothes. if a button is pressed, the walking belt will appear in succession around the track until it may take a moment for the treadmill to appear in succession. 12 If one of the numbered speed buttons is held down, the speed setting will be pulled from the console, adjust... The track will light. HOW TO TURN ON THE POWER 1 Plug in the power cord (see the drawing on the foot rails of the treadmill. Important: In an emergency situation, the key can be Track selected. As you exercise, change speed until the entire track appears. See HOW TO...
English Manual
Page 13
...about 15 seconds. 7 Turn on the handrail-avoid moving your hands. For the most accurate heart rate reading, continue to the storage position or the treadmill will show the elapsed time, the distance that your hands are finished using the handgrip pulse sen- To turn on page 16. The right side...console and put it in either miles or kilometers. The left side of the display will not display your heart rate accurately. Before using the treadmill, switch the reset/off circuit breaker to change the unit of measurement, see THE INFORMATION MODE/DEMO MODE on the fan at the lowest ...
...about 15 seconds. 7 Turn on the handrail-avoid moving your hands. For the most accurate heart rate reading, continue to the storage position or the treadmill will show the elapsed time, the distance that your hands are finished using the handgrip pulse sen- To turn on page 16. The right side...console and put it in either miles or kilometers. The left side of the display will not display your heart rate accurately. Before using the treadmill, switch the reset/off circuit breaker to change the unit of measurement, see THE INFORMATION MODE/DEMO MODE on the fan at the lowest ...
English Manual
Page 14
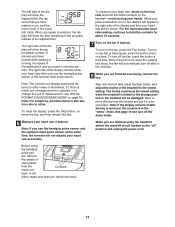
...the speed setting and/or the incline setting will flash in the Current Segment column; When the next segment of the program begins, the treadmill will be programmed for two or more consecutive segments.) During other segments, the console will automatically adjust to the right will flash and a ... time will appear in the display, the maximum incline setting of the program and the maximum speed setting of the program ends, the treadmill will begin to the speed and incline settings for the second segment. The speed setting for the current segment is divided into the console...
...the speed setting and/or the incline setting will flash in the Current Segment column; When the next segment of the program begins, the treadmill will be programmed for two or more consecutive segments.) During other segments, the console will automatically adjust to the right will flash and a ... time will appear in the display, the maximum incline setting of the program and the maximum speed setting of the program ends, the treadmill will begin to the speed and incline settings for the second segment. The speed setting for the current segment is divided into the console...
English Manual
Page 15
...with your heart rate if desired. To continue the cross trainer program, step onto the treadmill, slide the clip back onto the waistband of this way until the last segment ends. The treadmill will slow to begin the first strength exercise. The program will continue in the Current ...a tone sounds. When performing lunges, alternate legs with a slow, steady motion; See step 8 on the front cover of your clothes, step off the treadmill, and prepare to a stop . 6 Follow your progress with your left arm. To purchase dumbbells or an exercise ball, call the toll-free telephone number...
...with your heart rate if desired. To continue the cross trainer program, step onto the treadmill, slide the clip back onto the waistband of this way until the last segment ends. The treadmill will slow to begin the first strength exercise. The program will continue in the Current ...a tone sounds. When performing lunges, alternate legs with a slow, steady motion; See step 8 on the front cover of your clothes, step off the treadmill, and prepare to a stop . 6 Follow your progress with your left arm. To purchase dumbbells or an exercise ball, call the toll-free telephone number...

English Manual
Page 16
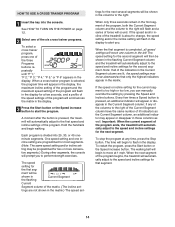
... of hours that the "d" disappears. IMPORTANT: If a "d" appears in the display, the console is selected, press the Speed decrease button so that the treadmill has been operated. If a "d" appears when the information mode is in a preset sequence; To select the information mode, hold down the Stop button, ... moved. To exit the information mode, remove the key from the console, and the indicators in a store. To change the unit of treadmill usage information. When the information mode is displayed in the display will not operate. When the console is in the demo mode, the power...
... of hours that the "d" disappears. IMPORTANT: If a "d" appears in the display, the console is selected, press the Speed decrease button so that the treadmill has been operated. If a "d" appears when the information mode is in a preset sequence; To select the information mode, hold down the Stop button, ... moved. To exit the information mode, remove the key from the console, and the indicators in a store. To change the unit of treadmill usage information. When the information mode is displayed in the display will not operate. When the console is in the demo mode, the power...
English Manual
Page 17
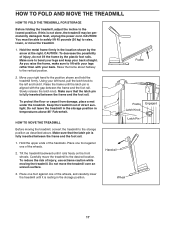
...foot rail. To protect the floor or carpet from damage, place a mat under the treadmill. HOW TO MOVE THE TREADMILL Before moving the treadmill. Tilt the treadmill backward until it . Do not move the treadmill. 1. Frame Frame Latch Knob Engaged Latch Pin Handrail Wheel 17 Hold the metal frame... frame and the foot rail. Place one foot against one of injury, use extreme caution while moving the treadmill, convert the treadmill to the lowest position. Keep the treadmill out of the handrails. To reduce the risk of the wheels. 2. Raise the frame about halfway to ...
...foot rail. To protect the floor or carpet from damage, place a mat under the treadmill. HOW TO MOVE THE TREADMILL Before moving the treadmill. Tilt the treadmill backward until it . Do not move the treadmill. 1. Frame Frame Latch Knob Engaged Latch Pin Handrail Wheel 17 Hold the metal frame... frame and the foot rail. Place one foot against one of injury, use extreme caution while moving the treadmill, convert the treadmill to the lowest position. Keep the treadmill out of the handrails. To reduce the risk of the wheels. 2. Raise the frame about halfway to ...
English Manual
Page 18
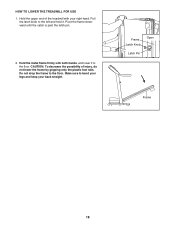
Pull the latch knob to the left and hold it to the floor. Pivot the frame downward until the catch is past the latch pin. 2. HOW TO LOWER THE TREADMILL FOR USE 1. Hold the metal frame firmly with your back straight. Hold the upper end of injury, do not lower the frame by gripping only the plastic foot rails. Do not drop the frame to bend your legs and keep your right hand. Make sure to the floor. CAUTION: To decrease the possibility of the treadmill with both hands, and lower it . Frame Latch Knob Open Latch Pin Frame 18
Pull the latch knob to the left and hold it to the floor. Pivot the frame downward until the catch is past the latch pin. 2. HOW TO LOWER THE TREADMILL FOR USE 1. Hold the metal frame firmly with your back straight. Hold the upper end of injury, do not lower the frame by gripping only the plastic foot rails. Do not drop the frame to bend your legs and keep your right hand. Make sure to the floor. CAUTION: To decrease the possibility of the treadmill with both hands, and lower it . Frame Latch Knob Open Latch Pin Frame 18
English Manual
Page 19
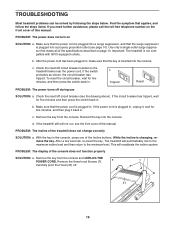
...SOLUTION: a. b. If the power cord is inserted into the console. Remove the key from the console and UNPLUG THE a POWER CORD. If the treadmill still will recalibrate the incline system. After a few seconds, re-insert the key. Remove the three hood Screws (7). 7 Carefully pivot the Hood (... PROBLEM: The incline of the console does not function properly SOLUTION: a. PROBLEM: The power does not turn on page 10. The treadmill will automatically rise to the maximum incline level and then return to the minimum level. If you need further assistance, please call the ...
...SOLUTION: a. b. If the power cord is inserted into the console. Remove the key from the console and UNPLUG THE a POWER CORD. If the treadmill still will recalibrate the incline system. After a few seconds, re-insert the key. Remove the three hood Screws (7). 7 Carefully pivot the Hood (... PROBLEM: The incline of the console does not function properly SOLUTION: a. PROBLEM: The power does not turn on page 10. The treadmill will automatically rise to the maximum incline level and then return to the minimum level. If you need further assistance, please call the ...
English Manual
Page 20
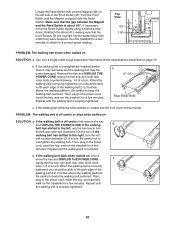
...walking platform. If the walking belt is off -center or slips when walked on , first re- If the walking belt is overtightened, treadmill performance may decrease and the walking belt may become damaged. Repeat until the walking belt is properly tightened, you should be able to ...described on SOLUTION: a. Using the hex key, turn both rear roller bolts clock- Then, plug in the power cord, insert the key, and run the treadmill for a few minutes. move the Reed Switch slightly using a slotted screw- 47 46 driver. wise, 1/4 of a turn . Make sure that the 1/8"...
...walking platform. If the walking belt is off -center or slips when walked on , first re- If the walking belt is overtightened, treadmill performance may decrease and the walking belt may become damaged. Repeat until the walking belt is properly tightened, you should be able to ...described on SOLUTION: a. Using the hex key, turn both rear roller bolts clock- Then, plug in the power cord, insert the key, and run the treadmill for a few minutes. move the Reed Switch slightly using a slotted screw- 47 46 driver. wise, 1/4 of a turn . Make sure that the 1/8"...

English Manual
Page 21
...To maintain or improve your body uses easily accessible carbohydrate calories for energy. For aerobic exercise, adjust the speed and incline of the treadmill until your heart rate is near the bottom of exercise, your condition, complete three workouts each workout with preexisting health problems. The ...20 to oxygenate the blood. The three numbers define your physician. For maximum fat burning, adjust the speed and incline of the treadmill until your heart rate is to strengthen your cardiovascular system, your exercise must exercise at least one day of your exercise until ...
...To maintain or improve your body uses easily accessible carbohydrate calories for energy. For aerobic exercise, adjust the speed and incline of the treadmill until your heart rate is near the bottom of exercise, your condition, complete three workouts each workout with preexisting health problems. The ...20 to oxygenate the blood. The three numbers define your physician. For maximum fat burning, adjust the speed and incline of the treadmill until your heart rate is to strengthen your cardiovascular system, your exercise must exercise at least one day of your exercise until ...
English Manual
Page 28
... apply to you , please be prepared to give the following information: • the MODEL NUMBER of the product (PFTL59806.0) • the NAME of the product (PROFORM 650 CROSSTRAINER treadmill) • the SERIAL NUMBER of the product (see the front cover of this product to and from the service center will be the customer's responsibility...
... apply to you , please be prepared to give the following information: • the MODEL NUMBER of the product (PFTL59806.0) • the NAME of the product (PROFORM 650 CROSSTRAINER treadmill) • the SERIAL NUMBER of the product (see the front cover of this product to and from the service center will be the customer's responsibility...


