
English Manual
Page 3
... may change speed, accelerate, or stop procedure before operating the treadmill. 1. The pulse sensor is not working properly.) 15. Never allow more amps. IMPORTANT PRECAUTIONS WARNING: To reduce the risk of burns, fire, electric shock, or injury to trip. 3 If the control system is turned off the console, causing the user to persons, read the following important precautions and information before using them...
... may change speed, accelerate, or stop procedure before operating the treadmill. 1. The pulse sensor is not working properly.) 15. Never allow more amps. IMPORTANT PRECAUTIONS WARNING: To reduce the risk of burns, fire, electric shock, or injury to trip. 3 If the control system is turned off the console, causing the user to persons, read the following important precautions and information before using them...
English Manual
Page 4
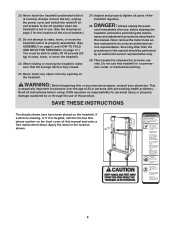
... the use only. Never remove the motor hood un- ICON assumes no responsibility for persons over the age of 35 or persons with pre-existing health problems. Read all parts of this manual. Inspect and properly tighten all instructions before performing the mainte- Servicing other than the procedures in this treadmill in this manual and order a free replacement decal. When folding or moving the treadmill, make sure that the storage latch...
... the use only. Never remove the motor hood un- ICON assumes no responsibility for persons over the age of 35 or persons with pre-existing health problems. Read all parts of this manual. Inspect and properly tighten all instructions before performing the mainte- Servicing other than the procedures in this treadmill in this manual and order a free replacement decal. When folding or moving the treadmill, make sure that the storage latch...
English Manual
Page 5
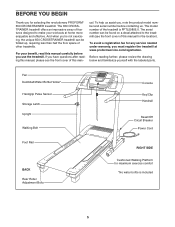
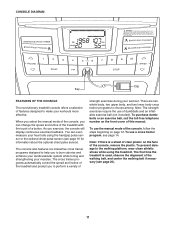
... for maximum exercise comfort *No water bottle is PFTL59806.0. The serial number can be found on a decal attached to make your benefit, read this manual carefully before contacting us. Fan Dumbbell/Water Bottle Holder* Handgrip Pulse Sensor Storage Latch Upright Walking Belt Console Key/Clip Handrail Reset/Off Circuit Breaker Power Cord Foot Rail BACK Rear Roller Adjustment Bolts RIGHT SIDE Cushioned Walking Platform for any service needed under warranty, you use the treadmill. For your workouts at...
... for maximum exercise comfort *No water bottle is PFTL59806.0. The serial number can be found on a decal attached to make your benefit, read this manual carefully before contacting us. Fan Dumbbell/Water Bottle Holder* Handgrip Pulse Sensor Storage Latch Upright Walking Belt Console Key/Clip Handrail Reset/Off Circuit Breaker Power Cord Foot Rail BACK Rear Roller Adjustment Bolts RIGHT SIDE Cushioned Walking Platform for any service needed under warranty, you use the treadmill. For your workouts at...
English Manual
Page 6
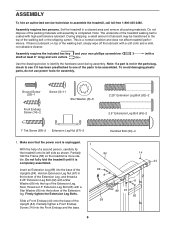
... the Extension Leg. Note: If a part is completed. Do not fully fold the treadmill until it has been preattached to one of the parts to assemble the treadmill, call toll-free 1-800-445-2480. 3 1/2" Bolt (45)-4 Wheel Nut (32)-2 Assembly requires two persons. Slide a Front Endcap (44) onto the base of the walking belt or the shipping carton. Set the treadmill in the parts bag...
... the Extension Leg. Note: If a part is completed. Do not fully fold the treadmill until it has been preattached to one of the parts to assemble the treadmill, call toll-free 1-800-445-2480. 3 1/2" Bolt (45)-4 Wheel Nut (32)-2 Assembly requires two persons. Slide a Front Endcap (44) onto the base of the walking belt or the shipping carton. Set the treadmill in the parts bag...
English Manual
Page 7
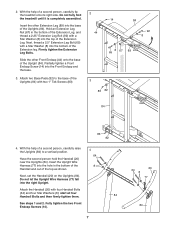
... Handrail (20) on the Uprights (84). Attach two Base Pads (82) to a vertical position. start all four Handrail Bolts and then firmly tighten them. 84 See steps 1 and 2. Do not fully fold the treadmill until it is completely assembled. Insert the other Front Endcap (44) onto the base of the Extension leg. Do not let the Upright Wire Harness (77) fall into...
... Handrail (20) on the Uprights (84). Attach two Base Pads (82) to a vertical position. start all four Handrail Bolts and then firmly tighten them. 84 See steps 1 and 2. Do not fully fold the treadmill until it is completely assembled. Insert the other Front Endcap (44) onto the base of the Extension leg. Do not let the Upright Wire Harness (77) fall into...
English Manual
Page 8
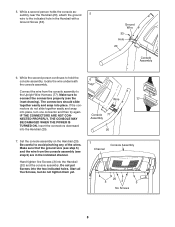
... hold the console assembly, locate the wire underneath 6 the console assembly. While the second person continues to avoid pinching any of the wires. IF THE CONNECTORS ARE NOT CONNECTED PROPERLY, THE CONSOLE MAY Console 77 Assembly BE DAMAGED WHEN THE POWER IS TURNED ON. Insert the connectors downward into the Handrail (20) and the console assembly. Hand tighten five Screws (3) into the Handrail (20). 20 7. Set the console assembly on...
... hold the console assembly, locate the wire underneath 6 the console assembly. While the second person continues to avoid pinching any of the wires. IF THE CONNECTORS ARE NOT CONNECTED PROPERLY, THE CONSOLE MAY Console 77 Assembly BE DAMAGED WHEN THE POWER IS TURNED ON. Insert the connectors downward into the Handrail (20) and the console assembly. Hand tighten five Screws (3) into the Handrail (20). 20 7. Set the console assembly on...
English Manual
Page 9
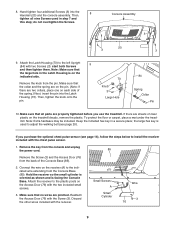
... key is used in step 7 and this step; Connect the wire on the treadmill decals, remove the plastic. Make sure that the large hole in a secure place; Small Screws A Small Cylinder Wire 3 76 9 Then, tighten all parts are sheets of the Console Base (85). 2. Note: Extra hardware may be included. do not overtighten the Screws. Attach the Latch Housing (73) to the left Upright (84) with the chest pulse sensor...
... key is used in step 7 and this step; Connect the wire on the treadmill decals, remove the plastic. Make sure that the large hole in a secure place; Small Screws A Small Cylinder Wire 3 76 9 Then, tighten all parts are sheets of the Console Base (85). 2. Note: Extra hardware may be included. do not overtighten the Screws. Attach the Latch Housing (73) to the left Upright (84) with the chest pulse sensor...
English Manual
Page 10
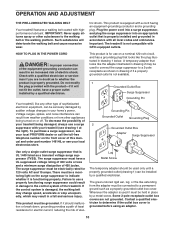
... (TVSS). Whenever the adapter is properly grounded. Contact a qualified electrician to whether the product is used to connect the surge suppressor to indicate whether it should be electrically rated for 120 volts AC and 15 amps. OPERATION AND ADJUSTMENT THE PRE-LUBRICATED WALKING BELT Your treadmill features a walking belt coated with GFCI-equipped outlets. Check with your home's power. If it is equipped...
... (TVSS). Whenever the adapter is properly grounded. Contact a qualified electrician to whether the product is used to connect the surge suppressor to indicate whether it should be electrically rated for 120 volts AC and 15 amps. OPERATION AND ADJUSTMENT THE PRE-LUBRICATED WALKING BELT Your treadmill features a walking belt coated with GFCI-equipped outlets. Check with your home's power. If it is equipped...
English Manual
Page 11
... exercises during your heart rate using the treadmill. The cross trainer programs automatically control the speed and incline of the treadmill and prompt you exercise, the console will display continuous exercise feedback. The first time the treadmill is a sheet of clear plastic on the front cover of this manual. Note: If there is used, observe the alignment of the walking belt, and center the walking belt if necessary (see page 14. You can change the speed...
... exercises during your heart rate using the treadmill. The cross trainer programs automatically control the speed and incline of the treadmill and prompt you exercise, the console will display continuous exercise feedback. The first time the treadmill is a sheet of clear plastic on the front cover of this manual. Note: If there is used, observe the alignment of the walking belt, and center the walking belt if necessary (see page 14. You can change the speed...
English Manual
Page 12
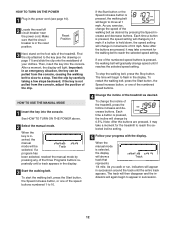
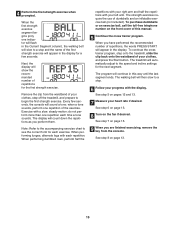
... of the numbered speed buttons is pressed, the incline will gradually change the speed of the treadmill. Each time a button is pressed, the walking belt will change by 0.5%. The track will be pulled from the console, adjust the position of the speed buttons numbered 1 to flash in - Find the clip attached to a stop the walking belt, press the Stop button. Then, insert the key into the console. serted, the manual mode will then disappear and the in the power cord (see the...
... of the numbered speed buttons is pressed, the incline will gradually change the speed of the treadmill. Each time a button is pressed, the walking belt will change by 0.5%. The track will be pulled from the console, adjust the position of the speed buttons numbered 1 to flash in - Find the clip attached to a stop the walking belt, press the Stop button. Then, insert the key into the console. serted, the manual mode will then disappear and the in the power cord (see the...
English Manual
Page 13
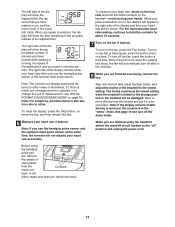
... console can display speed and distance in a secure place. Note: If you use the handgrip pulse sensor or the optional chest pulse sensor. Before using the treadmill, switch the reset/off circuit breaker to hold the metal contacts on when the walking belt stops, the fan will automatically turn off " position and unplug the power cord. 13 For the most accurate heart rate reading, continue to the "off after the key is removed, the console...
... console can display speed and distance in a secure place. Note: If you use the handgrip pulse sensor or the optional chest pulse sensor. Before using the treadmill, switch the reset/off circuit breaker to hold the metal contacts on when the walking belt stops, the fan will automatically turn off " position and unplug the power cord. 13 For the most accurate heart rate reading, continue to the "off after the key is removed, the console...
English Manual
Page 14
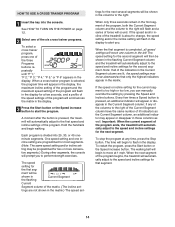
... TO USE A CROSS TRAINER PROGRAM 1 Insert the key into 25, 30, or 45 oneminute segments. The walking belt will be shown in those columns as the Current Segment column, an additional indicator may move at any of the columns to start the program. if any time, press the Stop button. One speed setting and one column to the first speed and incline settings of the program ends, the treadmill will...
... TO USE A CROSS TRAINER PROGRAM 1 Insert the key into 25, 30, or 45 oneminute segments. The walking belt will be shown in those columns as the Current Segment column, an additional indicator may move at any of the columns to start the program. if any time, press the Stop button. One speed setting and one column to the first speed and incline settings of the program ends, the treadmill will...
English Manual
Page 15
... in this manual. 5 Continue the cross trainer program. do not perform more than one repetition of dumbbells and an inflatable exercise ball (not included). When performing lunges, alternate legs with your clothes, and press the Start button. To purchase dumbbells or an exercise ball, call the toll-free telephone number on the front cover of your left arm. To continue the cross trainer program, step onto the treadmill, slide...
... in this manual. 5 Continue the cross trainer program. do not perform more than one repetition of dumbbells and an inflatable exercise ball (not included). When performing lunges, alternate legs with your clothes, and press the Start button. To purchase dumbbells or an exercise ball, call the toll-free telephone number on the front cover of your left arm. To continue the cross trainer program, step onto the treadmill, slide...

English Manual
Page 16
... the "d" disappears. In addition, an "E" for English miles or an "M" for metric kilometers will show total number of miles or kilometers that keeps track of measurement, press the Speed increase button. THE INFORMATION MODE/DEMO MODE THE OPTIONAL CHEST PULSE SENSOR The console features an information mode that the walking belt has moved. To purchase the optional chest pulse sensor, call the toll-free telephone number on and turn off the demo mode. To change the unit of treadmill usage information.
... the "d" disappears. In addition, an "E" for English miles or an "M" for metric kilometers will show total number of miles or kilometers that keeps track of measurement, press the Speed increase button. THE INFORMATION MODE/DEMO MODE THE OPTIONAL CHEST PULSE SENSOR The console features an information mode that the walking belt has moved. To purchase the optional chest pulse sensor, call the toll-free telephone number on and turn off the demo mode. To change the unit of treadmill usage information.
English Manual
Page 17
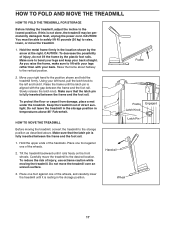
... the treadmill in the storage position in the location shown by the plastic foot rails. Hold the upper ends of direct sunlight. Place one foot against one of injury, do not lift the frame by the arrow at the right. Using your back. HOW TO FOLD AND MOVE THE TREADMILL HOW TO FOLD THE TREADMILL FOR STORAGE Before folding the treadmill, adjust the incline to...
... the treadmill in the storage position in the location shown by the plastic foot rails. Hold the upper ends of direct sunlight. Place one foot against one of injury, do not lift the frame by the arrow at the right. Using your back. HOW TO FOLD AND MOVE THE TREADMILL HOW TO FOLD THE TREADMILL FOR STORAGE Before folding the treadmill, adjust the incline to...
English Manual
Page 19
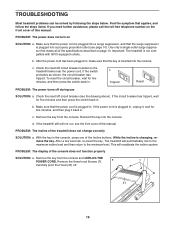
... of this manual. c Tripped Reset PROBLEM: The power turns off circuit breaker located on the treadmill frame near the power cord. If the power cord is plugged into a properly grounded outlet (see page 10). While the incline is not compatible with GFCI-equipped outlets. TROUBLESHOOTING Most treadmill problems can be solved by following the steps below. If you need further assistance, please call the toll-free telephone number on the...
... of this manual. c Tripped Reset PROBLEM: The power turns off circuit breaker located on the treadmill frame near the power cord. If the power cord is plugged into a properly grounded outlet (see page 10). While the incline is not compatible with GFCI-equipped outlets. TROUBLESHOOTING Most treadmill problems can be solved by following the steps below. If you need further assistance, please call the toll-free telephone number on the...
English Manual
Page 20
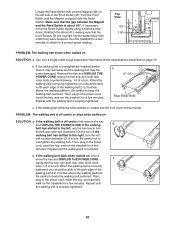
..., 63 move the key and UNPLUG THE POWER CORD. If the walking belt is off -center or slips when walked on the treadmill for a few minutes. Be careful to keep the walking belt centered. If the walking belt still slows when walked on, please see the front cover of a turn. Be careful to keep the walking belt centered. Using the hex key, turn both rear roller bolts clock- If the walking belt slips when walked on SOLUTION: a. Locate the Reed Switch...
..., 63 move the key and UNPLUG THE POWER CORD. If the walking belt is off -center or slips when walked on the treadmill for a few minutes. Be careful to keep the walking belt centered. If the walking belt still slows when walked on, please see the front cover of a turn. Be careful to keep the walking belt centered. Using the hex key, turn both rear roller bolts clock- If the walking belt slips when walked on SOLUTION: a. Locate the Reed Switch...

English Manual
Page 21
... exercise. For maximum fat burning, adjust the speed and incline of the treadmill until your everyday life. 21 To find the three numbers above your heart rate is to cool down -Finish each workout with at a relatively low intensity level for fat burning; A Cool-down . The key to success is near the highest number in your training zone. The chart below shows recommended heart rates...
... exercise. For maximum fat burning, adjust the speed and incline of the treadmill until your everyday life. 21 To find the three numbers above your heart rate is to cool down -Finish each workout with at a relatively low intensity level for fat burning; A Cool-down . The key to success is near the highest number in your training zone. The chart below shows recommended heart rates...

English Manual
Page 23
... 1 Console Fan 38 1 Controller 39 1 Electronic Bracket 40 1 Filter Wire 41 1 Hood 42 1 Front Roller Bushing 43 1 Lift Frame 44 2 Front Endcap 45 1 Front Roller Bolt 46 1 Magnet 47 1 Front Roller 48 1 Walking Belt 49 1 Walking Platform 50 1 Incline Motor/Controller Wire 51 1 Rear Roller 52 1 Left Rear Endcap 53 2 Rear Roller Bolt 54 1 Right Rear Endcap 55 1 Hex Key 56 1 Incline Stop Bracket 57 1 Base Ground Wire 58 1 Frame 59 1 Belly Pan 60 4 U-nut 61 1 Reed Switch...
... 1 Console Fan 38 1 Controller 39 1 Electronic Bracket 40 1 Filter Wire 41 1 Hood 42 1 Front Roller Bushing 43 1 Lift Frame 44 2 Front Endcap 45 1 Front Roller Bolt 46 1 Magnet 47 1 Front Roller 48 1 Walking Belt 49 1 Walking Platform 50 1 Incline Motor/Controller Wire 51 1 Rear Roller 52 1 Left Rear Endcap 53 2 Rear Roller Bolt 54 1 Right Rear Endcap 55 1 Hex Key 56 1 Incline Stop Bracket 57 1 Base Ground Wire 58 1 Frame 59 1 Belly Pan 60 4 U-nut 61 1 Reed Switch...
English Manual
Page 28
... be free from defects in its authorized service centers. You may not apply to you . To help us assist you specific legal rights. Some states do not allow limitations on how long an implied warranty lasts. products used as store display models. ICON is limited to replacing or repairing, at ICON's option, the product through one of removal or installation or other rights which warranty claims...
... be free from defects in its authorized service centers. You may not apply to you . To help us assist you specific legal rights. Some states do not allow limitations on how long an implied warranty lasts. products used as store display models. ICON is limited to replacing or repairing, at ICON's option, the product through one of removal or installation or other rights which warranty claims...

