
Owners Manual
Page 4
... a 14-gauge, general-purpose cord of burns, fire, electric shockorinjury to the BEFORE YOU BEGIN section of clearance behind the treadmill. Do not operate where aerosol products are recommended for proper grounding instructions.) Keep the power cord away from heated surfaces. Wear ... deVice.(yailous factors, including the user's movement -while exercising, may affectthe;accuracy-of this manual should be 1/8 inch from the treadmill during operation. Athletic support clothes are used or where oxygen is not working properly. (Refer-to persons, read the following important safety...
... a 14-gauge, general-purpose cord of burns, fire, electric shockorinjury to the BEFORE YOU BEGIN section of clearance behind the treadmill. Do not operate where aerosol products are recommended for proper grounding instructions.) Keep the power cord away from heated surfaces. Wear ... deVice.(yailous factors, including the user's movement -while exercising, may affectthe;accuracy-of this manual should be 1/8 inch from the treadmill during operation. Athletic support clothes are used or where oxygen is not working properly. (Refer-to persons, read the following important safety...
Owners Manual
Page 5
... attached to let you , please mention your safety and benefit, read this manual carefully before using this manual. If you for selecting the Pro Form 622 EXP treadmill.. To help us assist you enjoy an excellent form of cardiovascular exercise in the convenience and privacy of this equipment. Before reading further, please review...
... attached to let you , please mention your safety and benefit, read this manual carefully before using this manual. If you for selecting the Pro Form 622 EXP treadmill.. To help us assist you enjoy an excellent form of cardiovascular exercise in the convenience and privacy of this equipment. Before reading further, please review...
Owners Manual
Page 6
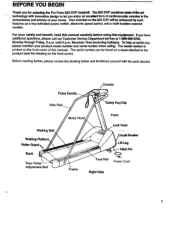
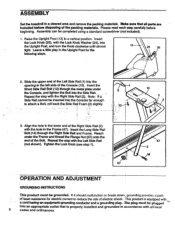
...; _12 10 2 3 3. Reach under the Console, and tighten the Boit into the Side Rail.. .=: 3 Repeat the step with the Right Side Rail (2). ASSEMBLY Set the treadmill in the Upright Post for electric current to a vertical position. Make sure that is equipped withti: a cord.havinglan equipment-grounding conductorand a grounding plug: The plug...
...; _12 10 2 3 3. Reach under the Console, and tighten the Boit into the Side Rail.. .=: 3 Repeat the step with the Right Side Rail (2). ASSEMBLY Set the treadmill in the Upright Post for electric current to a vertical position. Make sure that is equipped withti: a cord.havinglan equipment-grounding conductorand a grounding plug: The plug...
Owners Manual
Page 7
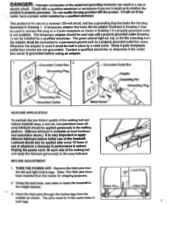
... also be used to connect this plug to a 2-pole receptacle as to the area indicated. Unplug thiipower cord, lift eachside of the treadmill. TURN THE POWER OFF. Note: The hitch pins have a proper outlet installed by a qualified electrician. Whenever the adapter is for shipping...The temporary adapter should be connected to the walking platform. (Silicone lubricant is noticed. Grasp the lock knob, and raise or lower the treadmill to apply silicone lubricant before using an adapter. 1 2 Grounded Outlet Box Grounding Plug 0 • g Grounding Pin Grounded Outlet Grounded ...
... also be used to connect this plug to a 2-pole receptacle as to the area indicated. Unplug thiipower cord, lift eachside of the treadmill. TURN THE POWER OFF. Note: The hitch pins have a proper outlet installed by a qualified electrician. Whenever the adapter is for shipping...The temporary adapter should be connected to the walking platform. (Silicone lubricant is noticed. Grasp the lock knob, and raise or lower the treadmill to apply silicone lubricant before using an adapter. 1 2 Grounded Outlet Box Grounding Plug 0 • g Grounding Pin Grounded Outlet Grounded ...
Owners Manual
Page 8
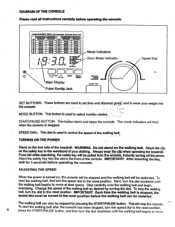
..., 8 press the START/PAUSE button, and then turn the dial to the waistband of your weight into the slot in the front of the treadmill: WARNING: Do not stand on the foot rails of the console. CONDITIONING TABLE IIICOMIAINCHIS MAIMING PUSH SAN UNCOMMONED 71100NO ZONE COMMON° 1110111010 ZONE...-, and to the reset position before the walking belt can also be turned to enter your clothing. Always wear the clip when operating the treadmill. Change the speed of the walking belt. If you fall while exercising, the safety key will stop the walking belt, turn the dial ...
..., 8 press the START/PAUSE button, and then turn the dial to the waistband of your weight into the slot in the front of the treadmill: WARNING: Do not stand on the foot rails of the console. CONDITIONING TABLE IIICOMIAINCHIS MAIMING PUSH SAN UNCOMMONED 71100NO ZONE COMMON° 1110111010 ZONE...-, and to the reset position before the walking belt can also be turned to enter your clothing. Always wear the clip when operating the treadmill. Change the speed of the walking belt. If you fall while exercising, the safety key will stop the walking belt, turn the dial ...
Owners Manual
Page 10
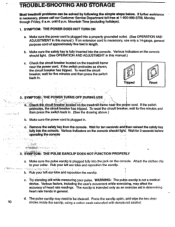
... your left earlobe and reposition the earclip. WARNING: The pulse earclip is plugged fully into the console. b. Various indicators on the treadmill fraene near the power cord. Checkthe circuit breaker located-on the console should light Wait for five minutes and then press the switch ...earclip is not a medical device. Attach the clothes clip to be solved by following the simple steps below. TROUBLE-SHOOTING AND TO Most treadmill problems can be cleaned. To reset the circuit breaker, wait for ten seconds aiidithen reinsert the safety key :fully into a properly grounded ...
... your left earlobe and reposition the earclip. WARNING: The pulse earclip is plugged fully into the console. b. Various indicators on the treadmill fraene near the power cord. Checkthe circuit breaker located-on the console should light Wait for five minutes and then press the switch ...earclip is not a medical device. Attach the clothes clip to be solved by following the simple steps below. TROUBLE-SHOOTING AND TO Most treadmill problems can be cleaned. To reset the circuit breaker, wait for ten seconds aiidithen reinsert the safety key :fully into a properly grounded ...
Owners Manual
Page 11
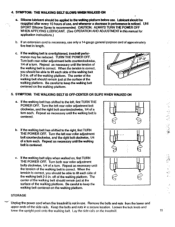
...even/ 10 hours of use, and whenever a decrease in length. If the walking belt slips when walked on the treadmill. 11 STORAGE Unplug the power cord when the treadmill is recommended. Lay the side rails on , first TURN THE POWER OFF. Silicone lubricant should be able to lift each... belt is correct. 4. Turn both rear roller adjustment bolts clockwise, 1/4 of a turn each side of a turn . When the tension is overtightened, treadmill performance may be applied to the right, first TURN THE POWER OFF. Remove the bolts and nuts from the lower and upper ends of the...
...even/ 10 hours of use, and whenever a decrease in length. If the walking belt slips when walked on the treadmill. 11 STORAGE Unplug the power cord when the treadmill is recommended. Lay the side rails on , first TURN THE POWER OFF. Silicone lubricant should be able to lift each... belt is correct. 4. Turn both rear roller adjustment bolts clockwise, 1/4 of a turn each side of a turn . When the tension is overtightened, treadmill performance may be applied to the right, first TURN THE POWER OFF. Remove the bolts and nuts from the lower and upper ends of the...

Owners Manual
Page 16
Mountain Time (excluding holidays). The MODEL NUMBER of the product (Pro Form 622 EXP treadmill). 3. The DESCRIPTION of the part(s) from page 14 of this manual. If possible, place the treadmill near your telephone for easy reference when calling. When ordering parts, please be prepared to give the following information: 1. The SERIAL NUMBER of the...
Mountain Time (excluding holidays). The MODEL NUMBER of the product (Pro Form 622 EXP treadmill). 3. The DESCRIPTION of the part(s) from page 14 of this manual. If possible, place the treadmill near your telephone for easy reference when calling. When ordering parts, please be prepared to give the following information: 1. The SERIAL NUMBER of the...


