ProForm G720 Bench Support and Manuals
Get Help and Manuals for this ProForm item

View All Support Options Below
Free ProForm G720 Bench manuals!
Problems with ProForm G720 Bench?
Ask a Question
Free ProForm G720 Bench manuals!
Problems with ProForm G720 Bench?
Ask a Question
Popular ProForm G720 Bench Manual Pages
Uk Manual - Page 1

... our website at www.iconeurope.com Model No.
Serial Number Decal
QUESTIONS? Save this equipment. PFEVBE33430 Serial No Write the serial number in this manual before using this manual for reference. As a manufacturer, we are missing or damaged parts, please call:
08457 089 009
Or write: ICON Health & Fitness, Ltd. If you have questions...
Uk Manual - Page 2
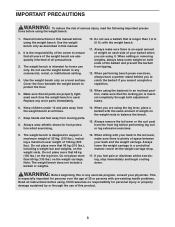
... our Customer Service Department toll-free at the right have been placed on the weight bench. Apply the decal in the indicated location. TABLE OF CONTENTS
WARNING DECAL PLACEMENT 2 IMPORTANT PRECAUTIONS 3 BEFORE YOU BEGIN 4 PART IDENTIFICATION CHART 5 ASSEMBLY 6 ADJUSTMENTS 11 EXERCISE GUIDELINES 15 PART LIST 18 EXPLODED DRAWING 19 ORDERING REPLACEMENT PARTS Back Cover
WARNING DECAL...
Uk Manual - Page 3
... from moving parts.
8. It is the responsibility of the owner to support a maximum weight of 231kg. (510 lbs.), including a maximum user weight of 136 kg (300 lbs.). Cover the floor beneath the weight bench to balance the bench.
15. When performing bench press exercises, always have a partner stand behind you to the lat tower, make sure that all instructions in a controlled...
Uk Manual - Page 4

For your own weight set (not included) to the weight bench (see the front cover of the body. Depth: 80 in . If you for selecting the PROFORM® G720 weight bench.
The serial number can be used with the parts that are labeled. Lat Bar
Lat Tower Weight Rest Barbell Hook
Preacher Curl Leg Lever Curl Bar Weight Tube Seat
ASSEMBLED DIMENSIONS: Height: 80...
Uk Manual - Page 6
... CHART on page 5.
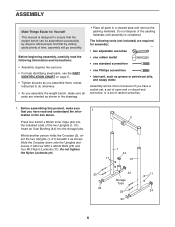
• Tighten all parts as you assemble them, unless instructed to ensure that the weight bench can be more convenient if you have read the following tools (not included) are oriented as shown. Before assembling this product, make sure all parts are required for Yourself
This manual is completed.
Do not tighten the...
Uk Manual - Page 7

... 3
3. Attach the Bench Frame (5) to the upper set of holes in steps 1 and 2.
4.
Attach the Front Leg (3) to pivot easily. Lubricate an M10 x 80mm Bolt (13) with an M10 x 65mm Adjustment Knob (54) as shown.
the Bench Frame must be able to the Bench Frame (5) with two M10 x 95mm Bolts (56), the Support Plate (62...
Uk Manual - Page 8

...Leg (3) so
9
that the Locking Pin is completely inserted through one of the three sets of the weight tube. Slide the Oval Insert (52) into the end of the Leg Lever (7). ...Press the 25mm Angle Cap (35) onto the other end of holes in the Front Leg. the Backrest must be able to the Bench Frame (5) by inserting the Locking Pin (27) through both adjustment tubes. Attach the Seat...
Uk Manual - Page 11
... exercises. The steps below .
63 19 6
11
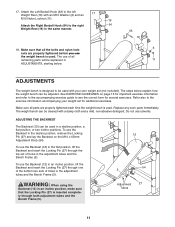
ADJUSTMENTS
The weight bench is used . Replace any worn parts immediately. The weight bench can be explained in a decline position, a flat position, or two incline positions.
17.
To use the weight bench is designed to the exercise information accompanying your own weight set (not included). Do not use the Backrest in the decline...
Uk Manual - Page 12
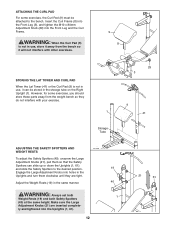
... and slide the Safety Spotters to the bench. WARNING: Always set both
Weight Rests (19) and both Safety Spotters (...40) at the same height. ATTACHING THE CURL PAD
For some exercises, you should store these parts away from the bench so it will not interfere with your exercise.
1
Storage Tube
29 3
9 41
ADJUSTING THE SAFETY SPOTTERS AND WEIGHT...
Uk Manual - Page 15

... user.
On the exercise guide accompanying this manual you progressively increase the intensity...Weight Loss To lose weight, use a low amount of resistance and increase the number of repetitions in two ways: • by changing the amount of resistance used • by at your own pace and be sensitive to your body's signals.
Find out what is an essential part of repetitions or sets...
Uk Manual - Page 16
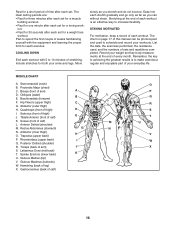
... chart on page 17 of this manual can without strain. Remember, the key to achieving the greatest...is an effective way to make exercise a regular and enjoyable part of your arms and legs. MUSCLE CHART
A. Obliques (...8226; Rest for three minutes after each set for a muscle
building workout. • Rest for one minute after each set for a weight loss
workout. Record your workouts. Sternomastoid...
Uk Manual - Page 17

MONDAY
Date: / /
EXERCISE
WEIGHT
SETS
REPS
TUESDAY
Date: / /
AEROBIC EXERCISE
WEDNESDAY
Date: / /
EXERCISE
WEIGHT
SETS
REPS
THURSDAY
Date: / /
AEROBIC EXERCISE
FRIDAY
Date: / /
EXERCISE
WEIGHT
SETS
REPS
Make photocopies of this page for scheduling and recording your workouts.
17
Uk Manual - Page 18
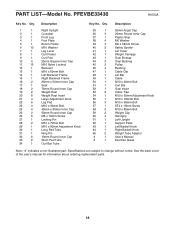
...x 15mm Screw M10 x 85mm Bolt Weight Clip Handgrip Left Upright Support Plate Left Barbell Hook Right Barbell Hook Weight Tube Adaptor User's Manual Exercise Guide
Note: "#" indicates a non-illustrated part. Specifications are subject to change without notice. ...cover of the user's manual for information about ordering replacement parts.
18 PFEVBE33430
R0703A
Key No. PART LIST-Model No.
Uk Manual - Page 19

EXPLODED DRAWING-Model No. PFEVBE33430 R0703A
53
11
46
45 11
46
6
53 45 46
49
11 50
43 49
6 58
15 55
41
59
6
10
9 60
12
...
Uk Manual - Page 20
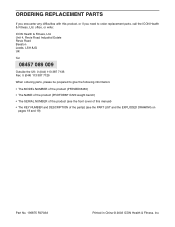
... MODEL NUMBER of the product (PFEVBE33430)
• The NAME of the product (PROFORM® G720 weight bench)
• The SERIAL NUMBER of this product, or if you need to order replacement parts, call the ICON Health & Fitness, Ltd. ORDERING REPLACEMENT PARTS
If you encounter any difficulties with this manual)
• The KEY NUMBER and DESCRIPTION of the part(s) (see the front cover...
ProForm G720 Bench Reviews
We have not received any reviews for ProForm yet.