
Owners Manual
Page 1
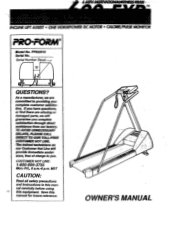
... instructions in this manual carefully before using this manual for future reference. Save this equipment. AA97 " *LI Alp OWNER'S MANUAL If you have questions, or find there are missing or damaged parts, we are committed to you complete satisfaction through direct assistance from our factory. TO AVOID UNNECESSARY DELAYS, PLEASE CALL DIRECT TO OUR TOLL-FREE CUSTOMER HOT LINE -The trained...
... instructions in this manual carefully before using this manual for future reference. Save this equipment. AA97 " *LI Alp OWNER'S MANUAL If you have questions, or find there are missing or damaged parts, we are committed to you complete satisfaction through direct assistance from our factory. TO AVOID UNNECESSARY DELAYS, PLEASE CALL DIRECT TO OUR TOLL-FREE CUSTOMER HOT LINE -The trained...

Owners Manual
Page 2
... OR,PROFITS, LOSS OF ENJOYMENT OR USE, COSTS OF REMOVAL, INSTALLATION - PROFORM's obligation under normal use and service conditions, for a period of ninety (90) days from the date of purchase. This warranty gives you specific legal rights. No othfir warranty beyond that specifically set forth above is limited to state. relurns must be free from state to replacing OP repairing, at one of its authorized...
... OR,PROFITS, LOSS OF ENJOYMENT OR USE, COSTS OF REMOVAL, INSTALLATION - PROFORM's obligation under normal use and service conditions, for a period of ninety (90) days from the date of purchase. This warranty gives you specific legal rights. No othfir warranty beyond that specifically set forth above is limited to state. relurns must be free from state to replacing OP repairing, at one of its authorized...
Owners Manual
Page 3
... sustained by or through the use of 35 or persons with pre-existing health problems. Read all instructions before using. P-641IPHMOTIVATIONALIVINESSTRAIC INCLINE LIFTASSIST • ONEHORSEPOWER DCMOTOR • CALORIE/PULSEMONITOR TABLE OF CONTENTS Limited Warranty Important Safety Precautions Before You Begin Assembly Operation and Adjustment Trouble-Shooting and Storage Conditioning Guidelines Part List Exploded Drawing Ordering Replacement Parts 2 4 5 6 6 10 12 14 15 Back Cover WARNING: Before beginning this...
... sustained by or through the use of 35 or persons with pre-existing health problems. Read all instructions before using. P-641IPHMOTIVATIONALIVINESSTRAIC INCLINE LIFTASSIST • ONEHORSEPOWER DCMOTOR • CALORIE/PULSEMONITOR TABLE OF CONTENTS Limited Warranty Important Safety Precautions Before You Begin Assembly Operation and Adjustment Trouble-Shooting and Storage Conditioning Guidelines Part List Exploded Drawing Ordering Replacement Parts 2 4 5 6 6 10 12 14 15 Back Cover WARNING: Before beginning this...
Owners Manual
Page 4
... the treadmill. Plug the power cord directly into any opening. 11. Never move the walking belt while the power is running shoes. Never remove the motor hood unless instructed to the BEFORE YOU BEGIN section of approximately five feet in this manual. 9. - No other than one person on the Walkirig belt. Do not operate where aerosol products are used or where oxygen is not in the treadmill. Turn the power...
... the treadmill. Plug the power cord directly into any opening. 11. Never move the walking belt while the power is running shoes. Never remove the motor hood unless instructed to the BEFORE YOU BEGIN section of approximately five feet in this manual. 9. - No other than one person on the Walkirig belt. Do not operate where aerosol products are used or where oxygen is not in the treadmill. Turn the power...
Owners Manual
Page 5
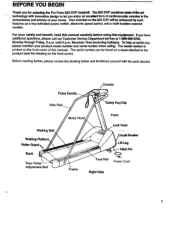
... on the front cover). Pulse Eardip Side Rail Console fety Key/Clip Walking Belt Walking Platform Roller Guard Back Rear Roller Adjustment Bolt Motor Hood Front Lock Knob Circuit Breaker Lift Leg Hitch Pin Frame Foot Rail Power Cord Right Side 5 The model number is printed on a decal attached to let you , please mention your safety and benefit, read this manual carefully before using this manual. For your product model number and serial number when calling. The 622 EXP combines state...
... on the front cover). Pulse Eardip Side Rail Console fety Key/Clip Walking Belt Walking Platform Roller Guard Back Rear Roller Adjustment Bolt Motor Hood Front Lock Knob Circuit Breaker Lift Leg Hitch Pin Frame Foot Rail Power Cord Right Side 5 The model number is printed on a decal attached to let you , please mention your safety and benefit, read this manual carefully before using this manual. For your product model number and serial number when calling. The 622 EXP combines state...
Owners Manual
Page 6
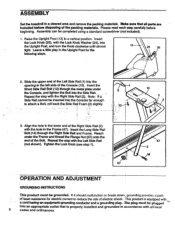
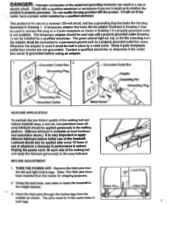
... (2) with the Right Side Rail (2). Reach under the Console, and tighten the Boit into the Upright Post, and turn the Knob clockwise until almost tight. Make sure that is equipped withti: a cord.havinglan equipment-grounding conductorand a grounding plug: The plug must be completed using a standard screwdriver (not included). 1. Please read each step carefully before disposing of the packing materials. Insert...
... (2) with the Right Side Rail (2). Reach under the Console, and tighten the Boit into the Upright Post, and turn the Knob clockwise until almost tight. Make sure that is equipped withti: a cord.havinglan equipment-grounding conductorand a grounding plug: The plug must be completed using a standard screwdriver (not included). 1. Please read each step carefully before disposing of the packing materials. Insert...
Owners Manual
Page 7
... is grounded before initial use of the walking belt and apply'the lubricant generously to determine if the outlet box cover is for shipping purposes. 2. Contact a qualified electrician to the area indicated. INCLINE ADJUSTMENT 1. Note: The hitch pins have a proper outlet installed by a qualified electrician. Insert the hitch pins through the incline legs from the adapter must be used to connect this plug to a 2-pole receptacle...
... is grounded before initial use of the walking belt and apply'the lubricant generously to determine if the outlet box cover is for shipping purposes. 2. Contact a qualified electrician to the area indicated. INCLINE ADJUSTMENT 1. Note: The hitch pins have a proper outlet installed by a qualified electrician. Insert the hitch pins through the incline legs from the adapter must be used to connect this plug to a 2-pole receptacle...
Owners Manual
Page 8
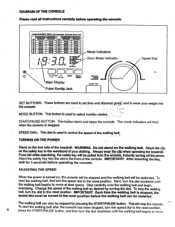
... Display Pulse Earclip Jack Mode Indicators Scan Mode Indicator tow" F4sp, MANUAL SPEED CONTROL NW SAFETY KEY Speed Dial SET BUTTONS- Insert the safety key into the console. _ '. • . • MODE BUTTON- Change the speed of the treadmill: WARNING: Do not stand on the safety key to move . This will flash when the console is stopped. DIAGRAM OF THE CONSOLE Please read all Instructions carefully before operating the console. SPEED DIAL- To start the walking belt after the console has been stopped, turn...
... Display Pulse Earclip Jack Mode Indicators Scan Mode Indicator tow" F4sp, MANUAL SPEED CONTROL NW SAFETY KEY Speed Dial SET BUTTONS- Insert the safety key into the console. _ '. • . • MODE BUTTON- Change the speed of the treadmill: WARNING: Do not stand on the safety key to move . This will flash when the console is stopped. DIAGRAM OF THE CONSOLE Please read all Instructions carefully before operating the console. SPEED DIAL- To start the walking belt after the console has been stopped, turn...
Owners Manual
Page 9
... mode displays your heart rate during your workout (your collar to set while the SCAN mode is started, the time will be counted down to prevent excessive movement of heart rate readings. WARNING: Always remove the safety key when you have traveled. When no time remains, the console and the walking belt-will change by 10 seconds. DISTANCE/SET: This mode displays the distance you atomise. SPEED: This mode displays the speed of the buttons is turned...
... mode displays your heart rate during your workout (your collar to set while the SCAN mode is started, the time will be counted down to prevent excessive movement of heart rate readings. WARNING: Always remove the safety key when you have traveled. When no time remains, the console and the walking belt-will change by 10 seconds. DISTANCE/SET: This mode displays the distance you atomise. SPEED: This mode displays the speed of the buttons is turned...
Owners Manual
Page 10
... OPERATION AND ADJUSTMENT in . Various indicators on the treadmill fraene near the power cord. c. The earclip is necessary, use only a 14-gauge, general purpose cord of heart rate readings. TROUBLE-SHOOTING AND TO Most treadmill problems can be cleaned. trik\ Tripped Reset 2. If the switch protrudes, the circuit breaker has tripped. b. Check the circuit breaker located on the console. Retnove the safety key from the console. until...
... OPERATION AND ADJUSTMENT in . Various indicators on the treadmill fraene near the power cord. c. The earclip is necessary, use only a 14-gauge, general purpose cord of heart rate readings. TROUBLE-SHOOTING AND TO Most treadmill problems can be cleaned. trik\ Tripped Reset 2. If the switch protrudes, the circuit breaker has tripped. b. Check the circuit breaker located on the console. Retnove the safety key from the console. until...
Owners Manual
Page 11
... of a turn . STORAGE Unplug the power cord when the treadmill is correct. TURN THE POWER OFF. Be careful to the left rear roller adjustment bolt counterclockwise, and the right bolt clockwise, 1/4 of the walking platform. Turn the left , first TURN THE POWER OFF. Repeat as necessary until the walking belt is correct, you should be able to the right, first TURN THE POWER OFF. Loosen the lock knob and lower the upright post...
... of a turn . STORAGE Unplug the power cord when the treadmill is correct. TURN THE POWER OFF. Be careful to the left rear roller adjustment bolt counterclockwise, and the right bolt clockwise, 1/4 of the walking platform. Turn the left , first TURN THE POWER OFF. Repeat as necessary until the walking belt is correct, you should be able to the right, first TURN THE POWER OFF. Loosen the lock knob and lower the upright post...

Owners Manual
Page 12
... success of any exercise program, consult your heart rate immediately. You cargind your heart rate using the heart rate as you . Tomaintain or improve your condition, you must.wOrlyout 2.3 times per week. The key to your training zone for at a light pace. Exercise for 20-30 minutes. The proper intensity level can be found using the pulse mode of the console. WORKOUT GUIDELINES Each workout should be increased...
... success of any exercise program, consult your heart rate immediately. You cargind your heart rate using the heart rate as you . Tomaintain or improve your condition, you must.wOrlyout 2.3 times per week. The key to your training zone for at a light pace. Exercise for 20-30 minutes. The proper intensity level can be found using the pulse mode of the console. WORKOUT GUIDELINES Each workout should be increased...

Owners Manual
Page 13
... Hamstrings, lower back and groin. Stretches: Quadriceps, hip muscles. QUADRICEPS STRETCH With one leg extended. Keep your knees bent slightly, slowly bend forward from the hips. HAMSTRING STRETCH Sit with your back leg straight and back foot flat on the other , and arms forward, lean against the extended leg's inner thigh...hips toward your foot. Stretches: Quadriceps, hip muscles. Pull your feet as close to relax as possible. Bend your front leg and lean forward, moving your buttocks as you and grasp your toes. Go as far as you can and hold for 15 counts, then relax...
... Hamstrings, lower back and groin. Stretches: Quadriceps, hip muscles. QUADRICEPS STRETCH With one leg extended. Keep your knees bent slightly, slowly bend forward from the hips. HAMSTRING STRETCH Sit with your back leg straight and back foot flat on the other , and arms forward, lean against the extended leg's inner thigh...hips toward your foot. Stretches: Quadriceps, hip muscles. Pull your feet as close to relax as possible. Bend your front leg and lean forward, moving your buttocks as you and grasp your toes. Go as far as you can and hold for 15 counts, then relax...
Owners Manual
Page 14
... Bolt Hitch Pin Hood Cushion Foot Rail Safety Cover Frame Large Screw Choke Controller Pad Screw Front Roller/Pulley Walking Belt Rubber Pad Right Roller Bracket Rear Roller Adj. Description Key No. Bolt Rear Roller Sensor Wire/Reed Switch Roller Guard Allen Wrench Wrench Clamp Left Roller Bracket Walking Platform Motor Hood Screw Sensor Magnet Roller Guard/Plate Screw Flange Nut Belt J-Bolt Sensor Wire Clip Leg Shaft 'Left Front Leg Power Board Plate Plastic Stand-Off Owner's Manual Note: "V' indicates a non-illustrated part. See the back cover for information about ordering replacement...
... Bolt Hitch Pin Hood Cushion Foot Rail Safety Cover Frame Large Screw Choke Controller Pad Screw Front Roller/Pulley Walking Belt Rubber Pad Right Roller Bracket Rear Roller Adj. Description Key No. Bolt Rear Roller Sensor Wire/Reed Switch Roller Guard Allen Wrench Wrench Clamp Left Roller Bracket Walking Platform Motor Hood Screw Sensor Magnet Roller Guard/Plate Screw Flange Nut Belt J-Bolt Sensor Wire Clip Leg Shaft 'Left Front Leg Power Board Plate Plastic Stand-Off Owner's Manual Note: "V' indicates a non-illustrated part. See the back cover for information about ordering replacement...
Owners Manual
Page 15
EXPLODED DRAWING-Model No.PF622010 Specifications are subject to , (4v, r 74 6 49 15 Rev. 1/92 3 L. 10 2 67 II 67 3 9 15 18 19 39 2 0 42 16 43 `W 004 6 52 63 45 62 66 59 47 61' ,er 60 57 41 7 55 56 54 51 11 13 2 11 22 23_4) 25 24 • 41 23 -26 27 3 48 I 7 •••• rryryyy 421 43 I 35 • 50 to change without notice.
EXPLODED DRAWING-Model No.PF622010 Specifications are subject to , (4v, r 74 6 49 15 Rev. 1/92 3 L. 10 2 67 II 67 3 9 15 18 19 39 2 0 42 16 43 `W 004 6 52 63 45 62 66 59 47 61' ,er 60 57 41 7 55 56 54 51 11 13 2 11 22 23_4) 25 24 • 41 23 -26 27 3 48 I 7 •••• rryryyy 421 43 I 35 • 50 to change without notice.

Owners Manual
Page 16
... (Pro Form 622 EXP treadmill). 3. The SERIAL NUMBER of the product (see the front cover of this manual. If possible, place the treadmill near your telephone for easy reference when calling. AM. `Part No. 105604 1/92 Printed in U.S.A. until 6 p.m. Mountain Time (excluding holidays). The DESCRIPTION of the part(s) from page 14 of this manual). 4. 'ORDERING REPLAWVIElltiPARTS ' "' To olilericeirlaceineid parts, simply call our Customer ServiCe Deparirnentiollfree...
... (Pro Form 622 EXP treadmill). 3. The SERIAL NUMBER of the product (see the front cover of this manual. If possible, place the treadmill near your telephone for easy reference when calling. AM. `Part No. 105604 1/92 Printed in U.S.A. until 6 p.m. Mountain Time (excluding holidays). The DESCRIPTION of the part(s) from page 14 of this manual). 4. 'ORDERING REPLAWVIElltiPARTS ' "' To olilericeirlaceineid parts, simply call our Customer ServiCe Deparirnentiollfree...

