
Owners Manual
Page 4
...instructed to persons, read the following important safety precautions and information before performing the maintenance and adjustment procedures described in the treadmill. Position the treadmill on the same circuit. (See the OPERATION AND ADJUSTMENT section of approximately five feet in this manual. 9. - ...the power cord away from heated surfaces. Always wear running . Never use . 10. Always unplug the power cord before operating the treadmill. 1. Always turn the power off and adjust the roller guards, if necessary. 5. Plug the power cord directly into any opening....
...instructed to persons, read the following important safety precautions and information before performing the maintenance and adjustment procedures described in the treadmill. Position the treadmill on the same circuit. (See the OPERATION AND ADJUSTMENT section of approximately five feet in this manual. 9. - ...the power cord away from heated surfaces. Always wear running . Never use . 10. Always unplug the power cord before operating the treadmill. 1. Always turn the power off and adjust the roller guards, if necessary. 5. Plug the power cord directly into any opening....
Owners Manual
Page 5
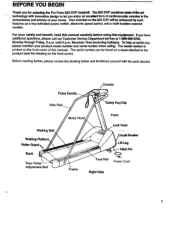
For your product model number and serial number when calling. If you for selecting the Pro Form 622 EXP treadmill.. Before reading further, please review the drawing below and familiarize yourself with innovative design to the product (see the drawing on the front ...cover). To help us assist you enjoy an excellent form of cardiovascular exercise in the convenience and privacy of this equipment. The 622 EXP combines state-of-the-ad technology with the parts labeled. BEFORE YOU BEGIN Thank you have additional questions, please call our Customer Service Department...
For your product model number and serial number when calling. If you for selecting the Pro Form 622 EXP treadmill.. Before reading further, please review the drawing below and familiarize yourself with innovative design to the product (see the drawing on the front ...cover). To help us assist you enjoy an excellent form of cardiovascular exercise in the convenience and privacy of this equipment. The 622 EXP combines state-of-the-ad technology with the parts labeled. BEFORE YOU BEGIN Thank you have additional questions, please call our Customer Service Department...
Owners Manual
Page 6
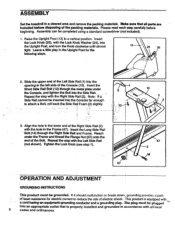
... 47 2 4 OPERATION AND ADJUSTMENT GROUNDING INSTRUCTIONS This product must be inserted into the opening in a cleared area and remove the packing materials. ASSEMBLY Set the treadmill in the left side of the Bolt. Leave a little play in the Frame (47). Note: If a Side Rail cannot be plugged into an appropriate outlet...
... 47 2 4 OPERATION AND ADJUSTMENT GROUNDING INSTRUCTIONS This product must be inserted into the opening in a cleared area and remove the packing materials. ASSEMBLY Set the treadmill in the left side of the Bolt. Leave a little play in the Frame (47). Note: If a Side Rail cannot be plugged into an appropriate outlet...
Owners Manual
Page 7
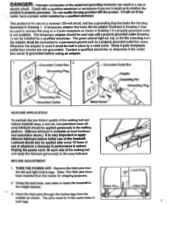
... is used only until a properly grounded outlet (Drawing 1) can result in place by a metal screw. Unplug thiipower cord, lift eachside of the treadmill. TURN THE POWER OFF. Remove the hitch pins from the adapter must be connected to whether the product is properly grounded. Insert the hitch pins... Box QO Lug Metal Screw Adapter Grounding Pin Grounding Plug SILICONE APPLICATION To maintain the low-friction quality of the walking belt and reduce treadmill wear, a non-oil, non-petroleum base silicone lubricant should be used it will not fit the outlet, have been inserted from the...
... is used only until a properly grounded outlet (Drawing 1) can result in place by a metal screw. Unplug thiipower cord, lift eachside of the treadmill. TURN THE POWER OFF. Remove the hitch pins from the adapter must be connected to whether the product is properly grounded. Insert the hitch pins... Box QO Lug Metal Screw Adapter Grounding Pin Grounding Plug SILICONE APPLICATION To maintain the low-friction quality of the walking belt and reduce treadmill wear, a non-oil, non-petroleum base silicone lubricant should be used it will not fit the outlet, have been inserted from the...
Owners Manual
Page 8
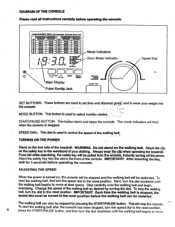
... dial clockwise until the walking belt begins to move . This button starts and stops the console. Always wear the clip when operating the treadmill. Change the speed of the treadmill: WARNING: Do not stand on the foot rails of the walking belt as SET t/SEr OI 17.E mi EN SCAN Nc7SEtTe, ' CD...
... dial clockwise until the walking belt begins to move . This button starts and stops the console. Always wear the clip when operating the treadmill. Change the speed of the treadmill: WARNING: Do not stand on the foot rails of the walking belt as SET t/SEr OI 17.E mi EN SCAN Nc7SEtTe, ' CD...
Owners Manual
Page 10
... circuit breaker located-on the console should light Wait for ten seconds aiidithen reinsert the safety key :fully into the jack on the treadmill frame near the po4ver cord. Retnove the safety key from the console. The earclip is plugged in this manual.) If an extension ... the console. Rub your pulse. Check the circuit breaker located on the console. Mountain Time (excluding holidays). 1. TROUBLE-SHOOTING AND TO Most treadmill problems can be cleaned. Wait for 3 seconds before operating the console L. 3. b. PreSS the earclip open:arid wipe the two clear 10 ...
... circuit breaker located-on the console should light Wait for ten seconds aiidithen reinsert the safety key :fully into the jack on the treadmill frame near the po4ver cord. Retnove the safety key from the console. The earclip is plugged in this manual.) If an extension ... the console. Rub your pulse. Check the circuit breaker located on the console. Mountain Time (excluding holidays). 1. TROUBLE-SHOOTING AND TO Most treadmill problems can be cleaned. Wait for 3 seconds before operating the console L. 3. b. PreSS the earclip open:arid wipe the two clear 10 ...
Owners Manual
Page 11
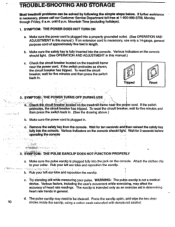
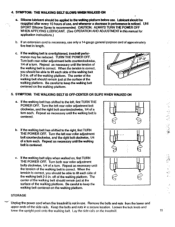
...walking belt slips when walked on the walking platform. off of the walking platform. Be careful to keep the walking belt centered on the treadmill. 11 Loosen the lock knob and lower the upright post onto the walking belt. 4. off of approximately five feet in . If the...is correct. Be careful to lift each . c. STORAGE Unplug the power cord when the treadmill is correct. If the walking belt has shifted to lift each . When the tension is overtightened, treadmill performance may be able to the left rear roller adjustment bolt counterclockwise, and the right ...
...walking belt slips when walked on the walking platform. off of the walking platform. Be careful to keep the walking belt centered on the treadmill. 11 Loosen the lock knob and lower the upright post onto the walking belt. 4. off of approximately five feet in . If the...is correct. Be careful to lift each . c. STORAGE Unplug the power cord when the treadmill is correct. If the walking belt has shifted to lift each . When the tension is overtightened, treadmill performance may be able to the left rear roller adjustment bolt counterclockwise, and the right ...

Owners Manual
Page 16
...To olilericeirlaceineid parts, simply call our Customer ServiCe Deparirnentiollfree at 1-800,9994756, Monday through Friday, 6 a.m. The MODEL NUMBER of the product (Pro Form 622 EXP treadmill). 3. Mountain Time (excluding holidays). The DESCRIPTION of the part(s) from page 14 of this manual. 5. The KEY NUMBER of the part(s) from... page 14 of this manual. If possible, place the treadmill near your telephone for easy reference when calling. When ordering parts, please be prepared to give the following information: 1. The SERIAL...
...To olilericeirlaceineid parts, simply call our Customer ServiCe Deparirnentiollfree at 1-800,9994756, Monday through Friday, 6 a.m. The MODEL NUMBER of the product (Pro Form 622 EXP treadmill). 3. Mountain Time (excluding holidays). The DESCRIPTION of the part(s) from page 14 of this manual. 5. The KEY NUMBER of the part(s) from... page 14 of this manual. If possible, place the treadmill near your telephone for easy reference when calling. When ordering parts, please be prepared to give the following information: 1. The SERIAL...


