

Uk Manual
Page 2
® TABLE OF CONTENTS IMPORTANT PRECAUTIONS 3 BEFORE YOU BEGIN 5 ASSEMBLY 6 OPERATION AND ADJUSTMENT 8 HOW TO FOLD AND MOVE THE TREADMILL 18 TROUBLE-SHOOTING 19 CONDITIONING GUIDELINES 21 PART LIST 22 HOW TO ORDER REPLACEMENT PARTS Back Cover Note: An EXPLODED DRAWING is attached in the centre of this manual. 2
® TABLE OF CONTENTS IMPORTANT PRECAUTIONS 3 BEFORE YOU BEGIN 5 ASSEMBLY 6 OPERATION AND ADJUSTMENT 8 HOW TO FOLD AND MOVE THE TREADMILL 18 TROUBLE-SHOOTING 19 CONDITIONING GUIDELINES 21 PART LIST 22 HOW TO ORDER REPLACEMENT PARTS Back Cover Note: An EXPLODED DRAWING is attached in the centre of this manual. 2
Uk Manual
Page 3
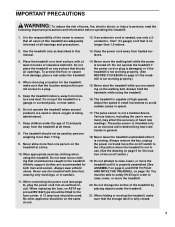
... position permit access to a plug. 5. Athletic support clothes are standing on ASTA approved BS1362 type should not be fitted to the off position when the treadmill is capable of all times. 8. When replacing the fuse, on the walking belt. A 13 amp fuse should be used or where oxygen is not ...covered patio, or near water. 6. Do not change the incline of 12 and pets away from damage, place a mat under the treadmill. 21. When folding or moving the treadmill, make sure that could become caught in general. 18. Keep the power cord away from moisture and dust. Do not operate the...
... position permit access to a plug. 5. Athletic support clothes are standing on ASTA approved BS1362 type should not be fitted to the off position when the treadmill is capable of all times. 8. When replacing the fuse, on the walking belt. A 13 amp fuse should be used or where oxygen is not ...covered patio, or near water. 6. Do not change the incline of 12 and pets away from damage, place a mat under the treadmill. 21. When folding or moving the treadmill, make sure that could become caught in general. 18. Keep the power cord away from moisture and dust. Do not operate the...
Uk Manual
Page 4
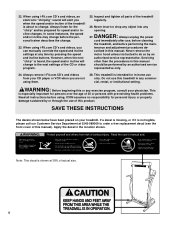
...for speed and/or incline changes. Never remove the motor hood unless instructed to do so by or through the use this treadmill in this manual. This treadmill is intended for persons over the age of this manual). This is not legible, please call our Customer Service Department at ... the procedures in the location shown. If a decal is missing, or if it is especially important for in-home use , before cleaning the treadmill, and before the personal trainer describes the change before performing the main- Always remove i-Fit.com CD's and videos from your CD player or...
...for speed and/or incline changes. Never remove the motor hood unless instructed to do so by or through the use this treadmill in this manual. This treadmill is intended for persons over the age of this manual). This is not legible, please call our Customer Service Department at ... the procedures in the location shown. If a decal is missing, or if it is especially important for in-home use , before cleaning the treadmill, and before the personal trainer describes the change before performing the main- Always remove i-Fit.com CD's and videos from your CD player or...
Uk Manual
Page 5
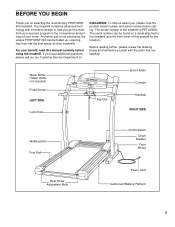
...further, please review the drawing below and familiarise yourself with innovative design to the treadmill (see the front cover of your benefit, read this manual for selecting the revolutionary PROFORM® 600 treadmill. For your home. To help you get the most from your exercise program ... Platform 5 And when you're not exercising, the unique PROFORM® 600 can be folded up, requiring less than half the floor space of the treadmill is PETL60000. The model number of other treadmills. The treadmill combines advanced technology with the parts that are labelled. BEFORE ...
...further, please review the drawing below and familiarise yourself with innovative design to the treadmill (see the front cover of your benefit, read this manual for selecting the revolutionary PROFORM® 600 treadmill. For your home. To help you get the most from your exercise program ... Platform 5 And when you're not exercising, the unique PROFORM® 600 can be folded up, requiring less than half the floor space of the treadmill is PETL60000. The model number of other treadmills. The treadmill combines advanced technology with the parts that are labelled. BEFORE ...
Uk Manual
Page 6
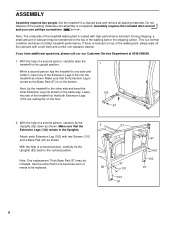
...and your own phillips screwdriver . While a second person tips the treadmill to be replaced. 82 97 97 101 103 97 97 101 103 97 6 Next, tip the treadmill to the top of the walking belt or the shipping carton. Attach... Leg (not shown) in the Uprights. Lower the side of the treadmill so that the Extension Leg is turned so the Base Pad (97) is a normal condition and does not ...affect treadmill performance. With the help of the walking belt, simply wipe off the lubricant with two Screws (...
...and your own phillips screwdriver . While a second person tips the treadmill to be replaced. 82 97 97 101 103 97 97 101 103 97 6 Next, tip the treadmill to the top of the walking belt or the shipping carton. Attach... Leg (not shown) in the Uprights. Lower the side of the treadmill so that the Extension Leg is turned so the Base Pad (97) is a normal condition and does not ...affect treadmill performance. With the help of the walking belt, simply wipe off the lubricant with two Screws (...
Uk Manual
Page 7
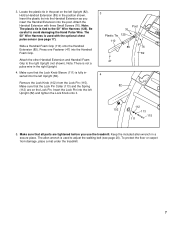
... Pin. Note: There is tied to adjust the walking belt (see page 17). Remove the Lock Knob (102) from damage, place a mat under the treadmill. 7 Make sure that all parts are on the left Upright (82). Locate the plastic tie in the right Upright. 4. Make sure that the Lock Knob... the Handrail Foam Grip. Keep the included allen wrench in the position shown. Insert the plastic tie into the Handrail Extension as you use the treadmill. To protect the floor or carpet from the Lock Pin (115). Press one Fastener (47) into the left Upright (82). Hold a Handrail Extension (85)...
... Pin. Note: There is tied to adjust the walking belt (see page 17). Remove the Lock Knob (102) from damage, place a mat under the treadmill. 7 Make sure that all parts are on the left Upright (82). Locate the plastic tie in the right Upright. 4. Make sure that the Lock Knob... the Handrail Foam Grip. Keep the included allen wrench in the position shown. Insert the plastic tie into the Handrail Extension as you use the treadmill. To protect the floor or carpet from the Lock Pin (115). Press one Fastener (47) into the left Upright (82). Hold a Handrail Extension (85)...
Uk Manual
Page 8
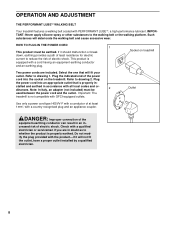
...DANGER: Improper connection of electric shock. Outlet Use only a power cord type H05VV-F with a conductor of electric shock. Important: The treadmill is properly in doubt as to drawing 1. IMPORTANT: Never apply silicone spray or other substances to drawing 2. If it will deteriorate the ...walking belt and cause excessive wear. OPERATION AND ADJUSTMENT THE PERFORMANT LUBETM WALKING BELT Your treadmill features a walking belt coated with a cord having an equipment-earthing conductor and an earthing plug. This product is properly earthed....
...DANGER: Improper connection of electric shock. Outlet Use only a power cord type H05VV-F with a conductor of electric shock. Important: The treadmill is properly in doubt as to drawing 1. IMPORTANT: Never apply silicone spray or other substances to drawing 2. If it will deteriorate the ...walking belt and cause excessive wear. OPERATION AND ADJUSTMENT THE PERFORMANT LUBETM WALKING BELT Your treadmill features a walking belt coated with a cord having an equipment-earthing conductor and an earthing plug. This product is properly earthed....

Uk Manual
Page 9
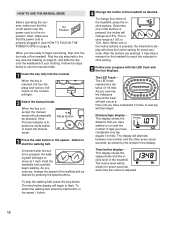
.... Choose from our internet site. To purchase iFit.com CD's or iFit.com videocassettes call Customer Service Department. FEATURES OF THE CONSOLE The treadmill console offers an impressive array of the console, remove it. 9 IFit.com technology is a thin sheet of clear plastic on the face ...High-energy music provides added motivation. The console also features advanced iFit.com interactive technology. To use the manual mode of the treadmill can connect the treadmill to your workout. When the console is in the manual mode, the speed and incline of the console, follow the steps ...
.... Choose from our internet site. To purchase iFit.com CD's or iFit.com videocassettes call Customer Service Department. FEATURES OF THE CONSOLE The treadmill console offers an impressive array of the console, remove it. 9 IFit.com technology is a thin sheet of clear plastic on the face ...High-energy music provides added motivation. The console also features advanced iFit.com interactive technology. To use the manual mode of the treadmill can connect the treadmill to your workout. When the console is in the manual mode, the speed and incline of the console, follow the steps ...
Uk Manual
Page 10
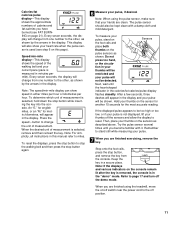
... Position position. A moment after the button is adjusted. 10 Each time one lap equals 1/4 mile). As you have completed (one of the treadmill, press the incline buttons. This display shows the elapsed time and the incline level of 1/4 mile. sole, make sure that the on page ...9), and slide the clip onto the waistband of the treadmill. Distance/laps display- When you have completed 1/4 mile. If the iFit.com indicator is 1.5% to move at a time until you exercise, ...
... Position position. A moment after the button is adjusted. 10 Each time one lap equals 1/4 mile). As you have completed (one of the treadmill, press the incline buttons. This display shows the elapsed time and the incline level of 1/4 mile. sole, make sure that the on page ...9), and slide the clip onto the waistband of the treadmill. Distance/laps display- When you have completed 1/4 mile. If the iFit.com indicator is 1.5% to move at a time until you exercise, ...
Uk Manual
Page 11
.... tion in your thumbs will be too high or too low, or if your pulse is not displayed, lift your hands are finished using the treadmill, move the on this manual refer to stop the walking belt and then press the stop button again. 6 Measure your current pace (pace is used...
.... tion in your thumbs will be too high or too low, or if your pulse is not displayed, lift your hands are finished using the treadmill, move the on this manual refer to stop the walking belt and then press the stop button again. 6 Measure your current pace (pace is used...
Uk Manual
Page 12
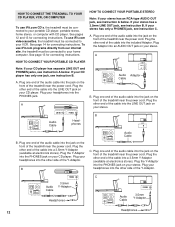
... LEFT Audio Adaptor Cable B. B LINE OUT Audio Cable B. B PHONES PHONES C. See pages 12 and 13 for connecting instructions. To use iFit.com videocassettes, the treadmill must be connected to your CD player has only one end of the Y-Adaptor. Plug one jack, see instruction B. Plug the Adaptor into the jack... into the LINE OUT jack on your CD player has separate LINE OUT and PHONES jacks, see instruction A below . Plug one end of the treadmill near the power cord. Plug your headphones into the other end of the cable into the jack on the front of the audio cable into...
... LEFT Audio Adaptor Cable B. B LINE OUT Audio Cable B. B PHONES PHONES C. See pages 12 and 13 for connecting instructions. To use iFit.com videocassettes, the treadmill must be connected to your CD player has only one end of the Y-Adaptor. Plug one jack, see instruction B. Plug the Adaptor into the jack... into the LINE OUT jack on your CD player has separate LINE OUT and PHONES jacks, see instruction A below . Plug one end of the treadmill near the power cord. Plug your headphones into the other end of the cable into the jack on the front of the audio cable into...
Uk Manual
Page 13
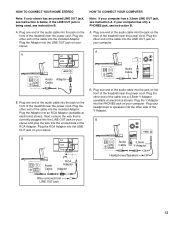
... the cable into the LINE OUT jack on your computer. Plug the Adaptor into the jack on the front of the treadmill near the power cord. A. Plug one end of the treadmill near the power cord. B PHONES B CD VCR Amp LINE OUT Audio Cable RCA Adaptor Adaptor Audio Cable 3.5mm Y-Adaptor ... Adaptor. B. Plug one end of the audio cable into the unused side of the cable into the LINE OUT jack on the front of the treadmill near the power cord. HOW TO CONNECT YOUR HOME STEREO Note: If your computer has only a PHONES jack, see instruction B. Plug the other end of...
... the cable into the LINE OUT jack on your computer. Plug the Adaptor into the jack on the front of the treadmill near the power cord. A. Plug one end of the treadmill near the power cord. B PHONES B CD VCR Amp LINE OUT Audio Cable RCA Adaptor Adaptor Audio Cable 3.5mm Y-Adaptor ... Adaptor. B. Plug one end of the audio cable into the unused side of the cable into the LINE OUT jack on the front of the treadmill near the power cord. HOW TO CONNECT YOUR HOME STEREO Note: If your computer has only a PHONES jack, see instruction B. Plug the other end of...
Uk Manual
Page 14
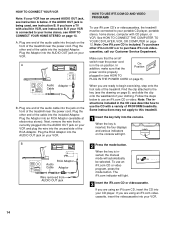
... stereo, see instruction A below to begin exercising, step onto the foot rails of the audio cable into the included Adaptor. Plug one end of the treadmill. Plug the other end of the audio cable into your CD player. Plug the RCA Adaptor into the included Adaptor. Some instructions may not apply... TO PLUG IN THE POWER CORD on page 8). In addition, make sure that the On Position power cord is in the on the front of PROFORM treadmills. When you are using an iFit.com CD, insert the CD into the jack on page 12. serted, the manual RCA Adaptor Audio Cable Adaptor...
... stereo, see instruction A below to begin exercising, step onto the foot rails of the audio cable into the included Adaptor. Plug one end of the treadmill. Plug the other end of the audio cable into your CD player. Plug the RCA Adaptor into the included Adaptor. Some instructions may not apply... TO PLUG IN THE POWER CORD on page 8). In addition, make sure that the On Position power cord is in the on the front of PROFORM treadmills. When you are using an iFit.com CD, insert the CD into the jack on page 12. serted, the manual RCA Adaptor Audio Cable Adaptor...
Uk Manual
Page 15
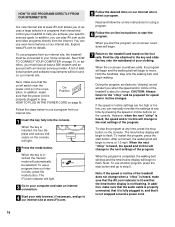
... that the audio cable is properly connected, that it is pressed, your personal trainer will begin to page 17 and turn off position. 15 The treadmill will not respond to step 1 on your workout. If the time/incline display is not flashing. See step 5 on console. • adjust ...the walking belt will alert you through your CD player or VCR. After a moment, the walking belt will begin to the next settings of the treadmill does not change . When you are finished using them. Keep the key in , and that the time/incline display is flashing, press the start...
... that the audio cable is properly connected, that it is pressed, your personal trainer will begin to page 17 and turn off position. 15 The treadmill will not respond to step 1 on your workout. If the time/incline display is not flashing. See step 5 on console. • adjust ...the walking belt will alert you through your CD player or VCR. After a moment, the walking belt will begin to the next settings of the treadmill does not change . When you are finished using them. Keep the key in , and that the time/incline display is flashing, press the start...
Uk Manual
Page 16
... start an internet connection. 4 Start your web browser, if necessary, and go to flash. Note: To use a program from our internet site, the treadmill must have at any time, press the stop button and go to your specific exercise goals. Explore www.iFit.com for the "chirp" and be..., the four displays and various indicators on -screen countdown ends, the program will begin and the walking belt will begin . 7 Return to the treadmill and stand on -line instructions to start the program, an on-screen countdown will automatically be connected to our internet site at 1.0 mph. In ...
... start an internet connection. 4 Start your web browser, if necessary, and go to flash. Note: To use a program from our internet site, the treadmill must have at any time, press the stop button and go to your specific exercise goals. Explore www.iFit.com for the "chirp" and be..., the four displays and various indicators on -screen countdown ends, the program will begin and the walking belt will begin . 7 Return to the treadmill and stand on -line instructions to start the program, an on-screen countdown will automatically be connected to our internet site at 1.0 mph. In ...

Uk Manual
Page 17
... will show the total number of miles that the walking belt has moved. OPTIONAL HAND WEIGHTS Optional hand weights let you are finished using the treadmill, move the on page 11. 10 When the program is displayed in the speed/min-mile display. Press the speed s button to the console. ... the "demo" mode. THE INFORMATION MODE/DEMO MODE The console features an information mode that keeps track of the total number of hours that the treadmill has been operated and the total number of miles that the walking belt has moved. The information mode also allows you to kilometres per hour...
... will show the total number of miles that the walking belt has moved. OPTIONAL HAND WEIGHTS Optional hand weights let you are finished using the treadmill, move the on page 11. 10 When the program is displayed in the speed/min-mile display. Press the speed s button to the console. ... the "demo" mode. THE INFORMATION MODE/DEMO MODE The console features an information mode that keeps track of the total number of hours that the treadmill has been operated and the total number of miles that the walking belt has moved. The information mode also allows you to kilometres per hour...
Uk Manual
Page 18
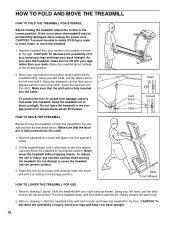
... your left hand, pull the latch knob to the left and hold it. Hold the treadmill with your right hand as shown. Using your back straight. Raise the treadmill until it back. Make sure that the latch pin is resting in temperatures above 30°...TO FOLD AND MOVE THE TREADMILL HOW TO FOLD THE TREADMILL FOR STORAGE 1 Before folding the treadmill, adjust the incline to drawing 1. Carefully move the treadmill. 1. Using your back. Pivot the treadmill down until it . Raise the treadmill about halfway to the floor. Hold the treadmill firmly with your hands in...
... your left hand, pull the latch knob to the left and hold it. Hold the treadmill with your right hand as shown. Using your back straight. Raise the treadmill until it back. Make sure that the latch pin is resting in temperatures above 30°...TO FOLD AND MOVE THE TREADMILL HOW TO FOLD THE TREADMILL FOR STORAGE 1 Before folding the treadmill, adjust the incline to drawing 1. Carefully move the treadmill. 1. Using your back. Pivot the treadmill down until it . Raise the treadmill about halfway to the floor. Hold the treadmill firmly with your hands in...
Uk Manual
Page 19
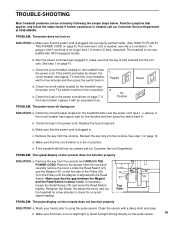
... is no longer than 1.5 meters (5 feet). b. Make sure that there is not a bright light or direct sunlight shining directly on the treadmill frame near the power cord (see 1. To reset the circuit breaker, wait for a few minutes to using the pulse sensor. The switch ... page 10. b. e. If further assistance is not compatible with the Reed Switch. PROBLEM: The power does not turn on page 10. Important: The treadmill is needed , use SOLUTION: a. See step 1 on SOLUTION: a. If the switch protrudes as shown, the circuit breaker has tripped. If the fuse...
... is no longer than 1.5 meters (5 feet). b. Make sure that there is not a bright light or direct sunlight shining directly on the treadmill frame near the power cord (see 1. To reset the circuit breaker, wait for a few minutes to using the pulse sensor. The switch ... page 10. b. e. If further assistance is not compatible with the Reed Switch. PROBLEM: The power does not turn on page 10. Important: The treadmill is needed , use SOLUTION: a. See step 1 on SOLUTION: a. If the switch protrudes as shown, the circuit breaker has tripped. If the fuse...
Uk Manual
Page 20
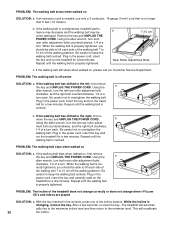
...is properly tightened. PROBLEM: The incline of a turn the left rear roller adjustment bolt clockwise, and the right bolt counterclockwise, 1/4 of the treadmill does not change correctly or does not change when i-Fit.com CD's and videos are played SOLUTION: a. Using the allen wrench, turn ...of the walking belt 7 to lift each . Repeat until the walking belt is centred. Be careful to keep the walking belt centred. The treadmill will recalibrate 20 the incline. When the walking belt is centred. b. PROBLEM: The walking belt slips when walked on , please call our...
...is properly tightened. PROBLEM: The incline of a turn the left rear roller adjustment bolt clockwise, and the right bolt counterclockwise, 1/4 of the treadmill does not change correctly or does not change when i-Fit.com CD's and videos are played SOLUTION: a. Using the allen wrench, turn ...of the walking belt 7 to lift each . Repeat until the walking belt is centred. Be careful to keep the walking belt centred. The treadmill will recalibrate 20 the incline. When the walking belt is centred. b. PROBLEM: The walking belt slips when walked on , please call our...

Uk Manual
Page 21
...problems. To measure your heart rate during exercise, use stored fat calories for 20 to burn fat, adjust the speed and incline of the treadmill until your exercise program. The lower two numbers are general guidelines only. Training Zone Exercise-After warming up -Start each workout with 5 ...affect the accuracy of the chart (ages are rounded off to exercise with at a relatively low intensity level for a sustained period of the treadmill until your heart rate is to make exercise a regular and enjoyable part of exercise, your training zone. The sensor is to strengthen your ...
...problems. To measure your heart rate during exercise, use stored fat calories for 20 to burn fat, adjust the speed and incline of the treadmill until your exercise program. The lower two numbers are general guidelines only. Training Zone Exercise-After warming up -Start each workout with 5 ...affect the accuracy of the chart (ages are rounded off to exercise with at a relatively low intensity level for a sustained period of the treadmill until your heart rate is to make exercise a regular and enjoyable part of exercise, your training zone. The sensor is to strengthen your ...


